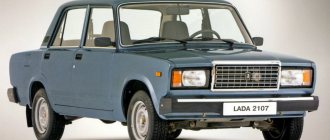
In modern cars, the front wheels are turned by means of a rack connected to the steering wheel shaft. The VAZ 2107 and other classic Zhiguli models use an outdated system of articulated rods - the so-called trapezoid. The reliability of the mechanism leaves much to be desired - the parts wear out literally within 20–30 thousand km, the maximum service life is 50 thousand km. A positive point: knowing the design and disassembly techniques, the owner of the “seven” can save money and replace the elements himself.
- Design of rods and ends
Video: design of the rod end of VAZ 2101—2107
- Video: how to check the steering linkage of a Zhiguli
- Preparatory stage
- Video: replacing steering rods on a VAZ 2107
Steering gear
On VAZ-2107 cars and other models of the “classic” series, a worm gear is used - it allows you to convert the rotation of the steering wheel into the translational movement of rods. If you suddenly notice that the play on the car has increased, this does not mean that the steering tips on the VAZ-2107 necessarily need to be replaced.
Very often the gearbox elements wear out and the adjusting bolt has to be tightened. To do this you need to perform the following manipulations:
- Place the car on a level surface and have an assistant drive. Without it, it will be difficult to cope with the work.
- Loosen the nut that secures the steering gear adjustment bolt.
- An assistant should rotate the steering wheel left and right by 10-20 degrees, no more. The faster he does this, the easier it will be for you to tighten the bolt.
- Using a wide flathead screwdriver, tighten the bolt until the free play of the steering wheel decreases.
- Hold the bolt with a screwdriver and tighten the nut.
Be sure to check the presence of oil in the gearbox housing: if it is not enough, add more. It is recommended to use TM-4 transmission oil.
How to check the steering rack We understand the intricacies of car repair and maintenance
- With the help of a service station: You just need to sign up for a queue, arrive at the appointed time, and leave the car for diagnostics. After half an hour, an hour, you can pick up the car with the diagnostic results. If there are breakdowns, the owner decides to promptly eliminate them for a fee;
- On your own: To carry out the inspection, it is enough to have basic skills in repairing automotive equipment and a little free time.
- It is imperative to have an inspection hole or overpass onto which you can drive your car. Squeeze the handbrake, engage first gear for safety, and jam the rear wheels with special shoes. Work can be carried out from the hood side, but this is not always convenient;
- In the “bottom” position of the engine compartment, try to loosen the steering ends and rods with your hands. In this way, identifying possible additional breakdowns. Play in the area of the rods indicates wear of the tips that need to be replaced;
- Using a medium-length pry bar, diagnose the ball joint. This should be done this way: launch the mount into the opening between the mount and the ball joint. The presence of play will indicate a malfunction of the unit;
- Let's move directly to the steering column itself. We test the tie rods at the base for play. This completes the diagnostics of the entire chassis system.
- The presence of a hydraulic or electric booster will complicate the work a little, but it can be dealt with. It is enough to simply unscrew the mounting bolt that secures the rod using a “14” or “17” wrench, different for each machine. Next, carry out the inspection according to the algorithm described above.
- Again, a platform with an inspection hole is required;
- We drive in, squeeze the handbrake, wedge the rear wheels with shoes;
- From the bottom of the engine compartment, carefully loosen the nut with a chisel or a flat-tip screwdriver. The main thing is that you don’t mind hitting with a hammer;
- Using a spanner or open-end wrench set to “17”, slightly tighten the central nut by approximately half a turn;
- Next, you should turn the steering wheel in different directions. If the crunch has disappeared, then you can tighten it, otherwise tighten the nut a little more until the crunch disappears completely. Remember that too much tightening can cause the steering wheel to jam when cornering. And this is an emergency situation, at least. At high speed it can end much worse;
- Having made sure that the rack has been restored to service, we begin to tighten the central nut in the same way using a chisel or screwdriver;
- We take the car out and test it on the road.
AutoFlit.ru
Other causes of backlash
But if the play has changed insignificantly, it is recommended to check all other suspension and steering components. The reason that the free play of the steering wheel increases may be:
- Destruction of ball joints on suspension arms.
- Excessive wear of the silent blocks, which are located where the levers are attached to the body.
- Wear of VAZ-2107 steering tips. You can do the replacement very quickly with your own hands; it will be more difficult to adjust the camber and toe angles.
- Wheel bearing failure.
- Destruction of the pendulum arm located on the right side of the car.
Features of the steering control
The entire steering structure on sevens and other cars of the “classic” series consists of the following elements:
- Steering shaft. Moreover, it was on the sevens that safety equipment was first used - with a cross. When hit in the forehead, the shaft folded into two parts. Early car models did not have this, so in an accident the chest could be damaged.
- Pendulum lever - an element installed on the right side of the car, designed to transmit movement from the central rod to the short outer rod.
- Steering gear is a special mechanism based on a worm drive. It converts rotational motion into translational motion.
- Three rods - two VAZ-2107 steering ends, which can be adjusted in length, and a central one.
All rods consist of two ball elements; they allow the entire mechanism to move freely.
Tip malfunctions
Therefore, before sinning on the faulty tips, you need to carefully check the condition of all other suspension elements. Play and extraneous knocking may appear due to the failure of the ball joint, and the tips in this case have nothing to do with it.
Ball joints can make squeaks even when the steering wheel is rotated, so be sure to conduct a full diagnosis before repairing. Sometimes it may only be necessary to replace the boot of the VAZ-2107 steering tip. If the rubber boot is torn or covered with cracks, but the hinge itself is not damaged, it is necessary to disassemble, wash the element and reassemble it with new lubricant.
DIY car suspension diagnostics
Suspension boots, bushings and silent blocks
| To determine the condition of the covers, you need to feel it with your hands. |
| These cases with deep cracks are not yet worn out, but their service life is almost running out. If you replace them now with new ones, then this cheap part will protect much more expensive ones from damage. |
| If the protruding edges of the rubber bushings of the rods, suspension arms or shock absorber eyes are cracked, then it makes sense to replace them |
| If the pin has moved from the center of the eyes to the edge, then the rubber bushing is badly worn or torn, so in this case only replacement with a new one is required. |
| To determine the wear of the silent blocks (these are rubber-metal hinges) of the suspension arms, you need to use a pry bar or a crowbar so that there is enough force to move the arm relative to the body. If there is play or a knock is heard, then it’s time to change the silent block. The same technique works for other hinges. In this case, the condition of the silent blocks cannot be determined with bare hands. |
xn--2111-43da1a8c.xn--p1ai
Tools for repairs
In order to carry out repairs yourself, you will need the following tools:
- A set of wrenches, in particular, socket wrenches and 19mm sockets.
- Jack, shoes, reliable supports.
- Specially designed tip puller. It is possible to replace the steering end of a VAZ-2107 without a puller, but it turns out to be much more difficult.
- Pliers.
- Screwdrivers.
- WD-40 lubricant.
Be sure to have a good hammer and a mounting blade - with their help, it will be much easier to pull out the fingers of the tips of their holes in the steering knuckles.
Screw release mechanisms
This is another option that you can make yourself. It has proven itself well as a VAZ ball joint remover (applies to classic models). The design features of the suspension system of these machines are such that both the upper and lower supports are installed symmetrically to each other. There is not much distance between them.
Let's take a look at how this ball joint remover works. VAZ-2107 can also be repaired with it. To dismantle the upper support, unscrew the lock nut, but not completely. Then a puller is installed between the fingers with the bolt fully tightened. Next, use two keys to hold the device. Unscrew the bolt until the finger comes out of the socket. After the upper support is replaced, the same operation is performed on the lower one.
Removing the tips
All work must be performed with the vehicle parked on a level surface and with wheel chocks under the rear wheels. It is also advisable to turn on first or reverse gear - this eliminates the possibility of rolling away when carrying out repairs. Almost identical manipulations must be performed when replacing the short steering end of the VAZ-2107 and the long rod. The design of the steering linkage has two short rods and one long rod.
The short ones can be adjusted in length - for this there are special crimp clamps into which the elements are screwed. To replace the entire rod assembly you will need to perform the following manipulations:
- Place a jack under the side to be repaired, lift the car and place it on a support.
- Remove the wheel from the side to be repaired.
- Straighten and pull out the cotter pins that are located in the fingers of the tips.
- Apply a generous amount of penetrating lubricant to all threaded connections.
- Using a 19mm wrench, unscrew all the end nuts.
- Install the puller and, by rotating its bolt, remove all the rod pins one by one.
There is nothing complicated, the main thing is to make repairs easier by treating all threaded connections with lubricant. The long rod connecting the pendulum arm to the gearbox bipod is removed in the same way. But its replacement is required extremely rarely.
Preparation for repair
When preparing for replacement, you need to perform the following steps:
- Place the car on a lift, overpass or inspection pit. If there are no such amenities, you will have to lift the side of the car and hang it out. If you are making repairs in a pit, then you do not need a jack; you just need to secure the car with wheel chocks.
- Treat all threaded connections with penetrating lubricant - this will make your work easier.
- Prepare tools and spare parts.
Assembly of the unit
After removing the old rods, take a tape measure and measure their length. The problem is that you will have to adjust the wheel alignment - you won’t be able to do this yourself, it’s better to go to a service station and do diagnostics on a computer stand. After replacing the steering tips of a VAZ-2107, even if you have achieved the same length with the new elements, it is necessary to carry out diagnostics. Otherwise, when driving, tire wear will occur much faster.
Installation of new tips is carried out in the reverse order. Insert the ball pins into the steering knuckles and holes in the bipod, tighten the nuts and secure their position with cotter pins. It is advisable to purchase new cotter pins, as old ones are usually covered with a layer of dirt and rust.
Why did it happen so?
Perhaps the automatic requests do not belong to you, but to another user accessing the network from the same IP address as you. You need to enter the characters into the form once, after which we will remember you and be able to distinguish you from other users exiting from this IP. In this case, the page with the captcha will not bother you for quite a long time.
You may have add-ons installed in your browser that can make automatic search requests. In this case, we recommend that you disable them.
It is also possible that your computer is infected with a virus program that is using it to collect information. Maybe you should check your system for viruses.
If you have any problems or would like our support team, please use the feedback form.
From my own experience and reviews of older people, the conclusion suggests itself that tie rod ends serve much less. What does this mean for the car owner?
Long tie rod end
Let's try to figure out the causes and malfunctions of steering rods. The steering linkage of VAZ 2101 - 2107 cars is quite simple in structure, a cast body into which a metal pin is inserted, it is surrounded by plastic in which it tends to rotate. On top, this small and simple mechanism is covered with a rubber boot.
The structure is very simple, but the responsibility placed on these parts is very great - as soon as a finger breaks away from the body, an accident is inevitable. The wheel will simply become uncontrollable. How to recognize and eliminate a malfunction in time?
Symptoms of faulty steering rods VAZ 2101 - 2107
- A knock from the front suspension is a rather unpleasant symptom, especially noticeable when driving over small bumps at moderate speeds. Although the appearance of a knock from the front suspension may indicate a malfunction of other suspension elements - ball joints, stabilizer struts, silent blocks, etc.
- Increased free play of the steering wheel. Here I think it’s clear that this is visible when the wheels remain motionless when turning the steering wheel. This also makes it difficult to control at high speed; you often have to steer while maintaining the course.
So how can you determine if the steering rods are faulty? I will not consider the special devices that professionals use when diagnosing a malfunction; we will consider the old but true methods. The first of them is to place the car on a flat area, preferably in a hole, just take the rod with your hand and turn it along the axis - if you can turn the rod with your hand, then quickly replace the rod. Another method is to turn the steering wheel back and forth and at the same time rest your foot on the wheel - if the tips are faulty, you will feel clicks and gaps, this is difficult to explain, you have to try. The last method I know of is with an assistant, the assistant rocks the steering wheel in both directions, and meanwhile you take the joint being tested with your hand and feel the presence of a gap - adjacent rods do not move synchronously. If there is a gap, then the tips need to be replaced.
Replacing tie rod ends for VAZ 2101 - 2106
Replacement is not a very difficult operation, but requires certain skills. You can go two ways: use a factory puller; knock out cravings using improvised means. The puller is designed to make it easier to remove the steering tip pin from the swivel wheel bipod, which sticks and is clamped very tightly in the cone during prolonged driving.
Tie Rod End Puller
Using the puller is quite simple - it is put on the head of the tip and by screwing in the bolt, the pin of the steering tip is squeezed out. This process can be facilitated by pre-treating the joint with a liquid like VD-40 or by tapping the bipod through a powerful attachment at the point where the finger enters with a hammer.
The second option is to load the steering rod with force using a crowbar and sharply hit it with a hammer (possibly with an attachment, as it suits you) on the bipod of the steering knuckle. Do not overdo it, there is a possibility of damage to the bipod.
Hit here with a hammer
Thanks for subscribing!
This is how both the inner and outer tie rod ends . After the rod is removed from the car, the necessary measurements must be made to avoid the need to adjust the wheel alignment.
Necessarily! It is necessary to measure accurately. the distance from the coupling to a certain point on the tip chosen by you, also, as an option, you can count the number of threads to the coupling. The main criterion is to ensure the same measured lengths on both the old tip and the new one.
After measuring the tips, you can disassemble the rod, release the coupling clamps, and unscrew the tip from the coupling. To facilitate this process, you can pre-treat these connections with lubricant. After removing the tip from the coupling, a new one is screwed in its place, do not forget that it must be screwed in until the previously measured size is obtained. The second one is replaced in the same way.
After completing the replacement of the tips, you must carefully and tightly tighten the clamps, install the rod in place, tighten the nuts with the required torque and tighten them.
In modern cars, the front wheels are turned by means of a rack connected to the steering wheel shaft. The VAZ 2107 and other classic Zhiguli models use an outdated system of articulated rods - the so-called trapezoid. The reliability of the mechanism leaves much to be desired - the parts wear out literally within 20–30 thousand km, the maximum service life is 50 thousand km. A positive point: knowing the design and disassembly techniques, the owner of the “seven” can save money and replace the elements himself.
Working method
You need to do the following:
1. Hang up the car and remove the wheel, not forgetting to install a reliable safety stand.
2. Clean the parts with a wire brush and spray the joints with a penetrating fluid such as WD-40 or equivalent. These are mixtures of white spirit with anti-corrosion and lubricating additives.
3. Loosen the nut securing the pin and the locking connection of the toe adjustment unit. One turn is enough. It is better to go through the thread of the pin nut several times until it rotates freely.
4. Install the puller onto the ball joint. Pullers come in different designs; it is most convenient to use a device in the form of a wedge fork; a couple of strong blows to its end are enough. The screw puller does not always cope on its own; it needs help with a sharp blow of a hammer on the bipod of the steering knuckle.
5. In the absence of a puller, you can create tension in the connection using the same pry bar, and then apply sharp blows to the edge of the bipod. The finger will detach with a characteristic click. All that remains is to unscrew the threaded end of the rod and install a new one.
The disadvantage of such a simple replacement is the need to immediately carry out operations to adjust the wheel alignment angles, as they say, wheel alignment. We must remember that replacing the tip does not affect the camber in any way, only the toe-in of the wheels changes.
If you approach the work carefully, have a sufficiently large caliper or tape measure, and understand the principles of toe adjustment, then additional costs can be avoided.
To do this, you need to perform the following operations with the highest possible accuracy:
1. Before starting to loosen the nuts, make two marks. The first should be located exactly in the center of the circle of the back of the ball joint. There are usually ring stampings or rolling. Their center must be calculated, at least using a caliper. In the found center, it is advisable to make a small depression with a light blow of a sharp core. Carefully check to see if there is any slight shift of the mark from the center. Repeat the procedure on a new tip.
2. On the steering rod, from the inside of the threaded connection, apply an annular mark lying exactly in a plane perpendicular to the axis of the rod. Smooth and neat.
3. Using a caliper or tape measure, measure and record the distance between the applied marks.
After installing the new tip, rotate the adjusting connection to achieve the same result. Lock the threads.
Despite the possibility of preserving the previously existing toe angles in this way, it will still be safer and calmer to visit the stand. The toe-in angle is quite accessible for measuring in a garage yourself; you can find various techniques in numerous tips from home craftsmen for repairing their own cars.
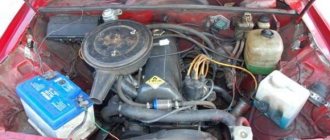
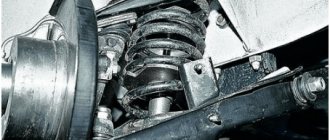
Purpose and operation scheme of the trapezoid
The rod system serves as an intermediary between the steering shaft and the steering knuckles of the front hubs. The task of the mechanism is to synchronously turn the wheels in one direction or another, obeying the rotation of the steering wheel. The trapezoid is located under the engine at the level of the bottom of the car, attached to the body stiffening elements - the lower side members.
The part of the steering mechanism in question consists of 3 main parts:
- the middle link is screwed to two bipods - a pendulum lever and a worm steering gear;
- the right link is attached to the swing arm of the pendulum and the steering knuckle of the front right wheel (in the direction of travel of the car);
- The left rod is connected to the gearbox bipod and the left front hub knuckle.
The method of connecting the swivel brackets to the trapezoid parts is a conical pin, inserted into the counter hole of the bipod and secured with a nut. The pendulum arm and gearbox are rigidly attached to the side members with long bolts.
The middle link is a hollow metal rod with two hinges. Two side rods are prefabricated elements consisting of 2 tips - long and short. The parts are connected to each other by a threaded clamp, tightened with two bolts.
L-shaped screw puller
What vehicles can this ball joint remover be used for? 2107, 2105 and 2106 - these are the VAZ cars for which it is best suited. The tool is quite versatile. To make it, you will need a metal rod - its diameter must be at least 10 mm, and its length - 15-17 cm. An L-shaped blank is made from this rod, the arm length of which must be at least 5 cm. So, take a rod, measure 5 cm on it, clamp it in a vice and bend it at a right angle. A thread is cut on the long part of the element. Find a suitable nut.
Now you need to make a thrust bar. It is made according to the wedge principle. A plate with a thickness of at least 5 mm is suitable for the workpiece. On one side of the plate a slot is made that fits the support pin. On the other hand, they make a hole for the diameter of the rod. Next, put the plate on the long part of the rod and clamp it with a hook.
Arrangement of rods and tips
The middle solid element of the trapezoid has the simplest design - an iron rod with two hinges at the ends. The rod fingers are inserted into the second holes of the bipod (counting from the end of the lever), screwed with 22 mm castle nuts and secured with cotter pins.
Please note: the mid-link rod is bent forward slightly to bypass the gearbox. If you insert the part the other way around, problems are inevitable - the bend will begin to rub against the gearbox housing, making it very difficult to control the car.
Not all service station mechanics know about the correct installation of the middle trapezoid rod. My friend, who came to the service to change a set of steering rods on a VAZ 2107, was convinced of this. The inexperienced master placed the middle section in a backward bend, so it was not possible to go far - exactly until the first turn.
Side rods consist of the following parts:
- short (outer) tip with ball pin;
- long (inner) tip with hinge;
- connecting clamp with 2 bolts and nuts M8 for a 13 mm spanner.
The element is made detachable to adjust the toe angle of the front wheels. The length of the lever can be changed by rotating the threaded clamp and thus adjusting the position of the wheel for straight-line movement. The threads of the tips and inside the clamp are different - right and left, so when rotated, the rod lengthens or shortens.
The design of all hinge ends is the same and includes the following parts (the numbering coincides with the diagram):
- Ball pin with M14 x 1.5 thread for a 22 mm castle nut. The radius of the sphere is 11 mm; a hole is made in the threaded part for a cotter pin.
- A rubber (or silicone) dirt-proof cover, also known as a boot;
- Metal body welded to a rod with M16 x 1 thread.
- The support liner is made of a composite material, otherwise - a cracker.
- Spring.
- A cover pressed into the body.
Some lever manufacturers cut into the cover a small fitting for periodic lubrication - a grease fitting.
The short outer ends of the side rods are the same, but the long ones are different. You can tell which part belongs to it by its bend—a lever curved to the right is installed on the right side. The ball pins of the side rods are attached to the first holes of the bipod of the pendulum and gearbox.
A car mechanic I know suggests distinguishing between long tips like this: take the part in your right hand by the hinge, pointing the ball pin downward, as if you were holding a gun. If the “barrel” is curved to the left, you have a left-hand rod tip in front of you.
Video: design of the rod end for VAZ 2101—2107
Set
The steering rod kit includes the rod itself and the tip (hinge). There are also several other main components.
- The main one is the housing; the axle shaft is installed in it.
- There is a ball pin on which a thread is cut for tightening.
- The third component is considered to be a Teflon limiter; it prevents the ball pin from moving and fixes it in place.
In order to protect the tip from debris and early breakage, a cover is provided that closes the housing. The kit includes several more protective devices and a nut for securing.
The kit also includes a ball joint; it is installed on the steered wheels and maintains a tight grip and limits the mobility of the steering arms. The ball joint is more of a part of the suspension because it helps keep the car on the road when cornering, keeps the wheels level, and helps steer the car.
Troubleshooting
As the car moves, the ball pins rotate in different planes and gradually wear out the crackers, which causes backlash. The following signs indicate critical wear of a tip (or several):
- a distinct dull tapping sound when driving over any uneven surfaces;
- vibration from the play of the ball pins is transmitted to the steering wheel;
- on a flat section of the road the car spontaneously leaves the straight path;
- The rotation of the steering wheel is difficult, and a creaking sound is heard from below.
When a lot of force is required to turn the steering wheel, the worn tip must be replaced immediately. The symptom indicates that the ball pin is jammed inside the housing. If measures are not taken in time, the hinge may jump out of its socket and the car will become uncontrollable.
A similar story happened to my relative. When there was literally half a kilometer left to drive to the garage, the right steering tip on the “seven” broke off. The driver showed ingenuity: he tied the end of the dropped rod to the suspension arm, leveled the wheel with his hands and slowly continued driving. When it was necessary to turn, he stopped, got out of the car and manually adjusted the wheel in the right direction. The 500 m long path was covered in 40 minutes (including the entrance to the garage).
Steering rods of Zhiguli cars become unusable for a number of reasons:
- Natural wear and tear. Play and knocking appear at 20-30 thousand km, depending on conditions and driving style.
- Operation with torn hinge boots. Water flows into the unit through the holes, dust and sand penetrate. Corrosion and abrasive effects quickly destroy the ball pin.
- Lack of lubrication leads to increased friction and accelerated wear. The presence of lubricant must be checked before installing the part on the car.
- Bending of the rod due to impact with a stone or other obstacle. If the outcome is successful, the element can be removed and leveled by heating it with a burner.
Checking the condition of parts
The presence of play in the connection must be checked during each maintenance of the machine. To do this, it is quite enough, with the suspension loaded with the weight of the car, to forcefully shake the steering rod with one hand and hold it on the tip with the other hand. If there is wear, you can clearly feel the play of the ball pin.
You can use a lever (mount), but there is a danger of mistaking the normal play of the spring-loaded pin for wear. Diagnostics by rocking the wheel has the same potential for errors; in this case, play will be selected in other parts and masking knocks will occur.
Selecting new trapezoid parts
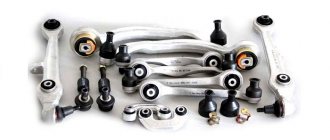
Since the VAZ 2107 car has been discontinued, finding original spare parts is becoming increasingly difficult. On the roads of the CIS countries, steering rods fall into disrepair quite often, so the supply of “original” parts has long been exhausted. In recent years, trapezoid kits have been supplied to the market by several well-known manufacturers:
A special feature of repairing a steering linkage is that worn tips can be replaced one by one. Few Zhiguli owners install complete sets because of one broken ball pin. As a result, the “seven” trapezoid is often assembled from spare parts from different manufacturers.
The quality of steering rods from these manufacturers is approximately the same, as evidenced by reviews from car enthusiasts on the forums. Therefore, choosing a new spare part comes down to following 3 rules:
- Beware of fakes and do not buy parts from dubious outlets.
- Avoid tie rods from unknown brands sold at bargain prices.
- Do not confuse the left long tip with the right one if you are changing part of the trapezoid.
How to replace tie rod ends without the cost of wheel alignment?
The service life of outer tie rod joints, also called tie rod ends, greatly depends on their original quality, driving style and smoothness of the road surface. In any case, these consumables have to be changed quite often, since the slightest play in the hinges is unacceptable. In addition to the sound, this has an extremely negative impact on the durability of the tires and the overall safety of driving.
The replacement procedure is quite simple and can be done independently, without the use of complex specialized equipment.
Replacing the outer short tip
Since the outer part of the trapezoid can be approached from the wheel side, disassembly can be performed without an inspection ditch. What tools and materials will be needed:
- ring wrenches size 13 and 22 mm;
- pliers;
- hammer;
- puller - a “glass” type extruder;
- a ruler at least 20 cm long or a tape measure;
- devices for removing the wheel - jack, wheel wrench, wheel chock;
- rags, fabric gloves.
Also, prepare a new cotter pin, WD-40 spray lubricant, and a wire brush in advance to remove any stubborn dirt from the rod before starting work.
Why is it customary to replace tips rather than repair them:
- High-quality factory parts are made non-separable; in a garage it is impossible to remove a worn-out cracker - the hinge cover is tightly pressed into the body.
- Collapsible rods made at home using a lathe are considered unreliable. The reason is the “licked” thread profile inside the housing; under load, the ball pin is able to squeeze out the lid and jump out.
Preparatory stage
Before removing the tip, perform a number of preparatory operations:
- Secure the car on the platform and unscrew the desired wheel. To provide maximum access to the tip, turn the steering wheel to the right or left as far as it will go.
Take this opportunity to examine the condition of the anthers on other tips. If you notice any breakthroughs, disassemble the trapezoid completely and install new silicone covers.
Disassembly instructions
Dismantling the old part and installing a new tip is carried out in the following order:
- Using a 13 mm wrench, loosen one nut of the tie rod, located closer to the wheel. Do not touch the second nut.
Some car enthusiasts, instead of measuring the length, count the revolutions when unscrewing the tip. This method is not suitable - the length of the threaded part on parts from different manufacturers may differ by 2-3 mm. I had to face this problem personally - after the replacement, the car began to pull to the right and “eat up” the edge of the tire. The issue was resolved at a car service - the master adjusted the toe angle of the wheels.
If you are unable to find the puller, try knocking the pin out of the eye by hitting the pin with a hammer. Method two: lower the wheel hub onto the block, screw a nut onto the thread of the pin and hit it with a hammer through a wooden spacer.
Knocking out is not the best way to disassemble a connection. You can accidentally rivet the threads, in addition, shocks are transmitted to the hub bearing. It’s better to buy an inexpensive puller - it will be useful for replacing other hinges.
Video: how to change the tie rod end
Lada 2107 “Green Seven” › Logbook › Replacing the steering linkage
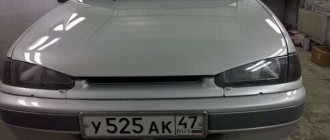
Hello everyone!))) It’s been a while since I wrote anything that happens with the typewriter and so on. I’ll start with a small link to an article that I found today: The cancellation of numbers was canceled
Well, actually, I replaced the steering linkage, otherwise the old one became really bad, it makes knocking noises, etc. I went and bought a new one, there were only BZAK brands, the sellers assured me that the company was good, it made quality work, well, I relied on them and bought it, the deal cost me 1480:
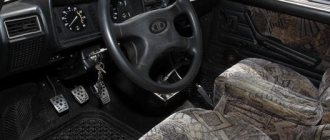
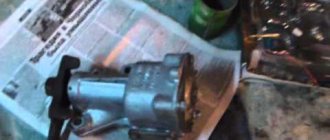
And then I waited until there was time and went to change it, having removed the protection I saw the object of work in front of me:
I will note now that before the replacement the car was pulled a little to the right, but this did not happen until the tips broke, the right tip was completely killed, such are our roads (I used this puller, it’s very convenient:
Unfortunately, I don’t have a photo of how I took it, since I had no time, I had to set up a trapeze and go to the alignment. Everything went like clockwork, the nuts were unscrewed quite easily, with force of course, but without any kind of force, but I came across the nut of the dead tip and then I swam:
After I removed everything, I assembled a new set:
Well, I made approximately the same lengths of the tips, so that there would not be a strong difference with the old ones:
Well, after that I started putting:
We stretch everything thoroughly, pin it, assemble it and go to the wheel alignment) On the way, I noticed that the car was again pulling to the right, only stronger, the steering wheel became heavier, but my path to the car service changed a little, my father told me to drive a little more, so that everything would fall into place, so after listening to his advice, I drove a little more and went to the service center:
And then I saw these numbers, but I couldn’t understand why I was so mistaken with the length, because the length was exactly the same as on the old one
The master quickly did everything as he did, I followed this, checked the balls for me, they were fine) it took about 30 minutes, they said you’ll ride for a week, if you don’t like something, come and fix it) I left the service and that’s happiness, the car drives straight, doesn’t drive, the steering handles perfectly, the steering wheel turns easily) I paid 1000 wooden rubles for the wheel alignment)
Well, that’s how yesterday went, today I’ll change the windshield and most likely there will be a report tomorrow, and I’ll finally get ready for the technical inspection, tomorrow I’ll go for a test and see what they say)
Complete disassembly of the trapezoid
Removing all rods is practiced in two cases - when replacing assembled levers or a complete set of anthers on hinges. The technology for carrying out the work is similar to dismantling the outer tip, but is done in a different order:
- Complete the preparatory stage - place the car in the pit, clean the hinges, apply lubricant and remove the cotter pins. There is no need to turn or remove the wheels.
- Using a 22 mm spanner, unscrew the nuts securing the two side link ball pins; do not touch the clamp bolts.
Don't forget to position the middle section correctly - bending forward. After replacement, it is worth driving out onto a flat section of the road and observing the behavior of the car. If the car pulls to the side, go to a service station to straighten the camber angles of the front wheels.
The cost of the tip on the VAZ-2107
Before replacing, you should buy both tips - you can change one, but it does not make sense, because such a partial replacement will accelerate the wear of the remaining part. When choosing a spare part, focus on the middle price segment.
Too expensive parts are a common overpayment for an advertised product. A tie rod end, the price of which is the lowest on the market, most likely will not meet the high quality requirements for such an important component in a car.
The average cost of high-quality internal tips is about 600 rubles per pair. External tips are a little cheaper and will cost you an average of 550 rubles per set.