The basic VAZ door lock, in principle, is a fairly reliable system, but there may be prerequisites for its replacement. In this case, it is better to replace it with a silent door lock.
At the same time, for most drivers, updating the silent locks of the VAZ 2110 is a matter of principle, because they strive to make the lock not just quiet, but almost inaudible. But first things first.
Door lock mechanism
Features of door adjustment
The opening device may become stuck because the door is sagging or poorly adjusted. Several effective methods have been developed:
The adjustment is carried out using the lock latch located on the door fragment pillar. Using an impact screwdriver, three bolts are loosened, the door is adjusted, and the screws are tightened. Adjustment of the response part. It provides soft and silent closing/opening. To do this, the door is moved outward using external adjustment screws. Hammering the bracket with a hammer
After a slight shift, it is important to check the functionality of the door, then repeat the procedure if necessary.
Loosen - tighten, this is an algorithm that will allow you to adjust any structure, even the trunk. If the door element is skewed, it means that the points on the rotation axis have shifted. Therefore, the loops are simply tightened by 5 mm. If these actions do not help, then the distortion should be looked for in another part of the body.
Lock pin VAZ 2110 Part 2
Hi all!
I continue the epic with the castle. In the previous entry www.drive2.ru/l/8092376/ I asked for advice on how to unscrew this damn finger. In response to my request, I received some practical advice, and identified the following options: 1. Gas wrench (bob) 2. Chisel + hammer, and then a sledgehammer. 3. Remove the wheel, remove the locker and spray the washer with penetrating lubricant.
So, I started with bobka. And immediately a bummer, my bob turned out to be too big and simply could not grab my finger tightly.
Then, I grabbed a hammer and chisel. Immediately realizing that an ordinary hammer would not be enough here, I went for a sledgehammer. Even under the blows of a sledgehammer, the bolt did not give way, the metal flattens, but the bolt does not move. Even in the previous post, they advised to tap the bracket and bend it a little, freeing the finger, this also did not help.
I had to move on to the third option.
I took off the wheel, unscrewed the locker and spent half an hour pouring VeDashka on the washer. As expected, it rusted to death.
The second approach with a chisel and sledgehammer still did not help. An impact screwdriver and a wrench didn't help either. In short, two hours of rowing, and the result was zero.
So far the following options are visible. First, buy a small bob that can grip your finger tightly. During this time, the locking nut spilled by VeDeshka may loosen.
The second option is to cut down and drill out this finger. The third option is not to fool your head and drive like this, but it’s not interesting at all. If you have any other ideas, I'm ready to listen.
Source
Adjusting the lock
After 3-4 years of operation, drivers note a defect: one of the doors of the VAZ 2110 car begins to close poorly. For example, it is loose when the part sticks out when closed. It also happens the other way around: when you try to slam the door hard, it doesn’t close. In such cases, adjust the latch. To work you will need good lighting and special tools:
- a large screwdriver with a socket head at the end of the handle;
- a key that will be used as a lever;
- crosshead screwdriver.
Work order:
- Using a screwdriver and a square key placed over it as a lever, partially unscrew all three locking mechanism lock screws. This is necessary to move it relative to the plane on which it is mounted.
- If a closed car door protrudes outward relative to other body elements, then it is necessary to move the latch towards the passenger compartment.
- The adjustment is carried out experimentally. There are no clear parameters for how far the latch needs to be advanced.
- When the door does not close completely, even if a lot of force is applied to it, it is necessary to move the latch closer to the outer edge of the car body.
- If the gaps between the car door and the body are uneven, this can be corrected by moving the lock up or down. The defect is corrected by adjusting the door hinges, placing washers of various thicknesses.
After the lock is adjusted, the bolts are tightened as tightly as possible.
Lock pin VAZ 2110
Lately the left rear door has become difficult to close. A quick inspection revealed a worn lock pin.
I bought new silent fingers for 20 rubles per piece.
I thought about replacing this pin in three seconds, but the hell was there, I couldn’t unscrew it. I already had experience in unscrewing locks, so the first thing I did was try to unscrew the soured bolt using a large screwdriver and a wrench. Did not work out.
I freaked out and went to the store to get an impact screwdriver.
The cost of the attraction is 250 rubles, the quality is so-so, there is noticeable play in the moving parts. Pleased with the removable head and the presence of several bits.
Half an hour of fiddling with an impact screwdriver led to nothing. This raises the question, who knows what kind of Jedi method can be used to unscrew this soured bolt? An alternative is to use a chisel with a hammer, but it’s boring, because if the splines get stuck, then just drill them out, which of course you wouldn’t want to do.
dimensions of doors with interior trims
Refinement of the base and mechanisms
One of the main disadvantages of a door lock is that it makes a lot of noise when closing. And the culprits of this shortcoming are the outer part and the locking bar, which engages with it when closing. The reason for the loud sound lies in the fact that all the parts that come into contact with each other are metal.
The best way out is to purchase a silent lock, in which the parts in contact with each other are made of plastic. You can modify the mechanism yourself, as a result the door will close even quieter and softer.
- Dismantle the outer part of the old lock without removing the casing.
- Remove the small retainer latch spring. Insert the large spring into place.
- Cut or remove the shaped rubber seal. The part often comes out of its seat because the block is skewed against its base, which prevents the door from closing normally.
- Slightly grind and adjust the nose of the locking ratchet, which, when closed, engages with the latch on the stand.
- Glue a rubber gasket or any vibration-absorbing material to the base of the door where the lock will be attached.
- Lubricate and install the new modified mechanism in the place where the old one stood.
Installation details
Very often, even the so-called silent locks (which are usually installed instead of old, noisy ones) are further modified.
There are several methods, but it is important to install a gasket between the body and the mechanism, since there remains a gap that affects the penetration of air, dust, and also the volume of sound.
If it suddenly turns out that after installation the door does not latch, you can solve the problem in several ways:
- Strengthening the lower springs (better suited for an old, noisy mechanism);
- Installing a cube of foam rubber in place of the bullet spring;
- By installing one large spring from below.
Adjustment on Kalina
Typically, it is necessary to adjust the operation of the lock on this model if there is excessive noise that occurs when closing the doors. It rarely gets to the point where the locking device works poorly. To work, you need a Phillips screwdriver, a wrench and a screwdriver with an asterisk. The work is carried out in the following order:
- Using a screwdriver, loosen the screws securing the clamp. It is secured with two Phillips screws and one sprocket;
- We make adjustments. The shift here is made up or down;
- Tighten the screws in the selected position.
To reduce noise, you can put a silicone cap on the clamp. If this procedure does not help, then it makes sense to tighten the screws securing the door hinges.
Removing the lock on Kalina
Sometimes adjustments don't help. This indicates wear of this mechanism; this often happens when the machine is used intensively. To continue normal operation of the car, it is necessary to change the lock. This is done in the following order:
- The door trim is dismantled;
- Using a Phillips screwdriver, remove the screw securing the base of the handle (inside). After this, carefully remove it from the guide pin;
- The insulating material located in the door is removed;
- The rod is disconnected from the cylinder mechanisms. To do this, press it out using a slotted screwdriver;
- The rod coming from the external handle is disconnected in the same way;
- Using the “8” head, the outer handle is detached;
- The outer handle is removed from the car;
- The lock itself is secured with 3 screws. Older machines use Phillips screws. On newer ones you can find stars;
- The locking drive block retainer moves upward. After that, disconnect the block with wires;
- Using a screwdriver, we disconnect the rod clamp; at the same time, it must be carefully rotated around its own axis. This way you can remove the handle rod (internal);
- The locking mechanism is removed from the door.
Assembly is carried out in reverse order. Before installing the new lock, be sure to lubricate it. This will extend the life of the mechanism.
Conclusion
. As a rule, car doors sag somewhat over time. This leads to some problems in operating the machine. To eliminate the problem, the door locks on Priora, 2107, 2110 and 2112 are adjusted. This work is not difficult, even a beginner should not have any problems. But sometimes this doesn't help. In this case, you will have to replace the entire lock. For each model, this work is slightly different, but usually, difficulties arise to a minimum.
Features of door adjustment
Below is the most visual material on this type of repair. Watch and remember!
The opening device may become stuck because the door is sagging or poorly adjusted. Several effective methods have been developed:
The adjustment is carried out using the lock latch located on the door fragment pillar. Using an impact screwdriver, three bolts are loosened, the door is adjusted, and the screws are tightened. Adjustment of the response part. It provides soft and silent closing/opening. To do this, the door is moved outward using external adjustment screws. Hammering the bracket with a hammer
After a slight shift, it is important to check the functionality of the door, then repeat the procedure if necessary
Loosen - tighten, this is an algorithm that will allow you to adjust any structure, even the trunk. If the door element is skewed, it means that the points on the rotation axis have shifted. Therefore, the loops are simply tightened by 5 mm. If these actions do not help, then the distortion should be looked for in another part of the body.
The luggage compartment cylinder comes complete with a cylinder for the door. To carry out repairs, replacement or adjustments, you will need a standard set of tools. Instructions:
- The covering material is removed. Use a wrench to unscrew the nuts on the lock fastenings.
- The two lamp terminal connectors are disconnected. The windshield wiper motor and actuator are turned off.
- The cylinder is removed and the core is removed with pliers. The larva is replaced, then all the parts are assembled in the reverse order.
Lock pin VAZ 2110 Part 2
Hi all! I continue the epic with the castle. In the previous entry www.drive2.ru/l/8092376/ I asked for advice on how to unscrew this damn finger.
In response to my request, I received some practical advice, and identified the following options: 1. Gas wrench (bob) 2. Chisel + hammer, and then a sledgehammer. 3. Remove the wheel, remove the locker and spray the washer with penetrating lubricant.
So, I started with bobka. And immediately a bummer, my bob turned out to be too big and simply could not grab my finger tightly.
Then, I grabbed a hammer and chisel. Immediately realizing that an ordinary hammer would not be enough here, I went for a sledgehammer. Even under the blows of a sledgehammer, the bolt did not give way, the metal flattens, but the bolt does not move. Even in the previous post, they advised to tap the bracket and bend it a little, freeing the finger, this also did not help.
I had to move on to the third option.
I took off the wheel, unscrewed the locker and spent half an hour pouring VeDashka on the washer. As expected, it rusted to death.
The second approach with a chisel and sledgehammer still did not help. An impact screwdriver and a wrench didn't help either. In short, two hours of rowing, and the result was zero.
So far the following options are visible. First, buy a small bob that can grip your finger tightly. During this time, the locking nut spilled by VeDeshka may loosen.
The second option is to cut down and drill out this finger. The third option is not to fool your head and drive like this, but it’s not interesting at all. If you have any other ideas, I'm ready to listen.
Source
When does it become necessary to replace a car lock cylinder?
Lock cylinders for VAZ 2110
First, you need to objectively understand that the larva is inside the castle, therefore, as many locks as there will be, there will be as many larvae. In practice, the need for replacement arises if there was an unsuccessful hacking attempt. Objective traces of hacking:
- unsteadiness and unreliable fixation of the lock to the base fastening structure;
- the key began to fit poorly into the keyhole;
- the lock does not open at all with the key;
- mechanical traces of a break-in attempt, etc. are visually visible.
Vital reasons that require replacing a car lock cylinder:
- loss of the key to the lock;
- accidental unintentional damage to the lock, during which it failed;
- there was a desire or need to increase the degree of security of the keyhole, etc.
The ignition system, doors and trunk are the basic elements that always contain a lock. They all have a common principle of replacing the lock cylinder.
Adjusting and replacing the lock on 2107
First, you need to identify the reason for the poor functioning of the lock. In some cases, the problem is sagging hinges. Because of this, the door sag and, accordingly, the lock does not coincide with the latch. You can check this by measuring the gaps between the door and the body. This figure can range from 3 to 7 millimeters
It is important that it is completely uniform. If the indicator is different, then you need to adjust the position of the loop
In some cases, this may save you from further manipulations with the lock.
The lock is adjusted in the following order:
- The position of the latch is outlined directly on the car. To do this, you can use a marker;
- If the door closes with just 1 click or just closes tightly. You need to unscrew the lock and move it to the sides of the outer part of the body;
- The door closes, but the gap remains, you need to loosen the latch, and then move it inside the body.
Sometimes, drivers experience problems opening the car from the inside. This occurs due to the door handle being misaligned. To fix it, you need to unscrew the screws securing the handle, move it to the optimal position and secure it. Replacing a lock is also not a difficult task. This option is used when other methods no longer help. Installation of the new mechanism is carried out in the following order:
- First, remove the armrest, window regulator, dismantle the trim;
- Unscrew the button that turns off the lock. The manufacturer recommends using a slotted screwdriver to disconnect the switch rod from the locking mechanism, but in practice you can do without it;
- From the end of the door, unscrew two screws securing the groove;
- Remove the tongue from the groove, while the gutter moves away, this happens together with the seal;
- Unscrew the 2 screws securing the inner handle. It must be pushed inside the door;
- Unscrew 3 screws securing the locking mechanism to the door;
- All that remains is to remove the lock from the door. This is done together with the rod and the internal handle.
Reassembly should not be difficult for you. The hardest part is installing the inside handle. It should be installed together with the lock and rod. The difficulty lies in inserting the handle into the groove intended for it. Don't forget to lubricate the mechanism when installing it. This will extend its service life.
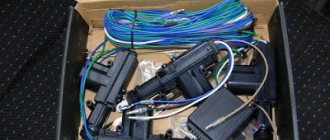
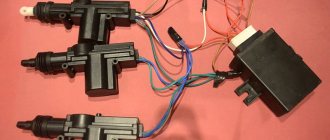
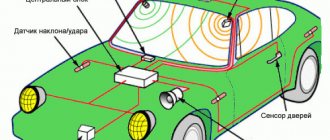
Let's make the alarm system and central locking together
Any modern alarm unit is equipped with two relays connected to the central locking control unit. One relay is opening, the second is locking, and the circuit in the general case looks like this:
In our case, the green and white cords coming from the signaling unit will be required, as indicated in the diagram. However, they will not be the only ones needed. We will connect the relay contacts to breaks in the standard wiring. This means there will be not 2, but 4 cords.
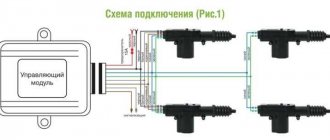
Connection diagram for VAZ central locker
Take another look at the diagram published in the first chapter. We will connect the relay to the gap in the white and brown wires going from the microswitch to the central lock control unit. And it is obvious that it is easier to break these wires near the 8-pin connector. The same one shown at the beginning.
To avoid any questions, we will show you what should happen as a result:
Connection diagram, central lock VAZ
The common contacts are connected to the wires coming out of the microphone. The white cord continues with the brown wire coming from the door, and so on. Normally closed contacts are also used, along with normally open ones. These are the features of connecting to the VAZ central locking system.
An approximate sequence of actions performed by the installer:
- Make and lay a 4-core cable running from the signaling unit to the 8-pin connector;
- Connect the cable on the side of the alarm unit (see the last diagram);
- Near the 8-pin connector, disconnect the white and brown wires coming from the microswitch (pins 5 and 7). The main thing is not to confuse them with the wires going to the triangular connector “C”;
- Make connections to the broken wires, white and brown. That's all.
We have given this sequence to emphasize once again that the relays are switched on between the microphone and the central lock control unit. There is no need to connect any additional devices. As a result, the alarm system will be able to control the state of the locks.
All wires added to the car structure must be protected (use heat-resistant tubes or electrical tape). Twisting is not the worst method to connect two wires. But it's even better to use soldering.
It would seem that if a person has experience working with electrical equipment, he can do everything according to the instructions given. As a result, if no mistakes are made, you may encounter an interesting phenomenon. Instead of closing, there will be a short-term locking followed by opening. And vice versa. What to do in this case?
Take a look at what exactly may be present in some of the configurations:
The driver's door may not have an actuator. And then, it is useless to connect the signaling system to the control unit. There is no actuator, which means there is no one to close or open the door and move the microphone lever. Let's say the locks are closed, and then we remove ground from the brown wire and we get the following: the white wire is on ground, unlocking occurs.
We note the following: installation can only be carried out when you are sure that there is an actuator in the driver's door.
There were configurations where only a microswitch was installed. There is no need for arrogance here - adding an actuator will be difficult, since standard wiring must go to it. As you understand, it may not be available from the factory. And it’s unclear what to do then.
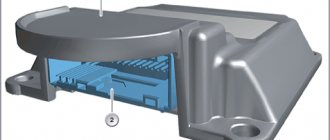
There remains one unanswered question - where exactly the central locking control unit is located. In these VAZ models, if there is a central locking system, then there is also a control unit. And it is located under the torpedo cover, next to the driver, on the right:
We remove the “beard” of the torpedo and look at what is on the upper right. On the same plane with the radio connector there are two boxes attached - the one we need, as well as the immobilizer (if there is one).
We would be lying if we did not say that in reality there is another option for installing the alarm. Standardly, only two power cables go to the actuators. Having a power outlet equipped with a fuse, these cables are connected directly to the alarm relay. This option, as you might guess, is not recommended. Imagine what would happen if the alarm system broke. The central lock must remain, but in this case this will not be done. Happy connection!
Door lock repair
In mechanical structures, repairs come down to replacing or restoring a faulty cylinder, cleaning and lubricating the internal lock mechanism, adjusting or replacing rods. It is not recommended to repair the internal locking mechanism itself, since it is assembled with rivets.
If the door lock does not work correctly, when the key does not turn or the door does not close, you need to do the following:
- Remove the car door trim.
- Remove the door lock cylinder.
- Carefully disassemble the cylinder, thoroughly clean, rinse, lubricate, carefully reassemble in the reverse order and install in its place.
- Remove the internal locking element. Rinse and lubricate. If there is a malfunction, replace it with a new one.
- Check the serviceability of the closing handle mechanism, the door button, all parts are connected to the internal locking mechanism.
- Adjust the locking latch.
If an electronic central unit is installed on a VAZ 2110, then the part is repaired at a service station. Almost none of the car owners have the necessary tools and equipment to check the signal quality and repair the ECU.
Method of driving the activator into operation of the central locking
Identifying the reasons why the central locking does not work must begin with the activator. Activator design:
- five power supply wires are connected to it;
- there is a boot on top, this can be seen when the top cover is removed;
- the electric motor is connected to the power supply by two wires;
- Three wires go to the end chips;
- a gear is mounted on the motor shaft;
- There is a rod shank.
Note: for safe operation of the rod or to protect the body from impacts of the rod when reaching extreme positions, shock-absorbing rubber inserts are installed.
- The operation of the activator must be checked by fixing it in place with the rod connected.
- Since an unsecured activator indicates incorrect operation, the rod will constantly spontaneously move in the opposite direction.
Step-by-step instructions for changing the ignition switch
Before you start changing the ignition switch in a VAZ 2110 car, you need to fulfill the main condition, namely, turn off the power to the vehicle. It is necessary to disconnect the “-” terminal on the battery; only after such actions can you begin to remove the cover on the steering column. To facilitate the process of replacing the cylinder, it is recommended to dismantle the entire ignition switch. After replacing the element, the working lock is installed in its place. If we consider the financial side of the issue, it can be noted that changing the contact group will be much more profitable. As in the previous case, you cannot do without removing the casing and the lock itself. To avoid unpleasant moments, when disconnecting the contact group, it is advisable to mark all the dismantled wires. Such measures will prevent tangling and save valuable time.
Note! In rare cases, there may be a retaining ring in the contact group that can be removed with an awl. Upon completion of changing the contact group, you need to put the retaining ring in its original position.
Changing the ignition switch for a VAZ 2110
To change the ignition switch of the "tens" it is not necessary to have any superpowers. At the same time, ignorance of some of the nuances will make you suffer a little and tinker.
Like other repair work, it is recommended to change the ignition switch by following the instructions provided:
When replacing a part, you need to use special bolts with break-away heads. Most craftsmen advise replacing them with 20 mm M6 bolts. This can be explained by the fact that they are easier to remove when the next lock repair is necessary.
Note! Despite such advantages, there is a downside, namely a decrease in the safe level and anti-theft protection of the vehicle.
You will need a chisel to loosen the bolts.
They must be used with extreme caution. In the worst case, you can cut off the head of this bolt. Before changing the ignition switch in a VAZ 2110 car, you need to insert the key into it, turning it to the first position
These measures must be taken to enter the lock body of the latch-lock, which blocks the steering shaft mechanism.
- After these steps, switch
can be placed on the steering column, but it must be secured with a bracket and tightened with new bolts for fastening. - After removing the key from the lock hole, it is necessary to verify the functionality of the steering shaft locking mechanism. If for some reason the shaft lock does not work after turning the steering wheel, you need to adjust the location of the ignition switch on the steering column.
READ How to change brake discs on a VAZ 2110
Note! The actions continue until the latch falls into the corresponding groove.
If, after adjustment, the locking mechanism still does not work, you need to use a size 10 spanner to tighten the bolts. The bolts are carefully tightened until their heads come off.
Of course, you can repair your car at a car service center, but if it comes to minor repairs, for example, changing the ignition switch in a VAZ 2110, you can do it yourself using videos and photos. This is a simple procedure that requires a minimum of knowledge, skills and time. If you replace the part repeatedly, the instructions will no longer be needed. Since the cost of repairs at a service station is considerable, independent actions make it possible to save significantly, the main thing is to purchase high-quality spare components.
Download PDF
Such work as replacing the ignition switch on a VAZ 2110 and 2112 is not uncommon. The reason for frequent malfunctions is the constant operation of this structural element. Low quality parts also have a negative impact. Before replacing, make sure that the problem is in the lock. Sometimes, similar symptoms can occur with other breakdowns. To work, you will need a minimum of tools, but in some cases, it may be difficult to remove the spare part from the car. Do everything carefully and carefully. Then you won't have any problems with this. Please note that the ignition switch has a mechanical anti-theft device.