Author: Evgeny Zhivoglyadov. Date of publication: September 22, 2016. Category: Automotive equipment.
Car window tinting not only allows car owners to feel more comfortable when driving on the road, but also performs other useful functions. First of all, it is protection from direct sunlight, which interferes with driving, greatly heats up the interior of the car and causes rapid fading of the upholstery.
Due to their advantages, film filters are almost irreplaceable if you often use a vehicle, but not all automakers tint car windows, which is why car owners have to make such updates themselves. Such a service in a salon will be very expensive, so tinting your car windows yourself, a video of which you will find at the end of the article, is the most relevant and budget solution. To do this, you don’t have to buy specialized tools or have special skills. You just need to follow the recommendations and do everything very carefully.
Preparing everything you need
Before applying the tint, you need to prepare a clean and dry place to work, as well as a standard set of tools:
- Tinting film that meets the requirements of GOST 5727-88. Light transmittance for the windshield should be at least 75%, for the front side windows - 70%, for the rear side and rear - any. Typically, 4 side windows require 1 roll of film filter.
- Liquid soap (without dyes) to fix the film. It is better to use special installation compounds that do not leave streaks, or a 10-20 percent solution of any transparent shampoo.
- Plastic sticker for smoothing tint. Usually it comes complete with a film filter, but if you don’t have one, you can use any elastic plastic, rubber spatula or construction rubber eraser. Also in the store you can find special distillers for removing bubbles (chisler - for hard-to-reach places, slammer - for squeezing the edges, bloomax - for forcing out liquid).
- Scrapers for cleaning glass surfaces. 12 cm products of various shapes are best suited.
- Spray bottle (manual) for applying soap solution.
- Blade or utility knife. The latter is made of mild steel, so it is convenient to cut the film without fear of the glass being scratched.
- Soft rags, clean rags or napkins made of lint-free material.
- Industrial dryer.
If you are tinting your car yourself for the first time, it would be a good idea to purchase special camouflage markers and tapes. With their help you can correct minor errors.
You should also ensure that you have easy access to clean, cold tap water. The room should be free of insects and dust.
If everything is prepared, you can start cutting the film filter.
Materials and tools
To perform car window tinting work with your own hands, you need a number of items, the set of which depends on whether you need to remove it or not. It is worth reminding: to obtain a high-quality result, it is advisable to entrust the pasting to a specialist or to carry it out together with an assistant. Before you start gluing, you need to check the car glass for irregularities and cracks; if there are any, it is better to refuse tuning. To implement your plan you will need:
- film;
- rubber spatula or roller;
- shampoo;
- spray;
- hair dryer;
- stationery knife;
- soft rags.
All materials used in the pasting process must be of high quality, but special attention should be paid to the choice of film. If you are starting to tint a car for the first time, then you should choose the one that is easiest to handle.
We cut out the tint
Before gluing the tint onto the car, it is better to study the video instructions for cutting the tint material (at the end of the article), since all further work depends on this stage.
Cutting can be done directly on the glass of the machine, but for beginners it is better to prepare a special glass stand for this. Next, we cut out and apply the film in one of two ways.
1 way
- Cut out a rectangle.
- Wet the glass. This is necessary so that the tinting material does not “run around”.
- Place a film filter on the glass outside of the pattern machine. In the future, the film will be glued from the inside, but for cutting it is more convenient to work from the outside.
- Cut the blank along the curves of the glass with an allowance of 5-10 mm; for convenience, lower the window by at least 5 cm.
- Perform molding.
- Transfer the pattern to the stand and cut off the sharp corners a little.
- Prepare strips of film (10 cm each) and stick them on the front side to make “tails” for which you will remove the protective layer.
Method 2
- Use ready-made patterns that can be selected for a specific car model in any store.
- Cut out the workpiece, leaving a small allowance of 5-10 mm.
- Apply the installation compound to the inside of the glass and attach the pattern.
- Perform fitting and shaping.
- Glue the tails.
Separately, it is worth saying a few words about film formation. You should not do this while pasting, as in this case you will get “arrows” and unevenness. Therefore, it is better to do the molding in advance. To do this, at the cutting stage, when you attach the workpiece to the glass, you need to supply hot air to it. After this, you need to go over the film by forcing it so that the material lays tightly on the glass, taking its shape. This will make it easier for you to remove the protective layer.
After this, the most important work of applying the film begins.
Video Vehicle tinting technology
In this video you can learn everything you need to tint your car.
Tinting is an affordable tuning tool that significantly transforms a car. And in our latitudes, the appearance of your favorite car is of significant importance. There are many offers on the market for such a popular service - gluing tint film. But the more options there are, the more difficult it is to find a contractor who can guarantee quality. Therefore, it is quite logical to do everything thoroughly and with your own hands. And we’ll talk about the nuances of how to tint a car yourself and glue the film correctly below.
Glue the film on the side windows
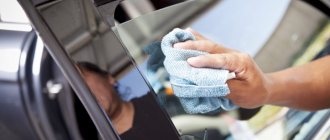
It is best to start the process with the side windows, since their area is smaller and you can “get your hands on it.”
Take the blade and lightly scrape from top to bottom to clean the inside surface of the glass. Try to get rid of all inclusions, dust particles, glue residues and other particles. After this, you can treat the glass with clean water from a spray bottle.
If the glass has become perfectly clean, in your opinion, then it is time to apply the installation solution to it. Spray it over the entire surface.
Important! You cannot use ordinary water at this stage, otherwise the film will immediately stick tightly and you will not have the opportunity to “turn.”
Now it's time to remove the protective coating from the film and apply soap solution to its sticky side. After this, it is very important to ensure that no dust gets on the adhesive surface.
Further:
- Carefully take the film by the “tails” and place it on the glass.
- Using gentle movements, gently smooth it out using a pressing tool to get rid of all bubbles.
- Warm up the glass with a hairdryer (start from the top edge). This way the film will press well and will not peel off when you lift the glass to process the bottom part.
- Smooth the edge again and remove any bubbles.
For 10-15 minutes the film will still move easily, so you can adjust it. After this time, it will take its place and you will need to expel the soap solution. To do this, it is most convenient to use a rubber spatula, moving from the center to the edge of the glass.
When we made the pattern blanks, we left small allowances, which we now need to get rid of. To do this, take a stationery knife and make cuts at an angle of 30 degrees relative to the glass, so that the light filter does not reach the edge by 1-2 mm.
After this, you can dry the film again with a hairdryer. You can start using the car after the filter has completely dried - after about 2 days.
For the windshield, tinting is done in the same way, but with the rear window things are a little more complicated.
Choosing the best film for self-window wrapping
To make the optimal choice, many parameters should be taken into account. The first is the type of film. They come in painted and metalized varieties (there are others, but inexperienced pasters should not mess with them). The second option is preferable, as it is more durable and provides good protection from sunlight, but the price is twice as high. It makes sense to take high-quality colored film for “training”. Its resource will last for 2-3 years, after which (based on the experience gained) you will decide which one to glue for the second time.
You should not take the cheapest options (most often Chinese) to learn how to tint. During installation, you will encounter additional difficulties: creases, poor glue and rapid wear. With such materials and without experience, it is unlikely that you will be able to complete the pasting process.
Choose which brand suits your liking and wallet, and we’ll get to work.
Tinting the rear window
If you have already processed the front and side elements of the car, then you have already approximately mastered the concept of tinting yourself. The rear window is more difficult, so be sure to practice.
The main difficulty is that this window is very curved, which is why it is rarely possible to tint this area with one piece of film. In order not to suffer with insets, after applying the tint (with a protective layer) to the soap solution, you need to pull it very tightly onto the glass. Don’t be afraid to tear the tint; it has good ductility and durability.
Also, before applying the tint to the rear window, it is recommended to call an assistant. He should heat the film with a hairdryer while you stretch it. Don't be afraid to use a lot of force when "driving" the bubbles out of the rear window. This will also help the material adhere better. In all other respects, the same operations are performed as described above.
If you can’t tint the rear window in one piece, use several pieces of light filters. It is better to cut them horizontally rather than vertically, so you can hide the traces of the resulting “designer”. If you can make a cut along the line of the heating element, this will be the best option.
Preparatory stage
Before you start directly tinting the glass, you will need to select a suitable film. It’s worth noting right away that it is extremely undesirable to use the cheapest Chinese film, since its service life will not be very long. Over time, such material fades in the sun, and the adhesive layer leaves much to be desired. It is either too weak or, on the contrary, too sticky and its remains will be very difficult to remove if the tint is removed.
More expensive film from famous manufacturers has optimal thickness, does not lose color in the sun and can last for many years.
We recommend:
Do-it-yourself painting of alloy wheels: detailed instructions
You should also not forget about the light transmittance of the film, because if you do not take this point into account, you can get serious problems when passing a technical inspection or a traffic police check. For example, rear windows can be tinted using any films, except those that have a mirror effect. If we talk about the front side windows, then they should be able to transmit at least 70 percent of the light, as for the windshield, then the figure should be at least 75 percent.
Car tinting should be done in a clean room with a good light source and normal humidity. It would also be useful to find an assistant in order to minimize all risks. Before starting the process, you should thoroughly wash the car, paying special attention to the windows. The surface must be smooth, free from dust, chips and deep scratches. If you plan to tint the door windows without removing them from the car, you will need to remove all the seals.