Replacing the clutch. Removing the driven and driven clutch discs
On cars before 2009 and after 2009, the work is similar.
We remove the gearbox (see here). In order for the clutch housing mounting bolts to be easily removed, tap their heads with a copper hammer.
If you plan to install the old pressure plate, mark the relative position of the disc housing and flywheel in any way to install the pressure plate in its original position (to maintain balance).
Screw the clutch housing mounting bolt into the hole in the engine cylinder block. In order to keep the flywheel from turning, we lean the mounting blade on the bolt and insert its end between the teeth of the flywheel ring.
Using a 13mm socket, unscrew the six bolts securing the clutch housing to the flywheel.
We unscrew the bolts evenly, no more than one turn each, so as not to deform the clutch housing.
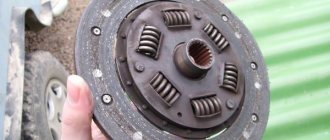
Remove the driven and driven clutch discs.
This is what the driven disk looks like for cars produced before 2009.
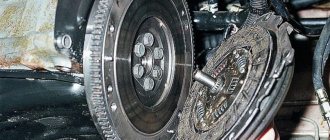
Inspect the working friction surfaces of the flywheel and pressure plate B. for the absence of deep marks, scuffs, obvious signs of wear and overheating. Replace defective parts
On vehicles manufactured before 2009, additionally inspect the three connecting plates of the pressure plate thrust flange. They must not be damaged. The fiber anti-noise lining of the flange must not be severely worn or damaged.
Make sure that the ends of the spring petals fit snugly against the thrust flange.
When installing the clutch, we orient the driven disk with its protruding part towards the drive disk, and insert the centering mandrel into the hole in the hub.
Instead of a mandrel, you can use the old input shaft from the gearbox to center the driven disk.
We insert the mandrel into the hole in the inner race of the crankshaft bearing and in this position we fix the clutch drive disc,...
...evenly (one turn per pass) tightening the bolts to the required torque (see here).
Remove the centering mandrel from the hole.
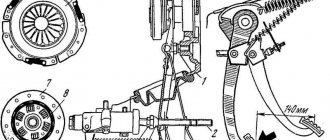
Principle of operation
The node works as follows:
- When you press the pedal, the force is transmitted through the hydraulic clutch to the pressure fork. It puts pressure on the release bearing, displacing it towards the engine.
- The latter compresses the petals of the springs mounted on the clutch basket.
- The driving and driven disks begin to rotate independently of each other, breaking the connection between the engine and the gearbox.
- When the pedal is released, the clutch parts return to their original position under spring pressure.
- The discs connect and again transmit torque from the engine to the transmission input shaft.
Friction linings, release bearings and other clutch parts gradually wear out. In this case, you have to change individual parts or the entire assembly.
Replacing the clutch in the field
Immediately after the new year, on January 7, I finally changed the clutch in the field, and at the same time changed the clutch master and slave cylinders. Replacing the clutch on a field and on a single-wheel drive is a completely different task in terms of labor intensity. I changed my clutch for two days, although I did a lot of other things along the way. It is highly advisable to call a friend for help. I managed to do everything alone, but next time I will try to do it with an assistant.
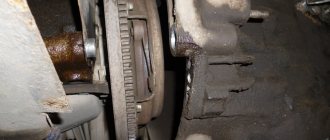
So, let's begin our difficult journey. Replacing a clutch in a field is one and a half times more troublesome than on a conventional front-wheel drive. The Niva also has a transfer case and two cardan drives, all of which are bolted together and to the gearbox. The photo shows that the front driveshaft has already been removed.
A picturesque view of the razdatka, then RK. In principle, there is no point in completely unscrewing the rear driveshaft. Simply unscrew the RK from the flange and put it aside. As in the photo.
I remember that year I wrote a little about the intermediate shaft. He became the reason for leaving the trophy raid on the first jersey. In the photo, the new shaft for 21213 is a CV joint, one part of it is essentially a standard “grenade”. The old-style crosspiece cannot be found in stores, which is sad. There are some being analyzed and I think I heard that they are making non-original ones. I didn’t buy it right away, I needed to drive it, so I took the standard one again. Its peculiarity is that if damaged, the car is immobilized. On the old cross shaft, according to people’s stories, you can somehow slowly get to the repair site.
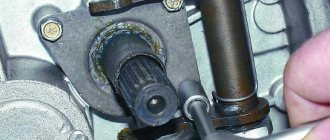
In order to remove the steering wheel, it is necessary to release the locking and downshift levers from above. To do this, the entire manual transmission cover is removed. The casing is on large self-tapping screws, for a Phillips screwdriver. Under the casing, right from the cabin, we can see the donut of the washout.
Then we go down under the car and unscrew the transfer case supports. But before doing this, using an awl, scissors, or something sharp, we outline the position of the supports relative to the bottom. In the photo you can see a mark around the studs - that's what it is - marks. We need to put the transfer case in the same position when we put it back. Using a 13mm ratchet with a long head, unscrew the nuts from the studs, 4 of them, two for each support. Next you will need an assistant or your own stupidity. We grab the transfer case and carefully remove it so as not to damage the studs. One of the most annoying problems with old fields is the transfer case studs. If it breaks off, rots, or the threads come off, it will be difficult to secure the transfer case properly. There will be noise and vibration. You can change the stud by drilling it out from inside. I had to do just that, but now the inserted bolt must be unscrewed while holding it both in the cabin and under the bottom of the car. Well, yes - it needs to be welded, I agree. I'll finish it in the spring.
Next we will remove the gearbox. In the photo we are looking at the gearbox shaft flange, to which the intermediate shaft between the gearbox and the gearbox is screwed. I didn’t film the filming process itself, since I was filming alone and getting my hands dirty, and it was inconvenient to photograph. The gearbox bell is bolted to the engine block with four bolts. Like 17 or 19 - I don’t remember, and it doesn’t really matter. The main thing is that you need heads with extensions; you can’t get to them that easily. It seems difficult the first time, but in reality you just need a ratchet with a good extension cord.
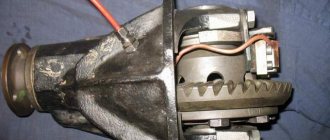
And this is the transfer case removed, placed closer to the rear axle so that it doesn’t get in the way
Having removed the gearbox, I try on a bearing on it.
Clutch disc from original kit. Of course, it would be more correct to install a clutch from a Chevy Niva. The original clutch 21213 is a mutant from classic and eight spare parts. The clutch from 2123 has undeniable advantages - it is two or three times more durable, softer, the disc is larger in diameter and area. But the price is twice as expensive.
When does it make sense to renovate?
The manufacturer did not provide for the possibility of repairing parts. In addition, clutch spare parts are not very expensive. Therefore, if a malfunction is detected, it is necessary to replace the worn part with a new one.
Sachs clutch
The Sachs clutch is produced by the German concern ZF. Sachs is famous for its wide network of concerns located in 39 countries. The Sachs clutch kit has the following advantages:
- The kit does not require maintenance.
- There are no asbestos linings.
- Copes well with increased loads.
- The clutch kit from Sachs for the Chevrolet Niva has gained enormous popularity in the CIS countries.
But it is worth highlighting one drawback that is a hindrance for budget car enthusiasts - the high cost of the product. The manufacturer also claims that the Sachs clutch kit has a service life of 100,000 km. But is it really so - you, dear Shnivovody, check. The kit costs approximately 5,500 rubles, but you still need to look for it.
replacing the Niva clutch slave cylinder
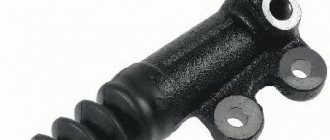
The clutch master and slave cylinders can also cause big problems. I had a leaky clutch giving the effect of the clutch sticking. Sometimes it was impossible to turn off the transmission, sometimes to turn it on. We remove the front cardan, we have already removed it. The flange of the front gearbox is visible, i.e. if the cardan was in place, it would be impossible to unscrew the rcs. Bolts 13, two pieces. It is advisable to photograph the mount itself as it stood. And then (six hours later) I twist it in my hands and can’t remember how it stood.
The cylinder is covered in snot, it’s obvious that it’s dead. Code to buy new 2101-1602515
That's it, the cylinder is removed, the new one is installed in the reverse order. But first I also changed the main one, it goes higher up the hose.
Pull the clutch cable
On Niva I try to buy everything from the factory, from Lada-Image in blue and white boxes. New slave and master cylinders.
replacing the Niva clutch master cylinder
So the clutch master cylinder is a classic. Spare part code - 2101-1602615
It’s easy to unscrew the cylinder - turn it right and left and you’re done. Although there is a problem with removal - the fitting on the first pipe becomes sour.
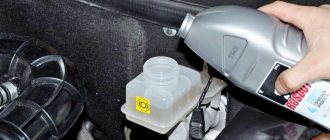
Now the GCS is in place. Now you need to bleed the system by pumping in new brake fluid. It’s better to pump with a partner, naturally. At this point, replacing the clutch in the field is completed, you can leave
Removing, replacing, installing clutch parts
Directory
Tags
Removing, replacing, installing anti-roll bar
Removing, replacing, installing timing belt
Removing, replacing, installing rear suspension shock absorber spring
Inspection, checking the steering
Removal, replacement, installation of the crankshaft and its bearings
Symptoms: the clutch does not work correctly, the clutch “slips”, the clutch “leads”, it hits the clutch pedal, the clutch pedal is depressed with difficulty, there is a grinding noise when pressing the clutch pedal; The clutch does not disengage.
Possible cause: clutch basket parts are damaged or worn; the clutch release fork is damaged; The clutch release bearing is damaged.
Tools: a set of wrenches, a set of sockets, a set of screwdrivers, a mounting blade, tools necessary for dismantling the gearbox, a centering mandrel for the driven disk, white spirit.
1. Place the car on an inspection hole or overpass.
2. Remove the gearbox.
3. Screw one of the clutch housing mounting bolts into the hole located in the cylinder block.
Note. If the pressure plate is not removed for replacement, use a center punch to mark its position relative to the flywheel. This will make assembly much easier.
During the following operation, to prevent deformation of the clutch housing, unscrew the mounting bolts evenly and no more than one turn at a time.
4. Secure the flywheel from turning using a mounting spade, insert it between the teeth of its crown, and at the same time unscrew the six bolts securing the clutch pressure plate to the flywheel, using a 13-socket socket wrench.
5. Remove the clutch pressure and driven discs from the vehicle.
6. Using a flat-blade screwdriver, bend the edge of the protective cover of the clutch release fork, and then remove this cover.
7. Disconnect the clutch release fork from the release bearing clutch spring, then remove the fork from the ball joint, and then remove it from the hole in the clutch housing.
8. Remove the clutch release bearing clutch along with the spring from the guide sleeve.
9. Check the removed clutch elements. The presence of burns, cracks and deep scratches on the friction surfaces of the flywheel and clutch pressure plate is not allowed. The friction linings of the driven disk should not have chips, cracks, signs of warping or severe wear, and in addition, the rivet heads of the driven disk should not be worn out. The disc hub must move along the splined surface of the gearbox input shaft without jamming or jamming. Check that the clutch release bearing moves easily and that there is no noise when it rotates. Inspect the clutch housing for cracks. Replace defective parts with new ones. In addition to the defective parts, replace the clutch pressure plate mounting bolts to the flywheel with new ones.
Published March 30, 2022
Step-by-step clutch replacement on Niva. How did I change the clutch? How does the clutch and release valve work? I bought the same set for myself, but even though the release lever on the shaft is playing so badly, I’m thinking about it.
The clutch slips (does not fully engage) When you sharply press the accelerator pedal, the engine gains speed, but the car almost does not accelerate (this is especially noticeable when driving uphill); the smell of overheated friction linings may be felt; fuel consumption increases
Incorrect clutch drive adjustment (no pedal free play)
Adjust the drive (see Clutch)
Oiling of the flywheel, pressure plate, friction linings of the driven disk
Thoroughly wash oily surfaces with white spirit or gasoline and wipe them dry. Replace the heavily oiled driven disk. Eliminate the cause of oiling (oil leakage through the engine and/or gearbox oil seal)
Severe wear or burning of the friction linings of the driven disk
Replace the driven disk assembly
Reduced diaphragm spring force
Replace the pressure plate assembly with the clutch housing (“basket”)
Jamming of the driven disk hub on the splines of the input shaft of the gearbox
Clean the splines from dirt, remove minor damage with a file. If the splines are significantly worn or damaged, replace the transmission disc and/or input shaft. Before assembly, apply Litol-24 or CV joint lubricant to the splines
Clutch master cylinder compensation hole clogged
Disassemble the master cylinder, wash and clean the parts. Replace its seals and hydraulic fluid
The piston of the clutch master cylinder slowly returns to its original position due to swelling of the rubber seals
Replace the cuffs or cylinder assembly. If you suspect gasoline or other solvents have gotten into the clutch fluid, replace it
Clutch moves (does not disengage completely) Shifting forward gears is difficult, reverse gear engages with noise
Replacing the clutch on a Niva 2121 with your own hands
Category: Car repair yourself
Vehicle characteristics: The dimensions of the car are as follows: length - 3504, width - 1100, height - 1321 mm. The wheelbase is 2918 mm. Ground clearance 182 mm. The car is equipped with a hybrid power unit. The 2-cylinder engine is equipped with a system that provides engine power output. There are 4 valves per cylinder. The diameter of one cylinder is 73 mm, the piston stroke is 75 mm. The engine crankshaft accelerates to 2000 rpm. Maximum torque is maintained up to 2000 rpm.
Posted by admin: at Dominic's request
Watch the VIDEO about VAZ Niva 2121 clutch replacement.
Answer from a car owner named Kiriak: The design is cosmic, the music is super, there are many options.
Original name: VAZ 2121 Niva Auystyru Kerek
Release date: 08/29/2022
Laughter in the topic: A woman instructs her daughter before the wedding: - Daughter, you should never open up completely to your husband. Understand, there must be at least some kind of riddle, secret in a woman, you know... - For example? - Well, for example, never completely expose yourself in front of him, even if something is even a little bit hidden. This excites a man so much... A month after the wedding, the son-in-law calls his mother-in-law: - Hello, mother-in-law, is everyone in your family all right? - I don’t understand what happened? - Yes, it seems like nothing special, just your daughter, It's been a whole month now and he's only been wearing a hat to bed!!
Replacing the clutch on a VAZ 2121 with your own hands - Club-j.ru
Replacing the clutch in the field
How to replace the clutch fork on a Chevrolet Niva - NOBLE CARPENTER
How to replace the clutch on a Niva 2121 – Fashion point
Video of replacing the clutch on a Niva Chevy - Replacing the clutch drive Niva 2121, Niva 2131
How to replace a Niva cart - Njkmznnb.ru
Questions and Answers - Page 84 - Tidbit
How to replace the clutch fork in the field - Service conference
Clutch engagement mechanisms Niva VAZ 21213, 21214, 2131 lada 4×4
How to replace the clutch fork on a Chevrolet Niva - NOBLE CARPENTER
VAZ Clutch Release Bearing
Replace the clutch in the field
Replacing the clutch on a Chevy Niva - SIMPLY DIY crafts from old jeans
How to replace the clutch fork on a Chevrolet Niva - NOBLE CARPENTER
How to replace the clutch on a Niva 21213 - NicosPizza.Ru
How to replace a clutch in the field - Bonbouton.ru
How to replace the clutch on a Niva 21213 - NicosPizza.Ru
How to replace the clutch on a Niva 21213 - NicosPizza.Ru
Replacing the clutch on Niva 21214
How to replace the clutch on a Niva 21213 - NicosPizza.Ru
Published on August 29, 2016
A guide for beginners. How to change the clutch disc alone. Repair at home. In the film - Removal and installation - Transfer cases, gearboxes, cardan shafts, underbody protection, working cylinder, starter, clutch disc, basket, fork and release bearing... For your reference. The author is not responsible for anything you do. Everything you do is at your own peril and risk.
Replacing the clutch in the field without an assistant, in one person.
Common faults
- Knocking or vibration when releasing the pedal. The problem occurs when the driven disk is deformed or its splines are worn out. The malfunction also appears if the engine is poorly secured to the supports or the diaphragm spring of the basket is deformed.
- The pedal sinks when pressed. This happens when the main or working cylinders break down, the hydraulic drive becomes airy, or the return spring or pressure fork breaks.
- The clutch does not disengage when the driver presses the pedal. The reason for this may be clogging or damage to the pipeline and cylinders of the hydraulic drive, deformation of the driven disk, the presence of scoring on its splines, breakage or change in the shape of the pressure fork, or diaphragm spring.
- The clutch is slipping. The problem appears when the friction linings attached to the driven disk are oiled or worn, the hydraulic drive is clogged, the pressure fork is jammed or incorrectly adjusted.
- Noise when pressing the pedal. A grinding, howling or whistling sound when the discs open is due to a faulty release bearing.
To eliminate most breakdowns, it is necessary to replace individual parts or the clutch as a whole.
Read news about the new Niva
- Winches for VAZ NIVA 2121 buy in Tula in the online store