The article will talk about a common and natural problem that arises during the operation of a UAZ vehicle. Many experienced truck drivers are not interested in this; they don’t consider replacing kingpins a problem, but in vain. The material will also be useful for beginners.
The UAZ car was created for the Soviet army; the design included the requirements of maximum simplicity, reliability and maintainability. Many solutions are still in use today. One such successful solution is king pins.
This part is changed when it is no longer possible to remove the beating and knocking by tightening the nuts. The malfunction of the kingpins cannot be ignored - a knocking sound in the chassis, from the side of the wheel, usually the right one, is clearly audible when driving on field and country roads. Over time it only becomes stronger. However, it needs to be repaired or adjusted when the first signs appear - deferred repairs will bring unnecessary problems with the car.
The “walkability” of the pivots depends on the working conditions. On good roads they run for a long time, up to 100,000 km, and on “rides” - depending on your luck. People with basic plumbing skills and desire can replace the kingpins themselves.
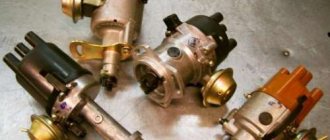
Varieties
There are several types of these mechanisms:
- Factory king pin UAZ "Patriot". The design of the element assumes the presence of plastic liners with a spherical support. The manufacturer produces lightweight components that require gap adjustment. Replacing the king pins on the UAZ Patriot with your own hands is done as the liners wear out. The cost of factory elements ranges from 5 to 8 thousand rubles per set. The resource is up to 50 thousand kilometers.
- Reinforced. This is a new model UAZ “Patriot” kingpin. Equipped with bronze inserts. Often used by off-road enthusiasts. The mechanism is produced in the form of a repair kit. Who makes such a kingpin? UAZ "Patriot" can be equipped with elements from, "Vaxoil" and "Avtogidraulika". The mechanism is marked “for particularly heavy loads.” Unlike factory plastic ones, bronze is a more durable kingpin. UAZ "Patriot" with such an element perfectly withstands shock and turning loads. Reviews say that the element has a resource of 100 thousand kilometers. In this case, it is necessary to lubricate every 20 thousand. Reinforced kingpins can be purchased for 8.5 thousand rubles (price per set).
- Bearing. It is a good analogue of the factory one. The UAZ “Patriot” kingpin on bearings does not require constant adjustment and has a long service life. The cost of such a mechanism is 2 thousand rubles per unit.
About syringing
This is the name for the procedure for lubrication of mechanism bushings. It is produced through grease nipples using a specialized syringe. A waterproof lubricant (for example, Litol-24) is placed inside the latter.
How often should the pins be injected? This procedure is performed every 20 thousand kilometers or once a year. This simple preventative measure will extend the life of the bushings and ensure easier steering rotation. This is noticeable already from the first meters of the road.
What to choose?
When choosing one or another type of spare part, you must remember that each type is suitable for different operating conditions. For example, if you drive mainly around the city, you need to buy a bearing kingpin. The UAZ Patriot, equipped with such a mechanism (with plastic inserts), is very easy to control. If you often drive in areas where there are no roads, use elements with bronze liners. However, keep in mind that the steering wheel will be very tight for the first 2 thousand kilometers. After this period, the mechanism will finally break in and be ready for full operation. Bearing kingpins have average characteristics on asphalt and dirt roads. Reviews advise purchasing products from Altai. It offers kingpins with a +8 caster angle. This makes driving a car much easier.
Steering adjustment
This is mandatory, otherwise problems with driving the car will inevitably occur and premature wear of the tires on the front wheels is possible.
The steering is adjustable with shims. For a standard kingpin, 4 pieces are suitable, and for a roller pin – 5 pieces of 0.5 mm each. After the test ride, you need to touch the wheel and kingpin. When the wheel heats up, a couple of spacers should be removed, but if the kingpin is hot, then add it.
The quality of UAZ control depends on the condition of the pivot. If it malfunctions, you will feel impacts on the steering wheel, so you should replace it in time. It is quite possible to carry out this repair with your own hands, however, if you have the opportunity to contact a specialist, you should not neglect this.
Instructions
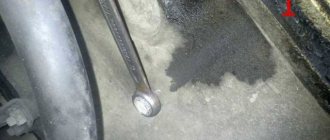
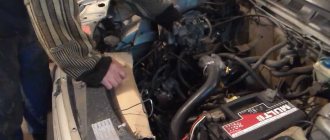
So, how to replace this mechanism yourself? First, the car is installed on a viewing hole or lift. Next, you need to hang the front wheel with the faulty kingpin. Then you need to get to the steering rod bipod. The nuts must be unscrewed using a 24mm wrench. The lubricating bolt of the pivot assembly is also removed.
Causes of failure
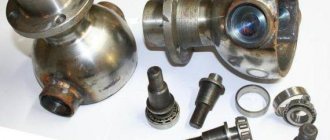
Ball pin assemblies usually fail due to the destruction of the rim of one of the cups covering the ball. At some point, this rim may simply crack, and this happens either from a strong impact (resulting from hitting an uneven road) or from so-called metal fatigue. As soon as the rim of the cup is destroyed, play in the ball appears, which causes knocking and creaking in the pivot assembly. It is possible to understand that it is the kingpin that is faulty only by completely disassembling the front steering knuckle.
Worn kingpin of a UAZ Patriot car
Additional recommendations
When replacing this mechanism, try to avoid distorting the top cover when installing it. To do this, it is better to pull it into the body using 4 bolts, and tighten them crosswise.
Why can't you immediately tighten the new part too much? It's very simple - it can break.
Symptoms of a problem
Spare parts. The main signs indicating wear of the UAZ Patriot suspension pins:
- The appearance of extraneous metallic sounds when driving over rough terrain. When overcoming an unevenness from the front wheel, you can hear a creaking or knocking noise that increases as the pin or liner wears out. Constant squeaks indicate complete wear of the element and the need for urgent replacement.
- Changing the position of the front wheel. The increased gap between the ball and the liner leads to the top edge of the tire falling deep into the arch. Sometimes, on the contrary, the lower edge of the wheel is buried under the car.
- Noticeable wheel play observed when raising the car on a jack.
- Uneven wear of rubber on the front wheels, resulting from a violation of the installation angle.
How to remove old hinges
Regardless of the type of hinge, the basic dismantling operations are the same. To replace or adjust the kingpins, you will need a level area. In addition, you will need:
- jack and safety stand;
- a set of socket and open-end wrenches;
- Screwdriver Set;
- set of sockets and ratchet;
- torque wrench;
- a powerful wrench and extension made from a piece of pipe;
- clean rags;
- wheel chocks;
- low stool;
- assistant or assistant.
It is important! If you are going to change or adjust the king pin, you should carefully read the safety rules and always follow them:
- never leave the car on a jack, always use a safety stand, which is sold in any car store, or a wide, flat block of wood;
- Be sure to support the wheels with wheel chocks;
- never carry out any work under the car alone - if something goes wrong, an assistant will be able to call for help or help you independently;
- do not drink alcohol, do not use narcotic or psychotropic substances before repairing your car.
Step by step guide
We have divided the entire process into separate operations that must be performed sequentially. This will help not only in disassembling the steering knuckle, but also in reassembling it after installing new or adjusting old hinges:
- Place the car on a level surface and apply the handbrake.
- Support the rear wheels with wheel chocks, then loosen the front wheel bolts and jack up that side.
- Place a safety stand under the car and remove the wheel.
- Unscrew the two bolts and remove the plate holding the pads, then pull out the pads.
- Unscrew the two bolts and remove the caliper bracket.
- Unscrew the two bolts, then remove and hang the brake caliper so that the hose is not strained or pinched.
- Unscrew the screws securing the brake disc and carefully hitting the back side with a piece of wood, knock it off the hub.
- Unscrew and unscrew the steering tip nut and remove the pin using a puller.
Removing ball joints
Unscrew the grease fitting or the bolt installed in its place and the 4 nuts securing the bipod to the steering knuckle. Using a hammer, lightly tap the bipod in the area of your fist to move it out of place. Remove the 4 cone washers, then remove the bipod and the shims underneath it. To remove the hinge parts, you will need a special puller, which can be made from a U-shaped profile 5 mm thick. The profile width is slightly larger than the diameter of the outer part of the kingpin. In the center of the puller, drill a hole whose diameter is 1–2 mm larger than the diameter of the hole for the grease fitting. Then take a 5-7 cm long bolt with a suitable thread and nut.
Screw a nut onto the bolt, then place the puller over the outer part of the hinge and screw the bolt into the plug through it until it stops. Tighten the nut until the bolt is completely pulled out of the outer part. If there is no such puller, you can try to pull out the hinge by screwing a bolt with large washers into it and squeezing the washers out with two pry bars, but this method is less effective. Then remove the ball and pull the ball joint out of the steering knuckle, then pull out the inner part of the joint in the same way. Thoroughly clean the places where the pins are installed to remove any remaining old grease.
Dismantling other types of hinges
The remaining types of kingpins are removed in the same way:
- Unscrew the upper kingpin nut, then hit the kingpin pin through a soft metal spacer to make it easier to unscrew the clamping sleeve.
- Using a special key (it is found in many sets of new king pins, and can also be bought at any auto store), unscrew the clamping sleeve.
- They pull out the finger.
- Unscrew the bolts of the rear plate of the steering knuckle and pull out the ball joint.
- Use a screwdriver to pry up and pull out the bearing shell or plastic/bronze cup.
- Thoroughly clean the liner and pin areas of old grease.
Installation of new kingpins
New ball joints are pressed in using a puller for replacing cylinder head guide bushings or a puller for replacing wheel bearings. You can use other pullers that will ensure that the upper and lower parts of the joint are fed strictly parallel to the channel in the ball joint and steering knuckle. Having installed the king pin in the ball joint, fill the space under the ball with Litol or a higher quality lubricant.
The rest of the hinges are installed like this:
- Insert new cups or liners into the ball joint, aligning the protrusions on them with the slots in the support, then slightly recess them by inserting the pivot pin into them and lightly hitting it with a hammer (it is advisable to use a spacer made of soft metal so as not to damage the threads).
- Fill the liner with lubricant.
- Insert the ball joint into the steering knuckle.
- The upper and lower fingers are inserted.
- Tighten the clamping bushings evenly on both sides. Tightening torque 70–100 Nm. After tightening the bushings, the ball joint should rotate with a force of 10–15 Nm.
It is important! Regardless of the type of joint, when installing and tightening, it is necessary to ensure the same distance from the ball joint to the steering knuckle at the top and bottom. Measure the gap using a caliper. The maximum gap difference is 0.2 mm.
Having installed the kingpin and secured the ball joint in the steering knuckle, lubricate the surface of the support with Litol or a better lubricant and install the oil seal, securing it with a metal ring and bolts. Then reassemble everything in the reverse order to what was used during disassembly. Don't forget to adjust the camber and toe.
Sequencing
- The car is installed above the inspection hole, and wheel chocks are placed under the rear wheels.
- A wheel with a faulty kingpin is jacked up and removed using a set of socket wrenches.
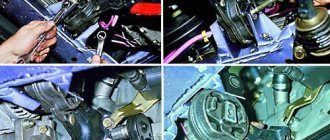
- After removing the wheel, you can get to the nuts of the steering rod bipod, there are 4 of them. The nuts are unscrewed using a 24mm open-end wrench. The wheel is removed, and all 4 nuts on the steering rod bipod are also unscrewed
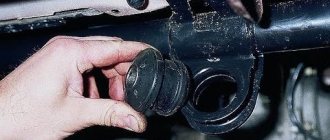
- You should also unscrew the lubrication bolt of the kingpin assembly (it is located in the middle, between the four tie rod bolts).
- Once all the nuts are unscrewed, the steering rod bipod is removed. It is under it that the pivot assembly is located. The bipod has been removed, the top cover of the pivot assembly is visible
- In order to press out the top cover of the kingpin, you should use a puller.
The puller bolt is screwed into the lubrication hole vacated by the bolt, after which the puller nut moves down the thread, pulling the top cap of the kingpin up from the steering knuckle body. The top cover of the pivot assembly is pressed out using a homemade puller. Pressing out of the top cover of the pivot assembly is completed, the ball is visible - Pressing out the bottom cover of the kingpin is also done using a puller, but in order to do this, you will have to go down into the inspection hole. The lower cover of the pivot assembly is also pressed out with a puller
- After pressing out both covers and removing the ball, the steering knuckle body is thoroughly cleaned of dust and dirt, and then the lower cover of the new pivot assembly and the ball are placed in it, the surface of which is pre-lubricated with lithol or grease. The bottom cover must be thoroughly lubricated with lithol before installing the ball.
- Now you need to install the top kingpin cover. Since the new cover will not fit completely into the body, you will have to lightly tap it with a hammer or other handy tool. To install the top cover of the pivot assembly, you can lightly tap it
- Having attached the lid, it should be completely seated. This is best done using the tie rod bipod bolts: the bipod is installed in place and its bolts are tightened, tightly pressing the top cap of the king pin into the steering knuckle body. The steering rod bipod is installed in place and screwed
- The pivot assembly is lubricated through the upper hole (this is done using a grease gun). Then a bolt is screwed into this hole to serve as a plug.
- After the steering rod bipod is screwed on, all that remains is to put the wheel in place and remove the car from the jack.
How to replace it yourself (video)
Stages of replacing king pins on a UAZ
First you need to unscrew the nuts securing the tie rods to the base of the steering knuckle and release the axle shafts from the hub.
Next, you need to unscrew the bolts securing the kingpins and, using a special nozzle, unscrew the fastening nut. The tool to perform this task is usually included with the new kingpins and is also sold separately.
Now you need to remove the oil seal from the rotating mechanism ball, after which you can remove the ball joint and knuckle.
Then you need to remove the old grease, replace worn gaskets, examine the condition of the threaded connections of the fasteners and bolts and replace them with new ones, if necessary.
Installing a bronze liner instead of a plastic one does not require any additional steps. After removing the old part, a new one is put in its place.
When replacing a bearing pin, the old cups in the form of a sphere are removed, the surface of the stock is cleaned, and new bushings are welded using welding, which must initially be correctly aligned to prevent misalignment.
The tapered bearing races included in the repair kit are pressed into these installation parts. Next, fresh lubricant is applied to all mating parts, after which the suspension is reassembled.
The ball joint is installed according to the position of the mounting bolts, and the location of the steering knuckle must be marked initially with a notch on the body or paint.
Before assembly, the pins must be well coated with lubricant. If a modification with bearings is installed, then a conical stop is put on the kingpin, which itself is pressed in at the moment the fastening nut is screwed on.
The pivot assembly must be tightened until the play disappears, after which it remains to make adjustments in the control unit of the car.
Procedure
Adjustment of the pivots on the UAZ Patriot is done as follows:
- We remove the brake disc and caliper, hanging it on some part of the suspension so as not to damage the brake line hoses.
- We release the axle mount and, together with it, remove the brake casing, hub and clutch.
- Using a little force, swaying from side to side, we pull the axle shaft towards ourselves and remove it from the engagement of the front axle.
- We dismantle the steering tips, unscrew the bolts and remove the steering knuckle.
- We install the pivot assembly in a vice and replace the worn liners with new ones.
- We install all the parts in their places in the reverse order.
- During assembly, you need to lubricate the necessary components.
- After the work has been completed, in order to prevent wear of the tires on the car, the camber and toe of the wheels should be adjusted.
- It is necessary to adjust the location of the steering knuckle housing and the pivot mechanism: the permissible gap is no more than 0.2 mm, which is measured with a caliper. The tightening torque should not exceed 250 Nm.
After the car's mileage is 500-600 km and the king pins have settled, they should be adjusted and lubricated again. After lubrication, it is recommended to unscrew and tighten the bolts of the grease fittings to avoid damage when driving off-road.
The front axle of UAZ Patriot cars has pin assemblies and constant velocity joints, which ensure the transmission of torque to the wheels in any position. In order for the unit to work properly, you need to know how to maintain and change the king pin.
Helpful information
If the replacement of the pins on the UAZ Patriot was carried out using bronze bushings, then in the subsequent operation of the vehicle the unit will need to be adjusted. This event must be carried out after 500 km of gentle running-in due to the natural shrinkage of parts. The service life of kingpins is on average 100 thousand km, provided that they are installed properly.
A kingpin on bearings requires the least subsequent maintenance during vehicle operation.
The excellent off-road qualities of the UAZ Patriot depend not least on the special hinges (pivots) of the steering knuckle, so they must be changed and adjusted in a timely manner. Next, we will talk about the different types of hinges installed on these cars, their replacement and adjustment features. This will help you replace and adjust the kingpin on a UAZ Patriot with your own hands.
Theoretical basis
Technical experience shows that the contact area of the mating rotating parts greatly affects the reliability of the pivot mechanism.
In the hinge mechanism, the perfect alignment of the cup and the ball is important. Due to the fact that these parts are produced on different machines by different workers, you should not hope for a good mating result
Therefore, during operation, the hemispherical contact turns into a point contact. This leads to imbalance of the mechanism, the appearance of destructive oscillatory forces and breakdown.
In a bearing assembly, the mating area is the entire surface of the race. A correctly pressed rolling bearing can withstand the required road loads for a long time. The disadvantage is the low resistance to shock stresses that occur when driving over rough terrain.
To eliminate unwanted vibrations after replacing ball pins with bearing ones, the UAZ is equipped with a steering damper.
Installation of kingpins with bearings
Reliable operation of the unit in question depends on the correct installation of all parts. Replacement of factory UAZ Patriot bearings is carried out in case of their wear and play in the turning mechanism. The appearance of gaps indicates the destruction of the plastic elements and the imminent breakdown of the entire pivot mechanism.
To install new elements, you need to remove the front wheel hub with the steering knuckle. On the crankcase of this element there are pin cups that require replacement. They are cut with a grinder and knocked out from the inside of the stocking, the cut area is cleaned. Bushings from a set of bearing supports are welded onto this surface.
It is important that new parts are mounted without distortion
The bearing races are pressed into the supplied cups. The dimensions of the mating parts are designed in such a way that the installation takes place with interference. It is better to check the compliance of the parameters in advance before carrying out work. The bearing is inserted into the cage and the steering knuckle housing is put in place. Don't forget to change the lubricant in the mechanism.
Welded UAZ bearing cup
The support body is secured to the pivot pin by tightening the breaking nuts. Alternate twisting is carried out until there are no gaps. Next, the adjusting washers are put on the finger and adjustments are made.
Steering Damper Installation
The safety mechanism is installed after replacing the pins. The damper is a shock absorber that dampens vibrations in the front suspension. The result is better vehicle controllability and reduced tire wear.
The feasibility of this unit is debatable, but experienced UAZ car owners strongly recommend installing a damper. It is placed on special brackets equipped with silent blocks. For normal operation, the accuracy of the alignment of the mounting holes is important. If the Patriot frequently goes outdoors, it is worth installing the device on the upper steering rod to avoid premature failure.
The steering damper is installed by welding or using clamps. There is nothing complicated in this procedure, you just need to maintain the parallelism of the axes.
Types of king pins
These SUVs are equipped with 4 types of joints, which differ in the type of bearing:
- plastic cup;
- bronze cup;
- steel ball;
- needle bearing.
At the factory, only plastic and ball joints are installed as standard. A bronze cup is installed instead of a plastic one without modifications, so such tuning increases the service life of the kingpin and does not constitute changes to the design of the car. Installing a bearing joint requires major modifications to the steering knuckle and is therefore considered a modification to the vehicle's design.
Adjustment
Before you start adjusting, prepare everything you need: bushings for the axle (if there is a groove on the axle), 4 thrust bushings, as well as oil seals. The main condition for adjustment is that the two halves of the CV joint do not dangle, both during straight-line movement and when turning! The procedure is as follows:
- Take the ball joint and press the bushing into it so that half of the CV joint does not hang out in the ball joint.
- There is a thrust washer on top; be sure to install a new one, even if the old one appears to be in good condition.
- Take a metal shaft (you can make it from a valve, for example) with cones on both sides and put a washer on it with a diameter similar to the central ball, that is, 27 mm. Place one edge against the center of the kingpin. Ideally, the second edge should also be in the center of the kingpin. If this is not the case, place the adjusting washers in the same place where the thrust washers are, or rather, under it.
How to remove old hinges
Regardless of the type of hinge, the basic dismantling operations are the same. To replace or adjust the kingpins, you will need a level area. In addition, you will need:
- jack and safety stand;
- a set of socket and open-end wrenches;
- Screwdriver Set;
- set of sockets and ratchet;
- torque wrench;
- a powerful wrench and extension made from a piece of pipe;
- clean rags;
- wheel chocks;
- low stool;
- assistant or assistant.
It is important! If you are going to change or adjust the king pin, you should carefully read the safety rules and always follow them:
- never leave the car on a jack, always use a safety stand, which is sold in any car store, or a wide, flat block of wood;
- Be sure to support the wheels with wheel chocks;
- never carry out any work under the car alone - if something goes wrong, an assistant will be able to call for help or help you independently;
- do not drink alcohol, do not use narcotic or psychotropic substances before repairing your car.
Advantages and disadvantages of a kingpin on bearings and on bronze liners
Every newcomer among patriots is concerned with the question of which pivot joints are best installed. Among jeepers there is no clear opinion on the need to equip the UAZ Patriot with a steering knuckle with rolling bearings. Replacing a hinge unit with a bearing one is quite labor-intensive and not cheap.
Advantages: 1. They do not require such frequent checking and tightening. If the tension is maintained, they run for a very long time. 2. Low friction even with high tension. 3. Large selection of ready-made kits on sale
Disadvantages: 1. Difficulty in correct installation (more on this later) 2. The 30203 bearing, on which most kits are made, seems a little weak. Although the declared 18 kN load capacity should be enough, purely theoretically. 3. Less resistant under extreme loads 4. Afraid of water ingress. 5. When working without tension, they quickly fail 6. In advanced cases, an emergency failure is possible with destruction of the bearing and jamming
Required Tools
To carry out the work, you will need a washed UAZ car, a pair of jacks, a hammer, a wrench for tightening the adjusting nuts and a set of standard linings. Special equipment is supplied in repair kits for replacing liners and pins or sold separately. The key is a splined pad that fits into the grooves of the clamping nut with its protrusions. For precise tightening, use a click-type torque wrench.
Steps for a simple kingpin adjustment
If small gaps occur, adjustments are made without completely disassembling the rotating mechanism.
- You need to fix the UAZ on a level surface, jack up the front axle and remove the front wheels.
- Remove the protective pads and gaskets on the clamping bushings of the pivot joint.
- Press the pivot pin with several blows to reduce the preload.
- Using a special wrench, tighten the clamping sleeve until any play is eliminated. The broaching is carried out at 10-12º, the tightening torque is no more than 30 Nm.
- Adjustment actions must be performed alternately on the upper and lower supports.
- After this, the force during movement of the steering knuckle is checked, which should be free.
- The clamping bushings are lubricated, then the gasket with a protective cover is installed.
When the Patriot's suspension play is significant and simple adjustment will not help, it is necessary to replace the ball joint liners to avoid its final failure. In this case, the front suspension is completely disassembled and the pivot mechanism is subsequently adjusted.
- You need to remove the brake disc. You can leave it hanging, having previously secured it so as not to break the brake hose.
- Loosen the attachment of the axle to the steering knuckle and remove the entire assembly with the hub, clutch and brake casing.
- Remove the axle shaft by using rotational-translational forces to pull the axle body until it finally exits the front axle housing.
- Unscrew the steering rod ends from the knuckle, remove the mounting bolts and remove the steering knuckle.
- This unit is placed in a vice and disassembled to remove worn liners.
- Then the UAZ front suspension is assembled in the reverse order.
- During assembly, all components are properly lubricated.
When disassembling the rotating device, subsequent adjustment of the relative position of the pivot mechanism with the knuckle body is carried out. It is necessary to check that the ball bearings are accurately positioned relative to the fist; the error may be about 0.2 mm. The total torque at which the adjustment ends is no more than 250 Nm. To do this, you need to use a torque wrench to accurately record the tightening torque.
After work, it is recommended to syringe the grease fittings
After such complex operations, the toe-in of the front wheels is adjusted to prevent wear. After this work, the Patriot should become more controllable and predictable at high speeds.
All procedures can be done with your own hands, but with the obligatory involvement of an experienced partner. The front suspension units on the UAZ are quite heavy, and adjusting the ball joints is more successful with two people. Moreover, you will gain invaluable experience that will be useful when traveling over rough terrain. Necessary repairs in the field will be much easier.
Every car requires regular maintenance and repair of the chassis: traffic safety and service life depend on this. The front suspension of the UAZ Patriot is equipped with kingpins that transmit rotation to the wheels in different positions. Over time, the pivot assemblies become loose, so you need to know how to tighten the pivots on a UAZ Patriot.
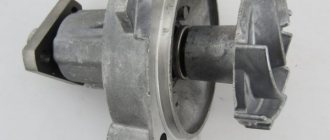
Part Specifications
The king pin is a part in the form of two cylinders of different diameters, machined from a single piece. At the end of the upper (wide) part, in its center, there is a machined channel with a thread for installing a grease fitting. Nearby, offset from the center, a channel of smaller diameter with smooth walls was drilled for installation of a locking pin. On the side surface of the lower (narrow) part there is an annular recess for distributing lubricant. Also, a through longitudinal channel can be made in the king pin to lubricate the entire assembly.
Sectional view of the UAZ Patriot pivot mechanism
The wide part of the kingpin is pressed into the steering knuckle body and fixed with a steel plate (it is held in place by four bolts), and rotation is prevented by a pin. With its narrow part, the pin is installed in a bronze bushing pressed into the ball joint housing. The bushing is calibrated so that the kingpin can rotate in it without jamming. Metal spacers are placed between the wide part of the pivot and the ball joint housing, with the help of which the entire pivot mechanism is centered. To facilitate turning and reduce wear on parts, the pins are installed at a slight angle.
The mechanism with these pins works simply: when performing a maneuver, the steering knuckle deviates from the middle position by means of a bipod, the pins rotate with their narrow parts in bushings pressed into the ball joint housing. When turning, grease from the pin channel enters the groove in its lower part, where it is distributed in the space between the pin and the bushing - this reduces friction forces and reduces the wear rate of parts.
Required Tools
Before starting repair work, the car is thoroughly washed to remove dirt, because... the ingress of dust and small debris into moving mechanisms or lubricant will lead to rapid wear of the installed parts.
To tighten the kingpins on a UAZ Patriot you will need the following tools:
- standard set of special linings;
- set of open-end wrenches;
- heads of different diameters;
- hammer;
- jack - 2 pcs;
- torque wrench;
- a wrench with an attachment for adjusting the pivot units.
A special key can be found in repair kits for kingpins and bearings. If it is not there, you will have to buy it separately. A kingpin wrench is similar to a splined pad with lugs that fit into slots on a lug nut. To ensure accurate tightening, use a torque wrench.