Often, traveling in a car unprepared for winter can result in unpleasant consequences for the driver and passengers, which may require the help of a tow. A snow-covered road or ice significantly reduces the vehicle's maneuverability, so before driving in the snow, it is advisable to equip yourself with snow chains. They will increase the cross-country ability of the car several times. Such equipment can be purchased at a specialized store or you can make wheel chains with your own hands. But how to make snow chains for a car with a minimum of funds? This will be discussed in more detail in this article.
Several ways to increase vehicle cross-country ability
- Installation of all-terrain tires with large and high tread elements on the wheels.
- Putting chains on wheels.
Tires with high lugs have high rolling resistance, which significantly increases fuel consumption. They also make a lot of noise, making them uncomfortable to ride. Riding on chains is even more costly and uncomfortable. To put chains on the wheels, you need to jack up the car. Which is not always possible due to the jack falling into the mud or snow. Therefore, it is quite difficult to put chains on the wheels before going off-road.
Design and advantages of anti-skid bracelets
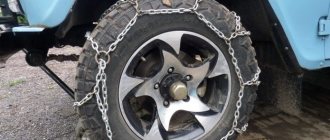
The anti-skid bracelet consists of two pieces of chain with ends connected in pairs and two belts, one with a buckle and the other free. It is put on the wheel so that the chain, forming lugs, lies on the tread in two rows with a small gap between them. The free end of the belt is threaded through the hole in the wheel rim, and after tightening, it is fastened with a buckle on the other side of the bracelet. One bracelet placed on the drive wheel is, of course, not enough to significantly increase cross-country ability. A set of bracelets usually consists of 6 pieces. For a car with one drive axle, this is enough. For an all-wheel drive vehicle, it is better to buy or make two such kits. You need to put on 3 bracelets on each drive wheel at equal intervals. You can buy such kits or make your own. The main advantage of bracelets over chains is that they can be put on wheels without jacking up the car. That is, putting them on before a problem section of the road will not be difficult, and you can move along a good road without them. You can even put them on a stuck car.
The effectiveness of using bracelets is also high as that of chains, since the lugs are formed in the same way.
But do not overestimate the increase in cross-country ability with their help. If the car lands on its bottom in mud or snow, they will not be able to help. The advantages of this device, of course, include low cost and safe operation. If the fastening belt breaks, the bracelet will simply fly off the wheel without causing damage to the body. Some sources note increased rubber wear when using this device. I think that if you don’t ride on bracelets all the time, then wear and tear will not increase.
Oddly enough, in our country anti-skid bracelets are not as widely used as in Europe, which is snowless by our standards. This is apparently explained by the complete ban on studded tires in some countries, and the long-standing habit of drivers to carry such a device with them just in case (such devices have been used there since the 20s of the last century). And the fact that there are roads there that, under certain conditions, are prohibited without such an accessory. Apparently it also plays a role. They even have special road signs that open or close depending on weather conditions.
Varieties of lugs according to geometric pattern
Depending on the geometry of the pattern, there are three types of snow chains:
- "Ladder".
- "Rhombus".
- "Honeycombs".
Each option has its own advantages and disadvantages, so we will consider them in detail.
"Ladder"
The “ladder” is a base in the form of longitudinally arranged branches. These branches are evenly distributed around the entire circumference of the wheel. To secure the chain on the wheel, the appropriate type of locks are used. Externally, this type of lug resembles a ladder, which is where the name comes from.
This lug option is one of the most popular, effective and in demand. Among the disadvantages of this type of chain it is worth noting:
- parallel arrangement of chains on the wheel, so the car will dig in when overcoming snowy or soil areas;
- low lateral stability, which is also due to the parallel arrangement of the chain branches;
- heavy load on the transmission.
Despite the high raking properties, ladder-type chains are practically useless on snowy ground
It is recommended to use chains of this type only when it is necessary to overcome a risky section of the route. This option is one of the cheapest, so when the need arises, most drivers prefer this option without delving into its features.
"Rhombus"
The diamond lug design is a modernized "Ladder" design. For this purpose, there are longitudinal branches that form a diamond-shaped pattern, eliminating all the negative factors that are characteristic of the “Ladder”.
The geometric shape in the form of a diamond is intended for the use of lugs when it is necessary to overcome a snowy or swampy area. The diamond shape is shown in the photo below.
Diamond-shaped chains have increased strength and high traction characteristics
The diamond-shaped shape of snow chains is popular among SUVs and crossovers, since this type of pattern on the lug increases the vehicle's cross-country ability several times. This is especially true for snow-covered and icy road sections.
"Honeycomb"
An analogue of a rhombus are “honeycombs”, which have transverse branches similar to a rhombus, but are additionally connected by straight connectors. Diamond and honeycomb are improved types of lugs, in which the products are in constant contact with the road surface. This is a big plus for both rubber and transmission, so when making lugs it is recommended to pay attention to the last two models.
“Honeycombs” ensure constant contact with the road, therefore giving the car a high level of lateral stability
It is also worth noting that when purchasing snow chains, you need to consider their size. The lugs produced in production are divided not only by size for wheels, but also depending on the type of car.
For those who want to make bracelets themselves
In order to make anti-slip bracelets with your own hands, you need to stock up on some materials. For one bracelet you will need:
- Two pieces of chain, five centimeters long, are greater than the width of the wheel tread. The chain should be such that an M8 screw fits into the outermost link of the segment. The joints of its links must be welded or soldered with copper, otherwise they may be torn during operation. The larger the chain links, the better lugs it will make. But before choosing a chain, measure the narrowest point between the tire and the wheel arch. The chain placed on the tire tread should pass this place without reaching the arch with a good margin. Since if it is missing, if dirt gets under it, it will start to touch the body.
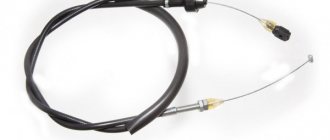
Cargo tie-down straps
The tools you will need are: two open-end wrenches the size of the nuts and bolt heads, an awl and a needle. To find out the tread width, it is not necessary to measure it. This size is indicated on the sidewall of the tire. This designation looks like this: XXX/70 R 14 The first three numbers are the tread width in millimeters.
The chain can be purchased at a professional fastener store or in a regular hardware department. Look for a lanyard with buckles at a climbing equipment store. Once the materials and tools are collected, production can begin.
Take one of the bolts, put a washer on it, and after it the outermost link of one piece of chain. Now put on another washer and tube. If there is no tube, screw in 4 regular nuts and pull the structure through. Put on another washer and the outer link of another piece of chain. Cover the link with a washer, screw on the self-locking nut and tighten it. Similarly, fasten the other two edges of these sections of chain together. After the edges of the segments are connected. Loop the free end of a belt or sling with a buckle around one of the bolts, pull it towards the buckle and stitch it frequently with nylon thread using an awl and a needle. The length of the end with the buckle should be about 10 cm. In the same way, attach a belt or sling without a buckle to the other bolt. For ease of fastening, leave the length of this end longer; if necessary, you can shorten it later.
Bottom line
It is possible to turn any car into a real SUV using chains. The manufacturing process will not take much time, no more than three hours.
The main thing is to choose the materials wisely and carry out the assembly efficiently. If you wish, you can buy this device at a specialized store.
Selection of ready-made bracelets
Choosing ready-made bracelets is easy. Available for sale, they are divided into three size categories: small (for cars), medium (for minibuses and SUVs) and large (for trucks). In order not to be mistaken in size, remember the width of the tire tread of your car, measure and compare the length of the bracelet chains with it. The length of the chains should be approximately 5 cm greater than the tread width. Assess the reliability of fastening the belts to the chains. The fastening of the belts must necessarily overlap, and threads made from natural raw materials should not be used for stitching, since in such conditions they will quickly rot. The stitching should be frequent, in several rows (necessarily with nylon threads). The joints of the chain links must certainly be welded or soldered with copper. Electroplating on these chains is not necessary, as it will still wear off after using the bracelet a few times. Along with steel chain bracelets, there are devices in the form of plastic clamps and rubber tubes, but they are not popular among our car enthusiasts. Since our drivers must have everything iron-clad.
Almost every driver dreams of his car having excellent cross-country ability. In order for a road of any quality to be passable in snow and muddy conditions, the car must have anti-slip bracelets on the wheels all year round. But how to make anti-slip bracelets with your own hands?
What is better chains or anti-skid bracelets?
Bracelets appeared on car wheels relatively recently.
The effectiveness of the bracelets has been confirmed on the most difficult off-road conditions. They help you confidently overcome deep snow and impassable mud. Drivers quickly appreciated the advantages of this anti-skid product, and it quickly became widespread. In some properties, the bracelet surpassed the traditional chain. It consists of two pieces of chain, secured at the ends of two metal pins. Each is fitted with a very durable woven polypropylene anti-slip strap that is threaded through the wheel rim holes. A special lock is attached to the end of one of these belts, which, after being attached to the tire, secures the entire device. The bracelet can be installed on a car with front-wheel drive, rear-wheel drive or all-wheel drive. Thanks to the adjustable dimensions, it can be placed on any wheel and can be combined with cars of most brands.
Several of these products mounted on a wheel provide off-road performance close to the chain. Moreover, their number is directly proportional to the smoothness of the car. Each driver, depending on the road situation, determines the required number of bracelets and wheels for their installation.
The advantages of this tool include:
- the ability to install it on a stuck wheel yourself;
- improving the vehicle's maneuverability on slippery and snowy roads;
- simplicity of design and short fastening time;
- compactness, allowing you to conveniently place several bracelets in the car;
- reasonable price;
- use on cars of different classes;
- versatility, allowing use on wheels of different radii;
- higher level of security than chains.
It is important that the design of this product allows you to make anti-slip bracelets with your own hands. Many motorists take advantage of this, making quite high-quality and reliable devices.
Project of an anti-skid device for a car
We were inspired by last year's research to get creative. Then we chose what was better to buy: chains or anti-slip bracelets. The verdict was that there is nothing to do with anti-slip belts on serious off-road conditions. In addition, the cuffs damage alloy wheels, which is critical for many owners. But the real help in making something with your own hands was the price list for the Konig chain. Last year they demanded about 9,000 rubles for the ZIP Ultra model. For a moment, for the same money a ready-made set of winter tires with above-average quality for the now popular 15-inch is sold. Agree, this is impressive.
Choosing a chain weaving pattern
Before purchasing and making anything, you need to have a project in hand: this principle underlies any serious invention and the tire chain is no exception. When designing wheel attachments that increase your vehicle's ability to maneuver in snow, it is important to choose a weaving pattern that suits your needs.
| Ladder | Honeycomb | Rhombus |
| +The most powerful traction force + Low price + Simplicity of design | +Excellent for storming the rut +Smooth ride on hard ground +Best handling in class +Good lateral grip | +Excellently gets out of ruts + Good handling |
| —Doesn't go well —Worst lateral grip in class —Increased load on transmission units on hard surfaces | —Average traction level | —Rows mediocre —Does not prevent the machine from sliding sideways —High vibration load of the transmission |
| Suitable for driven axle | The best choice for mountain roads and light off-roading | Not recommended for use. Pay attention to the honeycomb or ladder |
Link size
Not just a drawing. The caliber of chain links also determines a number of important characteristics, including cross-country ability and durability. This way, a thin chain won’t last long, but a larger option may not fit into the wheel arch. Strictly speaking, in this matter you should not focus on just one parameter:
- As the caliber increases, traction capabilities in snow and mud improve, the service life of the anti-slip product increases, but rubber wear occurs.
- Small-link snow chains cling to ice well, have a moderate appetite for rubber, but wear out quickly.
This is abstract reasoning. For each class of car, “working” ranges of link sizes have long been determined and, admittedly, they grow with increasing vehicle weight:
- Passenger cars and crossovers: 3.5-6 mm. Our colleagues from Autocomfort have experimentally determined that it is better to equip a two-ton SUV with 6 mm chains. It’s even better to choose an asymmetrical shape of 6x8 mm - then the machine demonstrates everything that it is capable of. As for the smaller size, a 5 mm chain will be too small for those over 2,000 kg.
- Trucks and special equipment: 6-19 mm.
Accessories
When you see branded kits, it becomes clear that the anti-skid device does not consist of one chain at all. The design also provides:
- Two connecting lines linking the chain sections at the back and front of the tire.
- A tightening device that tightly fixes the chain on the wheel (lock).
- Fasteners that fasten metal sections together directly on the tread (connecting rings).
What exactly can serve as one or another component is determined by the budget and range of equipment available. Here are examples for each of the three groups of fittings:
- The best option for connecting lengths of chain on the sides is to use a chain of the same gauge. In this situation, maximum strength and durability are guaranteed. The only thing that discourages this decision is the high cost. This is why the second version appeared - to use a cable for these purposes. A linear meter of cable rope is noticeably cheaper, but it can fray and unravel, and is therefore less reliable.
- The signature chain tie is also made from chain. It is difficult to implement such a solution in everyday life, so turnbuckles and peculiar locks, known from anti-slip devices “Made in the USSR,” have taken root on homemade products. The widespread use of lanyards is due to their availability in retail sales and the absence of the need to make anything with your own hands. At the same time, such a fastening scheme has poor dirt protection. This led to the belief that the turnbuckle was difficult to loosen after several trips. The advantage of the Soviet lock design is reliability and trouble-free operation. However, the lock has only one drawback: it is difficult to manufacture (additional equipment is required).
- The easiest way to connect straight and diamond-shaped sections in the tread area (applies to “honeycomb” and “diamond” weaving patterns) is to use special rings. If it is difficult to get them, then you can get by with a well-known technique: cut the link with a grinder, engage it and weld it with a welding machine.
The listed accessories are the backbone of the anti-slip device. Depending on the manufacturing technology, a number of mandatory parts are selected:
- Cable circuit for linking the chain on the sides of the tire. Additionally, you will need thimbles, shackles and clamps to secure the cable from unraveling.
- Chain linkage on the sides of the wheel. What is needed are plates connecting sections of the chain along the perimeter of the front and rear walls of the tire + removable brackets used on the section of fastening the lock/turnbuckle.
What types of bracelets are there?
A wheel equipped with a bracelet essentially receives a removable tread reinforcement that:
- Helps improve the vehicle's driving capabilities.
- The safety of the car on the road increases.
- Braking becomes more effective.
- Side drifts are minimized.
- Slippage is reduced.
The components of the bracelet can be made of different materials, of different thicknesses depending on the class of the car. So, for buses and trucks, the thickness of the metal from which the chain is made is 8 mm, and the width of the durable fabric tape is about 50 mm. For SUV bracelet chains, there is a 6mm chain and a thick strap to secure it. A passenger car weighing up to one and a half tons has a chain with a bar cross-section of 5 mm and a tape 25 mm wide. Typically, a car set consists of six bracelets. Three for each wheel. This allows you to overcome dirt, sand, snow, clay, and muddy ground. The factory-made kit also includes gloves, instructions for installation and safe work, a rubberized durable drawstring bag or plastic case.
Soft chains
Made from plastic, rubber or polyurethane. The main function here is performed by special linings with spikes.
The most popular are polyurethane snow chains.
The advantages are increased wear resistance, resistance to various chemicals, tensile strength and good elasticity (even at extremely low temperatures).
In terms of its properties, polyurethane is much better than rubber.
Generally speaking, soft chains have a number of advantages:
- permissible speed is up to 80 km/h;
- the level of excess noise is minimal;
- smaller thickness (compared to metal chains). This allows the product to be mounted on cars with small wheel arches;
- minimal tire wear;
- excellent cross-country ability in mud, snow or ice with special metal or plastic studs;
- long service life (if the device is used correctly, it can last for several years).
Flaws.
The main disadvantages include high cost (when compared with metal structures) and “hardening” of rubber in the cold, which complicates installation.
How to make anti-skid bracelets with your own hands
Before you start making such bracelets, you should pay attention to the design of similar products sold.
After this it will be easier to make bracelets. Before starting work, clarify what materials and tools are needed. Determine the total length of the chain, the securing strap, and the length and diameter of the high-strength steel rod for cutting studs. You will need metal tubes that will fit over the stud to reduce belt abrasion. You will also need nuts, washers, locking locks, and buckles. The chain should be selected welded with an anti-corrosion coating, the belt should be made of durable braided synthetic material. Equipment for the job will require tools and materials for cutting chains, cutting threads, cutting and stitching belts.
The purchased material must be marked, checked for correctness of calculations and cut to the appropriate sizes. Cut threads on the studs and prepare metal tubes for them. The shorter pieces of the belt are used to fasten the lock, the longer ones are used to tighten the bracelet. Melt the ends of the belt. At one end of each belt, make a loop with stitching into which the tube should fit tightly.
After this, directly make anti-skid bracelets with your own hands. First you need to prepare the studs. Place the tubes onto their greased surface. Then secure the end links of the chains on both sides of both studs using nuts and washers. A lock is placed on the short part of the belt. The long part is passed through the hole in the disk and connected to the lock from the outside.
The first product is mounted on the car, where its functionality and absence of contact with the parts of the brake mechanism are checked. Usually this is 2-3 pieces per drive wheel. If you do this in your free time from work, then in 3-4 days the machine can be equipped with a complete set.
Features of installation on a car
Making chains is only half the battle. Now you need to install them correctly on the car. There are several ways to do this. The first of them involves jacking up the car. To do this, the driver should perform the following manipulations:
- Before an obstacle, you need to stop on a hard surface, then set the car in first gear and squeeze the handbrake;
- Using a jack, you need to hang up the part of the car on which you plan to install the chain;
- As soon as the wheel is hung, you should begin installing the lug;
- This process usually takes about 10-15 minutes for one wheel. In this case, you need to make sure that the chain is securely fastened.
The product is installed in a similar way on the second side and, if necessary, for all four wheels. The second option involves installing a chain without lifting the wheels:
- You need to stop, and then place chains on both sides in front of the wheels.
- Drive the chains to the middle of their size.
- Secure the product from the inside with a hook or carabiner.
- Straighten each link, then connect the tension adjuster.
If there is no jack, it is possible to run over chains lying on the ground
This option seems simple, but in reality it is not. After installing the chain on the wheel, you need to drive a few meters and then adjust the tension. Then you can storm the obstacles.
How to mount bracelets
To skillfully handle anti-skid devices, it is better to install and remove bracelets in the car in advance in a calm environment. You should always remember that the bracelet is a chain, and any damage or breakage can damage the car and cause other troubles.
Using a homemade device requires taking into account the following circumstances:
- Before starting and during movement, make sure that the bracelets are securely fastened;
- they cannot be used on asphalt and concrete roads;
- you can move on them only after proper installation;
- use gloves when installing and removing;
- When starting to move, keep a safe distance;
- do not allow the wheel with the bracelet to slip.
Anti-slip bracelets can be installed on both stamped and regular wheels. Self-made anti-slip bracelets require special attention. They should be used in small off-road areas. At the same time, we must remember that they are of no use on loose sand. If the car is all-wheel drive, with a free center differential, each wheel must have the same number of bracelets. If the interaxle locking is enabled, they can be installed on the same drive axle. When traveling frequently on difficult roads, every few kilometers you should check the condition of the fastening and tighten the belt.
How to properly put chains on wheels
Spread the chains out on a flat surface in front of each wheel. Moving at minimum speed, drive onto the prepared devices so that the wheels are fully seated on them . Fasten all the carabiners and put on the tension adjusters.
If there is not enough space, it is possible to “dress” the wheels one by one with anti-slip equipment using a jack .
Be sure to check the chains for damage and twisting.
Installation method without jacking the car
Before you begin installing a homemade chain on car wheels , you should carefully lay it down, preventing the links from twisting. Next we proceed point by point:
- Drive the drive wheel onto the product.
- Put the car on the handbrake.
- Place the chain so that the tensioning device with hook and carabiner is on the outside.
- From the inside, connect the hook and the last link of the longitudinal element.
- From the outside, place the carabiner coupling onto the tensioning mechanism and secure it.
- Distribute the transverse parts and tighten them.
Installing a chain on car wheels with your own hands using a jack is similar to the technology described above, its only advantage is that it makes the task easier. For a better installation, you must first reduce the tire pressure, but after the operation do not forget to restore normal parameters. This procedure will allow the product to fit as tightly as possible to the tire.
How do they travel with them?
Even the best anti-skid devices, which are made by yourself, are not a panacea for off-road conditions.
A car equipped with bracelets requires special attention. A lot depends on what kind of surface the road has. On a slippery, steep climb, in mud and clay, or in dense snow, the bracelets perform well. Attempts to use them in sand or loose snow may not yield results. If in the summer the car gets stuck in a high rut or the body sits on the ground, then there is a high probability that the bracelet will be useless. Moreover, the wheel dressed in it will sink more and more into the ground. Here you will need a shovel, a winch, a tow rope and a tractor. Similar problems arise in winter, when the snow is loose and the temperature is close to zero. The bracelets turn out to be useless, digging a hole under the car.
It is also important to strictly observe the speed limit when driving with an anti-skid device. It is unacceptable to drive with bracelets on snow or ground at a speed of more than 40 km/h. If you have rocky or icy ground under your wheels, you must drive especially carefully at a speed of no more than tens of kilometers per hour.
Service
Sometimes making such products yourself is easier than caring for them regularly. A car with bracelets in the trunk regularly overcomes off-road conditions with their help. After this, the bracelets are thrown back into the trunk. Once again it turns out that the chain on them is rusty, the belt is torn, and the lock does not hold it. In addition, the tire where it was placed shows signs of wear.
Therefore, you should adhere to several basic rules for caring for the work of your hands:
- keep bracelets in a dry and clean place;
- after use, remove dirt and wash;
- check belts, chains and locks;
- lubricate and tighten the nuts;
- replace worn belts;
- Avoid contact with moisture, fuel, acids.
Anti-skid bracelet and its types
Simply, a bracelet or chain is just an additional protector that can be removed at any time, just as it was installed. As quickly and simply as possible. Despite the simplicity of the device, there are quite a few design solutions for these bracelets and chains. You can choose it for both light snowy conditions and deadly mud and deep snow. Considering, of course, the capabilities of the machine. Due to the large lug, the bracelet helps to overcome even rocky, icy slopes or bare ice and increases the vehicle's maneuverability many times over.
Anti-slip devices are divided into two types:
There can be one chain that wraps around the entire wheel, and the bracelet can consist of separate plastic or reinforced strips. There can be from one to five or six such stripes on each wheel.
Materials and features of bracelets
Devices can be made of different materials, but the most common ones are:
- devices made of durable alloy steel;
- reinforced rubber fibers;
- polyurethane;
- bracelets made of high-strength plastic.
The more severe the road conditions, the more rigid the design of the device should be and the stronger the material should be. So, for shallow snow on hard compacted soil or asphalt, softer lugs are used and speed limits may not apply to them.
The use of traction control devices also depends on the diameter of the vehicle's wheels. Depending on the nature of the coating, choose a lug pattern: for deep snow it is more advisable to use a ladder; honeycombs and diamonds with a smaller pattern are intended more for icy roads.
Benefits of anti-skid bracelets
A snow chain is good in those places and conditions where you don’t have to remove it for a long time. This is due to the fact that the chain is usually thicker and more massive than bracelets, and its installation takes a long time. It all depends on the design, but massive chains are not profitable to take off and put on several times a day. The bracelet can be left on even on the asphalt, so you can put it on in comfortable conditions and drive along a good road to the off-road destination fully armed.
Also, bracelets are more financially profitable than chains, since the chain itself will cost several times less to make a bracelet, fewer parts are needed to fasten the elements, and such a device is much easier to install than chains, which is why we decided to make an anti-skid bracelet with our own hands.
Making an anti-skid bracelet
In order to assemble a set of bracelets, it will be necessary to choose a good chain. it must have welded rather than soldered link connections. This can greatly affect the strength of the structure in harsh conditions. The thickness of the lug is selected arbitrarily and the size of the chain link will depend on the size of the fasteners - bolts, nuts and washers.
The whole design consists of three bracelets for each wheel. Bracelets are fixed separately from each other, their number can also be regulated by traffic conditions. Each of the bracelets tightens the rubber and disc, the metal, chain part is closed with the help of straps on self-tightening buckles.
There are a lot of such rigging belts in construction stores; you can choose any one, both in width and thickness, not to mention the material. The belt itself will not be in contact with the road; its task is simply to tie and secure the chain bracelet.
Manufacturing technology
First, the chain is divided into equal parts in accordance with the number of bracelets that are planned for installation. To do this you just need to take into account the thickness of the wheel. For example, for 215 tires, two pieces of chain of 15-17 links each will be enough. everything is calculated empirically, the main thing is that the chain segments are the same.
When the chain is divided into segments, the bracelets are connected in two pieces of chain using a bolt with a diameter corresponding to the size of the link and a length of 50 mm. To ensure that the ends of the chain are fixed and do not move while moving along the bolt, either a bushing of the appropriate length is put on it, or nuts are screwed on so that the end of the second section of the chain is firmly attached.
It is better to use a self-locking nut or flare the thread to prevent spontaneous unscrewing. When the bracelets are ready, their ends go around the wheel and are connected with rigging straps.
After installing the device on the car, it is recommended to drive a couple of hundred meters and check the strength and reliability of the structure. Naturally, with bracelets, the maximum speed will be limited at the discretion of the driver, but it is not recommended to exceed the barrier of 50-60 km/h on a flat road, and to stick to 20 km/h on off-road roads.
So a simple device can make any road passable and any point accessible all year round. Do not exceed the speed limit with bracelets, and have an easy road for everyone!
Things to remember
The use of anti-slip chains is prohibited when driving on hard-surfaced roads (concrete, asphalt). In conditions of loose snow or soil, it is recommended to maintain a speed of 10-20 km/h. Wheel slip must not be allowed.
After installing the anti-slip device, after driving the first 100 meters, you should stop and check the reliability of its fixation, as well as the tension around the entire perimeter. A poorly tensioned chain can cause damage to suspension and steering components.
Sources
- https://carnovato.ru/cepi-protivoskolzheniya-svoimi-rukami/
- https://remontautomobilya.ru/cepi-protivoskolzheniya-svoimi-rukami-poshagovaya-instrukciya.html
- https://autostadt.su/tsepi-protivoskolzheniya-svoimi-rukami/
- https://autoclub.su/samodelnye-cepi-na-kolesa/
- https://sdelairukami.ru/kak-sdelat-tsepi-protivoskolzheniya-na-kolesa-za-15-minut/
- https://avtoshark.com/article/ratings/accessories/rejting-brasletov-protivoskolzheniya/
- https://zen-Top.ru/top-cepej-protivoskolzhenija/