Many owners of the practical domestic small car Lada Kalina eventually face the nagging question of how to remove the instrument panel?
Over the years of operation, the car we are considering has revealed some shortcomings, among which the dashboard is hidden. This interior component annoys the owners of Lada Kalina with squeaks and other noises while driving, and even “does” this with enviable consistency, so many often ask the question: how to remove the instrument panel. Assemblers and manufacturer inspectors make it a priority during the production run to ensure correct clearances. Here it seems that few people are interested in the quality of the panel’s fit and the reliability of its fixation.
This does not stop stubborn owners, and they independently remove the dashboard in order to eliminate these annoying “participants of the interior orchestra”; the main thing is to know how to remove the instrument panel. Removing this product is quite difficult, so we recommend that the subject who dares to undertake such an experiment study the manuals, including the material presented here.
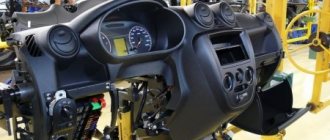
The work itself involves following several mandatory steps, and the removal of each of the structural elements, including the removal of the torpedo, must be performed with extreme caution.
How to remove the dashboard and instrument cluster on a VAZ 1117-1119 Kalina car
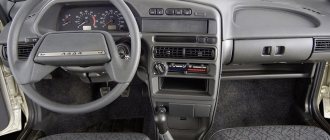
VAZ 1117 "Kalina" is one of the most popular cars from the domestic manufacturer - AvtoVAZ. In principle, there is nothing surprising in the popularity of the Kalina, because this particular model has become a kind of symbol of the new vector of development of the Russian automobile industry.
But today we will leave aside the production directions of AvtoVAZ and the popularity of the Lada Kalina. Let's talk about the process of removing the instrument cluster from this car, as well as the dashboard (dashboard). As for the need to carry out such measures, everything is simple: firstly, dismantling may be necessary to repair certain faults, and secondly, to modernize standard parts, that is, for tuning. By the way, you can read about tuning the VAZ2117 dashboard here.
Removing the instrument cluster Lada Kalina
Work on removing the instrument panel is carried out in the following sequence:
Let's sum it up
In addition to the irresistible desire of LADA Kalina owners to defeat the “crickets” in the panel, there is another reason for removing the structure, this also applies to the removal of the torpedo. This is a noble goal of tuning, especially since now many people know how to disassemble the instrument panel.
The domestic manufacturer has deprived the LADA Kalina of a chic design and quality of panel material with a variety of lights and electronic gadgets. The diehard owners did not give up here either, and boldly installed fashionable instrument panels with a neon glow into the standard design, repainted individual components, installed lighting (including for the feet), and also performed a great variety of modern “tricks.” The main thing is to achieve a good fit of the parts and the panel will thank the owner with a soothing silence.
How to remove the instrument panel on Kalina yourself?
How to remove the panel on Kalina? This question is asked by almost all car enthusiasts who have purchased a new or used AvtoVAZ car. Lada Kalina is an almost legendary car; there are a lot of jokes and stories about it. Of course, listening to all this is quite exciting, but when you yourself are faced with one of the comic problems, it’s no longer funny.
Kalina has many different flaws, and one of them is the dashboard. At the factory, its installation is carried out manually, which can later cause squeaks, unpleasant noise and other annoying sounds during a trip. They check exclusively the gaps, and rarely pay attention to the quality of the torpedo connection.
Because of this, many owners try to remove the panel themselves to eliminate the source of the noise. But this is not so easy to do either. Removing the instrument panel is carried out in several stages, and everything should be disconnected extremely carefully.
Rules for choosing an audio system
Before you begin installing the radio on Kalina, you should select it at a car dealership or hardware store. The choice should be approached carefully and carefully. And before going to the store, it is better to decide on your desires and capabilities.
When choosing a radio for your car, you should decide which music media will be used as the main one. This will help you save some money. If, for example, a car owner is sure that he will not need a CD or cassette player, then why should he overpay for a radio with these functions.
For those choosing CD players, there is one minor drawback that manufacturers are trying to combat - the loss of music fragments due to shaking during a trip. But progress does not stand still, and the mechanics are improving. The presence of ISO in the car and, accordingly, in the audio device will simplify the connection. The presence of a USB adapter will allow you to play music from various media.
Pioneer model range
When choosing a car radio, you should pay attention to the power ratings. They have a maximum and minimum threshold. Maximum power is rarely used, except in extreme situations. The choice should be made according to the rated power, that is, the one that is used most often. Manufacturers often indicate only maximum values on packages, so when choosing, you need to carefully study the instructions (passport), and not the box.
Read also: Nissan Teana test drive video
It is also worth paying attention to the control panel. It should be extremely simple and convenient, since it will most often be used while moving. Intricate designs can distract from the road. Convenient and understandable buttons and adjustable backlight brightness will only be beneficial. It is imperative to check the range of perceived frequencies. Since radio stations mainly broadcast in the range from 80 to 110 MHz, it is better that the tuner also has this range.
Pay attention to the number of outputs to the speakers and the resonant frequency, it should be lower.
How to remove the panel on Kalina 2 (VAZ 2192, 2194)
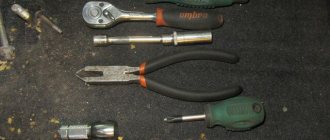
h3 >Removing the Kalina 2 dashboard Required: Disconnect the negative terminal from the battery. For Kalina 2 vehicles with air conditioning, unload the refrigerant from the air conditioning system in accordance with the operating instructions for the service equipment. Prepare a 8-point, 10-point, 13-point, 21-point socket, a Phillips and a flat-head screwdriver.
Unscrew the two bolts (No. 2) securing the thermostatic valve (No. 1) of the air conditioner using a 10" socket.
Unscrew the nut (No. 7) securing the heater using a '10' wrench. Loosen the clamps (No. 4 and No. 6) using the '8' socket. Disconnect the outlet (No. 3) and inlet (No. 5) hoses from the heater radiator. Remove the cabin filter.
Remove the four screws (No. 1) securing the heating and air conditioning system air intake using a Phillips screwdriver.
Remove Kalina's beard 2. Unscrew the bolt (No. 1) securing the parking brake lever, remove the bracket (No. 2) of the handbrake limit switch using a 13-inch socket.
Unscrew the two bolts (No. 2) from the right and left sides that secure the pillar (No. 1) of the instrument panel cross member to the floor tunnel, using a 13-inch socket. Unscrew the nut (No. 3) of the ground wire of the instrument panel harness using a 10mm socket. Under the front seats, unscrew the nut securing the air duct (No. 4) for heating the interior using a 10mm socket. Remove the air duct.
Remove the steering column
How to complete a manual (classic method)
- According to the factory instructions, the work of dismantling the heating device takes from three to six hours, including the preparatory stage. Below we briefly analyze the main stage of dismantling the heater. You need to start by disconnecting the negative terminal of the battery. Before removing the heater, you must disconnect the negative terminal of the battery.
- Second step: remove the windshield frame trim. We remove the battery and air filter housing along with the air duct. According to the instructions, you need to remove the windshield frame trim
- Remove the battery from the engine compartment.
- The next step is to disconnect the radiator hoses, which will drain the coolant and go under the car. Before draining the coolant, disconnect the heater hoses.
- Then you need to unscrew the bolt securing the heater to the partition of the engine compartment. Disconnect the heater
- Last step. Remove the heater cover and heat exchanger. The radiator is located under the dashboard in a plastic housing, so in this case the console and front seats must be removed from the passenger compartment. In addition, the main stage of work, in addition to removing the torpedo, is preceded by the dismantling of the steering column, power steering and central tunnel.
Sound insulation of Kalina panel/dashboard
| The disease of Russian cars is rattling, crickets and squeaks, and the LADA Kalina panel is no exception; it is also made of inexpensive plastic, like the rest of the interior elements. Let's figure out how to soundproof Kalina's instrument panel without removing or dismantling it. |
If you decide to make soundproofing for Kalina yourself, then you will have to buy:
- Anti-creak (modelin).
- Vibrating material (for example, STP).
- Plastic clamps.
- Hot-melt gun and hot glue.
- Bitoplast or splen, optional.
Instrument panel Kalina, sound insulation without removal
There is no need to remove the dashboard assembly, but you will have to remove the attached elements. As a result, you should see something like this:
Stove radiator design
A car's heater consists of a housing with dampers and a metal radiator with pipes. Two types are installed: copper and aluminum. Each has its own advantages:
- Copper heaters have lower thermal conductivity, they heat up more slowly and also give off heat. Their reliability and maintainability are higher; the radiator can always be soldered.
- Aluminum is valued for its fast heating and good heat dissipation, low price and light weight. But if there is a leak, it is impossible to repair it.
Soundproofing Lada Kalina dashboard
When I picked up the car from the cabin, I heard some noises from the dashboard, so I already knew what I needed to do. I waited until the noise became unbearable and decided to soundproof the front panel of the Lada Kalina with my own hands.
What you will need:1. Madeleine is a whole topic! Can be used everywhere - universal anti-creak!2. Thermal gun with rods.3. Straight arms - as always.4. Lots of time and patience!
Do-it-yourself soundproofing of Lada Kalina dashboard:
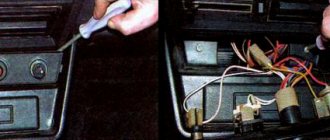
1. Disassemble the panel. We have already published a guide on the site on how to remove a torpedo on a Lada Kalina.
2. He took off his beard and tidy. I removed unnecessary parts from the panel.
3. We remember where all the wires came from. I filled all the connectors on the wire side with hot glue from a gun so as not to make noise.
4. Removed the shelf from the panel. That's how it was for me before Shumka.
5. Looked inside from the tidy side. There's a lot of dust.
6. So I finally removed the panel!
7. Dust, fear and horror when looking at the photo!
8. I wish I could put everything back in place and have no extra screws left! Dreams Dreams…
9. Now the panel is pulled off. I glued the panel itself from the inside with madeline (anti-creaking agent) in the right places in the beard area. STP didn’t bother gluing it - it didn’t bother him at all...
10. I taped the air ducts at the junction points.
11. I taped the wires with Madeleine.
Removing and installing the panel (dashboard) of Kalina with heater
Depending on the year of manufacture of the car, it may be possible to remove the Kalina panel with or without a heater. In this article, dismantling a dashboard with a stove:
Required tools: Phillips and flat head screwdrivers, 8 socket, 10 high socket, 13 socket. Disconnect the negative terminal of the battery. Drain the Kalina coolant.
From the bottom of the car, loosen the clamps ("8" socket) and disconnect the hoses from the heater radiator pipes passing through the front panel. Unscrew the nut securing the heater to the front panel using the high "10" socket. Remove the Kalina cabin filter. Unscrew the 4 screws securing the filter housing using a Phillips screwdriver.
Unscrew the nuts securing the Kalina steering column and lower it to the floor. Remove the central tunnel.
Disconnect the wire ends from the brake light switch. Disconnect the 7 connectors with the wires behind the fuse block. Unscrew the bolts securing the console brackets to the floor tunnel on both sides, using a socket “13”. Unscrew the nuts securing the air ducts for the rear passengers under the front seats, using a socket “ on 10".
Remove the pillar covers by snapping off the plastic clips.
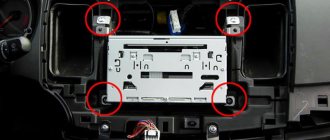
Remove the end cap from the left and right sides of the instrument panel using a flathead screwdriver. Unscrew 2 bolts securing the instrument panel on both sides, with a “13” head. Unscrew the self-tapping screws of the right and left fastenings of the front trim of the instrument panel using a Phillips screwdriver. Remove the front trim of the instrument panel, overcoming the resistance of 7 spring holders. Location of the holders for the Kalina panel trim. Unscrew the 7 instrument panel nuts in front of the windshield using a 10mm socket. Unscrew the 2 bolts securing the instrument panel cross member to the pedal bracket using a 13 socket. Unscrew the third bolt securing the instrument panel crossmember to the pedal bracket.
Kalina Torpedo (rear view):
1 — heater fan electric motor; 2 — heater fan casing; 3 — air recirculation damper; 4— air ducts; 5 — heater casing; 6 — inlet pipe of the heater radiator; 7 — heater radiator outlet pipe
Unscrew the 2 nuts (under the windshield) securing the instrument panel cross member to the body using a 13mm socket. Remove the end of the “mass” wire from the stud. Disconnect the wiring block from the Kalina ECU.
Move the rear passenger air ducts towards the rear of the car, disconnecting them from the heater. Move the Kalina instrument panel away from the front panel and disconnect the block from the wires behind the heater. Remove the dashboard assembly with the heater from the passenger compartment.
Installation of the dashboard is carried out in the reverse order. When installing, make sure that the heater radiator pipes fit into the hole in the front panel. We pour coolant into the cooling system and bring it to normal. See also, removing the Kalina panel without a heater.
| If you decide to soundproof the engine shield, or tuning the panel (re-tighten or paint), then carefully study the instructions on how to remove and install the Lada Kalina panel with your own hands. |
Without removing the windshield
In this case, the windshield protective cover and cabin filter remain in place. Roughly speaking, there are fewer preparatory operations. But the algorithm for the main stage of work is radically different from the traditional one. It looks like this:
- Disconnect the accelerator pedal cable.
- We remove the pedal.
- We are dismantling the sensor for turning on the rear parking lights.
- We disconnect the brake pedal from its drive by disabling the clamp and the metal pin.
- Remove the steering column.
- Remove the trim on the left side of the dashboard.
Operation algorithm
Started:
Note that the overlay is attached using iron buttons;
They are located on both sides of the emergency system key;
Let us note right away that it is easier to remove the panel through the passenger door. As for the method of draining the coolant and removing the stove, everything is done almost the same, except with some nuances. After the sound insulation has been carried out, we install the panel in place. Don't forget to first pass the block with wires for the switch. We also insert the glove compartment light in advance, using the appropriate holes. Thus, the operation can be considered complete. Having learned how to remove a torpedo on Kalina, you can safely take on this work, even without the help of an assistant. On the other hand, an extra pair of hands certainly won't hurt.
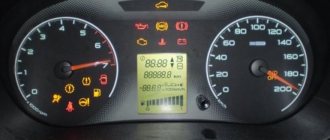
Replacing dashboard light bulbs Lada Kalina video instructions
Lada Priora Hatchback Black Bunny Logbook Wheels R15 Kalina 2cross on Priora. Part 2
Hi all. Today we will replace the dashboard light bulbs on the Lada Kalina. On Kalina, the light bulbs in the dashboard are not reliable. We decided to write detailed instructions for replacing them to save you money on repairs.
We will need:
- short flat and shaped screwdriver
- long flat and figured screwdriver
Step-by-step replacement of dashboard lamps Lada Kalina
1. Lower the tongue and move the steering wheel down.
2. Unscrew the two marked screws for a shaped screwdriver.
3. After unscrewing the screws, pull the dashboard frame towards you by hand; it is latched.
4. Lower the panel frame with the top edge towards the steering wheel and pull it out.
The clips on the frame are practically disposable; before disassembling it is better to immediately buy new ones.
5. Unscrew the two screws on the sides of the instrument panel. Take a long flathead screwdriver.
6. After unscrewing the screws, lower the top edge of the dashboard down and turn it slightly to the right.
7. Use a screwdriver to pry off the clamp of the dashboard power connector.
After hooking it up, use your fingers to lift the latch slightly up and move the ear of the latch to the other side. I advise you to watch this on video so as not to break it.
8. After you move your ear away, the connector will come free. We remove the connector.
9. Remove the dashboard from the landing site.
10. Engineers have thought out how to replace lamps without unscrewing the back cover of the instrument panel.
11. Change the necessary lamps. In order to pull out the light bulb, you need to grab it by the body, turn it to the left and pull it out towards you. Next, remove the old one from the case and install the new one. Well, all that remains is to install the housing with the new lamp into the panel. To do this, insert and turn to the right.
I would like to note that the lamp that illuminates the liquid crystal display is not removable; it is soldered into the panel.
12. After replacing the lamps, insert the panel into place and connect the power connector. After installing the connector, lower the latch.
13. Raise the dashboard and get into the grooves. The grooves are located on the sides of the bottom of the dashboard housing.
After installation in the grooves, tighten the two fastening screws on the sides.
15. After checking, we continue assembly. If you have intact clips, you are lucky; if not, we change them. You can see the replacement of clips in the video.
16. Insert the panel frame and snap it into place. We insert it as we removed it.
17. Tighten the two screws at the top and the job is complete.
We also recommend:
How to choose a new radiator
Before changing the heat exchanger, you need to select a new one. Particular attention should be paid to the material.
Based on this feature, radiators are divided into two types:
- Aluminum. Has lower thermal conductivity. If damaged, it cannot be soldered, but it costs much less. The vast majority of experts advise choosing this one.
- Copper. It is generally accepted that this heat exchanger is better. Its advantages are high thermal conductivity and maintainability. There is only one drawback - the price.
The heat capacity of the model does not play a decisive role; aluminum is more than enough to heat the interior. Maintainability, in modern times, is a dubious advantage; hardly anyone will solder. The quality of the radiators is approximately the same, so there is no point in overpaying for copper.
car dashboard skills
If you are tormented by squeaks while driving and you are thinking about disassembling the front panel of a Lada car, Kalina, the following instructions will come in handy.
To dismantle the torpedo you will need the following tools:
- short Phillips with screwdriver handle;
- slotted (minus) screwdriver with a short handle;
- tubular wrench 10;
- marker.
In addition, you will need a little patience and accuracy when performing the work.
Algorithm of actions when disassembling and removing a torpedo.
First you need to bend the rubber seals of the front doors from the A-pillars. After this, you need to remove the plastic lining of the front struts. Each of them is held on by 3 clips. slotted Use a screwdriver as a lever. Next, you need to unscrew the screws securing the upper front (as you move) panel trim. There are 2 of them: one on the right, the other on the left, both are located near the racks
After this, you need to remove the upper front carefully, pulling the cover towards you. It is not secured with self-tapping screws; it is held in place by clips at the front.
When removing, try not to lose the panel. Then you need to unscrew all the screws and remove the trim on the side air ducts.
You can now begin dismantling the center console.
- You must first remove the ashtray. To do this, just pull it all the way back (unscrew it as you go) and use 4 self-tapping screws that secure it to the then.
- you need to pry the console with a screwdriver and pull out the plugs located to the right and left of the emergency button.
- To signal this, you need to unscrew the 2 screws located under the plugs located and securing the center console. Now.
- From below you should carefully pull out the console and disconnect all the wiring from it, having previously marked with a marker what is attached where. If you don’t have a marker, you can take a picture with your phone of which wires go where.
- After dismantling the center console, you need to unscrew 2 bolts and 5 screws and remove the steering column casing.
- Then you need to unscrew self-tapping screw 2 and dismantle the outer cover of the combination Next.
- instruments, you need to unscrew all the fastenings of the instrument panel from above using a 10mm wrench.
- After this, you need to tear off the lock washers on which the heater air duct is seated, unscrew the remaining screws securing the instrument panel, and remove it by pulling it towards you.
How to remove the center console in a luxury package
Let's say it was decided to dismantle the panels located on the center console. You can see that there are two of them. One is the front panel of the air conditioner, the second protects the radio and contains air duct grilles in its design. These two parts are not connected to each other. However, it will not be possible to remove the radio panel unless you first remove the climate control panel. Below it are metric screws (A, B) that secure the media center shield from below.
Central console of Kalina-2, Luxury package
The question arises, why are we even talking about how to dismantle the center console, since after this the car can be removed from warranty? Usually the shield is removed to install additional equipment (for example, a rear view camera). But connecting any equipment, the use of which has not been agreed upon with the dealer, will void the vehicle warranty. If you haven't changed your mind yet, continue reading.
The climate control shield is held in place by 4 clips, which are located on the bottom and top sides of the part closer to the corners. Having disconnected even two clips (1, 2 or 3, 4), you can try to pull the panel towards you to dismantle it. But if you have no experience working with such a mount, it is better not to try - you may scratch the outer surface of the shield. In fact, all you need to do is use a flathead screwdriver (some people use a thin-bladed knife and a screwdriver).
To dismantle the climate control panel, you do not need to first remove the control knobs located on it, if we are talking about the “Lux” package. The same applies to the “Norma with climate control” package. In all other versions, a stove control unit is used, the design of which does not allow removing the shield without first dismantling the handles. Be careful.
If the climate control panel is removed, all that remains is to unscrew two bolts and just as carefully remove the media center panel. Additionally, this part is secured with nine clips:
- Two clips are located at the level of the border of the air duct grille;
- Three clips on each side board are located at equal distances;
- Three more clips can be found on the top side (the windows they fit into are circled in the photo).
Based on the information listed above, you can try to dismantle it yourself, but it is still better to entrust this work to a specialist. It is advisable not to use a hammer, chisel, or grinder when performing any actions, as shown in this video. However, here we are talking about the “Norma” configuration, which we will talk about further.