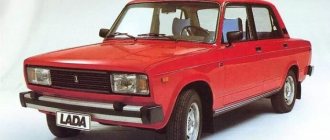
Compared to other VAZ cars, the Lada Priora has a more modern design and fairly high-quality materials. The panel is made of Soft Look plastic and has a convenient instrument cluster. However, there are also disadvantages, for example, the backlight could be more effective. Therefore, many drivers decide to tune the Priora instrument panel.
Standard instrument panel - article number and price
The original car tidy exists in three types.
- the first is an option for a pre-restyling car;
- the second panel is for a restyled car;
- and the third is the “Lux” option for the restyled one, which has become faintly similar to all previous torpedoes.
Each of them contains standard elements such as a tachometer, so their functionality does not decrease. . Who wants to do tuning of the instrument panel, this option is for them.
Priora first generation
The instrument cluster for the first generation Lada Priora received catalog number 2170-3801010. Cost – about 6,000 rubles. Everything is standard with it - from left to right there are four arc scales with red arrows: odometer, speedometer, coolant temperature, fuel level. Below the speedometer there is a small on-board computer display, and above the arches are all the indicators, including the direction indicators.
Priora 2
For the Priora “Lux” variation there are two more “subtypes” - with or without a CAN bus. Different subtypes were made so that the panel could be connected to any car. Catalog number – 2170-3801010-50 without tire, 2170-3801010-60 with tire. It is distinctive in that it contains an elongated display with a screen that can highlight the navigator.
The catalog number of the combination for the “Norma” assembly is 21720-03801010-20. Cost – 6,500 rubles. Like the “Lux” version, it received a brighter speedometer and odometer, and the coolant temperature along with the fuel level indicator is hidden at the bottom of the speedometer and odometer. The base will not create a route on the display, but will show all the information in color.
Decor of plastic components
The sedan is equipped with a lot of plastic parts in the interior; fortunately, many of them have light colors and can be easily repainted. The process of painting plastic from an aerosol can requires not only a respirator and gloves, but also a degreasing liquid and a primer. During operation, it is important to prevent the formation of drips.
Another way to improve the appearance of plastic elements is to cover them with carbon film. According to many car enthusiasts, this material is durable and looks impressive. The blanks are cut with a margin of 20-25 mm at the edges, after which the film is glued to a degreased surface. Edges and curves are blow-dried to prevent kinks and kinks.
Code meanings for self-diagnosis
How to reset the on-board computer settings of a VAZ 2114
Using the on-board computer, the driver can determine the following faults:
- Code “ 2
” – excessive voltage in the on-board network. To eliminate it, you need to check the main electrical circuits; - The number “ 3
” indicates a malfunction of the fuel control indicator; - «4
» – problems with the refrigerant temperature sensor; - The number “ 5
” means incorrect operation of the environmental indicator; - Code “ 6
” means engine overheating; - «7
» – critical lubricant pressure; - The number “ 8
” indicates a malfunction in the brake system; - «9
» – signals that the battery is low; - The " E
" symbol indicates a problem with the packet data.
It is worth noting that if the BC options switch key is inactive for more than 10 seconds, the instrument panel will return to normal operation.
In what cases is it necessary to remove the instrument panel?
On-board computer errors on Peugeot 308: codes and decoding
Dismantling the Priora tidy is required for tuning or replacing burnt out lamps. The VAZ 2170 is a modern model, so there are not many fastenings on the panel. To disassemble you will need a set of screwdrivers. Don't forget to turn off the negative battery.
- The process begins with removing the mounting block. To do this, you need to turn the latches on the fuse cover and then remove it;
Priora has several panels, depending on the year of manufacture, plus non-standard ones made specifically for it
Everyone knows how important it is to know the instantaneous status of instruments and machine parameters
The panel, also known as the control panel, on a Lada Priora car is, in fact, brief information about the condition of the car at the moment. It contains all the basic information, from movement speed to indicator readings on malfunctions of the main units and components of the machine. When something in it doesn’t work, it’s immediately alarming, because it’s current information. A description of all the icons and their meaning can be found below in the article. Technology is gradually developing, so the dashboard is becoming more and more technologically advanced. But since the Lada Priora is a low budget car, the panel on it is of the same quality. On the first devices, the backlight often does not light up, or is only half lit. Of course, this doesn’t look good on Priora.
The instrument panel on the Priora car changed with the restyling of the 2nd Lada car. And Lux cars come with navigation. In fact, its basic functionality remains the same - all basic information is visible. Here you can monitor the operation of the engine, monitoring the speed, and understand that it is time to take the car for maintenance when one of the lights comes on. The price of a first (1) and second (2) generation part starts from 6,000 rubles and above. Tidying saves you from speeding, helps you refuel on time and prevent the Priora from boiling.
Central deflectors of the heating and ventilation system
1 – handwheel for adjusting the flow intensity through the deflectors (when rotating up, the damper opens, down, it closes); 2 – lever for adjusting the direction of the air flow left and right. The direction of the air flow through the deflector is adjusted up and down by pressing on the top or bottom of the deflector.
Tuning the Priora instrument panel mainly consists of connecting additional lighting and installing several color inserts inside the device. No specific replacement of parts is required, nor is the installation of expensive new items required. How to implement a budget tuning option?
Lada Priora became the first VAZ model to use a new type of material for the dashboard. “Soft look” plastic has a visual similarity to leather, so the console looks quite solid. The dashboard includes all the most necessary devices to inform the driver:
- tachometer;
- speedometer;
- fuel sensor;
- oil quantity sensor;
- There are many small indicators on the instrument panel: turn, lighting, reserve fuel, etc.
In fact, the dashboard is fully equipped and does not require any technical modifications or installation of additional sensors. Then the next question arises: is it worth redoing the instrument panel at all? If you are quite satisfied with its appearance, leave everything without modifications. But if you are going to remodel the interior, then changes will be required for the instrument panel. You can change its color, strengthen it a little, change the lighting of the devices. In addition, you can add a few details for yourself. For example, highlight the most important indicators in a certain color - the amount of gasoline, the speed of the car, so as not to search for them throughout the entire panel.
Removal and replacement
Pinout of old-style gazelle panel instruments instrument readings
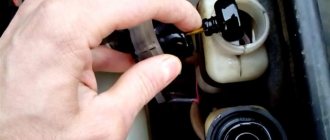
So, if you are firmly convinced that the Priora instrument panel is faulty, it must be removed for replacement
This operation must be carried out very carefully so as not to damage the trim housing and the wires running under the instrument cluster. First of all, according to the rules, when performing any work on electrical equipment, the battery must be disconnected. In this
In this
In this case, this action also makes sense, since the instrument panel ECU is under constant load to save the parameters. Therefore, you should first disconnect the battery terminal. After this, in the cabin, begin dismantling the device. First, remove the panel under the steering column covering the fuse box. It is held in place by three decorative plastic locks. By turning them half a turn, you can remove it. After this, remove the four screws holding the instrument panel trim panel. Now the combination is completely open.
Now you need to unscrew two more screws holding it and remove the panel. Carefully turn over. Move the connector latch to the side. With this action, it will partially come out of the groove. Now completely disconnect the part and put it aside. If the panel only needs to replace the lamps, then this is quite simple. They come immediately in special plastic nests when sold. On the device they are located in small wells, with the plastic end facing up. Just grab it and turn it a quarter turn counterclockwise. The lamp will immediately fall out. At the end, you need to insert a new one in its place, and turning it clockwise, fix it.
Replacing the panel
Before you put the new panel in place, you should make sure that power is supplied to it correctly. To do this, you will need a test lamp, with the ability to check both the “+” and “-” contacts. You need to know that on the 19th contact of the block there is a common “minus” of the device. Or as they say - “mass”. On pin 20 there is a constant plus from the battery, and on pin 21, a “plus” appears when the ignition is turned on. These connector sockets should definitely be checked before installing a new combination. And after the contacts have been checked, you can connect a new panel to the connector and check it by turning on the ignition. If everything is fine, you can install it in place. Hers or the old one, if it was only necessary to change the light bulbs. You can install the instrument cluster on the “Priors” panel by doing everything in reverse order.
Features of the Gamma instrument panel
The latest models of Priora cars are equipped with a factory navigation system. And in this case, a model called “Gamma” is installed. But do not assume that this is a well-made toy, suitable only for a car with
navigation. No, it installs perfectly on earlier versions of Priora. Since there is practically no need to change anything in the wiring. The only modification: run one wire to the car's diagnostic connector! But this will allow the driver, in addition to the stunning design, to have before his eyes the car’s on-board computer with many functions, including reading error codes from the main Priora ECU. In general, although it is an expensive thing, it is worth the money. In the video, removing the Priora instrument panel:
- DIY muffler resonator
- Lambda probe "Priors"
- Features of the knock sensor on the Priora
- What is a speed sensor on a Priora?
Reworking the backlight
Tuning the instrument panel primarily involves changing the backlight of the scales and the background of the panel.
Cleaning up pollination
To do this, the overlay, which is coated with paint from the inside, must be made completely transparent. We remove all pollination (usually green on the inside where the numbers are) using a sharp, rounded knife. After this, you need to wipe the pad with alcohol - it is better to use a cloth rather than a cotton pad.
In order not to spoil the overlay, it makes sense to first clean off a small part and see how the numbers show through.
Next, let's move on to the lighting itself. It's better not to use 3mm LEDs. They are not very reliable and burn out quickly, but they are best for shooters.
Laying LED strip
If in the future you plan to make a smooth ignition of the light, then already at this stage you need to take all the tapes in the panel of the same type 12-volt, single-color or multi-color. They will need to be cut. Only about 70 cm of such tape will be needed for illumination. Degrease the surface and place the parts of the tape. We seal them (plus to plus, minus to minus). We bring the wires through the hole to the bottom of the panel. We insert the light guide into place and fix it. Place the cover and turn on the power supply. If everything is done correctly, the backlight will shine evenly and as planned.
This is the easiest way to tune the Priora panel.
Instructions for replacing the tidy yourself
The procedure for removing, disassembling and replacing the control panel can be carried out on your own; there is nothing complicated about it.
How to remove the PP:
- First of all, turn off the ignition, and then disconnect the battery from the power supply.
- For greater convenience, you should remove the steering column cover, and also dismantle the steering wheel itself.
- After this, using a screwdriver, you need to unscrew the two screws that secure the upper part of the tidy.
- Next, two more screws are unscrewed, only now from the bottom.
- There are two more screws on the sides of the control panel; they also need to be unscrewed.
- After this, you can pull the tidy towards you, but do not remove it completely. Since wires are connected to the device, you need to disconnect the connectors on the back side, and then release the latch.
- The PP is removed and replaced with a new one. Assembly steps are carried out in reverse order.
Braid on the steering wheel
Initially, the steering wheel on the Priora was trimmed with leatherette, which has its drawbacks. Firstly, it is very thin and short-lived. And secondly, this material seems slippery. This, in turn, can have a very negative impact on driving safety. Therefore, a responsible car owner, after purchasing a car, first of all strives to install a new braid on the steering wheel. Its size is M1. Purchased at your local parts store, placed on the steering wheel and sewn together using a clamp needle.
The braid on the steering wheel is sewn together with a clamp needle
Designation of icons on the Kia Rio dashboard
- Pointer tachometer.
- Speedometer indicator – displays the current vehicle speed.
- If the yellow symbol of the car lights up while driving, a faulty immobilizer has been detected.
- Indication of power steering serviceability.
- Displays the performance of the SRS system.
- ABS module status indicator.
- The windshield washer reservoir is empty.
- Pointer indicator of fuel tank remaining.
- The blue icon indicates that the high beam headlights are turned on.
- There are less than 5 liters of fuel left in the tank - refueling is required.
- The front fog lights are activated.
- Likewise for stern optics.
- Turn on dimensions.
- The seat belt is not fastened - movement is prohibited.
- Indicators for the operation of turn signal breakers.
- On-board display, additional information for the driver is displayed here.
- Similar to point No. 15.
- Coolant temperature display.
- Critically low oil pressure in the engine boat.
- An orange icon appears when the handbrake is raised.
- Indicates an engine malfunction.
- The doors or cargo compartment lid are open.
- ECO. A green indicator indicates that the engine is operating in fuel saving mode.
Exclamation mark
On certain modifications of modules (4th generation), the symbol means detection of a puncture of one or more wheels (TPMS).
The engine icon on the Kia Rio dashboard came on
It is noteworthy that the lamp usually lights up together with other indicators - this significantly narrows the search range.
The battery icon is flashing on the Kia Rio dashboard
As in other cars, the symbol indicates a severe loss of charge or a malfunction of the element. To eliminate the breakdown, you need to check the battery charge level and the generator wiring.
The icon indicates that one or more tires in the car are broken. To extinguish the lamp you need to remove the puncture.
ECO icon on the Kia Rio dashboard
The ECO sign turns on only when the fuel economy mode is turned on. In this case, the engine operates in a gentle mode with one cylinder turned off. The option is forcibly activated by the motorist by pressing a special button.
EPS icon
The icon is intended to indicate the correct operation of the vehicle's electronic stabilization system. The operating principle of the module is based on braking individual wheels in turns to maintain a given course. After the engine starts, the indicator should go out. If the lamp continues to light, this indicates a problem with the device.
The car can move further, but with increased caution
Fog light icon
The indicators for turning on the fog lights are purely informational. On models after 2015 there are two indicators located in the same area of the instrument panel.
Snowflake icon
Appeared on the dashboard of the Rio 3, released in 2022. The indicator lights up in the range from +5 to -5 degrees Celsius and means that icing may occur on the road surface. The symbol is for informational purposes only and has nothing to do with the work of onboard workers.
Error signs
When diagnosing, you can see error codes on the display of the car’s on-board computer. The most common variations are described below:
- 2 – DPKV – incorrect signal;
- 3 – DFR has failed or the circuit is open;
- 7 – the crankshaft is installed incorrectly (the marks are knocked off);
- 8 – Mass air flow sensor is missing or the signal is incorrect;
- 9 – DTOZH broken/damaged wiring;
- 10/11 – the actual intake air temperature does not correspond to the measured one;
- 12 – TPS has failed or is damaged;
- 16 – the recirculation valve is clogged;
- 18-21 – fuel injectors are not working properly;
- 24 – the fuel pump operates intermittently;
- 37 – depressurization of the intake system, mixture too lean;
- 48 – the adsorber purge valve is broken.
Main indicators
The Priora dashboard contains twenty-four visual elements. When the ignition is turned on, all warning lights on the dashboard turn on briefly. Thus, the on-board computer (in the future, possibly BC) checks their serviceability. This is not a mistake, as some novice car enthusiasts think.
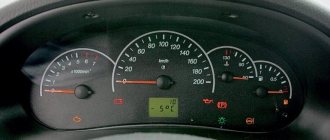
On the Priora shield, from left to right, there are four largest elements in the form of graduated semicircles.
- The first scale is the tachometer scale, the purpose of which is to measure the engine speed. The values are shown in two colors: white (normal) and red (dangerous). If the instrument needle falls into the last gap, then the Priora’s engine is in danger.
- The second scale is a visualization of the car's speed - the speedometer.
- The third graduated semicircle indicates the current antifreeze temperature. If the indicator needle hits the area with red numbers, the Priora should be stopped in order to avoid boiling in the cooling system.
- The fourth semicircular scale of the Priora dashboard reflects the fuel level in the tank. When the arrow hits the area with red scale divisions, the yellow indicator lights up. It is located slightly lower and is depicted in the form of a gas station. This means that Priora has been transferred to the reserve level of gasoline consumption.
The following indicators are located at the bottom of the panel from left to right.
- Check signal, or Check Engine. This indicator lights up when a breakdown occurs in the engine and displays Priora errors on the instrument panel.
- Lights up when there is a problem with the clutch system.
- Signals that a certain airbag is disabled.
- Indicates that an accident has occurred with the brake system.
- If the passenger's seat belts are not worn, this indicator will illuminate.
- BC screen.
- It beeps and lights up if there is a malfunction in the immobilizer system.
- Airbag failure indicator.
- Indicator of the operation of external lighting devices: low beam or dimensions.
- Lights up when the high beams are turned on.
- Failure indicator in the electric amplifier.
- Alarm when the emergency lights are on.
- Reset button.
- displays errors that occur in the brake force distribution system;
- battery low indicator;
- indicator of emergency, reduced lubricant pressure in the engine;
- a signal that the Priora has the handbrake on.
On the dashboard of the Lada Priora, under the speedometer, there is a functional element, which is a bot computer screen. It contains information received from sensors and devices, and indicates the mileage for the current day and for the entire period of operation of the Priora.
Icons on the Priora dashboard
Please describe the icons on the Lada Priora instrument panel.
- Tachometer. Crankshaft rotation speed. The needle must not go into the red zone. The red zone is dangerous for the engine.
- Brake force distributor malfunction lamp. Lights up red for a few seconds when the ignition is turned on. If the lamp lights up in other cases, this may indicate a system malfunction.
- Battery charge lamp. Lights up red when the ignition is turned on and goes out immediately after the engine starts. If it lights up even after starting the engine, this indicates that the battery charge has expired/the battery is faulty.
- Left turn indicator. Flashes when the turn signal is on, also flashes when the hazard lights are on.
- Speedometer. Shows the speed of the car.
- Emergency oil pressure lamp. Lights up red when the ignition is turned on and goes out immediately after starting the engine. If the lamp is lit in any other case, this indicates low pressure in the system. Operating the car in this case is dangerous for the engine.
- Right turn indicator. Flashes when the right turn signal or hazard warning lights are on.
- Parking brake. Lights up red when the handbrake is applied.
- Coolant temperature indicator. Under normal conditions, the needle is located in the middle of the scale. Engine operating temperature is 90 degrees and above to the red zone. The arrow should not fall into the red zone, which indicates engine overheating. In this case, it is prohibited to further operate the car. You can continue using the car as soon as the needle drops to normal values.
- Fuel level indicator in the gas tank. Shows fuel level. If there is no gasoline, the fuel pump may fail.
- Fuel reserve lamp. Lights up when there is less than 10 liters of fuel left in the tank. Also, a beep sounds.
- Button for switching display modes and resetting the daily mileage counter. To reset the daily mileage, hold the button pressed for 3 seconds.
- Alarm. Flashes along with turns when the emergency lights are turned on.
- EUR malfunction icon. Lights up yellow when the ignition is turned on for a few seconds and goes off. In other cases, the lamp burning indicates a malfunction of the EUR.
- High beam headlight lamp.
- Lamp for turning on external lighting. Lights up when the headlights and low beam are turned on.
- Airbag system malfunction icon. Lights up yellow for a few seconds when the ignition is turned on and goes off. If the lamp burns in any other cases, it may indicate a malfunction in the airbag system.
- Immobilizer icon. Lights up or flashes yellow and displays the status of the immobilizer system and the vehicle's security mode. If the system is in order and the engine is allowed to start, when the ignition is turned on, the lamp flashes 1 time and goes out.
- LCD display of on-board computer. Displays information from the on-board computer, as well as daily and total mileage.
- Unfastened seat belt. Lights up when the ignition is turned on if the driver's seat belt is not fastened.
- Brake system emergency lamp. Lights up red when the ignition is turned on for a few seconds and goes out. The lamp also lights up when the brake fluid level is insufficient and when a malfunction occurs in the service brake system.
- Passenger airbag deactivation icon (optional). Lights up when the ignition is turned on.
- ABS fault icon (optional). To check, the lamp lights up when the ignition is turned on and goes out after a few seconds or after the engine starts. If the lamp is lit, there is a malfunction in the ABS system. However, the performance of the braking system is not affected.
- Engine fault lamp. Check Engine. To check, it lights up when the ignition is turned on and goes out after the engine starts. In other cases, the lamp is lit indicating an engine malfunction. It is not recommended to operate the car in this case.
Analysis of the Priora shield
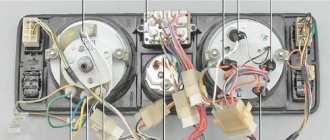
The panel can be attached in two ways. These can be latches that you just need to press and the panel will simply come out. Or there may be bolts that need to be unscrewed with a screwdriver. However, in general the panels all come out the same way without any effort.
We continue disassembling for subsequent tuning of the Priora instrument panel.
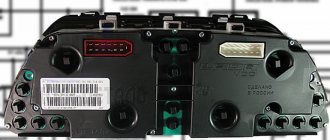
Once you have removed the panel, you need to remove the glass from the front and unscrew the back cover. It is held on by several bolts. Under it you will see a green microcircuit and other internals of the devices.
Visor
After the back cover, you need to remove the visor. It is held on by two latches. The arrows should be positioned at zero. In general, when disassembling the panels, it is better to take a photo of where the arrows point, so as not to get confused later and to align them correctly.
Arrows
The next stage of tuning the Priora dashboard is removing the arrows. This must be done carefully, in no case should you pull them, tear them or apply much force. The arrows are removed by turning counterclockwise and lightly pulling upward. If the arrows are jammed and cannot be removed, you can use a screwdriver and “pick them up” a little. We pry the arrows on both sides and gradually pull up. At some point the arrow will pop out, but be aware that the spring may cause it to fly quite far.
You must try not to touch the coating with your nails, otherwise marks and scratches may remain on the panel. They will be highlighted and spoil the whole picture.
Overlay and light guides
Next, remove the cover. Some Priora instrument panels cannot be disassembled without removing this trim. But in other cases it is better to remove it, since because of it you cannot see what is behind the devices and how the backlight is located. The backlight can be uniform for all sensors or separate for each. Remove the glued overlay with light filters so as not to damage it in any way.
Priora usually has three separate light guides. They are attached with latches and can be removed very easily. Sometimes the light guide may be damaged during removal. There is nothing wrong with this and you can continue to use it.
Removing the screen
To continue disassembling the instrument panel in the Priora for tuning with your own hands, remove the screen. It rests on rubber conductors, so it is also easy to remove. Turn the panel over and unscrew the remaining bolts. We also take out light bulbs that are no longer needed.
Using pliers, release the clamps and take out the screen. Under the screen there is another light guide - a bright light green color; it must be removed.
The panel is almost disassembled, all that remains is to separate the main white part from the green microcircuit. Thus, we have disassembled the entire dashboard and can continue tuning the Priora instrument panel.
Glass tinting
Glass tinting is an elementary type of tuning the panel of a Lada Priora. The film is attached to the outside of the glass. You can use film No. 15 or any other depending on the driver’s preference. The main thing is to choose the right shade to make the glass look good. American film, which often has a reddish tint, is not suitable for every interior.
The film is applied as usual - we degrease the glass using any dishwashing detergent, Fairy and others will do. We apply the film and cut it, paying special attention to the edges. It is better to cut off the edges so that the film does not start to bubble after installing the glass in place.
Designation of dashboard indicators Priora 1
Tachometer (shows the number of crankshaft revolutions per 1 minute at the current moment); Electronic brake unit malfunction lamp (if such a lamp lights up on your car, you must move with extreme caution to the nearest service station). During normal operation, it lights up when the ignition is turned on, and goes out when the engine is started; Charging the battery
When the ignition is turned on, it lights up, and when the engine starts, it should go out. If the lamp lights up while the engine is running, this indicates a problem with the generator; Lamp indicator of the left turn signal on. When the turn is on, it blinks green with a characteristic “squeaking” sound; Speedometer, shows the speed of the car in real time; Low oil pressure lamp in the internal combustion engine. During normal operation, it lights up when the ignition is turned on; after starting, it should go out within 3 seconds. If the lamp lights up when the engine is running, this indicates a problem with the internal combustion engine; Indicator lamp that the right turn signal is on. When the turn is on, it blinks green with a characteristic “squeaking” sound; Handbrake indicator. Lights up when the handbrake is pulled; Coolant temperature gauge. The operating coolant temperature of the Priora internal combustion engine is 85°C; Level sensor for remaining fuel in the tank. The fuel tank of the Priora has a volume of 43 liters; Minimum fuel remaining indicator. Lights up when there is less than 10 liters of gasoline in the tank; Odometer control button. A short press switches the daily mileage to full, and a long press resets the daily mileage; EUR failure indicator. Lights up when the ignition is turned on for 2 seconds, in other cases it indicates a breakdown in the EUR; The hazard warning lamp flashes together with the turn signals; High beam indicator; Low beam and headlight indicator; The SRS (airbag) malfunction indicator lights up for a couple of seconds when the ignition is turned on; Immobilizer indicator; Screen for daily and total vehicle mileage; The seat belt not fastened indicator lights up when the driver of the car is not fastened; The indicator of low brake fluid level in the system lights up when the car ignition is turned on for a few seconds, after which it goes out; Front passenger airbag deactivation indicator; ABS fault indicator; The “Check Engine” light comes on when the ignition is turned on and goes out when the engine starts. In other cases, it indicates a malfunction in the internal combustion engine;
Removing and installing a torpedo on a Priora
How to remove the dashboard on this car? Quite simple if you follow the instructions. On a Lada Priora, removing the torpedo will not be difficult. This must be done if you need to install a soundproofing shield, or paint the panel itself, or replace it.
You will need tools such as screwdrivers (flat and Phillips), pliers (specifically with narrow jaws) and a number 10 head. To remove the dashboard on a Priora, you need to disconnect the negative terminal from the battery. The work must be carried out carefully so that the instrument panel lighting is not affected. After this, you can remove the steering column switches.
Now the surface of the safety block on the Priora is disconnected. To do this, you need to rotate the locks of this cover 90 degrees, and then remove the latches from the safety block on the Priora. Now you need to carefully remove all the wires from the ignition switch. Then the instrument cluster is carefully removed. After this, the center floor tunnel is released. It is necessary to remove the cables from the power steering on the Priora.
Next, you need to perform these actions in turn. Loosen the latches and remove the pillar upholstery on the left side. Use the same steps to remove the upholstery on the right side of the Priora. Then the glass blower is removed from the right and left sides. It is better to use a screwdriver with a soft cloth underneath it to avoid damage.
To remove the torpedo on the Priora, you need to further unscrew the nuts, which are the upper fasteners of the torpedo. These nuts are located on either side of the blower nozzle, which is already disconnected. Then you need to remove the tips from the torpedo. Be sure to further remove the blocks with cables that connect the dashboard.
These pads are located near the bracket. All pads are removed one by one. It is necessary to remove not only the side pads, but also the central one. To do this, unscrew the fastening nut from the controller near the center console.
On the other hand, the fasteners also need to be disconnected. Now you need to remove the controller from the torpedo. After this, you can squeeze the center pad latches and pull it out. You need to disconnect its two connectors along with the cables. Next, the harness near the bracket is released. You need to be careful, because... The dashboard lighting should not be damaged.
Now you need to unscrew the screws in the side mount of the torpedo. Phillips screwdrivers are used for this. Similarly, on the other side, the fastenings are disconnected. You need to carefully monitor navigation devices. Now you should open the glove box (glove compartment). There you can also unscrew the torpedo screw. Then the side screws of the console are removed. After this, you need to carefully remove the torpedo on the Priora. If it is necessary to reinstall the torpedo, then all steps are performed in the reverse order.
Interior reupholstery
The interior of a Priora is usually reupholstered only after several years of use of the car, or after some serious damage to the original upholstery. In other situations, car enthusiasts prefer not to bother with reupholstery, since it is an incredibly labor-intensive, although uncomplicated, procedure. Here's what you'll need to get started:
- knife;
- universal glue;
- construction hair dryer;
- scissors;
- marker;
- rubber roller;
- upholstery.
DIY finishing
The first thing to do is decide on the type of material. The most durable option is leather. But it is also the most expensive, so not every car enthusiast can afford it. In second place is leatherette. It lasts half as long as leather, but also costs half as much. Finally, you can use velor or carpet. These are the cheapest and shortest materials. But they are the ones who can make tuning the Priora’s interior incredible.
Leather is a durable, beautiful and very expensive material for interior trim.
- All old upholstery is removed from the car. It should be removed very carefully, since the elements of this upholstery (from the seat covers to the ceiling upholstery) will later be used as the basis for the pattern.
- After removing the upholstery, all surfaces in the cabin are thoroughly cleaned of dirt and dust.
- Based on patterns made from the old upholstery, new elements of the interior covering are cut out from the selected material. Then all the necessary holes are cut in them (for door handles, ceiling lamps, etc.).
- New upholstery is always installed on the doors first. Universal glue is applied to the material prepared for the doors. It needs to be allowed to dry for a minute. After this, the material is glued to the door and carefully smoothed with a rubber roller.
- Similar operations are performed with the ceiling upholstery and armrests. All air bubbles that arise under the material are removed using a roller.
- After gluing all the upholstery elements, the interior should dry. This requires 48 hours. To speed up the process, you can use a hair dryer. But it must work at minimum power.
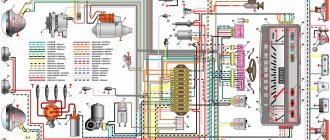
Electronics LadaPrioraTuning
Electronic components for tuning Lada Priora are presented: instrument panels, on-board computers, parking sensors, angel eyes.
Compatibility - BOSCH M1.5.4/MP7.0/M7.9.7/17.9.7 - January 5.1/VS 5.1/7.2/M7.3 (Euro-3)/M74 Graphic display 128×64 Type: TFT indicator 65535 colors Resolution ( pixel) 480×272 Diagonal: 4 inches More details…
The new instrument cluster for Lada Priora, Lada Kalina, Lada 2110 cars with the new GF 821 panel was developed taking into account the wishes of users of the first generation FERRUM dial instrument cluster More details...
Instrument cluster Gamma 819. Relieves the user of unnecessary body movements. To view parameters and diagnose vehicle systems, the combinations are equipped with a vertically oriented LCD display. More details...
Instrument cluster Gamma 819 Black. Compatibility – BOSCH M1.5.4/MP7.0/M7.9.7/17.9.7 – January 5.1/VS 5.1/7.2/M7.3 (Euro-3)/M74 Indicator type and color Graphic display 128×64: – Black background , white symbols Read more…
Instrument cluster GF619. Upgraded Instrument Cluster GF618. Shows parameters of electrical accessories, power steering, airbags, ABS. Added a motion alert function with low beam headlights turned off or with active More details…
Adapter for installing instrument clusters from any manufacturer on Lada cars with a CAN bus (manufactured after 2013). Read more…
Instrument cluster FLASH X4 for Lada Priora. Pointer and digital indication of speed and engine speed LED RGB backlight (allows you to choose more than 32,000 colors) More details…
On-board computer Gamma 270 for Lada Priora. Compatibility - BOSCH M1.5.4/MP7.0/M7.9.7/17.9.7 - January 5.1/VS 5.1/7.2/M7.3 (Euro-3)/M74 Indicator type and color Graphic display 132×48: - LCD blue background, white backlight Read more…
On-board computer Gamma 777. Compatibility BOSCH M1.5.4/MP7.0/M7.9.7/ January 5.1/VS 5.1/7.2/M7.3 (Euro-3)/ Indicator type and color Graphic display 256×64: OLED, yellow backlight ; OLED, blue backlight Read more…
The best Angel Eyes for Lada Priora. Easy installation, long service life (50,000 hours). They also perform the function of Daytime Running Lights. Excellent visibility in any (even the sunniest) weather. Read more…
Parking radar AME-102 Automatic activation when reverse gear is engaged Color and sound indication of the distance to an obstacle indicating the direction 4-stage audio warning of approaching an obstacle More details...