I was replacing the ceiling trim on a VAZ classic (tensioned), I decided to share tips and photos of the process.
Replacing the ceiling trim of a VAZ
Replacing the ceiling must begin with dismantling the front and rear windows, removing the handles and injury protection with visors. The sheathing itself is attached to the ceiling using metal arches and small metal latches under the door and glass seals.
After removing the glass, you can then remove all the metal latches around the perimeter of the casing. We save them, as practice shows, in order to stretch a new ceiling well, you need a larger number of latches than in the factory cladding version. The thing is that at the factory, in addition to the fact that the ceiling is fastened with latches, it is also glued along the bend. To compensate for the lack of glue, it is necessary to use more fasteners.
After all the fasteners have been removed, you can remove the arches, this must be done very carefully, as you can break the fasteners. It is necessary to remove the arches from the passenger side, not the driver.
Next, we spread the new ceiling upholstery, and one by one we move the arches from the old ceiling to the new one. The new casing has stampings (not always visible) along which it is necessary to cut off the loop in which the arc is attached.
New ceiling laid out
The arcs were rearranged into new casing
The ceiling is installed on one side only; the arcs are located more often on the back of the casing.
It is necessary to put white (yellow) fasteners on the arches. You need to start stretching the ceiling from the rear window. The arcs are installed first with one end in the black cap, and the other with a plastic tube in the hole in the body.
White tube fastener
We first install the arcs themselves, with the ceiling not stretched, and after fastening, we pull the arc towards ourselves, thereby stretching the ceiling. Be careful here; under no circumstances should you tear the ceiling.
When installing arches, try to stretch the ceiling as much as possible, since it will be difficult to do this later.
You should get something like this
Next, we take the ceiling in front and pull it slightly forward to tighten the front part of the trim and secure it with fasteners on the windshield frame. Next, the last arc near the rear window also needs to be secured by the tongue.
Source
Changing the ceiling of a VAZ 2107
VAZ 2107 (seven) is a classic, in the past the pride and beauty of the Volga Automobile Plant. Currently, this morally and technically outdated car has ceased to be produced, but until recently it was not only sold by the car plant, but what is most surprising was that it found its buyers! In fact, the answer is simple - the simplicity of the design, the unique appearance and price of the car did not leave other models in this category much chance of winning the fight for a buyer. As a rule, the owner of the “seven” was a not very rich car owner, who with his own hands could not only go through all the “guts” of his iron friend in the middle of a field, “on his knees,” but also significantly improve its appearance and technical characteristics. That is, the owner, who was not indifferent to his car, sooner or later still began to tune his car to one degree or another.
What is this operation and what is hidden behind the word tuning?
- Firstly. Tuning is a change, an improvement to suit your personal needs, that is, in essence, adjusting the product to suit you;
- Secondly. Tuning is divided into 3 stages:
- Engine.
- Appearance.
- Salon.
This procedure was in demand more than ever in the domestic automotive market. Ask why? Yes, because a new domestic car is like a new apartment - no repairs, no conditions. Theoretically, you can use it, but is it convenient?
Usually all improvement work starts with the engine, this is:
- Carburetor improvement;
- Replacement of valves, spark plugs and armored wires with foreign ones
- Installing a zero-resistance air filter;
- Installation of lambda probe;
- Enlargement of the combustion chamber.
The interior of the Seven is so unattractive that you can redo literally everything here without hesitation or regret. Removing, reupholstering, and replacing the VAZ 2107 ceiling is a standard procedure for owners of used cars.
Also some of the most common jobs are:
- Reupholstery of seats, interior;
- Installation of electric windows;
- Improvement of the heater, in particular the left pipe;
- Noise insulation;
- Installation of a smaller diameter steering wheel, decent acoustics.
External tuning includes:
- Body painting;
- Installation of alloy wheels, body kits;
- Tinting.
Do I need this? Everyone decides for themselves.
In essence, tuning the “Seven” does not require large financial investments, but it brings enough “hemorrhoids” to the performer of this trick. In general, this activity qualifies as a hobby, a passion, much like collecting stamps... Most car owners pay too much attention to the external appearance of the “iron horse” while forgetting about the car’s interior. But the quality and materials of the interior directly affect the comfort of driving a car. Therefore, the entire impression of tuning the interior depends on the condition of the VAZ 2107’s ceiling upholstery . To get a taste for it, I would first suggest changing the steering wheel to a more modern model, after which you can move on to the interior itself. For example, purchase additional sets of accessories for the dashboard, since there is nowhere to put ordinary small things in the cabin, and these simple pockets and recesses are the best suited for storing various small things. Just looking at the classic Lada, I immediately have an irresistible desire to change something about it. And therefore, in this article I propose to analyze such a moment as tuning the ceiling of a VAZ 2107, which includes replacing the rear view mirror and sun visors. Next, we present to your attention detailed instructions - VAZ 2107 ceiling tuning.
Body transformation
In the process of tuning the famous “four” from VAZ, the greatest attention is paid to changing the body. Its design has long been no longer considered attractive and modern; now this angular shape looks outdated and unattractive. You can tune the body in several options, which differ in cost and amount of work:
- easy consists of replacing the radiator grille, tinting the windows, installing rims on the wheels and a Vikhur skirt;
- with average body tuning, it will be necessary to install alternative optics, replace the body kit, think about the likelihood of ordering professional airbrushing and shaving, which involves removing handles, locks and moldings;
- deep, as you might guess, is the most complex, expensive and time-consuming, since it requires changes in the body structure, for example, changing the roof level, converting to a coupe, installing lambo doors.
Even a light tuning option will transform the appearance of the car. Sparkling chrome on the body, solid tinted windows, rare or, conversely, ultra-modern wheel covers - and your car will already look decent on the road.
Transformation of the appearance of the VAZ-21043
Changing the body structure
And if you take a more serious approach to transforming a domestic car and decide to “truncate” the body, then you can get a small-sized car that can be deftly drifted and easily maneuvered. To get such a powerful baby, it is necessary to remove part of the passenger compartment and reduce the length of the driveshaft. You shouldn’t expect significant fuel savings; consumption will decrease, but not as significantly as we would like. Now we need to do the electrical wiring, reinstall the brake lines, carefully close everything up and repaint the improved body. Another drastic solution is to move the spare tire to the trunk lid. But such a design, as they say, is not for everybody.
The body structure can change not only in length, but also in height. Typically, the interior height is lowered by a maximum of 15 cm. This result can be achieved by cutting the pillars, changing the front bumper, and rear lighting. In this case, the exterior changes dramatically. It will not be easy to get used to such dimensions of the car.
If you are lucky enough to drive on perfect asphalt, then you can transform your VAZ-2104 in a rare Stance style. Its essence is to install short springs and small diameter discs. A car with such changes is quite rare, so your VAZ-2104 can become a unique specimen. A more popular type of tuning is body lifting, which is the opposite of Stance. Such a car can easily overcome bad sections of the road and even off-road.
VAZ-2104 in Stance style
The controversial point is the need to strengthen the body support areas. This point cannot be called mandatory, but it is still better if it is implemented. This will definitely not make anyone worse. The installation of rigid springs, which is provided for during the tuning process, requires reinforced metal. For the front suspension, you can choose springs from the Volga, and the rear shock absorbers can be taken from the Gazelle front end.
You seriously need to think about installing air springs that will prevent the body from swaying and make the ride softer. Air springs are installed inside the springs. A similar element can be added to a lifted and standard body, its operation will not change.
Coloring
Body painting is an important element in any tuning. Still, this parameter is most striking and can highlight any car. There are several ways to solve this problem. You can go the standard route and cover the body with regular paint with an interesting effect (metallic, chameleon, matte, glossy). One of the new solutions is liquid rubber. Such painting will not only make the tuned car expressive, but will also protect the body from external influences. Airbrushing can be used not only on expensive foreign cars, but also on models of the domestic automobile industry. It is better to entrust such coloring to specialists who have extensive experience in this field and will be able to transfer any imagination to metal. Airbrushing requires compliance with the declared status, and if you have chosen this method of transformation, then an awkward roof rack, old wheels or a rusty trailer will make the car look ridiculous and tasteless.
Airbrushing makes the VAZ-2104 more expressive
Why is such a ceiling needed?
From the factory, all VAZ 2107 cars are equipped with a suspended ceiling, which has some disadvantages. Due to these shortcomings, some car owners are trying to replace it with a VAZ 2107 hardtop. You can do this yourself, and you don’t need to go to a car service center to carry out easy tuning of the interior.
First, let's look at why many owners of sevens strive to replace the soft ceiling with a hard one. The reasons for this are varied:
- The standard suspended ceiling does not have an attractive appearance, so when modernizing the interior, it is important to update the roof.
- Over the course of the car's operation, the upholstery becomes very yellow, which greatly spoils the interior of the car.
- A thin layer of material does not in any way affect the noise reduction of the car roof.
- The soft upholstery is easily damaged, so it is enough to catch it with a sharp object to disturb the interior of the car.
In addition, various additional elements can be attached to the hard ceiling, for example, lampshades for illuminating the interior of a car. Once you decide to modernize your roof, you won’t need to invent anything. Ready-made roof options are available in automotive stores or can be found on the Internet. Installing such a roof takes a minimum of time, and as a result, the interior of the Seven becomes more modern. When carrying out such restyling of the ceiling with your own hands, we recommend that you simultaneously reduce the noise of the roof.
But even installing a ready-made rigid base is a simple option that not all car owners agree to. After all, if you carry out modernization, it is advisable to do it in such a way that the roof completely satisfies the owner of the car. To do this, you will need to make the ceiling for the interior of a VAZ 2107 car with your own hands. This will require more time and effort than with a purchased hard ceiling option, but the wait and effort are completely worth it.
Installing a hard ceiling on a car
Installing a factory-produced hard roof is a snap. Fastening is carried out using standard places, and there is no need for additional modifications or changes. Detailed instructions on how to install a VAZ 2107 hard ceiling are described below.
- The first step is to disconnect the negative terminal from the battery to eliminate the possibility of a short circuit.
- Initially, the trim is removed, which can be done without dismantling the front and rear windows. However, you will need to remove the glass from the back or front in order to move the new structure into the car interior. It is recommended to remove the rear window. Some craftsmen resort to inserting the structure into the interior through the door, bending it slightly, but this option is too risky, as it can be damaged.
- After removing the soft sheathing, it is necessary to clean the inner surface of the roof, followed by gluing noise-reducing materials.
- The frame can be covered with carpet or other materials using special glue.
- After this, you can begin installing the hard ceiling. If you use a hard roof on a VAZ 2107, then the process of installing it is that you need to alternately fix the structure around the perimeter with pistons.
- The rubber door linings fit behind the new trim.
- The handles are screwed on using M6x30 bolts.
- The interior lighting is installed in place, and then the rear view mirror and visors are fixed.
It is also recommended to replace the visor trim, as they will stand out strongly and unsightly. For the cladding, the same material is used that is used to cover the hard ceiling on the seven. If, instead of a stretch ceiling, you decide to make a rigid structure with your own hands, then you will need fiberglass for this. Carpet is used for cladding, as it is an ideal option on which dirty spots are not visible, and it is resistant to mechanical stress. You can also cover a durable fiberglass frame with leatherette and other similar materials. The hard ceiling on a VAZ 2107 can be supplemented with a lampshade, for example, from a Lada Kalina car.
The principle of installing the lampshade on the roof of the seven is simple, and consists of performing the following steps:
- Cut out a round base from chipboard, onto which the lampshade itself will later be attached.
- Secure the chipboard base to the rigid ceiling frame with self-tapping screws (suitable in length) in the place where you plan to install the lampshade.
- The free space formed between the frame and the chipboard template should be filled with polyurethane foam and allowed to dry for 24 hours.
- Remove the remaining foam and cover the roof surface with carpet or other materials.
When installing a hard roof on a VAZ 2107, it is necessary to install the wiring, and at the end, when the base is secured, install a lamp with its connection. At this point, the procedure for installing a hard roof on a VAZ 2107 is completed, and as you can see, this process is not difficult and takes 2-3 hours. Depending on preferences and imagination, the hard roof can also be additionally equipped with other elements, which is within the capabilities of every car owner.
Source
Tuning VAZ 2104: improving appearance
The VAZ 2104 is a station wagon, but it also needs to be made more impressive and attractive. First you need to tint all the windows, then the car will immediately look more impressive. To do this, you will need to buy a special tinting film, if you have experience, then you can do the tinting yourself, if you don’t have experience, then you can still do it, the main thing is that you have the desire. If there is no desire, then you can delegate this work to the masters. It is better to choose a film of more or less high quality, then it will fit better and look better. When tuning a VAZ 2115, you also need to do tinting, only if you don’t live in Russia, otherwise the police start harassing you on the roads.
Next, you can move on to tuning the body of the VAZ 2104, you can attach original linings or body kits, usually they are made of plastic. If you can find bumpers and linings made of carbon fiber, then it is better to buy them, they will last longer.
Also, during the installation of these decorative elements in the VAZ 2104, you need to make sure that they are firmly attached and secure them with clamps so that they do not fall off at the first hole.
Next, you need to decide whether to paint the car or wrap it with vinyl. The service will charge a lot of money for painting, you can try painting it yourself using a roller, by the way, here’s a video about how this is done, maybe this method will suit someone:
You can paint a VAZ 2104 with any paint, essentially, it can be plain or chameleon, if you have a lot of money, you can take imported paint, in general, you need to choose a paint to suit your tastes and preferences. You can also paint the car yourself, the main thing is that you have a garage so that dust does not interfere with the work. First you need to wash the body, then make a preparation, that is, sand off the rust, treat it and fill the holes. You will also need to cover with oilcloth those places where the paint should not get on - usually glass. Then you need to apply the first layer, after the paint has dried, you can add a second layer, in the end you need to ensure that the body is evenly painted.
VAZ 2106 roof lining replacement - we do it ourselves
VAZ 2107 (seven) is a classic, in the past the pride and beauty of the Volga Automobile Plant. Currently, this morally and technically outdated car has ceased to be produced, but until recently it was not only sold by the car plant, but what is most surprising was that it found its buyers! In fact, the answer is simple - the simplicity of the design, the unique appearance and price of the car did not leave other models in this category much chance of winning the fight for a buyer. As a rule, the owner of the “seven” was a not very rich car owner, who with his own hands could not only go through all the “guts” of his iron friend in the middle of a field, “on his knees,” but also significantly improve its appearance and technical characteristics. That is, the owner, who was not indifferent to his car, sooner or later still began to tune his car to one degree or another.
What is this operation and what is hidden behind the word tuning?
- Firstly. Tuning is a change, an improvement to suit your personal needs, that is, in essence, adjusting the product to suit you;
- Secondly. Tuning is divided into 3 stages:
- Engine.
- Appearance.
- Salon.
This procedure was in demand more than ever in the domestic automotive market. Ask why? Yes, because a new domestic car is like a new apartment - no repairs, no conditions. Theoretically, you can use it, but is it convenient?
Usually all improvement work starts with the engine, this is:
- Carburetor improvement;
- Replacement of valves, spark plugs and armored wires with foreign ones
- Installing a zero-resistance air filter;
- Installation of lambda probe;
- Enlargement of the combustion chamber.
The interior of the Seven is so unattractive that you can redo literally everything here without hesitation or regret. Removing, reupholstering, and replacing the VAZ 2107 ceiling is a standard procedure for owners of used cars.
Also some of the most common jobs are:
- Reupholstery of seats, interior;
- Installation of electric windows;
- Improvement of the heater, in particular the left pipe;
- Noise insulation;
- Installation of a smaller diameter steering wheel, decent acoustics.
External tuning includes:
- Body painting;
- Installation of alloy wheels, body kits;
- Tinting.
Do I need this? Everyone decides for themselves.
In essence, tuning the “Seven” does not require large financial investments, but it brings enough “hemorrhoids” to the performer of this trick. In general, this activity qualifies as a hobby, a passion, much like collecting stamps... Most car owners pay too much attention to the external appearance of the “iron horse” while forgetting about the car’s interior. But the quality and materials of the interior directly affect the comfort of driving a car. Therefore, the entire impression of tuning the interior depends on the condition of the VAZ 2107’s ceiling upholstery . To get a taste for it, I would first suggest changing the steering wheel to a more modern model, after which you can move on to the interior itself. For example, purchase additional sets of accessories for the dashboard, since there is nowhere to put ordinary small things in the cabin, and these simple pockets and recesses are the best suited for storing various small things. Just looking at the classic Lada, I immediately have an irresistible desire to change something about it. And therefore, in this article I propose to analyze such a moment as tuning the ceiling of a VAZ 2107, which includes replacing the rear view mirror and sun visors. Next, we present to your attention detailed instructions - VAZ 2107 ceiling tuning.
Replacement and repair of muffler for VAZ 2104–2107 cars
To replace the muffler you will need:
- inspection hole or lift;
- screwdriver;
- a set of car keys;
- hammer.
Removing and installing the muffler
To dismantle the “glushak”, repair it, and then return it to its place, follow this sequence of actions:
- Drive the car into the inspection hole. Stop the engine and turn off the ignition. Wait until the exhaust manifold cools down.
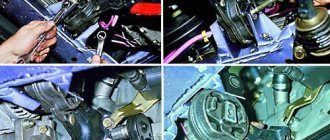
- Unbend the hooks of the rubber suspension straps of the muffler.
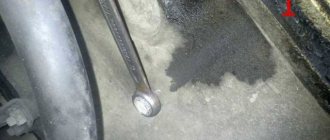
Using a screwdriver, straighten the hooks of the rubber straps on which the muffler is suspended
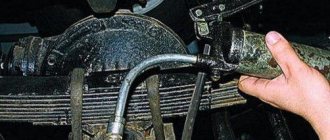
Unscrew the exhaust pipe fastening to the rubber cushion with a wrench
Loosen the clamp between the pipes of the main and additional muffler
Carefully knock the resonator out of the mount by hitting it with a hammer through a wooden spacer
Unscrew the exhaust pipe from the gearbox bracket
Carefully bend the stoppers and unscrew the exhaust pipe from the manifold
Install the new muffler in the opposite order of removal. However, do not use a used gasket. Before assembly, treat the pipes at the places where they are connected with clamps with graphite lubricant.
Video: replacing a VAZ 2107 muffler in a garage
In 1979, at VAZ, a car was built especially for “dear Leonid Ilyich,” which received the common name “half past six.” This happened after the presentation of the VAZ-2105 and 2107 models to the country's leadership, the serial production of which was still quite far away, and Brezhnev wished to give such a car to one of his family members. The result was a unique car, the body and interior of which was a hybrid of a “six” and a “seven” - hence the name.
Innokenty Kishkurno
Wheels
Let's start with dismantling
Removing the sun visor
- Pull the visor axle out of the holder by pulling it in your direction.
- Three self-tapping screws are unscrewed with a Phillips screwdriver.
Removing the interior rear view mirror
Using a screwdriver, remove the decorative trim of the mirror bracket
Unscrew the two screws with a Phillips screwdriver
With a mirror, the issue is easily resolved - I bought a larger one and secured it on a standard mount, but the visors force me to make a choice - either re-tighten it with a carpet or buy tuning ones. For most, the second option is preferable; they both look and cope with their duties better than standard ones.
Removing a hard ceiling
Many car owners have a question: how to remove the hard ceiling on a VAZ 2107? Most of the advice boils down to the need to dismantle the windshield, but I suggest trying a more gentle, although also labor-intensive, method. I wanted to post a video, but I think we’ll make do with instructions and photos. In a VAZ 2107, replacing the ceiling begins with dismantling the rear seats, removing the side plastics on the rear and front pillars, as well as dismantling the front passenger door. After unscrewing all the fasteners on the ceiling, it easily fits into the opening of the removed passenger door. And although this method seems very difficult, believe me, the new ceiling upholstery of the VAZ 2107 is worth the effort!
Advice! Buy four new plastic plugs that secure the ceiling to the roof.
Removing the rear seats
Unscrew all fasteners
We take you out of the salon
Removing a soft ceiling
The soft ceiling lining of the VAZ 2107 can also be removed in two ways - both with removing the windshield and without dismantling it. In the second case, you will have to be a little nervous, since picking out the brackets holding the ceiling from under the windshield sealing rubber is not a pleasant task (it can be solved by using a screwdriver and some kind of mother).
In order to remove the ceiling of a VAZ 2107 with soft upholstery, you need to dismantle:
- Door seals;
- Handles above doors;
- Sun visors.
We begin to remove the upholstery from the windshield. And then step by step:
- We feel for the first arc (the first seam from the windshield);
- We push it by the middle, towards the trunk;
- The arc rotates around its axis, thereby weakening the upholstery;
- We remove the arc from the side niche of the roof profile, slightly squeezing it in the center.
- Further, with other arcs, in a similar order.
Now we are faced with the question of whether to stitch the leatherette so that we get hinges (a high-quality, but labor-intensive option with a big disadvantage - the seams are visible) or glue a new one directly onto the new skin.
In any case, having removed the ceiling from the VAZ 2107, you first need to wash it...
Old ceiling
...and cover it with material...
Sheathing Result
...or cover it with vinyl.
Vinyl
Replacing the ceiling trim of a VAZ classic
I was replacing the ceiling trim on a VAZ classic (tensioned), I decided to share tips and photos of the process.
Replacing the ceiling trim of a VAZ
Replacing the ceiling must begin with dismantling the front and rear windows, removing the handles and injury protection with visors. The sheathing itself is attached to the ceiling using metal arches and small metal latches under the door and glass seals.
After removing the glass, you can then remove all the metal latches around the perimeter of the casing. We save them, as practice shows, in order to stretch a new ceiling well, you need a larger number of latches than in the factory cladding version. The thing is that at the factory, in addition to the fact that the ceiling is fastened with latches, it is also glued along the bend. To compensate for the lack of glue, it is necessary to use more fasteners.
After all the fasteners have been removed, you can remove the arches, this must be done very carefully, as you can break the fasteners. It is necessary to remove the arches from the passenger side, not the driver.
Next, we spread the new ceiling upholstery, and one by one we move the arches from the old ceiling to the new one. The new casing has stampings (not always visible) along which it is necessary to cut off the loop in which the arc is attached.
New ceiling laid out
The arcs were rearranged into new casing
The ceiling is installed on one side only; the arcs are located more often on the back of the casing.
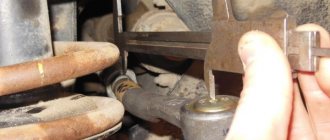
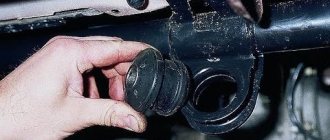
It is necessary to put white (yellow) fasteners on the arches. You need to start stretching the ceiling from the rear window. The arcs are installed first with one end in the black cap, and the other with a plastic tube in the hole in the body.
Black cap
White tube fastener
We first install the arcs themselves, with the ceiling not stretched, and after fastening, we pull the arc towards ourselves, thereby stretching the ceiling. Be careful here; under no circumstances should you tear the ceiling.
When installing arches, try to stretch the ceiling as much as possible, since it will be difficult to do this later.
You should get something like this
Next, we take the ceiling in front and pull it slightly forward to tighten the front part of the trim and secure it with fasteners on the windshield frame. Next, the last arc near the rear window also needs to be secured by the tongue.
We fix the ceiling in front
Last arc fastening tongue
Thanks for subscribing!
The last rod is tightened by the tongue and fixed
Then we stretch the ceiling little by little using metal latches; I do not recommend putting them on all the way right away, since in practice you usually have to remove them and tighten the ceiling 2-3 times.
We fix the ceiling as follows
Gradually stretch the sheathing, trying to smooth out all the folds; wrinkles from storing the sheathing will go away over time.
In the process of stretching the ceiling
Process
I’ll post a photo of the final version a little later, and after finishing the process of stretching the ceiling, we cut off the excess material along the edges and return the glass to its place.
Changing the ceiling of a VAZ 2107
VAZ 2107 (seven) is a classic, in the past the pride and beauty of the Volga Automobile Plant. Currently, this morally and technically outdated car has ceased to be produced, but until recently it was not only sold by the car plant, but what is most surprising was that it found its buyers! In fact, the answer is simple - the simplicity of the design, the unique appearance and price of the car did not leave other models in this category much chance of winning the fight for a buyer. As a rule, the owner of the “seven” was a not very rich car owner, who with his own hands could not only go through all the “guts” of his iron friend in the middle of a field, “on his knees,” but also significantly improve its appearance and technical characteristics. That is, the owner, who was not indifferent to his car, sooner or later still began to tune his car to one degree or another.
Ceiling on a VAZ 2106 car
In its current design, the VAZ 2106 ceiling performs several functions, including:
- Classic. The classic function takes us back to the time when the presence of a ceiling (roof) formed the type of car body;
- Security. The security function of a car ceiling is that it serves to retain heat during the cold season;
- Decorative. The decorative function of the ceiling of the VAZ 2106 is that it is part of the interior of the car. It is by the condition of the interior ceiling that you can determine the degree of car maintenance.
Reasons for replacing or reupholstering the ceiling of a VAZ 2106
The main reasons for replacing or reupholstering the ceiling of a VAZ 2106 are:
- Accidental damage to the ceiling due to careless work in the cabin
- Failure of the interior ceiling due to its long-term use and natural wear
- Tuning or pre-sale preparation of a car
In the first two cases with the VAZ 2106, the ceiling is replaced with the installation of a standard factory-colored ceiling. It comes, as a rule, in pastel colors, as well as white with shades and brown. As for the third option - VAZ 2106 ceiling tuning, here an arbitrary color is used, which the car enthusiast directly likes. As a rule, it can be very catchy and is associated with the tuned colors of the interior.
How to change the muffler on a “classic”
Replacing the muffler on a VAZ “classic” is not particularly difficult. It is necessary to first drive the car onto an inspection hole or overpass. If it is not possible to use the pit, you can raise the rear left side with a jack. The main thing is to make sure that the car is stably raised above the ground.
The easiest and most convenient way to get to the muffler is to drive the car onto an overpass
Preparing tools
In the matter of self-service or repair of a machine, a major role is played by the timely preparation of all those tools that may be needed in the work . To remove the muffler and install a new product in its place, you will need the following set of tools and auxiliary materials:
two 13mm wrenches;
screwdriver with a thin flat blade;
brake fluid or WD-40.
How to remove a part
The order of work can cause difficulties only if the fastening joints are heavily rusted. Therefore, it is recommended to follow the following plan to make the work easier:
Installation of a hard ceiling VAZ 2101, 2106, 2107 classic
I want to tell you about installing a hard ceiling on a VAZ 2101. The ceiling was purchased from an export car, this is exactly what I was looking for, it is thick, durable and most importantly, it does not bend like snot. First of all, I glued it a little, since one edge of the ceiling was stored in damp, and the ceiling is in good condition. Next we have to make a podium for the Kalino chandelier; unfortunately, we can’t do it without a podium. And so let’s break it: Take OSB or plywood 8mm thick, let’s say that there is something thinner that will do. Take the top part of the viburnum chandelier and outline it
We cut it out and try it on the lampshade, everything should be clear
Next we put it on the ceiling
Then we cut a hole in the ceiling along the contour, as in the workpiece with a stationery knife, and screw it to the ceiling with self-tapping screws through spacers
We fill this whole thing with foam, since it was not summer outside when I bought winter foam. A day later I cut the whole thing off and adjusted the shape
After shaping, I filled everything with epoxy resin
Pouring with epoxy resin
It was decided that the lamp should be moved in the center closer to the rear passengers, so that it would be lighter in the back.
Filled the old hole with epoxy
Ceiling with new hole
Friends, the weekend has arrived and I finished the ceiling as planned. The first thing I did was pull it over
, painted the canopies and the fireplace chandelier black, the canopies with matte paint, the chandelier with glossy paint
then I tried the whole thing on
We are putting off the ceiling for now. To begin with, I pulled out the rear window and removed the old ceiling and was horrified
The ceiling was cleaned, degreased and glued as required
We install the ceiling through the rear window, as we installed it, we figured for convenience, I immediately installed the glass back. We start fixing the ceiling with the handles, then the rear view glass, then the pistons at the rear wall, and lastly the lampshade and visors. I took the caps from a gazelle, black
Friends, be careful when attaching the lamp frame and do not drill into the roof! When we do the wiring for the lampshade, do not forget to carefully insulate everything
Removing the ceiling of a VAZ 2107
The safety ceiling lining on the classic is located in the front part of the cabin above the windshield. Sun visors are also attached to it. You may need to remove it to install wiring, soundproof the roof, or simply remove the ceiling.
This pad is attached at several points. Namely: handles above the front doors, sun visors and the interior rear view mirror bracket. Accordingly, in order to free the lining from the fasteners and remove it from the ceiling, it is necessary to dismantle the specified elements.
Do-it-yourself noise insulation of VAZ 2104
VAZ 2104 interior sound insulation, carried out after removing all the seats
There is simply no sound insulation on the VAZ 2104, as on all other domestic cars of previous years (on all “classics”). The reason is simple: when such cars were designed and produced, sound insulation had not yet been invented.
Therefore, soundproofing the interior of a VAZ is the concern of its owner; it will be cheaper to do it yourself, now we’ll tell you how.
Why is such a ceiling needed?
From the factory, all VAZ 2107 cars are equipped with a suspended ceiling, which has some disadvantages. Due to these shortcomings, some car owners are trying to replace it with a VAZ 2107 hardtop. You can do this yourself, and you don’t need to go to a car service center to carry out easy tuning of the interior.
First, let's look at why many owners of sevens strive to replace the soft ceiling with a hard one. The reasons for this are varied:
- The standard suspended ceiling does not have an attractive appearance, so when modernizing the interior, it is important to update the roof.
- Over the course of the car's operation, the upholstery becomes very yellow, which greatly spoils the interior of the car.
- A thin layer of material does not in any way affect the noise reduction of the car roof.
- The soft upholstery is easily damaged, so it is enough to catch it with a sharp object to disturb the interior of the car.
Source