This important spare part ensures the movement and controllability of the car. Its main functions:
- wheel mount;
- its rotation;
- transmission of torque from the transmission to the wheel, that is, the connection between the shaft and the disk.
Hubs are divided into two types - front wheel hubs and rear wheel hubs. They differ in location: the former can be found in the front wheels, and the latter in the rear.
Rear wheel hub
Structure
The part has a fairly simple structure. Essential elements:
- outer rim (used for screwing in bolts);
- internal part (for bearings);
- holes with slots (for CV joint);
- protective caps;
- sensor (it is sometimes included in the design).
CV joints are constant velocity joints; their main task is to transmit torque.
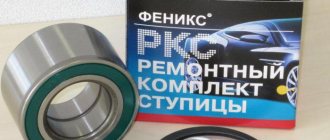
Note! The set of fasteners for this part consists of two nuts and one washer.
Hubs for different purposes have different technical characteristics. Hubs for passenger cars have the form of a hollow, lightweight cylinder, while for “heavyweights” the diameter of the part is larger.
What drives can be installed
When planning to replace old steel wheels with alloy wheels, you should choose either original products or products from well-known manufacturers who care about the quality and safety of their products.
Alloy wheels combine the following useful properties: they are lightweight, practical to use, endowed with sufficient strength and have an attractive appearance, which is aimed at transforming the entire appearance of the car.
The most common among alloy wheels are aluminum products. This is due to the fact that they are resistant to corrosion, meet strength requirements and, in comparison with other alloy wheels, remain relatively inexpensive.
Titanium alloy is the most expensive option. It also meets all the technical specifications, but at the same time has a more attractive appearance. In third place is the option using a magnesium alloy.
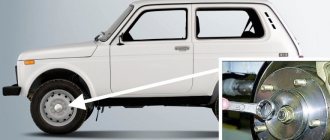
The latest models from AvtoVAZ use wheels with a 4x100 mounting pattern. When installing them on a 4x98 hub, you should use studs with an eccentric to compensate for the difference of 2 mm. To install disks with other mounting patterns, you will have to use the appropriate adapters (spacers).
You must understand that installing wheels larger than 15 inches is impossible without interfering with the car’s design.
Causes of problems
The hub is a very durable part of a car disk, so breakdowns rarely occur. But still sometimes deformation of the spare part occurs. In addition, the rear hub is more wear-resistant than the front hub, since it is less subject to heavy loads.
"Road factors"
Ingress of moisture and dust eventually displaces the lubricant, and the disc begins to overheat as a result of excess friction.
Insufficient lubrication
It ranks first among the causes of failure of this spare part.
Important!
Sometimes it is caused by poor-quality lubricant material.
Excessive loads
In the average area this is unlikely. Usually found in mountainous areas.
Strong “tightening” of fasteners
It often happens that the bolts are screwed in more than necessary - this is how the threads wear out.
Important! If the hub and bearing are an inseparable connection, then there is almost no risk of wear of such a structure.
Replacement
Having selected the set of front wheel bearings required for replacement, you can get to work.
For repairs, in addition to the standard set of tools, you will need special bearing mandrels. If they are not available, you can use a pipe of suitable diameter.
Dismantling works
By following the instructions and relying on video lessons, you can replace the front wheel bearing with your own hands.
- Loosen the tension of the wheel bolts, remove the decorative plastic plug from the hub bearing and loosen the fastening nut.
- Using a socket and lever, loosen the bearing mounting nut.
- Raise the car with a jack, and then remove the wheels from the part of the front of the VAZ 2109 where you plan to replace the bearing.
- Remove anything that might prevent you from removing the hub. These objects include the brake disc, fastening to the steering knuckle, ball joint, steering knuckle mounting bolts, and front strut fasteners. Dismantle it all and move on.
- Completely unscrew the front hub nut, remove it and remove the thrust washer.
- It is necessary to remove the hubs from the front strut bracket and remove it.
- The hub has been dismantled, so you can press the damaged bearing out of it and put a serviceable unit in its place.
- Place the hub in a vise or in any other way convenient for you.
- Using a drift that fits the diameter, press the hub out of the inner race of the bearing.
- In some cases, the outer part of the inner ring may remain on the hub. In such a situation, you cannot do without a puller. In general, it is better to work with a special tool. It will probably be found among your friends or neighbors in the garage.
- Using the same drift, you need to remove the bearing from the steering knuckle. To do this work, you will have to remove the retaining rings in advance. They can be removed with any available tool, such as an awl. Although there are special clamps for such purposes.
This is interesting: Definition - what is an actuator: types, do-it-yourself repairs, modernization, installation and removal
Accuracy is paramount
- That's it, you managed to remove the hub bearing.
- Carefully treat all dismantled parts using clean kerosene. Follow fire safety regulations.
- Assess the condition of the hub itself. If there are signs of damage, defects, or chips on it, it should be replaced with a new one.
- The new bearing is installed in place using a vice or press. In this case, force must be applied to the outer rings.
- Using a tool such as a hammer to drive in a bearing is strictly prohibited, as this will lead to destruction of the new part.
- After installing the front wheel bearing, perform the reassembly procedure
- Don't forget to change the hub nut.
- Once the assembly is fully assembled and the vehicle is lowered to the ground, only then should the mounting nuts be fully tightened.
Repairing the front hub when the bearing wears out or breaks is not as difficult as it might seem at first glance. Our instructions, supplemented by video tutorials, will help you complete the process yourself from start to finish.
Replacement with the rack not removed
This method will allow you to avoid subsequent collapse. Here you need to remove:
- wheel together with disk;
- caliper and the hub itself.
Replacement is carried out directly on the car, without removing the rack. Here you will have to work with a puller. The procedure is performed like this:
- unscrew the bolts from the brake drum and remove it;
- remove the ball joints;
- pull out the CV joint from the front hub, and then remove it itself using a chisel;
- the retaining ring is pulled out from the steering knuckle (it contains the outer part of the damaged bearing);
- the puller is installed directly on the fist;
- by tightening the bolt of the device, the part is pressed out;
When it completely leaves the axle, the protection is dismantled, then the hub is removed, from which the inner race is removed.
You can also remove the latter without a puller, but you will need a chisel for this. It’s also quite easy to score with a grinder and then split with a heavy hammer.
Installation
The inner surface of the fist is cleaned of dirt and lubricant (solid oil) is applied to it. The puller with the new bearing is installed in place and pressed into place. To make the process easier, it is recommended to first cool it thoroughly in the freezer.
A working unit is inserted into the fist as evenly as possible, trying to avoid distortion. After installing the bearing, put the hub back on and press it in if necessary. All other stages of work are carried out in reverse order.
The hub nut must be tightened using a torque wrench (the required force is 20 N*M).
Replacement without a puller with dismantling the rack
In this case, the entire structure must be completely removed from the car, including the steering knuckle. Replacement of a part that has become unusable is carried out directly at the rack. The advantage of this method is that there is no need to subsequently deal with wheel alignment.
All work is carried out in the following order:
- the steering tip is removed;
- the upper bolts holding the rack are unscrewed (they are located in the engine compartment);
- then it is removed from the CV joint and pulled out of the car.
The bearing is replaced and the strut is mounted in place.
Replacement without dismantling the stand and puller
In this case, it is necessary to remove the entire rotating mechanism with the hub installed.
Then she is knocked out. Upon completion of the work, you will have to check the wheel alignment. The sequence of actions here looks like this:
- the caliper is removed;
- the bolts securing the rack are screwed together;
- the rotating mechanism is removed;
- the CV joint is then removed;
- the drum is twisted from the hub;
- dismantle the protection;
- the fist, freed from other elements, is secured in a vice;
- the hub is knocked out, and then the bearing is removed.
How to recognize malfunctions
There are many signs that help identify a breakdown:
- uneven wear of tires;
- increased vibration;
- the appearance of extraneous noise;
- overheating of the disk (this means that the bearing is not working properly);
- the car deviates to the side from a straight path and the body sways (these signs are explained by the fact that a working wheel ensures smooth movement, and when a breakdown occurs, imbalance occurs).
Important!
The most characteristic “pattern” is the sound in the rear chassis.
The easiest way
If all of the above is not picked up by the hearing and vestibular apparatus, then there is an optimal method. You need to push the tire with your foot to identify any play.
Note!
This method is very effective in the initial stages, when the symptoms are least pronounced.
When should you replace the front wheel bearing?
It should be said right away that the bearings on both the front and rear hubs of the VAZ 2109 do not have a strictly specified service life. If we take the average data provided by the car owners themselves, it turns out that a new domestically produced wheel bearing can successfully travel up to 100,000 kilometers. After this number, problems may begin.
What leads to rapid wear
- Bad roads. When driving on a bad road, wheel bearings are subjected not only to frictional forces, but also to huge shock loads. For some time, the bearing successfully copes with all this, but then so-called “metal fatigue” may occur, which will lead to the rapid destruction of this part.
- Overheat. During operation, the bearing either heats up or cools down. Such temperature changes are harmful for any part, but in our country they are also aggravated by the climate (regular heating and sudden cooling in the cold of 40 degrees is clearly not good for bearings).
- Aggressive environment. This means that moisture, dirt, and chemicals that are sprinkled on roads sometimes get into the hub. Dirt and sand can act as an abrasive, and moisture and chemicals can cause corrosion.
There is only one result: premature wear. The main sign that it is time to change the bearings is a characteristic low hum that occurs in the wheel area while the car is moving. And the higher the speed of the car, the louder the hum. At first, when the bearing is not yet very worn, this hum is practically inaudible; it appears and then disappears. But as it wears out, it develops into a real howl that is hard not to hear. If the bearing has already “howled”, this means only one thing: it needs to be changed urgently. If this is not done, the wheel will simply jam. And if this happens while driving at high speed, the car will definitely skid, which, in turn, will lead to an accident.
Tools
The “package” of tools includes:
- hammer, pry bar;
- socket wrenches (for drum pins), spanner wrench;
- passages (for rings).
Note!
You can use an additional wooden block to soften the blow, and it’s good to add a long pipe to the socket wrenches.
Appearance of socket wrenches
Why is inaction dangerous?
It is better not to ignore a malfunction of the rear wheel bearing for several reasons:
- firstly, in the presence of noise and hum, driving a car is not nearly as pleasant as it might seem at first glance. To get rid of unnecessary sounds, car enthusiasts are ready to endure any costs;
- secondly, ignoring a bearing failure may lead to the need to replace the entire strut (which, naturally, entails more serious costs);
- thirdly, malfunctions of the chassis system are dangerous due to the unpredictability of the car on the road and an increase in the likelihood of an accident. Therefore, it is highly undesirable to joke with this.
How to remove a rear wheel hub and install a new one
The replacement procedure looks like this:
1. The car is installed on a lift. 2. Next, unscrew the nuts and remove the caliper. 3. Remove the hose, brake disc, and steering lever. 4. Release the hub from the ball joints and remove the strut fasteners. 5. Install a new bearing, return all parts to their place.
Important!
For diagnostics, you can contact a service station, but according to reviews from car owners, the quality of the repair will depend on the responsibility and skill of the specialist, so in some cases you can repair the part yourself, but you should be extremely careful.
Preparatory activities before replacement
Regardless of the chosen replacement option, you will need a minimum set of tools:
- Large screwdriver.
- Keys: 17, 13, 10.
- Hexagon 10.
- Hammer and chisel.
- A long 30mm wrench or a 30mm socket with a knob.
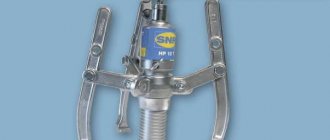
- Wheel puller for VAZ (photo).
- Mandrels (or heads) for knocking out the old part from the hub.
- Torque wrench.
We prepare the car, place it on a flat surface, you will also need bright lighting. You will complete all the work faster with an assistant, and also if you use an inspection hole (overpass). Put the car in first gear, and be sure to put chocks under the rear wheels.
Advice: The first, more efficient and high-quality replacement option is recommended for work, since pressing in and out is done using a removable device, in a shock-free manner.
Tools and materials for work
- Wheel chocks;
- Socket head for nine, thirteen, fifteen, nineteen, thirty;
- Power wrench;
- Jack;
- Wheel bolt wrench;
- Car stand;
- Nineteen spanner;
- Penetrating lubricant;
- Ratchet driver;
- Kardanchik;
- Extension;
- Pliers;
- Vise;
- Torque wrench;
- Extensions for dismantling and installing bearings;
- Hammer;
- Deep head for seven;
- Slotted screwdriver;
- Rubber hammer;
- Bulgarian;
- Chisel;
- Circlip pliers;
- Lithium grease.
This is interesting: EGR valve: what is it, principle of operation, main malfunctions
Sequencing
- First of all, the car should be in first gear, after which the car is put on the handbrake. Wheel chocks must be placed under the rear wheels.
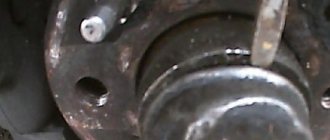
- The car is jacked up, the wheel, in the hub of which the bearing is damaged, is removed.
The car is on a jack, the wheel is removed, the hub is visible
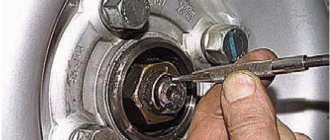
- Use a 30 mm socket wrench to unscrew the wheel bearing nut.
The nut is unscrewed with a 30mm head
- Using a flat screwdriver, pry up the caliper, then it should be unscrewed from the steering knuckle (for this, use a 17 mm spanner).
- The unscrewed caliper should be tied with something (otherwise it will hang on the brake hose and this hose may come off under its weight). You should also unscrew the brake disc from the hub.
- Now you need to remove the wheel bearing itself. To get to it, you must first remove the steering knuckle, which will require unscrewing a couple of bolts that secure the knuckle to the car's ball joint.
Use a spanner to unscrew the ball joint bolts
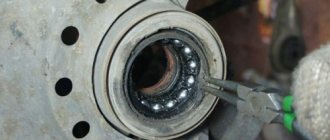
- Using an attachment of a suitable diameter (you can use a piece of steel pipe of the required diameter as this attachment), you should knock the hub out of the bearing, after which you need to remove the retaining ring (pliers are excellent for removing the retaining ring).
It is better to knock out the hub with a pipe of suitable diameter
The best way to remove the ring is with pliers.
- Now you need to press out the bearing. This is done using a puller pre-clamped in a vice.
Pressing out the bearing with a puller
The bearing was successfully pressed out by the puller
- After pressing out the bearing, the place where it was located must be thoroughly cleaned of rust and dirt, and then lubricated.
- The new wheel bearing is pressed into the steering knuckle using a vice and a puller, and the retaining ring is installed in place.
- The knuckle with the new bearing is screwed back to the ball joint, the unit is reassembled, and the wheel is installed in place.
Kinds
The following types of hubs exist:
- driving unsteered wheels;
This type is suitable for rear-wheel drive cars and is installed on the rear wheels.
- driven uncontrolled;
You might be interested in this About rims on Hyundai cars
Designed for the rear wheels of front-wheel drive vehicles.
- leading managed;
Used in the front wheels of front-wheel drive cars.
- slave managed;
This type is needed for the front wheels of rear-wheel drive cars.
Bearing selection
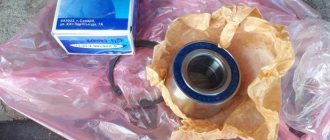
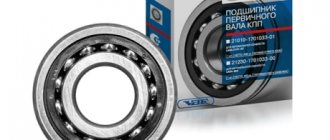
To replace a wheel bearing, you will need to know about its parameters, dimensions, and characteristics specific to the VAZ 2109.
For the “nine”, a double-row angular contact roller bearing with tapered rollers is used. Axial clearances are pre-adjusted and filled with lubricant. Closed bearing type.
Based on the table, you can find the optimal bearing for the front hub of your car.
| Parameter | Required indicator |
| Inner diameter | 34 millimeters |
| Outside diameter | 64 millimeters |
| Bearing width | 37 millimeters |
| Bearing weight | 0.556 kilograms |
| Limit speed | 3700 rpm |
Hub for VAZ-2108
The spare part for the VAZ-2108 is fundamentally no different except for the size. Clip diameter: internal - 30 mm, external - 60 mm. Width - 37 mm, weighs 400 grams. The tools that will be useful are head 30, keys 12, 13, 14.
Manufacturers
The main manufacturers of spare parts are factories in the cities of Saratov, Samara, Kursk, Vologda.
Important!
All characteristics need to be clarified with sellers, because factories periodically update production standards.
Approximate drawing of a hub for a VAZ-2108
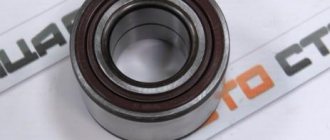
What is a wheel bearing
The wheel bearing is the most important part of a car. Its main task is to ensure smooth and uniform rotation of the wheel. It acts as a connecting link between the car axle and the hub (to which the brake discs and wheel are attached using studs). It is impossible to see the wheel bearing from the outside. To get to it, you will have to remove the so-called rotary cam from the car, inside of which this bearing is located.
External view of the wheel bearing of a VAZ 2109 car
Wheel bearing location diagram for VAZ 2109
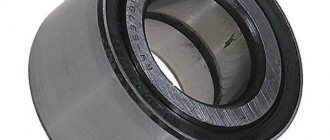
Bearing designs may vary. They come in both ball and roller types (this depends on both the brand of the bearing and the car manufacturer). Since the article is about the VAZ 2109 car, the car owner will have to deal with closed-type double-row wheel ball bearings, better known as HUB-1. They are used on almost all “nines”, and the reliability of these bearings leaves much to be desired.
Which hub to buy
Hubs are presented in two categories on the market:
- branded;
- specialized brands SNR (France, satisfactory reviews*), SKF (Sweden, ranked second after SNR), FAG (Germany) and others.
Important!
In addition to direct manufacturers, there are also packaging companies on the market - CX (China), QH (has low ratings), Optimal (you can find many negative reviews about this packer), Ruville (average quality).
What is a hub and why is it needed?
In mechanics, a hub is the central part of a part with a hole (usually it looks like a keyway) for fitting onto a shaft, in particular onto a trunnion. Also, spokes are attached to the hub.
This is what the hub looks like. The part is made of cast iron or steel, turning and milling.
This important spare part ensures the movement and controllability of the car. Its main functions:
- wheel mount;
- its rotation;
- transmission of torque from the transmission to the wheel, that is, the connection between the shaft and the disk.
Hubs are divided into two types - front wheel hubs and rear wheel hubs. They differ in location: the former can be found in the front wheels, and the latter in the rear.
Rear wheel hub
Final assembly
To assemble, follow these steps:
- Install the hub onto the axle.
- Place the washer and tighten the nut by hand.
- Install the brake drum and tighten the studs.
- Place the wheel and lower the car.
- Tighten all threaded connections.
- Place the nut on the hub.
Reassembling the entire assembly occurs in the reverse order. The hub nut must be tightened to a torque of about 200 N*m.
Source
Rear suspension of VAZ 2109.
- central beam,
- trailing arms,
- mounting brackets,
- springs,
- hydraulic shock absorbers.
The central beam is the main element in the design of the rear axle of a car. The design is welded.
Springs and hydraulic shock absorbers are also of high importance in suspension. They are attached to the beam from below with bolts, and with their upper part to the car body through rubber-metal bushings.
Shock absorbers (double-acting) give smoothness and stability to the vehicle, and also dampen radial vibrations.
As for the rear suspension springs, they come in two stiffness classes: A - more rigid, “high” and B - less rigid, “low”. In this case, the rear springs must have the same stiffness as the front suspension springs. Although in some cases, it is allowed for class B springs in the rear suspension, and class A springs in the front suspension, but not vice versa!
In the case when the car’s suspension “breaks through” to the bump stops and (or) sags under load, it is recommended to install stiffer springs on the car, not forgetting to first check their performance.
But let's return to the main structural element of the rear suspension of the VAZ 2109 - the central beam.
According to the design of the car, flanges are welded to its side parts, to which, in turn, the hub is screwed. The hub has a sleeve bearing. This is a double-row angular contact bearing with a transitional fit on the axle. During vehicle operation, this wheel bearing does not require replenishment of lubrication or adjustment. By the way, if play occurs, the bearing should simply be replaced, but under no circumstances should you try to eliminate the play by tightening the nut. If the bearing does not play, then there is no need to remove the hub.
As for other malfunctions and possible repairs, I would like to note the following.
The chassis of a car is its basis, therefore, it is necessary to regularly (at least once every 6 months, and during intensive driving - once every 3 months) monitor its condition.