The cigarette lighter is an essential attribute of any car. Often there is a need for an additional cigarette lighter, located in the trunk or on the panel, next to the main one. Through a splitter you can connect up to 3 different devices to one cigarette lighter. The additional cigarette lighter is connected directly to the battery. After reading the article, you will learn how to connect the cigarette lighter in your car correctly without harming your car.
How does a cigarette lighter work?
A car cigarette lighter is two devices - a heating element and a connector (plug) in a convenient housing. It can be directly connected to the battery, so the device works even if the ignition switch is turned off. In addition to its main purpose, the plug is often used as a 12/24 volt outlet to which a splitter is connected to provide power to a laptop, phone or other devices. A splitter is also connected to it, so you can simultaneously charge a laptop, phone, or use a DVR. The power splitter or power supplies of these devices are inserted into a plug that provides a reliable connection to the cigarette lighter socket contacts.
What you need to insert a cigarette lighter
If you decide to install an additional cigarette lighter, you will need the following tools:
- drill;
- set of metal drills;
- metal crown, the diameter of which corresponds to the selected cigarette lighter;
- round and flat files;
- soldering iron;
- solder;
- rosin;
- pliers;
- side cutters;
- Screwdriver Set;
- heat-shrink tubing;
- switch;
- fuse;
- the wire;
- a regular cable splitter (220 volts) from a hardware store
How to install a cigarette lighter
Before starting work, be sure to disconnect the negative terminal of the battery, and also make sure that the ignition switch is in the “off” position.
There is no single method for inserting this device, because cigarette lighters vary in length, size and shape of the case, as well as the method of fastening. The easiest way is to insert this device into a standard hole of a suitable size. If there is no such place and you could not find a suitable crown, mark the contours of the opening, then very densely drill holes with a diameter of 2–3 mm around the perimeter. After this, use side cutters to carefully cut the jumpers between the holes, and then level the seat with a file. Insert the cigarette lighter to ensure the area is prepared correctly. If necessary, correct the hole.
Do not install the plug on curved or corrugated surfaces because you will not be able to secure it properly. Remember, the distance from the bottom of the cigarette lighter body to any body part must be at least 2 cm.
Having prepared the seat, proceed to selecting the wire and fuse. A plug directly connected to the battery can easily transmit current up to 30–40 amperes, so the load power limitation depends on the thickness of the wire and the fuse rating. Each millimeter of cross-section of a stranded wire is capable of transmitting 5–10 amperes of current to the plug. If you are going to connect a load with a power of 300-500 watts, then the current will be 25-40 amperes. The cross-section of the wire for such a current will be 4–6 mm. An attempt to pass such current through a wire of a smaller cross-section will lead to its melting or fire. Consider a path for the wire that will directly connect the plug and battery. It is advisable to lay it through the technological holes of the body next to the standard wiring.
Remove the interior floor and trunk trim, then carefully inspect the selected path for the wire. If you can get it through the finished holes, then do it. If not, drill new ones. At your local auto store, purchase rubber seals that will protect the wires from the sharp edges of the hole in the body. Drill holes, focusing on the diameter of the seal, and process their edges first with a file, then with anti-corrosion materials. Attach the wire to the body or standard wiring bus using plastic clamps.
Connecting the cigarette lighter
Never connect the cigarette lighter to the ignition switch. The ignition system will not withstand such a load. Having laid the wire in the engine compartment, bring it to the positive terminal of the battery, connect the fuse and then attach it to the terminal. If for some reason you cannot do this, run a wire with a fuse to the starter and attach it to the positive terminal of the relay. Strip the end of the wire at a distance of 1 cm, place it on the terminal, then crimp it using pliers. Be sure to secure the wire so that it does not dangle anywhere. To attach the wire to the cigarette lighter, use a soldering iron or an appropriate terminal, depending on the device model. Install a fuse and a switch next to the cigarette lighter, this will increase the safety of using this device.
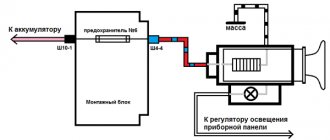
Do not confuse the arrangement of parts of the diagram:
- Battery.
- Fuse.
- Switch.
- Relay.
- Cigarette lighter.
The switch must be designed for a current of 1.5 times the maximum load. If there is no such switch, attach a relay next to it that is suitable for the current. Some drivers place a switch and relay next to the ignition switch. Connect the switch to the control contact of the relay, and the cigarette lighter to the power one. To do this, place heat-shrink tubing on the exposed ends of the wire, then push and crimp the terminals. Adjust the tube so that it completely covers the junction of the terminal and the wire, then heat it with a match or lighter. You can also install a regular cable splitter (220 volts), which is sold in hardware stores. Find the nearest ground connection location (the wire is bolted directly to the body). Unscrew the bolt, clean the contact pads of the terminal and body. Route a piece of wire from the relay and cigarette lighter to the ground hole to determine the length, then cut and strip the ends.
Make a splitter - take a piece of wire of a suitable length, strip both ends. Then solder the ends of the long and short wires to each other so that they both point in the same direction. Protect the connection with heat shrink tubing, then attach the connection terminal to the negative of the cigarette lighter. Position the tube so that it completely covers the contact point. Place heat shrink tubing on the other end of the short wire and attach the terminal. Or use a regular cable splitter, which must be rigidly attached to the body.
Installation check
Check all connections carefully. The relay and splitter must be securely attached to the housing. After making sure that everything is in order, check that the ignition switch is turned to the off position and connect the battery. Using a tester, measure the voltage on the unconnected battery. Place the negative terminal on the corresponding battery terminal and measure the voltage again. If it hasn't changed, then everything is fine. If it drops by at least 0.5 volts, turn all electrical appliances on and off, including the ignition system. If the voltage does not rise, disconnect the battery and look for a short circuit. If everything is fine, turn on the switch and measure the voltage on the battery again. After making sure that everything is correct, measure the voltage at the cigarette lighter contacts. If everything is in order, you have successfully completed the job.
This device is in every car. Even non-smoking drivers use the cigarette lighter. After all, you can connect additional devices to the socket. Most often the following is connected to the cigarette lighter socket:
- tire inflation pump;
- portable charger for mobile phones, tablets or laptops;
- DVR recording traffic conditions;
- navigation system.
Drivers often feel the need for an additional socket. You can find out how you can connect the cigarette lighter with your own hands, what you will need for this, and how to carry out the entire installation procedure, in the article.
Connecting the DVR through the ceiling lamp
If you install a DVR with a camera in the area of the rearview mirror, then it can be connected to the lamp located on the ceiling. When implementing this option, a minimum piece of wire will be required.
What will you need?
To complete the task you will need:
- Phillips head screwdriver;
- flat-head screwdriver;
- a set of cables through which the recorder will be connected to the power supply;
- a set of fastening brackets equipped with Velcro;
- soldering iron with rosin and tin;
- insulating tape.
Step-by-step instruction
The correct method of installation and connection to the lighting lamp has the following features:
- The upper light source is disassembled; for this, a screwdriver with a flat or Phillips head is used, depending on the type of fasteners. The electrical circuit contacts are soldered to the positive and negative lines on the lampshade. You can connect the ends of the wires to the contact elements on the plug.
- To ensure reliable connections, electrical circuits cannot be insulated. This may cause interference with the operation of the DVR. And the presence of interference will reduce the quality of the image that the device records.
- To determine the place where the positive wire will be connected, you need to use a multimeter. Using the tester, the ground in the lighting device loop is also determined and the voltage in the machine's electrical network is diagnosed.
- To connect the power supply circuit to the device from the lighting device, it is better not to use the standard connector; it is recommended to disassemble it. Experts advise users who have experience in electrical installation work to do this.
- To ensure maximum safety when connecting to a lighting fixture, a power module is used. It is purchased additionally and is not included in the package. The main advantage of such a device is the presence of a built-in resistor element rated at 150 Ohms. When connecting models that consume less than 200 mA, additional load resistors must be added to the electrical circuit.
- Hidden wiring is carried out to the technological hole in the center console or to the lighting device. Placement will require removal of the decorative trim on the side pillar next to the windshield. If an open cable routing option is used, the electrical circuit can be located at the junction of the rack. Fixation of power lines is carried out using adhesive staples. In order not to disturb the aesthetics of the interior, the color of the cable must be chosen to match the decorative upholstery.
Dmitry Pristrom spoke about the nuances of connecting the recorder circuit to the lamp in the car interior.
How does a cigarette lighter and its structure work?
The device circuit is simple. The cigarette lighter in a car consists of several parts:
- sockets with a connector connected to it;
- metal cartridge, inside of which there is a nichrome spiral.
The cigarette lighter is designed in such a way that when the car owner presses the button, the contacts are closed, to which alternating current is supplied. As a result, the element begins to heat up. When the maximum temperature is reached, the built-in thermal relay gives the command to snap off the device. If used correctly, the car cigarette lighter will work for a long time. However, there are reasons why the device fails earlier.
This is the connection of several powerful devices to one socket. The maximum permissible current value increases and the cigarette lighter fails. Therefore, car owners tend to install an additional device in their car.
Where is the plus in the cigarette lighter, where is the minus: pinout, car, polarity, plug, contacts, socket
Leading automakers began introducing cigarette lighters in their cars back in the 20s. last century. Since then, they have gained great popularity and have become an indispensable accessory on the dashboard of vehicles. The operating principle of the devices has not changed, but the capabilities and functions have been expanded.
Design and principle of operation
The car cigarette lighter has a simple design and is a small metal cartridge with a plastic handle and button. A nichrome spiral is installed under the body, which is heated by electric current.
There is a special socket on the instrument panel or in another part of the car. If you insert the cigarette lighter into it and press the handle, it will be connected to the on-board network.
The positive contact mates with the central terminal of the socket and the spiral of the device. The negative interacts with the socket base and the plug clamping mechanism. When using the cigarette lighter, current is supplied through the nichrome element, which contributes to its heating.
After reaching the maximum temperature indicators, the thermal relay is activated, and the cigarette lighter is disconnected from the on-board power supply.
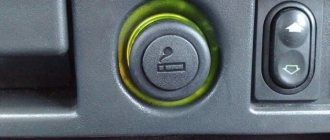
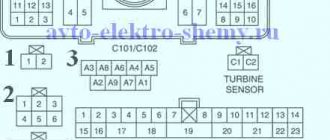
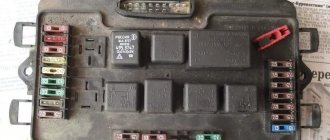
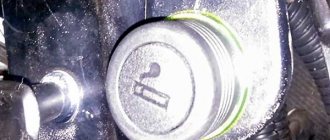
To protect the connector from blowing, manufacturers install a 10 A fuse. It is located in the fuse block and is indicated by the “cigar” marking or a cigarette icon.
Since its appearance in the first half of the 20th century. The internal structure of the cigarette lighter has remained virtually unchanged.
The key advantage of the device is the ability to power a variety of electrical appliances, which make long driving comfortable and safe.
However, due to the consumption of a large amount of energy, the structure may fail. In addition, there are other disadvantages of such an accessory. When gadgets are frequently connected, the internal elements of the device are subject to a large mechanical load, which contributes to their wear.
Most fork models have only spring elements and a few pressure forks. Therefore, when driving over rough terrain, natural vibrations are created that disrupt contact and lead to sparks in the cigarette lighter. This phenomenon can cause a short circuit and even lead to a fire.
Where is the plus and where is the minus in the cigarette lighter?
To understand how the cigarette lighter works, where the plus and where the minus are, it is enough to examine its key components.
The plus point about the cigarette lighter is its handle. When you press the button, the electrical circuit is closed, and the nichrome spiral is heated
When wondering where the minus is on the cigarette lighter, you should pay attention to the side walls of the metal cylinder
Using the polarity information as a guide, you can begin to repair the damaged part. To restore a failed element you need to:
- Unscrew the nut on the back side and remove the device.
- Find the semiconductor wafer and remove it (if it caused the breakdown).
- Make a small cut on the body and begin assembling the device.
- Strip the wires and crimp the terminals.
- Remove the center console in the car and turn off the backlight.
- Remove the block.
- Connect the wires using connecting clips, observing the diagram and polarity.
- Pull the wires down and connect them to the socket.
- Put the accessory in place.
- Turn on the backlight.
Cigarette lighter installation tool
To professionally make a cut-in and connect the device, you will need to stock up on the necessary tools:
- drill or screwdriver with a set of metal drills;
- a crown for cutting out a socket, the diameter must match the diameter of the cigarette lighter;
- file;
- soldering iron with solder;
- wire cutters;
- screwdrivers;
- multitester;
- heat-shrink tubing;
- wire of suitable cross-section;
- a fuse that can withstand the current recommended by the manufacturer (from 10 to 25 amperes - depending on the car model).
You will need to buy an additional plug-in cigarette lighter to connect it. The price of the device ranges from 300 to 1.5 thousand rubles (per Euro model), depending on the manufacturer. You need to buy original parts - they guarantee proper operation of the device. Cheap cigarette lighter options should be abandoned. The quality of the materials there is unsatisfactory and such elements will quickly fail.
Connector configuration
One of the key parameters of a car cigarette lighter splitter is the number of 12 V sockets: from one to four. Accordingly, the more connectors are provided, the more equipment can be connected. But the more slots, the more massive the device body becomes.
USB ports may also be provided in the splitters. Not all models have them, but many are equipped with one or even two computer connectors. They are useful for charging smartphones, tablets and other mobile equipment. The main convenience of USB ports is that they are more compact than conventional 12-V outlets, and a USB cable usually costs less than a full-fledged car charger.
In most cases, manufacturers install USB ports with weak output parameters - 5 V/0.5 A. In this case, fast charging is out of the question: if you connect a smartphone with the navigation program turned on, you will have to hope that the device will at least not discharged. In some cases, the manufacturer claims a current of 1.5 or even 2.1 A, which is much better, although the actual values depend on many factors.
Regarding tension, there is one more subtle point that you can forget about. If you are going to use a “tee” in a truck with a 24 V on-board network, then you need to make sure that the device can withstand it. In most cases, splitters do not care what voltage they work with (12 or 24 V), but some models are only compatible with 12 V.
How to connect correctly
A three-pin plug fits a standard car cigarette lighter. Before installing an additional device, you need to understand how a car cigarette lighter works and learn the pinout.
The connection diagram looks like this.
- A constant minus. Comes to the car body.
- A constant plus. Connects through a fuse to the battery.
- Plus, coming up to the backlight bulb.
Option to mount directly to the battery
There is a way to connect directly to the car battery. This scheme has advantages. You need to know how to connect the cigarette lighter directly to the battery. This will avoid interference with the wiring itself. The work will take less time; the positive wires should be brought directly to the battery, and the negative wire should be attached to the car body.
It is necessary to select the necessary spare parts. Initially, this concerns the wires. Each square millimeter of cross-section is designed for 5 - 10 amperes of current. You should take the wire with a reserve. A cross-section of 3–5 mm is quite sufficient to transmit the required voltage. Otherwise, the wires may burn, resulting in a risk of short circuit. The circuit should be routed through an additional fuse with a rating specified by the manufacturer.
How to make an additional cigarette lighter?
If you have the necessary tools and spare parts, you should begin installation work.
- Turn off the engine and then remove the negative cable from the battery.
- We determine the place where the additional cigarette lighter should be located. As a rule, this is the space near the rear seats or near the luggage compartment. Do not connect the socket on curved or corrugated surfaces - it will not fit securely. The minimum permissible distance between the plug and the body is 2 centimeters.
- Using a hole saw of a suitable diameter and a drill, we cut out a seat for the cigarette lighter. We process the circle with a file, removing excess material.
- We remove the floor or trunk trim to find out how best to route the wiring. It is most convenient to mount the wires through the factory holes. If that doesn't work, drill new ones in suitable places. Each hole must be equipped with a rubber seal to avoid chafing or creasing the wire. For reliability, it is worth using plastic clamps.
- Mount the switch. It must be designed for a current of at least one and a half times the maximum load. It is most convenient to mount the switch near the ignition switch.
- We connect the switch to the control relay, and the cable to the power one. To ensure reliable contacts, it is recommended to place all solders on heat-shrinkable tubes. For convenience, you can use standard cable splitters.
Checking the work done
After the installation procedure, you should inspect the device.
- Before assembly, all connections must be checked. The wires must be well soldered and not come into contact with metal parts of the body. No creases or exposed areas.
- We measure the voltage on the battery. Then we connect the negative terminal and check again. If the voltage drops by more than 0.5 volts, then you should look for a short circuit. You may have failed to connect to the cigarette lighter correctly.
- Measure the voltage at the cigarette lighter contacts and test all wires for continuity. Afterwards, it is advisable to turn on the ignition and check the functionality of the socket. The device should easily charge your phone or withstand a connected compressor.
How to improve a ready-made cigarette lighter
Many car enthusiasts purchase a special splitter unit that allows you to connect several devices to one connector (see photo). However, the design of the car's cigarette lighter, as well as the cross-section of the wires, does not allow it to be used as efficiently as possible.
Connecting several devices leads to excess voltage or current, causing the fuse to blow or the wires to burn out. Then the device needs to be repaired. You can improve the device by choosing thicker cables that fit the car cigarette lighter.
The millimeter of cross-section is designed for a current of about 5 - 10 amperes. If a device with a power of 300–500 watts is connected to the socket, then the power will reach 25–40 amperes. You will need wires with a cross section of 4 - 6 mm. Such a reinforced structure will work for a long time without causing problems. You can connect an additional socket according to the instructions described earlier.
The cigarette lighter is an essential attribute of any car. Often there is a need for an additional cigarette lighter, located in the trunk or on the panel, next to the main one. Through a splitter you can connect up to 3 different devices to one cigarette lighter. The additional cigarette lighter is connected directly to the battery. After reading the article, you will learn how to connect the cigarette lighter in your car correctly without harming your car.
How does a cigarette lighter work?
A car cigarette lighter is two devices - a heating element and a connector (plug) in a convenient housing. It can be directly connected to the battery, so the device works even if the ignition switch is turned off. In addition to its main purpose, the plug is often used as a 12/24 volt outlet to which a splitter is connected to provide power to a laptop, phone or other devices. A splitter is also connected to it, so you can simultaneously charge a laptop, phone, or use a DVR. The power splitter or power supplies of these devices are inserted into a plug that provides a reliable connection to the cigarette lighter socket contacts.
What you need to insert a cigarette lighter
If you decide to install an additional cigarette lighter, you will need the following tools:
- drill;
- set of metal drills;
- metal crown, the diameter of which corresponds to the selected cigarette lighter;
- round and flat files;
- soldering iron;
- solder;
- rosin;
- pliers;
- side cutters;
- Screwdriver Set;
- heat-shrink tubing;
- switch;
- fuse;
- the wire;
- a regular cable splitter (220 volts) from a hardware store
Advantages and disadvantages of car cigarette lighters
Once introduced, it remains an integral part of the equipment.
With the development of technology, many devices have appeared that require sufficient power from the vehicle’s on-board network. AP began to be used as a car socket. The operating principle of the device has not changed over the years. But various tees and adapters appeared that expanded the possibilities of using AP (the author of the video is Do It Yourself).
The main advantage of a car cigarette lighter is the ability to connect a large number of different electrical appliances that may be needed on a long trip or will increase the comfort of the trip.
Since large amounts of current pass through the AP, its design is unreliable. In addition, the device constantly experiences additional mechanical stress due to the constant connection of various devices. During the trip, due to vibration, the contact between the AP and the socket is broken. As a result, sparks may appear, which may even cause a short circuit.
How to install a cigarette lighter
Before starting work, be sure to disconnect the negative terminal of the battery, and also make sure that the ignition switch is in the “off” position.
There is no single method for inserting this device, because cigarette lighters vary in length, size and shape of the case, as well as the method of fastening. The easiest way is to insert this device into a standard hole of a suitable size. If there is no such place and you could not find a suitable crown, mark the contours of the opening, then very densely drill holes with a diameter of 2–3 mm around the perimeter. After this, use side cutters to carefully cut the jumpers between the holes, and then level the seat with a file. Insert the cigarette lighter to ensure the area is prepared correctly. If necessary, correct the hole.
Do not install the plug on curved or corrugated surfaces because you will not be able to secure it properly. Remember, the distance from the bottom of the cigarette lighter body to any body part must be at least 2 cm.
Having prepared the seat, proceed to selecting the wire and fuse. A plug directly connected to the battery can easily transmit current up to 30–40 amperes, so the load power limitation depends on the thickness of the wire and the fuse rating. Each millimeter of cross-section of a stranded wire is capable of transmitting 5–10 amperes of current to the plug. If you are going to connect a load with a power of 300-500 watts, then the current will be 25-40 amperes. The cross-section of the wire for such a current will be 4–6 mm. An attempt to pass such current through a wire of a smaller cross-section will lead to its melting or fire. Consider a path for the wire that will directly connect the plug and battery. It is advisable to lay it through the technological holes of the body next to the standard wiring.
Remove the interior floor and trunk trim, then carefully inspect the selected path for the wire. If you can get it through the finished holes, then do it. If not, drill new ones. At your local auto store, purchase rubber seals that will protect the wires from the sharp edges of the hole in the body. Drill holes, focusing on the diameter of the seal, and process their edges first with a file, then with anti-corrosion materials. Attach the wire to the body or standard wiring bus using plastic clamps.
Connecting the cigarette lighter
Never connect the cigarette lighter to the ignition switch. The ignition system will not withstand such a load. Having laid the wire in the engine compartment, bring it to the positive terminal of the battery, connect the fuse and then attach it to the terminal. If for some reason you cannot do this, run a wire with a fuse to the starter and attach it to the positive terminal of the relay. Strip the end of the wire at a distance of 1 cm, place it on the terminal, then crimp it using pliers. Be sure to secure the wire so that it does not dangle anywhere. To attach the wire to the cigarette lighter, use a soldering iron or an appropriate terminal, depending on the device model. Install a fuse and a switch next to the cigarette lighter, this will increase the safety of using this device.
Do not confuse the arrangement of parts of the diagram:
- Battery.
- Fuse.
- Switch.
- Relay.
- Cigarette lighter.
The switch must be designed for a current of 1.5 times the maximum load. If there is no such switch, attach a relay next to it that is suitable for the current. Some drivers place a switch and relay next to the ignition switch. Connect the switch to the control contact of the relay, and the cigarette lighter to the power one. To do this, place heat-shrink tubing on the exposed ends of the wire, then push and crimp the terminals. Adjust the tube so that it completely covers the junction of the terminal and the wire, then heat it with a match or lighter. You can also install a regular cable splitter (220 volts), which is sold in hardware stores. Find the nearest ground connection location (the wire is bolted directly to the body). Unscrew the bolt, clean the contact pads of the terminal and body. Route a piece of wire from the relay and cigarette lighter to the ground hole to determine the length, then cut and strip the ends.
Make a splitter - take a piece of wire of a suitable length, strip both ends. Then solder the ends of the long and short wires to each other so that they both point in the same direction. Protect the connection with heat shrink tubing, then attach the connection terminal to the negative of the cigarette lighter. Position the tube so that it completely covers the contact point. Place heat shrink tubing on the other end of the short wire and attach the terminal. Or use a regular cable splitter, which must be rigidly attached to the body.
Installation check
Check all connections carefully. The relay and splitter must be securely attached to the housing. After making sure that everything is in order, check that the ignition switch is turned to the off position and connect the battery. Using a tester, measure the voltage on the unconnected battery. Place the negative terminal on the corresponding battery terminal and measure the voltage again. If it hasn't changed, then everything is fine. If it drops by at least 0.5 volts, turn all electrical appliances on and off, including the ignition system. If the voltage does not rise, disconnect the battery and look for a short circuit. If everything is fine, turn on the switch and measure the voltage on the battery again. After making sure that everything is correct, measure the voltage at the cigarette lighter contacts. If everything is in order, you have successfully completed the job.
How to select and install a cigarette lighter socket A cigarette lighter socket is necessary on long trips to recharge a mobile phone, connect a navigator and other devices to the on-board network. Let's start with choosing a nest!
Cigarette lighter socket. Easily attaches to the side of the plastic
Cigarette lighter socket double overhead
Mortise cigarette lighter sockets. Mounted in plastic panels, they do not spoil the appearance, they look as if they were installed standard from the factory
Cigarette lighter with crocodiles. Used as a temporary (spare) option for charging the phone while parked. A universal thing, for those who don’t want to bother with installation, put the crocodile clips on the battery terminals and go.
Attention ! movement with such a connection is dangerous due to short circuit, damage to wiring or fire
To use this version of the cigarette lighter when driving, we recommend replacing the alligator clips with ring connectors (sold at any radio parts store)
There are several ways to connect the cigarette lighter socket. Let's consider the most popular connection schemes:
1. The simplest connection diagram: the cigarette lighter socket is connected directly to the battery terminals, without a fuse
Disadvantages: this circuit is not protected in any way; if there is a short circuit, the wiring burns out, and there is a high probability of fire.
We strongly recommend using a 10-15 amp fuse to protect the electrical wiring! The fuse is installed on the positive wire as close as possible to the power source.
2. A more interesting option: connect via a power relay, controlled from the ignition switch.
Connection diagram for the cigarette lighter, via a relay, with a control plus from the ignition switch.
Operating principle: when the ignition is turned on, +12 volts is supplied to the control contact, the relay is activated, the contacts close and the cigarette lighter starts working; when the ignition is turned off, the relay de-energizes the cigarette lighter socket.
In case of emergency, you can install a toggle switch for turning on the cigarette lighter, bypassing the ignition switch. The toggle switch can be used to turn on the cigarette lighter. For example, to charge the battery while parked, without disassembling, we will make an adapter for your charger.
To increase the performance of additional equipment, all elements (fuse, relay...) of our circuit must be well secured. It is better to tape the wires with electrical tape to the standard wiring or first lay them in a plastic corrugation, and then fix them along the body.
This device is in every car. Even non-smoking drivers use the cigarette lighter. After all, you can connect additional devices to the socket. Most often the following is connected to the cigarette lighter socket:
- tire inflation pump;
- portable charger for mobile phones, tablets or laptops;
- DVR recording traffic conditions;
- navigation system.
Drivers often feel the need for an additional socket. You can find out how you can connect the cigarette lighter with your own hands, what you will need for this, and how to carry out the entire installation procedure, in the article.
connecting when the socket is busy, methods
The question of how to connect a DVR in a car without a cigarette lighter has become relevant for those who like to use several electronic devices. Motorists often connect a charger for a phone or GPS navigator to one free power supply socket, so the cigarette lighter is often occupied. In other cases, the car simply does not have a cigarette lighter socket.
Basic methods
For users of electronic devices, a splitter with various connectors is suitable, but this can lead to overloads of the car's power system and possible cases of fire in the cabin. Connecting a DVR without a cigarette lighter is not difficult if it has a USB cable, since it can be connected to standard dashboard ports or car radio connectors. If the cigarette lighter is missing or occupied by other devices, non-standard connection methods are suitable so as not to take up an extra connector. The DVR can be connected in the following non-standard ways:
- To the ceiling lamp.
- Directly to the battery.
- To the inside of the cigarette lighter.
- To the ignition switch.
It should be remembered that manipulating the power supply requires technical education or at least basic electrical installation skills. If the connection is incorrect, interruptions in the operation of the entire electrical system of the car may occur.
Description of non-standard connection methods
If the top part of the windshield is chosen as the installation location, then connecting to the ceiling lamp is the best option. You should disassemble the interior lamp and use a multimeter to determine the positive and negative pads for soldering the wires. Then you need to disassemble the plug in the DVR and remove the wires from it. For greater safety, the contacts can be connected to a power module with a built-in resistor (150 Ohm), which can be easily found in the store.
To connect the recorder directly to the battery, you will need a 15 A fuse, an adapter and a long wire. A wire with a fuse is connected to the installed recorder via an adapter.
Then, under the casing, carefully pull the wire into the compartment with the motor. The next step is to connect the “plus” contact to the battery, and the “minus” contact to any place in the car with negative wiring
When connecting to the inside of the cigarette lighter, first of all you will need to determine the polarity in the plug, then solder the wires to them, and wrap the plug itself with electrical tape. After this, the DVR wire should be laid under the trim to the cigarette lighter connector. Next, you need to disassemble the panel, use a multimeter to determine the polarity of the cigarette lighter power contacts and connect the wires from the insulated plug to them, observing the polarities. All that remains is to secure the plug and assemble the panel.
You can connect a DVR to the ignition switch, but this is inconvenient, because... It will turn on only after turning the key. The first step is to lay the recorder wire under or above the windshield to the ignition switch.
Using a multimeter, you determine the positive terminal to which the contact is attached.
The negative polarity contact is connected to the corresponding wire of the radio or to the negative contacts of the car wiring.
If everything is assembled correctly, the system will not cause malfunctions in the operation of the DVR, no matter where it is connected.
How does a cigarette lighter and its structure work?
The device circuit is simple. The cigarette lighter in a car consists of several parts:
- sockets with a connector connected to it;
- metal cartridge, inside of which there is a nichrome spiral.
The cigarette lighter is designed in such a way that when the car owner presses the button, the contacts are closed, to which alternating current is supplied. As a result, the element begins to heat up. When the maximum temperature is reached, the built-in thermal relay gives the command to snap off the device. If used correctly, the car cigarette lighter will work for a long time. However, there are reasons why the device fails earlier.
This is the connection of several powerful devices to one socket. The maximum permissible current value increases and the cigarette lighter fails. Therefore, car owners tend to install an additional device in their car.
Device
A traditional car lighter consists of two parts - a cartridge and a socket. In the center of the socket there is a metal rod that acts as a positive contact.
The “-” contact is the outer metal shell.
There is a spacer between the positive and negative terminals to prevent them from touching each other. “+” and “-” are connected by a nichrome spiral, which acts as a heating element.
When electrical current is applied, current flows through the coil, heating it to a high temperature. When the cartridge reaches a certain temperature, the electrical current is stopped by a thermal relay located in the plastic holder.
The socket is an elongated recess in the car panel, which contains a metal tube with a central contact. The middle contact outputs “+” from the battery. The side of the socket serves as a permanent “minus”. There is also a backlight on the cigarette lighter body that automatically turns on when the external light bulbs are turned on.
To turn on the heating mode, you need to dig into its socket. It is fixed in the pressed position, the positive contact of the socket is connected to the “+” socket, the “-” socket is connected to the “negative” terminal of the socket.
The heating element will start working. As a rule, 15-20 seconds are enough to warm up the coil, after which the cartridge returns to its original position with a slight click. Warm-up time may be longer if the board voltage is low.
Cigarette lighter installation tool
To professionally make a cut-in and connect the device, you will need to stock up on the necessary tools:
- drill or screwdriver with a set of metal drills;
- a crown for cutting out a socket, the diameter must match the diameter of the cigarette lighter;
- file;
- soldering iron with solder;
- wire cutters;
- screwdrivers;
- multitester;
- heat-shrink tubing;
- wire of suitable cross-section;
- a fuse that can withstand the current recommended by the manufacturer (from 10 to 25 amperes - depending on the car model).
You will need to buy an additional plug-in cigarette lighter to connect it. The price of the device ranges from 300 to 1.5 thousand rubles (per Euro model), depending on the manufacturer. You need to buy original parts - they guarantee proper operation of the device. Cheap cigarette lighter options should be abandoned. The quality of the materials there is unsatisfactory and such elements will quickly fail.
How to connect correctly
A three-pin plug fits a standard car cigarette lighter. Before installing an additional device, you need to understand how a car cigarette lighter works and learn the pinout.
The connection diagram looks like this.
- A constant minus. Comes to the car body.
- A constant plus. Connects through a fuse to the battery.
- Plus, coming up to the backlight bulb.
Option to mount directly to the battery
There is a way to connect directly to the car battery. This scheme has advantages. You need to know how to connect the cigarette lighter directly to the battery. This will avoid interference with the wiring itself. The work will take less time; the positive wires should be brought directly to the battery, and the negative wire should be attached to the car body.
It is necessary to select the necessary spare parts. Initially, this concerns the wires. Each square millimeter of cross-section is designed for 5 - 10 amperes of current. You should take the wire with a reserve. A cross-section of 3–5 mm is quite sufficient to transmit the required voltage. Otherwise, the wires may burn, resulting in a risk of short circuit. The circuit should be routed through an additional fuse with a rating specified by the manufacturer.
Connecting the DVR to the fuse box
Safe ways to connect a DVR include connecting the device plug to the fuse box. For this connection you need:
- buy a standard car fuse;
- solder a wire from the positive contact of the plug to one of the legs;
- solder a wire with a ring to the negative terminal of the plug;
- secure the wire with the ring with a screw to the dashboard frame;
- install the fuse in the free socket of the block.
Receiving power without disassembling the plug is recommended for DVR models with a 5-volt power supply. The electrical circuit of the plug lowers the voltage of the car battery to the desired value.
You can see in detail how to connect a DVR in a car without a cigarette lighter in the video:
How to make an additional cigarette lighter?
If you have the necessary tools and spare parts, you should begin installation work.
- Turn off the engine and then remove the negative cable from the battery.
- We determine the place where the additional cigarette lighter should be located. As a rule, this is the space near the rear seats or near the luggage compartment. Do not connect the socket on curved or corrugated surfaces - it will not fit securely. The minimum permissible distance between the plug and the body is 2 centimeters.
- Using a hole saw of a suitable diameter and a drill, we cut out a seat for the cigarette lighter. We process the circle with a file, removing excess material.
- We remove the floor or trunk trim to find out how best to route the wiring. It is most convenient to mount the wires through the factory holes. If that doesn't work, drill new ones in suitable places. Each hole must be equipped with a rubber seal to avoid chafing or creasing the wire. For reliability, it is worth using plastic clamps.
- Mount the switch. It must be designed for a current of at least one and a half times the maximum load. It is most convenient to mount the switch near the ignition switch.
- We connect the switch to the control relay, and the cable to the power one. To ensure reliable contacts, it is recommended to place all solders on heat-shrinkable tubes. For convenience, you can use standard cable splitters.
Checking the work done
After the installation procedure, you should inspect the device.
- Before assembly, all connections must be checked. The wires must be well soldered and not come into contact with metal parts of the body. No creases or exposed areas.
- We measure the voltage on the battery. Then we connect the negative terminal and check again. If the voltage drops by more than 0.5 volts, then you should look for a short circuit. You may have failed to connect to the cigarette lighter correctly.
- Measure the voltage at the cigarette lighter contacts and test all wires for continuity. Afterwards, it is advisable to turn on the ignition and check the functionality of the socket. The device should easily charge your phone or withstand a connected compressor.
How to improve a ready-made cigarette lighter
Many car enthusiasts purchase a special splitter unit that allows you to connect several devices to one connector (see photo). However, the design of the car's cigarette lighter, as well as the cross-section of the wires, does not allow it to be used as efficiently as possible.
Connecting several devices leads to excess voltage or current, causing the fuse to blow or the wires to burn out. Then the device needs to be repaired. You can improve the device by choosing thicker cables that fit the car cigarette lighter.
The millimeter of cross-section is designed for a current of about 5 - 10 amperes. If a device with a power of 300–500 watts is connected to the socket, then the power will reach 25–40 amperes. You will need wires with a cross section of 4 - 6 mm. Such a reinforced structure will work for a long time without causing problems. You can connect an additional socket according to the instructions described earlier.
Additional functions
Most models have built-in short-voltage protection. This precaution will never be superfluous.
A very rare option are switches for individual splitter sockets. They can be useful if the driver periodically needs to deactivate some of the connected devices, but at the same time maintain power to others. The scenario is clearly not the most common, but there are also very few similar models.
A switch for the entire splitter would be more popular. With one click, you can turn off the power to all connected devices, which can be convenient when leaving the car. The vast majority of modern cars are equipped with a CAN bus, which automatically turns off external consumers a few minutes after stopping the engine, so this mechanism is useful mainly for older vehicles.
Among the decorations, one can highlight only the power indicator light. But even in this purely cosmetic function, you can find positive aspects from a practicality point of view: a small light will be useful if the power plug does not sit tightly in the cigarette lighter socket and periodically loses contact. In this case, you can quickly check whether the equipment has turned off (this is true for video recorders with a switchable display and radar detectors with weak backlight: it is sometimes difficult to understand from them whether they are working at a given time).