4/5 — (74 votes)
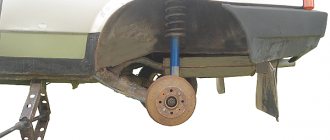
The VAZ 2114 brake drum is installed on the rear wheels of the car. The main job of stopping the car is done by the front disc brakes. They are more efficient, more reliable, and in some cases more durable. Some motorists carry out tuning - install disc brakes on the rear wheels. This significantly improves efficiency, but one inconvenience arises - in order to save money, the driver is forced to give up such an attribute as the handbrake. The fact is that the pads will be controlled not by a cable, but by a liquid. Therefore, it is necessary to include an additional piston in the rear brake circuit, which is driven by a lever. Such difficulties are sometimes scary, but in reality there is nothing difficult.
Replacing rear brake pads on VAZ-2110, 2111, 2112
One of the most popular models on the domestic market today is still a simple, practical ten.
This machine began to be designed back in 1983 as part of a new plant development project. Assembled on the basis of the VAZ-2108, the model became its improved version, which received not only a modern image, but also a richer technical content. But, like the eight, and like all AvtoVAZ cars, the ten also has a number of shortcomings. In particular, these are weak rear brake pads, which quite often fail and need to be replaced.
We will talk about how to replace parts yourself in this article.
Cast iron
The disadvantages of this material are directly opposite to the advantages of aluminum. That is, cast iron drums are heavy, expensive and rust, so they need to be painted and treated with anti-rust. However, their reliability is beyond praise: they are temperature stable (the handbrake does not stick even in deadly frosts), they do not creak, something that aluminum often suffers from, their geometry is correct from the moment of purchase and does not require adjustments throughout their service life. True, you will need to buy stronger pads for them - soft ones will quickly wear out.
Another advantage is that they practically do not stick.
: Cast iron drums that have been in service for years often do not even require the use of a sledgehammer.
As for going overboard with weight, this argument is somewhat dubious: in aluminum drums, the working surface is also filled with cast iron, that is, the gain in lightness is not so great.
An additional bonus is the ability to choose a manufacturer: cast iron drums are produced by many firms and companies.
What are the pads for?
This part is an integral and important part of the car's braking system. The importance of the operation of these parts is to stop the machine in a timely manner. They operate quite simply: when you press the brake pedal, the braking force is transmitted to the pads, as a result they are pressed very tightly against the drum and do not allow it to spin, as a result the wheel stops and the car slows down.
Let's move directly to the question: how to change the rear pads on a VAZ 2114?
Dismantling and installation
Of course, you will not be able to install new disc brakes on the rear axle of the VAZ 2110 until you remove the drum mechanisms. To dismantle them, do the following:
- The wheel is removed;
- The drum is dismantled;
- The pads are removed;
- The brake pipe is unscrewed;
- The hub is removed from the wheel.
In words it looks simple, that's a fact. But in reality, certain difficulties may arise. First of all, due to sticking of elements and sticking of fastening bolts as a result of corrosion. In order not to suffer with them, treat them in advance with the almighty WD40, which will dissolve rust and “scale”, and remove them without serious effort or harm to the edges of the fasteners.
Fastener drawings
Now we proceed to the installation, in which the old drums are sent to their well-deserved rest, and new disc brakes take their place.
- When you knock off the hub, it needs to be put back in place.
- Install the element through a plate with a caliper built into it.
- Make sure all holes line up and alignment is correct.
- Use a hammer to adjust the angle of the beam. The caliper should not rest against it.
- Place the brake disc on the hub. A spacer is placed between the elements and the disk is fixed with brackets in its new place.
- Now install brake pads selected specifically for the VAZ 2110.
- First, attach the brake hose to the caliper, and then connect it to the pipe.
- The friction material of the pad must be partially worn off. This is necessary so that the braking force on the rear brakes is less than on the front.
When replacement is required
In order not to miss the moment when the pads become completely unusable and may pose a threat to your safety, we recommend periodically checking the rear pads. This way you can check how much time this node has left to “live”.
Some versions of the “fourteenth” model are equipped with a special indicator that determines element wear. When the pads are completely worn out, the metal plate begins to rub against the brake disc, producing a characteristic and unpleasant grinding noise.
Adjustment
After installing the disk mechanisms, a leak test procedure and, of course, bleeding are required.
But the work cannot be considered completed at this point, since the braking force needs to be adjusted.
The efficiency of disc brakes is much higher than drum brakes, therefore the braking force regulator must be adjusted.
This unit is located at the left wheel, fixed to the body and connected to the beam by means of a small traction. Loosen the fastening of the rod to the regulator (sorcerer), move it 2-4 millimeters back. In this position, the thrust is fixed. Such manipulations allow you to deceive the sorcerer
It will distribute less braking force to the rear brakes. Drive the car in favorable weather conditions for several days after replacing the brake system, brake carefully, and do not press hard on the pedal. Please note that “rolling” can have both a positive and negative effect on the behavior of the car. If the car behaves well, it means that you managed to correctly replace the drums with discs
If problems arise with the stability and balance of the brakes, it is advisable to entrust the adjustment to specialists from good service stations.
Installing disc mechanisms at the rear is a competent and correct decision for all VAZ 2110 owners. Of course, if the drums behave well, there are no complaints about the quality of braking, and you are not going to increase the power of the power unit, then there is no clear need to switch to disc brakes. But if you do this over time, you will clearly experience the difference between discs and drums from your own example.
Source luxvaz.ru
AUTOFIZIK.RU / auto repair
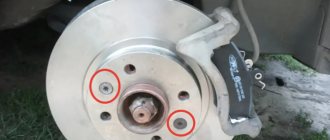
We replace the rear wheel pads if they are damaged, oily, or if the linings are worn to a thickness of less than 1 mm. We replace the drum if it is damaged, cracked, or if the working surface is worn to a diameter of more than 283 mm. We replace all four rear wheel pads at the same time. Remove the rear wheels.
In case of a tight fit or “sticking” of the drum to the hub, you can compress it by screwing three M10 bolts into special holes.
ATTENTION The brake drums are machined together with the hubs, so we install the removed drums only in their original places. The factory instructions recommend grinding new drums together with the hub before installing them on the car. Do not press the brake pedal after removing the brake drum.
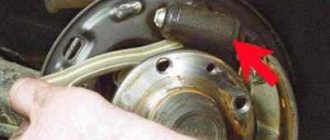
Using a hook or thin pliers, remove the end of the tension spring from the hole in the rear brake shoe.
It is more convenient to use a special device for this.
From the inside of the brake shield, with one hand we press on the cap of the rear brake pad rod, with the other hand on the cup, compressing the spring. Rotate the spring cup 90°. In this case, the slot on the cup will align with the tip of the axle. Remove the cups with the spring.
We remove the rod from the hole in the brake shield.
Turn the rear block and remove the lower tension spring.
We remove the parking brake lever from the cable end.
Similarly, remove the fastening of the front brake pad to the brake shield, and remove the front pad.
Remove the tension spring from the block and the spring from the spacer rod.
Using a 17mm wrench, unscrew the nut securing the rod to the block...
...and remove the parts of the parking brake adjustment mechanism.
Use pliers to unscrew the nut securing the parking brake lever.
Holding the fastening bolt with a 17mm wrench, use the same wrench to unscrew the nut...
... take out the bolt and remove the parts securing the parking brake lever to the block.
We rearrange the removed parts onto new pads. We install new brake pads in the reverse order, and then adjust the gap between the pads and the brake drum (see Adjusting the parking brake drive). We install the drum, lubricating its seating belt with CV joint grease-4 or graphite grease.
ATTENTION The brake drum is installed on the hub in only one position, since the holes for the screws are made with a variable pitch around the circumference.
We install the wheels and press the brake pedal several times to self-install the brake components.
Adjusting the pressure
First, you need to adjust the parking brake. This device always requires adjustment after repair work.
Secondly, the rear brakes are adjusted so that the system locks the rear wheels a little later than the front ones.
Knowing the structure of the brakes, loosen the bolt securing the pressure regulator, using a screwdriver, move the bracket of the regulator drive lever to create a gap of about 2 mm between the lever and its spring.
We carry out a test - we accelerate the car to 40 kilometers, then sharply brake. Someone observing the process from the outside notes whether the wheels are locked correctly. If the front wheels lock later than the rear ones, then the adjuster must be moved in the direction of decreasing the gap. Then test again until correct wheel locking is achieved.
REAR BRAKES, REPLACING PADS
Unlike disc pads and discs themselves, drum pads and drums have a longer lifespan. But sooner or later a replacement still has to be made.
In this article we will look at how to replace the rear brake pads on a front-wheel drive VAZ family car. It should be immediately noted that the rear suspension of models 2108, 2109, 2113, 2114, 2115 is no different.
REAR PADS
There is no strict framework for how long it takes to change the rear brake pads, but usually replacement for the VAZ 2114 is done somewhere after 70 thousand kilometers. But the frequency may be different, this is influenced by various factors:
- Driving style of the car owner;
- Conditions in which the machine is operated;
- Condition of the drums;
- The quality of the pads themselves and the friction linings on them.
Constant emergency braking leads to premature wear of the friction layer of the pads; the rubbing elements of the brake system operate faster in wet, rainy weather. A brake drum on a VAZ with uneven wear on the inner surface also wears the pads unevenly.
Rear brake pads for the VAZ 2114 are now manufactured by various companies, and the quality of the products also varies. The most proven and reliable parts are those produced by AvtoVAZ. The companies TRIALLI and ALLIED NIPPON have proven themselves to be quite good; the cost of a set of pads can range from 700-1200 rubles. You should not be tempted by cheap goods - there are various nuances here:
- Rear brake pads may squeak due to poor quality friction linings;
- Also, due to poor quality, the pads will wear out quickly.
BRAKE DRUM
The drum is one of the main elements of the brake system and interacts with the pads during braking. The car stops due to friction between these parts when you press the brake pedal. Drums are considered a somewhat outdated design that is less efficient than a disc system. But the service life of drum brakes is much longer than disc brakes.
Installation
It's time to install disc brakes instead of the removed rear drum brakes.
Having knocked off the hub, we will put it back, but in a different way:
It should be installed through the plate into which the caliper is already mounted. Carefully ensure that all holes line up
Particular attention to alignment; Next, use a hammer to straighten the corner of the beam so that the caliper does not rest against it; Now you can put the brake disc on the hub, placing spacers between these parts, and secure the disc with a bracket; We install brake pads from VAZ 2110; First, carefully and securely attach the brake hose to the caliper, and then to the tube; To reduce the braking force of the rear brakes compared to the front, you need to partially grind off the friction material of the pads.
Tool required for replacement
Minimum required. A hammer might also come in handy
So, for proper replacement you will need several tools that are not in the standard set, and in addition to them, you will need:
- a wheel chock, a brick made of red clay is also perfect in extreme cases;
- wheel wrench;
- standard set of keys;
- wooden block;
- decent hammer;
- a powerful awl or a long thin screwdriver;
- pliers, round nose pliers;
- clean brake fluid or magic spray WD-40.
Actually, after purchasing new brake pads, you can put on gloves and get to work.
Dismantling brake drums VAZ-2112, technology
The replacement process itself is simple and clear; just look at the photo and brief explanations and get started, even if the work is being done for the first time. It goes without saying that it is necessary to provide comfortable working conditions. At the very least, place the car on a flat surface, place anti-roll bricks under the front wheels and engage first gear. Now you can remove the bolts with a wheel wrench.
Next, we follow a simple algorithm:
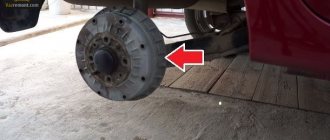
- We install the jack and check whether the wheel chock is under the front diagonally opposite wheel. If it is lying down, jack up the car and remove the wheel. We see a dirty brake drum.
Broken nuts are easier to unscrew later.
Brake drum and stud
Using rotating movements, pull the brake drum towards you.
This brake drum is just for the scrapyard. The grooves are visible, he has already left his own
We inspect the drum for wear: scuffing, etc./ This brake drum is in good condition
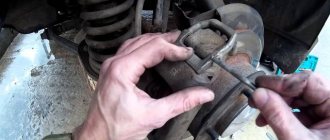
Brake mechanism without drum. You can see the brake cylinder, tension springs and the pads themselves
We take this opportunity and check the integrity of the boots on the working cylinder, inspect the brake shield for leaks. Ideally, the area underneath the drum should be dry and clean. Brake fluid stains and drips may indicate a faulty brake cylinder, and eliminating them will delay the work for an hour or two.
Changing rear brake pads
If the inspection shows that everything is in order with the mechanism, you can begin to dismantle the pads themselves.
The manufacturer allows a minimum thickness of the lining of 1.5 mm, however, this is a critical thickness. It is worth changing the element even if the thickness is about 2-3 mm.
Then everything is simple:
- Remove the tip from the lever, the cotter pin, do not lose the washer.
The spring can also be removed with pliers
Remove the block and springs
Installing new pads
The pads are installed in the reverse order, but you should first recess the piston of the working cylinder all the way, otherwise we may not be able to install the brake drum later.
Attach the end of the cable to the lever
We install new pads, cotter the handbrake rod, use a screwdriver to install the tension spring, not forgetting about the spacer bar. It can be inserted later, as you are used to. We make sure that the cable, or rather its jacket, does not rub against moving parts. You can install a brake drum.
New pads installed
Additional recommendations
If you cannot depress the brake cylinders, open the cap of the brake fluid reservoir to reduce the pressure. If the pads wear unevenly, pay attention to the caliper. Most likely it will need repairs. When replacing rear pads, replace all springs as well.
They are inexpensive, but they will protect you from possible failures until the next replacement. The front caliper guides can be lubricated with graphite grease for smoother operation.
Replacing the pads on the front axle will not cause problems even for “dummies” of automotive repair. But from the back it’s not so simple. Assess your strengths and capabilities in advance: can you reach the handbrake cable and cope with a stuck brake drum? If yes, then everything will definitely work out.
Didn't find the information you are looking for? on our forum.
Perforated brake drums for VAZ 2108-2110-2194 with self-cleaning and ventilation functions
Share with your friends
Applicability
- VAZ 2108-2115 (LADA Samara)
- VAZ 2110-2112 (LADA 110)
- VAZ 1117-1119 (LADA Kalina)
- VAZ 2170-2172 (LADA Priora)
- VAZ 2190-2191 (LADA Granta)
- VAZ 2192, 2194 (LADA Kalina-2)
Benefits of using SS20 brake drums
- significant reduction in the risk of uncontrolled vehicle skidding,
- stable and effective braking in any weather throughout the entire service life,
- silent operation in wet weather (no whistling or creaking),
- service life increased by 1.5 times,
- increased heat dissipation.
Guarantee
- Description
- Buy
Is the brake drum plain or perforated?
The brake system is the most reliable and durable element of a car. It is this belief that lulls our attention, which should be given to this system while operating the car.
We drive thousands of kilometers without remembering or servicing the brake system. At the same time, everyone understands that the slightest malfunction of the brakes will inevitably lead to an emergency, and possibly to damage to the car, harm to the health of themselves, their loved ones and other people.
And after the fact of what happened, questions arise: why did it skid, why did it drift into the oncoming lane, why did it end up in a ditch?
Uneven braking of any of the wheels on one axle of the car leads to a possible loss of control.
For a long time, many motorists have preferred to use self-cleaning, perforated (with holes for cleaning) front brake discs, which significantly speed up the removal of water from the discs and quickly restore braking efficiency after the wheels get into puddles. In addition, perforation ensures uniform wear of the discs, quickly removing dirt and abrasive particles from the working surfaces. This proven technology is used not only on cars, but also on bicycles and motorcycles.
At the same time, many cars are still equipped with conventional rear drum brakes (without perforation) to reduce their cost. In such drums, dirt (abrasive grains of sand), slag from worn pads, and moisture accumulate, which enter the friction zone of the pads and the drum. Hence the ineffective and uneven braking of the right and left rear wheels.
Wheel balancing quality
Boring
We found out how often it is necessary to balance wheels. Now let's look at the issue of the quality of this procedure.
In general, the quality of the work performed depends on the equipment used, the degree of its wear, as well as the experience and professionalism of the car service workers.
Balancing stands can be mobile or stationary. Stationary equipment is used in cases where it is necessary to balance wheel rims removed from a vehicle. On mobile machines you can perform balancing without removing the wheels from the car. It is believed that portable stands are used for finishing work when it is possible to take into account the characteristics of the hub and brake disc. For this reason, testing on mobile equipment is done after performing the procedure on a stationary stand.
Balancing weights are attached outside and inside the disk or only on its inside. The latter option is often preferred in order to maintain the attractive appearance of the rim.
It is important to install weights on the disk next to each other, but take into account their total weight - it should not exceed 60 g. If this value exceeds the maximum permissible, the problem may be due to a defect in the rubber or disk. The positive effect of balancing is achieved only when the identified defects are eliminated
The positive effect of balancing is achieved only when the identified defects are eliminated.
Sometimes the problem lies in the balancing stand itself (for example, the fastening has worn out). Balancing in this case will be much less accurate. The deterioration of the wheel rim fastening occurs due to the deformation of the landing cones, which acquire an elliptical shape. This machine defect is more common than others, and it directly affects the efficiency of the work performed.
Other equipment malfunctions include disrupted operation of the bearings in it. A damaged bearing will create periodic runout, which in turn will negatively affect the operation of the sensors, which will give incorrect information. It is impossible to do balancing on such a machine.
Modern computer-controlled equipment is most effective. It allows you to balance discs using a system of spaced weights and, thanks to modern software, copes even with extremely unbalanced discs.
The calibration of the balancing stand also affects the quality of the procedure. Stands can be calibrated at 1, 5 and 10 g. The most commonly used calibration is 5 g, which gives good results for most popular car models.
An acceptable result is obtained by equipment calibrated at 10 g. Calibration at 1 g is less commonly done. It is needed only in case of frequent vehicle operation at high speeds (more than 200 km/h).
Device
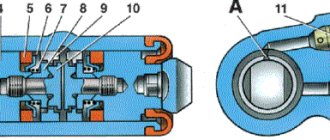
Before disassembling, you need to know the structure of the braking system. The VAZ 2110 has hydraulic brakes with distributed circuits. One circuit is the front right and rear left mechanisms, the second circuit is diagonal.
The hydraulic drive includes a (also dual-circuit) pressure regulator. It helps regulate the brake fluid pressure on the rear brake systems. It is through the regulator that the fluid flows to both rear mechanisms.
Hydraulic brake circuit diagram
Adjustment is carried out through four chambers. Their design is as follows: two are connected to the main cylinder, and two, respectively, to both cylinders of the rear brakes.
For high-quality braking, it is necessary that the entire system works smoothly, there is correct adjustment and reliable mechanisms.
Grooving stages
The grooving procedure itself consists of 3 key steps. This is precisely the principle that specialists adhere to, and those who do the work with their own hands rely on it.
- First stage. At the first stage, the initial removal of a layer 0.5 mm thick is carried out. This makes it clear how much the drum material is worn, what its current condition is, and whether there are more serious defects;
- Second phase. Next comes the procedure of smoothing, leveling and subsequent removal of all existing irregularities. About 0.25 mm of the metal layer is removed;
- Third stage. He's the finisher. This involves finishing sanding and removing all remaining small nicks and chips.
Having sharpened the brakes, a smooth working surface remains, and braking efficiency increases significantly.
But this procedure only allows you to get rid of irregularities. If there are geometric errors, the groove will not help at all. Similar phenomena occur if strong temperature changes occur.
Thank you for your attention! Subscribe, leave reviews, ask questions and tell your friends about us!
(1 ratings, average: 5.00 out of 5)