Before you start talking about how to remove the drum on a VAZ 2114 and install a new one in its place, you should figure out when exactly it needs to be replaced and what signs can be used to judge its critical wear.
Obvious signs of damage are cracks, chips and other defects visible to the naked eye.
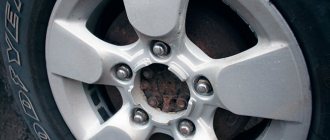
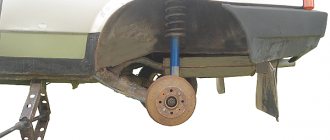
Removing the rear brake drum
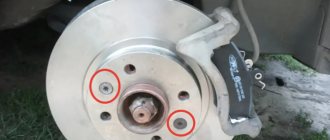
The next, and also the most sure sign of serious wear, is a change in the internal diameter as a result of wear of the working surface. In order to check this, it is enough to use a caliper or even (in the absence of the first) an ordinary metal ruler.
If the measured diameter exceeds 201.5 mm, this means that the degree of wear of the drum is very high. In addition, another common problem associated with drum wear is the lack of its correct round geometric shape or the presence of bevels on the surface.
You can check this by performing a series of measurements of the internal diameter in different directions of the measuring tool (in this case, only a caliper will help). So, if at the first measurement the result turned out to be 201 mm, and at the second 203 mm, then this directly indicates the presence of bevels and the absence of the correct shape.
By the way, the presence of this problem can be determined by indirect signs, even before the measurements begin - if the brake drum is of an incorrect shape, strong vibration will be observed during the braking process (and the larger the bevels, the more this vibration will be noticeable).
Brake drum diameter measurement
In addition, you should inspect the inner surface of the drum itself - if grooves, potholes, chips and cracks are noticeable on it, then this also indicates obvious wear and it is highly undesirable to use such a part in the future (even if the geometric shape is correct and the general diameter). But before performing such an inspection and taking measurements, the brake drum of the VAZ 2114 should be removed.
Brake drums VAZ 2114
It is strongly recommended to remove the drums at least annually for preventive purposes - in order to prevent them from becoming too strongly stuck.
Replacement of drums
So, you will need the following tool and material:
- The wheel wrench is set to “19” or “17” (depending on what bolts are on the wheels).
- Jack.
- Keys for “7”, “10” or “12” - depending on the size of the guide pin.
- Hammer.
- Wooden spacer.
- Penetrating lubricant WD-40.
Having this entire arsenal, you can start replacing. First of all, loosen the wheel bolts and lift the side to be repaired. Of course, the car must be secured - place stops under the front wheels. Next, remove the wheel and unscrew the guides. With their help, the drum is held on the hub.
The next step is to remove the VAZ 2114 drum with your own hands. This can be difficult to do as the metal may have become stuck to the hub. Try treating all contacting surfaces with penetrating lubricant, tapping them with a hammer, and then, applying even blows to the back of the drum, carefully remove it from the hub. It is advisable to install a new one only after the entire surface has been cleaned. There should be no problems with installation. It is advisable to screw in new guides as well - old ones may have defects. Reinstall the wheel and use a similar scheme to replace the VAZ 2114 brake drum on the second side. This completes the repair.
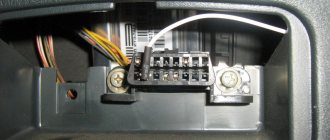
Necessary tool
To replace the pads you do not need to use a special tool, just have:
- Set of wrenches;
- Balloon wrench;
- Pliers;
- Hammer;
- A soft metal drift or wooden block;
- Screwdrivers.
It is better to have a WB-40 cylinder on hand, since the mechanism is susceptible to corrosion and it is not always possible to disassemble it easily.
It is better to replace it in a garage or in a fenced area with little traffic around, so as not to interfere with other road users.
When to change the brake drum of a VAZ 2114
Signs that the drum mechanism has failed are the occurrence of beating of the steering wheel when braking, the presence of knocking noises. Of course, the steering wheel can also beat due to other problems - wear of the front pads, wheel bearings. Therefore, you should diagnose the car before carrying out repairs. The price of one drum for a VAZ 2114 is approximately 750 rubles. And even if only one fails, two should be replaced at once.
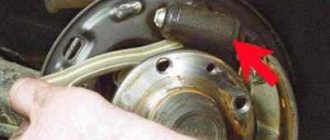
If you change only on one side, the braking performance deteriorates sharply and the car may pull to the side. Which has a negative impact on safety. You can verify the serviceability of the drums only after removing them - there should be no cracks or damage on them, weights must be present in their places
Pay attention to the inner surface - it should be as smooth as possible. But if the drums have been working for a long time, the inside surface will be wavy
Therefore, for repairs, you just need to turn to a turner and grind the working surface to perfect condition. But if the brake drum of the VAZ 2114 has serious damage - chips, cracks, large wear (the internal diameter should be no more than 201.5 mm). If you have at least one of the above symptoms, you need to replace both brake drums. We will now tell you how this is done. The task is not difficult, you can do everything in a matter of minutes if you have the necessary tools.
How the rear brakes work on the VAZ 2107
The rear brakes of the “seven” consist of two important elements: the brake drum and the brake mechanism located in this drum. Let's look at each element in more detail.
Brake drum
As the car drives, the brake drums attached to the rear wheels rotate with them. These are massive metal parts with holes for mounting pins located around the perimeter of the drum. These studs hold both the drums and the rear wheels of the VAZ 2107.
Two cast iron brake drums for VAZ 2107
Here are the main dimensions of a standard “seven” brake drum:
- internal diameter - 250 mm;
- the maximum permissible diameter taking into account boring is 252.2 mm;
- internal drum height - 57 mm;
- total drum height - 69 mm;
- mounting diameter - 58 mm;
- number of mounting holes for the wheel - 4;
- the total number of mounting holes is 8.
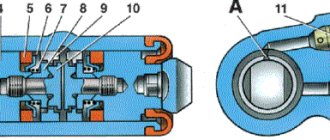
Brake mechanism
The brake mechanism of the “seven” is mounted on a special brake flap, and this flap, in turn, is securely screwed to the wheel hub. Here are the main elements of the VAZ 2107 brake mechanism:
- a pair of brake pads with linings made of special material;
- a double-ended brake cylinder (the word “double-ended” means that this cylinder has not one, but two pistons that extend from opposite ends of the device);
- two return springs;
- hand brake cable;
- handbrake lever.
The rear brakes consist of a drum and a brake mechanism
The two pads in the rear brake mechanism are tightened by return springs. Between these pads there is a double-sided cylinder. The operating sequence of the brake mechanism is as follows. The driver presses on the brakes. And the brake fluid begins to quickly flow from the main hydraulic cylinder into the double-sided cylinder in the drum. Double-sided pistons extend and press on the pads, which also begin to move apart and rest against the inner wall of the drum, securely fixing the device. When the driver removes the car from the handbrake, the brake fluid pressure in the system decreases sharply, and the pistons of the working cylinder move back into the device body. The return springs pull the shoes back to their original position, freeing the drum and allowing the rear wheel to rotate freely.
Removing the rear brake drum
Now let's look at the most important thing - how to remove the rear drum on a VAZ 2114, what tools are needed for this and how to then install a new one instead of the old drum.
To begin with, it’s worth saying that it is strongly recommended to remove the rear drums at least once a year (and if more often, even better), even if there is no indirect suspicion of their wear. This is due to the fact that brake drums, which have been standing in place for many years, become very sticky, and they can only be removed by pouring them heavily with VeDeshka and using enormous force (which can result in harm to both the motorist and the car).
That is why, preventive annual dismantling of the drums, their inspection and installation in place is a guarantee that in the future there will be no problems with such an operation.
Treating the drum with WD-40
And so, let's move directly to removing the brake drum.
First, let's collect a set of necessary tools:
- jack;
- wheel wrench (17 or 19 - depends on the installed wheel bolts);
- wrenches 7, 10 or 12 - depending on the size of the guide pin;
- hammer;
- a wooden plank (as a spacer when working with a hammer - so as not to damage the metal parts);
- lubricant like WD-40 or similar in properties.
Regarding the last point, you should immediately make a clarification - you need to use exactly the specified lubricant or as close as possible to it. The use of any other liquids - solvents, kerosene, gasoline and the like - is strictly not recommended. Now let's look at how to remove the rear brake drum on a VAZ 2114.
This should be done according to the following scheme:
- securely stop the car (put the handbrake on and place a shoe under the wheels);
- raise the rear of the car using a jack (roll or bottle);
- remove the wheel;
- thoroughly and generously treat all joints with VeDe-40 type lubricant;
- wait about 5 minutes (so that the lubricant has time to act) and remove all dirt with a rag;
- unscrew the mounting pins;
- carefully apply a series of blows to the edges of the drum (through a spacer or using a rubber/wooden mallet) until it begins to move by hand;
- remove the brake drum.
Removing the brake drum using a hammer
Installing the new drum in its place is done in exactly the same way, but in the reverse order. Also, there is another, often faster and at the same time safer, way to dismantle the old drum (you can also try it in a situation where prolonged hammering did not lead to success and the part did not move from its place).
This should be done as follows:
- fix the car in place and hang it up (all as in the previous method);
- remove the wheel;
- unscrew the two installation bolts from their sockets;
- screw the same bolts into the other mounting sockets of the drum (there are four of them on the drum - two have bolts screwed in, the other two are empty);
- begin to gradually tighten one bolt, then the other, so that their heads always remain parallel to each other (in order to achieve this, you can turn each bolt half a turn in turn).
Removing the brake drum using bolts
Thus, passing through the drum and resting on the reverse side, these bolts, when tightened, will pull it out of place, as a result of which the entire dismantling process will be as safe as possible and will not cause any damage to the car parts.
Cost of rear pads and article number
When purchasing a set of rear pads, it is best to give preference to original parts. Car owners recommend them for purchase, rather than analog brands, because they have a better price-quality ratio.
You should look for the part by article number: 21080-3502090-55 . This will help you avoid running into a fake in packaging similar to the original.
It is worth noting that when replacing the rear pads on a VAZ 2114, most often a failed brake cylinder is also discovered. It becomes sour in certain positions and when the brake is pressed and does not provide a proper seal.
Cast iron brake drums
Needless to say, this metal is much stronger, but also many times heavier than its opponent. Some manufacturers sacrifice suspension lightweighting and still install cast iron on their cars.
There are a number of reasons for this, but as you probably guessed, they stem from the competitor’s disadvantages, let’s list:
- Durable. A very durable option in terms of wear and tear.
- The sticking is not so strong; in extreme cases, you can beat them off with a hammer; here you are unlikely to damage them.
- Do not deform from temperature loads.
That's all! Of course there are more disadvantages.
- It is much more difficult to cool down, because of this, braking efficiency decreases.
- Heavy. Create a large load on the vehicle axle.
- Prone to rust. You have to paint the outside, they don't look aesthetically pleasing.
By the way, here is a short video after painting such a drum.
Brake system VAZ 2114, how it works, how it works
The brake system on a VAZ 2114 car includes two main parts:
- Drive is a system that is designed to transmit force from the depressed brake pedal to the wheel mechanisms.
- Wheel mechanisms - directly affect the parts rotating with the wheel and slow down its speed.
The VAZ 2114 has a dual-circuit brake system with a hydraulic drive. What does it mean? And the fact that the force generated by pressing the brake pedal creates fluid pressure (hydraulics) throughout the system. This pressure forces the wheel cylinders to work. The word “double-circuit” indicates that the force from the pedal is transmitted through two lines (circuits) independent of each other to pairs of wheels. These circuits have a diagonal arrangement: the right rear wheel works together with the left front, the left rear - with the right front wheel. In conditions of failure of one of the circuits, this solution makes it possible to maintain vehicle stability when braking, especially when turning and on slippery roads.
The main condition for the operability of the system is its tightness. Therefore, it is very dangerous to operate a vehicle with fluid leakage. Equally dangerous is air getting into the brake system. When compressed, air repeatedly decreases in volume, unlike liquid, which does not actually change volume when compressed. When braking a vehicle with a leaking system, the brake pedal may “sink,” causing the brakes to fail to operate.
Signs of rear pad wear
Unlike the front pads, where wear can be determined visually, the rear pads are covered by a drum. To inspect the mechanism inside, you will have to remove the wheel and the drum itself. Few car owners would want to do something like this just for the sake of diagnostics.
Useful : How to bleed the brakes?
Of the obvious signs by sensation, only two can be identified:
- Weak handbrake. This does not always happen due to a cable that has been stretched over time, since when the pads are worn, the travel of the parking brake lever increases, because more force is required to lock the wheel.
- Poor responsiveness to the brake pedal. The car will stop less effectively during braking, since only the front ones will work fully. If the rear pad lining is worn down to metal, there will be creaking and vibrations on the body. This can lead to overheating of the drum and boiling of the brakes.
The minimum thickness of the rear pads, as stated by the manufacturer, should be 1.5 mm .
What to choose?
Despite the fact that the price of original consumables is slightly overpriced, in terms of quality they are the best option. In addition, such brake pads are recommended by the manufacturer and are fully compatible with a specific model.
If you don’t want to overpay, then you should pay attention to Hi-Q pads. These are inexpensive, but at the same time very high-quality consumables that are compatible with the Hyundai Accent and demonstrate good responsiveness both when overheating and when cold
We use them both front and back.
Sangsin Hi-Q is a manufacturer of not only analogues, but also original spare parts, so its quality can be trusted.
Step by step procedure for replacing pads
When replacing pads, you first need to take care of your safety. To do this, place the machine on a level surface. Place wheel chocks, wedges or, in extreme cases, stones under the rear wheels. It is better under both wheels or diagonally from the lifted front one. And set the car to the parking brake. The further procedure will be as follows:
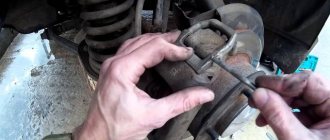
Start on the right side, so turn the steering wheel all the way to the right. Open the hood and brake fluid reservoir cap. If the level is close to the maximum, pump out the liquid to the minimum level. Loosen the wheel bolts, but do not unscrew them completely. Raise the car with a jack. Unscrew the bolts and remove the wheel. Clean the caliper from dirt with a brush and remove dust with a rag. Try to push the brake piston into the cylinder. To do this, rest your thumbs on the caliper, and with the rest, pull the bracket with the brake cylinder towards you
If that doesn’t work, then carefully, so as not to damage the rubber seal, insert a slotted screwdriver between the block and the piston and try to press it into the cylinder. Use a 17 key to hold the nut, and use a 14 key to unscrew the lower and upper guide bolts of the caliper. Remove the caliper bracket and tie it to the spring. Remove the brake pads. Check the condition of the rubber protective seals and replace them with new ones if necessary. Unscrew, lubricate and reinstall the guide bolts. Insert new pads. The block with a wear indicator is installed on the inner side. Check whether the brake piston is completely recessed into the cylinder
If not, you'll have to press it in. To do this, press the piston with adjustable pliers or sliding pliers. Be careful not to damage the rubber cuff! The lack of pliers or pliers is not a problem. Use another method. Attach an old block, or better yet two, to the piston, with the entire plane, insert a wheel wrench into the window of the bracket and press the piston. It is not recommended to do this with a bracket screwed to the caliper. In this case, you will hit the brake disc with the key and may damage it. Reinstall and screw the bracket. Also holding the nut with a 17mm wrench. Install the wheel and tighten the bolts. Lower the car and be sure to finally tighten the bolts. Remove the jack, turn the wheels the other way and move on to the next wheel.
Which brake drums are better, cast iron or aluminum? Read for everyone
Rear drum brakes are still quite common (although there are now quite a few disc options). This is done for the sake of saving production on the one hand. And for longer operation on the other hand, on the consumer side (they last at least 30 - 40% longer than the opponent). However, their braking is definitely worse, and the rear disc brakes look visually better. However, drum systems are not as simple as they seem; the difference may be the material. At the moment, it is possible to distinguish between aluminum and cast iron options. We’ll talk about them now...
You can often find information on the Internet that the cast iron drum system is outdated and is not used often. But on the contrary, aluminum is advanced and is now installed everywhere! But this is not entirely true; brake drums are now used approximately 50/50. And some manufacturers are not moving away from cast iron, and there are good reasons for this. Let's talk about them.
Aluminum brake drums
Now they are the most advanced. Why? Yes, they simply weigh little, and manufacturers are trying their best to lighten the weight of the car and, in particular, reduce the load on the axle.
Therefore, this material is now being used more and more often, what other advantages are there:
- As I already wrote, this is weight. Aluminum can weigh up to 50% less than the same cast iron version.
- Price. Not to say that they were cheaper just like that, after all, they are non-ferrous metal. But due to the mass, the difference in price is quite significant. About 30% cheaper.
- Cooling. This is really a big plus, we all know that during prolonged braking, say in the city, the discs and drums literally get hot. Aluminum conducts heat well, meaning it heats up quickly and cools down quickly. Therefore, drums made from it perfectly remove heat and cool quickly enough. Also, you can often see ribs on them, for even greater heat dissipation. It is worth noting that the more the drum heats up, the more effective the brakes decrease, and the pads simply begin to “float”. Cooling saves the situation and efficiency is maintained.
- Corrosion and aesthetic appearance. Yes, it should be noted that aluminum practically does not show any signs of rust or other decay. Thus, the outer and inner surfaces always remain clean. It is practical, and also aesthetically pleasing; there is no need to tint or maintain it. This is definitely a plus.
But this system also has disadvantages and they are also significant, let’s take it in order.
- The very first disadvantage is greater wear on the disc. Aluminum is a soft metal and therefore wears out quickly. You will change much more often than your opponent.
- They get very attached. This material sticks very strongly to the place of attachment, and it is not at all easy to remove them.
- Fragility. If you plan to remove them, then you must have special pullers, otherwise there is a high probability of breaking the drum, it is very fragile.
- With strong heating, after falling into a puddle, the geometry can change. What will affect the quality of braking?
To be honest, aluminum drums are not as durable a product as, say, cast iron. They really break very easily. Let’s say your rear wheel is stuck, the brake lining is torn off due to high wear, you won’t be able to just remove it and look inside, and if you hit it with a hammer, you’ll simply break the drum. In this regard, the opponent looks much more profitable.
Brake drums cast iron or aluminum
Some drivers wonder which brake drums are better, cast iron or aluminum. And this is not surprising, because the material is different, it has its pros and cons. All this needs to be understood in order to answer the question posed. Of course, when choosing, each driver relies on his own knowledge and reviews. It is worth remembering that not only your safety, but also the comfort of movement depends on the quality of brake drums.
It is worth focusing your attention on this matter and carefully examining the presented models. There are currently two types of brake drums:
- Cast iron;
- Aluminum.
Which brake drums are better, cast iron or aluminum - this is a question that arises among many drivers. The safety of not only the driver, but also the passengers depends on this.
It is very important that the system works like a clock, without failures or jams. Of course, at the first malfunction they can be easily changed
But this is extra money and time. There are times when the brake drum simply sticks to the base and is not very easy to remove.
You have to resort to physical force, spend extra effort and money. To prevent this from happening, it is necessary to regularly check the brakes and lubricate them. It is not very easy to answer this question, since cast iron and aluminum have their own characteristics, pros and cons. We will talk about them further.
Many can say that this material is very popular and lightweight. It can compete with cast iron drums, which is not surprising. The main advantages include:
Price category. This part can be purchased much cheaper than cast iron. The fact is that during production it does not require a lot of time and money;
Weight. The aluminum drum weighs almost nothing, which is great. Due to this, the driver will not have problems with servicing the system, removing the drums;
Corrosion. This material is absolutely not susceptible to corrosion.
This is very important for any driver, since you will not have to spend additional money to prevent the process;
Cooling. The material cools down very quickly, which is important.
As for the disadvantages, they include:
- Low wear resistance.
That is, the material will not last very long; the drums will have to be changed regularly. And this means additional money and time; - Complete intolerance to temperature changes.
During this process, the material cracks and bursts; - The geometry doesn't hold up well.
That is, with a strong impact, deformation occurs; - Sticks very quickly at high and low temperatures.
You have to resort to physical force and a sledgehammer to somehow remove them. And this is extra effort, money and time. In addition, an incorrect impact can damage not only the drum, but also the brake mechanism itself.
In addition to all this, defects occur during production, and quite often. Because of this, manufacturers do not make aluminum drums as often.
Changing the rear braking system
When purchasing a car, you should immediately check the condition of the brake pads.
Just a note! In the case when the size of the brake pads on the car does not reach the permissible size, i.e. their thickness is less than 1.5 mm, do not operate the car under any circumstances until they are completely replaced. The lives of the driver and passengers, as well as other road users, directly depend on this!
Replacing brake pads on a VAZ 2114 is necessary immediately after purchasing the car. It is necessary to regularly monitor the condition of the brake system to ensure your own safety when operating your car.
The rear brake pads on the VAZ 2114 are changed a little differently than the front ones; it is necessary to expend more physical and moral strength. It is more convenient to carry out this kind of work on an overpass.
Possible difficulties during the replacement procedure:
- The brake drum is worn out; its internal diameter is more than 200.5 mm; accordingly, it must be replaced.
- There is a leak in the cylinder, which means it needs to be replaced urgently.
- The drum is stuck, in this case you can use a sledgehammer and a block.
- And etc.
Which rear pads to choose for replacement?
On average, rear brake pads last from 30 to 50 thousand km. However, their service life depends primarily on the driving style and the quality of the pads themselves. It is clear that cheaper ones will wear out faster. That is why you should not buy too cheap analogues.
I recommend periodically - once every 15-20 thousand km. mileage to carry out diagnostics of the brake system. Check the brake fluid level and the condition of the pads themselves. If the thickness of the working surface of the pad is 2 mm or less, they should be replaced. The pads are replaced in pairs. That is, 4 pieces at once - on the front or rear wheels.
Original Hyundai/KIA 58302 1RA30 pads were installed from the factory. The cost of the kit at the moment is from 2000 rubles. However, in addition to the original, you can also choose cheaper analogues of quite good quality.
- Allied Nippon ADB32023 from 880 rub.
- Avantech AV202 from 1000 rub.
- Bosch 0 986 494 557 from 11,000 rub.
- Ferodo FDB4387W from 1100 rub.
- Frixa FPH17R from 1350 rub.
- LYNXauto BD3620 from 850 rub.
- Sangsin Brake GP1401 from 1250 rub.
- SCT Germany SP629 from 750 rub.
After what mileage should the rear brake pads be changed?
There is no exact answer to the question of how long brake pads last. Since in this case it all depends on your driving style. If it is calm, with smooth braking, then the parts can travel up to 170,000 km , and when jerky, with sharp braking, then about 100,000 km.
Also, a lot depends on the manufacturer. If you bought a used car, then it is unknown what quality of parts are installed in it. Pay attention to the signs of wear that were listed earlier, or carry out a visual inspection once a year during maintenance.
Carrying out car repairs yourself is not difficult. You don't need to use a specialized tool or have any special skills. The repair itself takes place within a couple of hours and does not require extensive knowledge. It is enough to be guided by the information obtained from this article.
Pay attention to the quality of the products you purchase for replacement so that you don’t return to repairs after 40-50 thousand km.
Features associated with replacing a brake drum
Some of them (relating to annual prevention and the use of proper lubrication) have already been mentioned. Another important point is that if one of the drums wears out and is replaced, the second drum must be replaced (even if it has less wear). This rule is strictly mandatory and has no exceptions.
Brake drum installation
In addition, in case of almost all damage - cracks, chips, grooves, and others - the drum should be replaced; it cannot be repaired. The only case when the situation can be corrected is if there are small bevels (in this case, you can turn the part on a lathe until you get an even round shape). True, after this operation you should check its diameter - if after grooving it exceeds 201.5 mm, then such a drum can no longer be used.