How the rear brakes of the Kalina work
The rear brake assembly consists of:
- from brake drums;
- two-piston cylinder;
- pads;
- hand brake mechanism;
- “soldiers” holding pads;
- return springs;
- adjusting bolts with eccentrics.
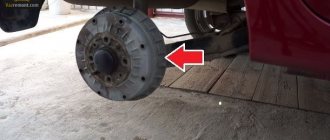
Rear wheel brake
The size of the rear drums on Kalina is 256 mm. This is the outer diameter. But when purchasing a spare part, it is not necessary to know the exact parameters. It is enough to tell the seller the make and model of the car, as well as the year of manufacture. The same information must be provided when ordering parts online.
Product added to bookmarks!
- Description
- Reviews
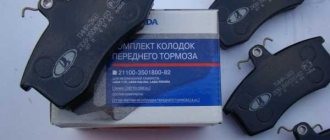
APPLICABILITY: VAZ 2108, 2109, 21099, VAZ 2110, 2111, 2112, VAZ 2113, 2114, 2115, VAZ 1117, 1118, 1119 (Lada-Kalina), VAZ 2170, 2171, 2172 (Lada-Priora ), VAZ 2190, 2191 (Lada-Granta), VAZ 2192, 2194 (Lada-Kalina 2).
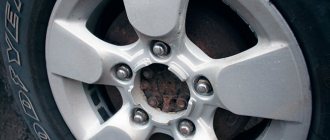
Compared to standard ones, cast iron drums have greater rigidity, due to which they are less susceptible to deformation, less susceptible to overheating as a result of frequent braking, silumin (the alloy from which standard drums are made) is more fragile, susceptible to temperature deformation and not only (egg-shaped), while cast iron retains its shape (there will be no wobbling). Silumin sticks to the hub, sometimes even graphite doesn’t help. Cast iron is much easier to remove when replacing pads.
The largest manufacturer of automotive security systems in the world!
How to remove the drum
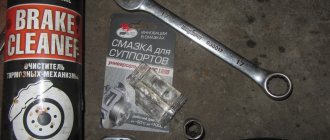
You can remove the Lada Kalina brake drum yourself. The procedure takes only a few minutes. It is advisable to work in a garage. To do this you will need the following tools:
- jack;
- balloon key;
- socket wrench 7;
- flat screwdriver.
Hanging the car and removing the wheel
To remove the brake drum from the rear wheel of the Kalina:
- Put the car in gear and turn off the handbrake (pull its lever down): this will free the rear wheels.
- Use a wheel wrench to remove all wheel mounting bolts.
- Place a jack under the car. Then lift until the wheel is touching the ground.
- Place a safety stand under the vehicle.
- Unscrew all mounting bolts and remove the wheel.
Removing the wheel
If there is no safety stand, place the free wheel under the car body.
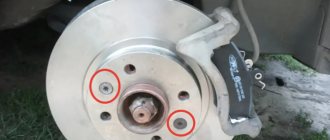
Removing the drum
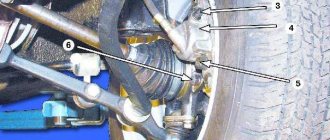
To remove the brake drum of the Kalina rear wheel, unscrew the guides with a 7mm wrench. If they do not unscrew, treat them with WD-40 and gently tap them with a hammer. In particularly severe cases, you have to heat them with a torch or cut them with a grinder, and then unscrew the cut from the hub.
If the drum moves on the hub but does not come off, try loosening the handbrake tension nut. To do this, lift the front wheel of the same side with a jack and support it with a safety stand. If there is no stand, assemble the car and roll it into a pit.
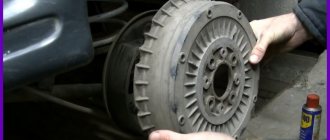
Removing the brake drum of the Kalina rear wheel
If you decide to put back the old drum, check its condition. There should be no cracks or deep cavities on it. The internal diameter along the most worn part should not exceed 201.5 mm. Otherwise, install a new part.
What to do if the drum cannot be removed
Sometimes it is not possible to remove the Kalina rear wheel drum because it is stuck to the hub. To dismantle it, follow these steps:
- Treat the joint between the drum and hub with WD-40.
- Screw the guides into the holes, shifted 90 degrees. They will rest against the hub and tear the part off it.
- Warm up the drum in the hub area with a burner. The cast iron will expand and you can remove it.
- Place a block of wood against the back of the drum so that it does not rest against the support plate. Hit the block several times with a hammer. Then repeat the same action on the other side.
Treating the hub with WD-40
If necessary, repeat several more times, constantly moving the block around the circumference of the drum.
The structure of the main elements of the brake system of the VAZ 2106
Let's consider the features of the design and operation of all the main parts that provide vehicle braking.
Main brake cylinder
The braking system on the VAZ 2106 is divided into two circuits: primary and secondary. This is done so that if the front brakes break down, the driver can use the rear ones and vice versa. Both the primary and secondary circuits are equipped with hydraulic cylinders that push the pistons out of the shoes. And the pressure in this entire system is created by the master cylinder. After braking begins, the piston in this cylinder begins to move, pumping fluid into the primary circuit (or into the secondary circuit - it all depends on which brakes the driver used).
The master cylinder creates fluid pressure throughout the entire brake system.
The fluid reaches hydraulic cylinders through hoses, from which pistons extend, pressing on the pads. In general, in the main cylinder of the “six” there is not one, but two powerful pistons placed in special sealing containers. The main piston is connected to the main brake pedal rod, and the additional one is connected to the main one and begins to move after it. When there is no longer a need to brake, the driver removes his foot from the brake pedal. After this, return springs come into play, removing the displaced pistons to their original positions until the next braking.
Under the hood of the VAZ 2106 there is a reservoir, a vacuum booster and a master cylinder, assembled into a single system
If you open the hood of a VAZ 2106, the main brake cylinder can be seen under the vacuum booster, with which it forms a single system. And next to this cylinder there is a small tank, divided by a partition into two unequal halves. This reservoir stores a small reserve of brake fluid. If a leak begins in some circuit, then liquid will flow into the system from this tank for some time, replenishing the losses. If the fluid supply runs out before the leak is found and repaired, the brakes will fail and the driver will be in mortal danger.
Video: how to change the main brake cylinder on a classic
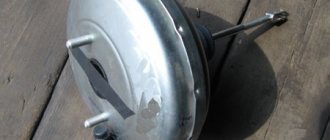
Vacuum booster
The vacuum booster is an intermediate link between the pedal and the main brake cylinder. As soon as the brake pedal is pressed, its pressure reaches the vacuum booster through several small levers. This device is a sealed housing divided into two halves by an elastic membrane.
The vacuum amplifier is a simple housing with a diaphragm inside
The engine exhaust manifold pipe is connected to one half. When the engine starts, the pressure in this half decreases greatly (and a real, deep vacuum is not formed there, it is just an area of very low pressure, but in everyday life the amplifier is still called a vacuum amplifier). The second half of the intensifying chamber has access to the atmosphere at normal pressure.
It is the vacuum booster that transmits the driver’s force to the master brake cylinder
When the pressure in one half of the chamber is very low and normal in the other, the elastic membrane gradually begins to bend to where the pressure is low and put pressure on the pusher. And it causes displacement of the piston in the main brake cylinder.
Video: we disassemble the vacuum booster ourselves
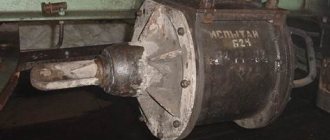
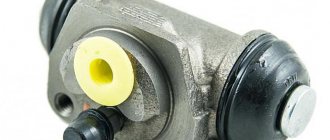
Working cylinders
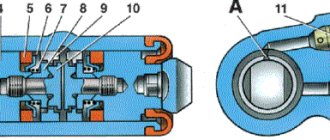
As mentioned above, the brake wheel cylinders must use their pistons to cause the pads to move. The cylinders on the “six”, installed at the front and rear, are not very different in design. They consist of sealed housings with retractable pistons. Each piston is contained in a sealing container. This is necessary in order to prevent brake fluid from leaking while the cylinder is operating.
The front working cylinder of the VAZ 2106 consists of a housing and a piston, which comes out of its container during braking
The difference between the front and rear cylinders is only in the force application pattern. The working cylinders in the front calipers (those with discs) press on the pads so that they move and clamp the brake disc. And the cylinders of the rear drum brakes press on the C-shaped shoes so that they move apart and rest against the inner wall of the drum.
The rear working cylinder presses on the brake drum walls from the inside
Brake pads
The principle of operation of the “six” brake pads is absolutely the same for all wheels. When the pads work, they simply convert one type of energy into another. The driver sees an obstacle, presses the brake pedal, and the pads come into contact with the brake disc or the inner wall of the brake drum. Friction appears at the point of contact, which causes rapid heating. That is, the kinetic energy generated when the wheels of the car rotate is converted into thermal energy, which warms up the brakes. The result of this transformation is that the machine stops.
The front pads on the VAZ 2106 are flat
A special protective material is attached to the working surface of the pads, which has an increased coefficient of friction. And its hardness is significantly lower than the hardness of the brake disc. To obtain such properties, manufacturers use various composite materials, the main filler of which is sawdust of soft metals, such as copper. The pads on the front wheels are flat and they compress the brake disc from the outside. On the rear wheels, the pads are C-shaped and rest against the walls of the brake drum from the inside.
The rear pads on the VAZ 2106 are C-shaped, following the internal contours of the brake drum
Brake hoses
Brake hoses, along with the pads, are the most important element of the VAZ 2106 brake system. It is through the hoses that the brake fluid is supplied from the master cylinder to the brake working cylinders. During the trip, the life of the driver of the “six” and his passengers literally depends on the reliability of the hoses, so the requirements for them are very strict. Brake hoses on the “six” are made only from high-quality rubber and tool steel. They must have the highest wear resistance, corrosion resistance and be immune to the effects of various chemicals that are sprinkled on roads in icy conditions.
Brake hoses are subject to the highest technical requirements
In addition, all hoses are checked for:
- high pressure. The minimum pressure that a VAZ 2106 brake hose must withstand is 200 bar. At this load, no leakage should occur;
- gap The hoses are stretched with a pressure of 1200 bar. A high-quality product should not tear;
- bending and volumetric expansion.
Only after going through all these procedures are the parts installed on the car.
Brake pedal
The pedal is the main control element of the brake system of the VAZ 2106. It is located under the steering column, next to the gas and clutch pedals, and is used as a lever that allows the driver to transfer muscle force to the main brake cylinder.
Using the pedal, the driver controls the car's braking system
A correctly adjusted pedal must have a free play reserve of 4–6 cm . After the foot pressing the pedal has passed this distance, the car should begin to brake smoothly. If this does not happen, then one of the breakdowns mentioned above is present.