What causes a generator to hum?
This question is often asked on forums. Why does the alternator on a car hum and stop doing so as soon as the terminal is disconnected from the battery? At the same time, the more electricity consumers are connected to the car, the louder it can buzz. As for the voltage, it shows 14.05V without additional consumers, however, as the car accelerates, the voltage drops to 12.3.
What is a generator for and how does it work?
Electricity consumption in modern cars is very high. The result of such a large quantity is, first of all, the operation of the generator. Many drivers do not take generator failure seriously, and in such cases rely on the battery. In practice this works.
However, you won’t be able to drive for long on a battery alone, and besides, when driving like this, it’s not always possible to start the engine. Another reason not to drive if the alternator breaks down is the risk of driving in such conditions. Also, when a generator fails, the systems associated with it also break down. Thus, monitoring the correct operation of this part is very important.
If the generator bearing is humming, it needs to be checked. VAZ generator bearing is humming. It’s easy and quick. In addition, after such a check, you will be convinced that this important part of the car is in good condition and will avoid further unpleasant breakdowns, the correction of which will be expensive.
A passenger inside the car while driving will only hear what is happening outside the window and the sound of the car moving, and only if it has poor sound insulation. It is the driver’s task to listen to all unusual sounds that arise during vehicle operation.
An experienced car owner should be able to detect any malfunction of his car by hearing, even while talking with passengers and listening to music. The hum of the generator bearing is no exception, which at the next stage can develop into a grinding noise. consequences of a humming prior generator bearing This tells the driver about a malfunction of the generator - the most important part of the car. Therefore, in such a situation, you need to think: is it even worth continuing with such a problem?
Pullers for standard parts
The front bearing can simply be knocked out of the cover with a hammer, even if there is a socket, so in 99% of cases only a generator rear bearing puller of two types is used:
In addition, the device can be made independently; the most popular are two designs:
With homemade gadgets, replacing a generator bearing is faster and cheaper. However, making them will take time.
Generator bearing humming consequences
Serious problems can begin with a simple humming noise. Therefore, when it appears, you should immediately contact a car service center. Firstly, they will tell you for sure whether the problem is in the generator or something else. If the problem is with the generator, then a competent car service worker will be able to determine the degree of bearing wear. how a generator bearing hums video The easiest deviation is a hum. In this situation, theoretically, you can even continue driving. If the sound resembles a grinding sound, you need to take the breakdown seriously and immediately send the car for repairs. In this case, you will most likely have to buy a new generator.
Other causes of whistling
Why does the belt slip? If the load is to blame, then after replacement everything should return to normal. However, the noise continues with the new belt. Some kind of opportunity. No need to panic. It is better to find the reason for all this in the first place.
Experts advise taking the following actions:
- visually inspect the belt, checking it for integrity (even new products today are found to be defective and of poor quality);
- check the shaft and pulleys for cleanliness (oil and other dirt can easily cause whistling);
- diagnose the degree of tension (weak tension also causes noise);
- check the alignment of the pulleys (if two pulleys are not located in relation to each other in the same plane, the belt will not rotate smoothly, thereby touching certain parts with its edges and whistling).
Generator check
To check the generator you need to use a special device - a multimeter. This is not a scarce commodity. It is sold in any specialty store. You can also purchase a multimeter online. This option is not that expensive.
First you need to turn on the device at up to 20 volts and install it on the generator wheels. Next comes a series of simple steps, after which it will become clear what condition the generator is in.
You can do without a multimeter, but the result will not be as accurate. This check is not suitable for all cars.
You should also check the alternator overrunning clutch. It would be a good idea to do a full check of the generator. In this case, check:
- brushes and rings;
- diode bridge;
- generator rotor;
- stator.
Thus, to check the generator, you only need a multimeter, which is not difficult to buy. It is important to remember that you can only check the generator yourself, but if you find problems in its operation, you need to contact a specialist. At a car service center, after consulting with a technician, you will have to make a decision whether to continue driving (if you hear the bearing hum) or leave the car for repairs. The second option is useful when the generator bearing makes an unpleasant grinding noise. In this case, the generator will most likely have to be replaced.
Interesting articles:
How to make arches on a car yourself
Is it possible to celebrate the New Year alone?
Disassembly, replacement
Having prepared everything you need, you can begin work. The sequence of actions is as follows:
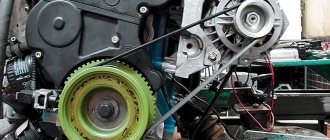
- We put the VAZ-2110 in the garage or on the site. Disconnect the negative terminal from the battery. Disconnect all wiring from the generator.
- We unscrew the fixing nut and the adjusting screw, push the generator completely towards the motor and remove its belt. Unscrew the bolts securing the adjusting bar and remove it.
- We climb under the car. We remove the front part of the crankcase protection from the car, unscrew the nut of the lower mounting of the generator, remove the bolt and pull out the generator.
All subsequent work is performed on the removed generator. - Unscrew the pulley mounting nut. There are several ways to do this. The first of them is if a hole for a hexagon is made in the rotor shaft. Use a hexagon to hold the shaft, and use a spanner to unscrew the nut.
If this method fails to loosen the pulley fastening, we use the second method. It comes down to fixing the rotor with a screwdriver. We install it in the slots made in the rotor through the ventilation holes.
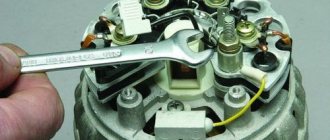
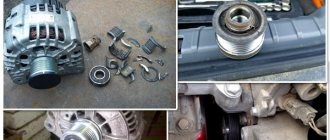
Having fixed the rotor, unscrew the nut with a wrench. If we couldn’t unscrew it this way, we’ll give up trying for now and move on to further work. - Removes the protective cover mounted on the rear of the generator. To do this, pull back the three latches and carefully remove the case.
- In order not to damage the generator elements installed in the rear part (brushes, regulator, diode bridge, capacitor) during further work, it is better to remove them by unscrewing their mounting bolts.
- Remove the back cover. It is attached to the front with 4 bolts. In some models, the bolt heads are made for an 8 socket wrench, in others - for a Phillips screwdriver.
First fill these bolts with WD-40, since they often turn sour. We also mark the position of the back cover to the front with a marker. You can do this in advance.
After unscrewing the bolts with a screwdriver, carefully press the back cover and remove it. In this case, the rear bearing should remain on the shaft. - If it was not possible to remove the pulley before, after dismantling the back cover, this can be done by holding the rotor in a vice. If the pulley was removed earlier, knock out the rotor from the front cover. To do this, screw a nut onto the shaft thread, holding the front cover of the generator, hit the shaft with the nut on a wooden stand - the rotor should come out of the front bearing. Unscrew the nut and completely remove the rotor.
- We knock out the bearing from the front cover. To do this, we use a suitable piece of pipe or a 27 socket from a set of keys.
Or using a pipe with a suitable diameter.
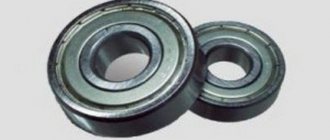
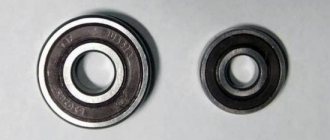
If you immediately purchased a cap with a bearing, it will be much easier. - We lubricate the new bearing and drive it into the seat using the old one. The old bearing is used as a guide and is struck with a hammer until the new element is completely seated.
After this, we flare the edges of the cover to fix the bearing in it. - Remove the rear bearing from the shaft. To do this we use a puller.
If this is not the case, you can use a regular large open-end wrench. We place one jaw of the wrench under the bearing, the rotor will play the role of a stop. We use the key as a lever, striking it lightly with a hammer. The key must be moved in a circle so that when removed it does not become distorted. - Having removed or knocked down the rear bearing, we install a new one in its place. We fill it to its location using a pipe attachment or a socket wrench. It is important that when landing, the diameter of the tube or key is equal to the diameter of the inner race of the bearing.
- Before assembly, we once again thoroughly lubricate the new bearings.
The generator is broken: is it worth continuing driving?
If the initial stage of generator failure (bearing hum) has been detected, theoretically you can still drive. But if possible, it is better to refuse to travel, because this may jeopardize the health of the driver and his passengers. Over time, the hum can develop into a grinding sound, and this is a direct route to a car service center and replacement of the generator. But you can prevent the situation from getting worse and carry out a thorough technical inspection of the car at an early stage of the breakdown. Of course, you need to pay special attention to the generator.
So, if the generator bearing is humming, you should not ignore this problem. The generator is the most important part of the car, and its failure can be the beginning of a series of serious car breakdowns that will cost the driver a pretty penny.
It is better to purchase a multimeter and periodically check the generator, and if there is the slightest malfunction in its operation, contact a car service center and consult with a specialist who, depending on the degree of damage to the generator, will advise what to do next. It is important to remember that it is better to eliminate any breakdown at the initial stage. This way you can save your time and money. In addition, it is better to drive a fully functional car so as not to put yourself and your passengers at risk.
Why does the gene make noise?
ATTENTION! I found a completely simple way to reduce fuel consumption! You do not believe me? Even a mechanic with 15 years of experience didn’t believe it until he tried it. Now save 35,000 rubles a year on gasoline! Know more"
Please note that increased bearing noise, although not affecting unit performance, requires immediate attention. A worn bearing is a hazard that can easily damage your generator at the most inopportune moment.
How can you tell if a bearing is making noise? This is easy to do: you need to press the accelerator pedal. If the noise increases, it means that the generator connected directly to the engine is humming. The higher the rotation speed of the internal combustion engine, the greater the output of the gene and, as a result, the greater the noise.
However, it is not always necessary to look for the cause of noise in bearings. Yes, the percentage they publish is quite high, but other cases are known.
For example, if a gene has recently been replaced. After all, no one excludes the possibility of incorrect installation of the unit. At a gas station today you can stumble upon such crooked amateurs that you wouldn’t wish on your enemy. Such a benefactor will give you a new gene, and after a while it will begin to make noise. You, assuming that these are bearings, will change them every time until you think: why so often?
Incorrect genetic installation also means lack of plastic protection. The latter, as is known, protects the unit from dirt and splashes from the wheels. There is no protection - the generator will constantly become dirty, which will lead to its rapid wear and noise.
Protection, boot, plastic side - you can call it whatever you want, but the essence is the same. Do not allow moisture or dirt to enter the generator.
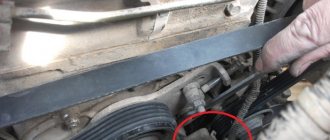
The alternator may also make noise due to an incorrectly installed belt. Excessive interference, such as over-tightening, causes noise. To determine the normal tension level, you need to be able to rotate the belt from vertical to horizontal using medium force.
The alignment of the bracket and the crankshaft pulley is extremely important. If it is bent, it is clear that the belt will also move crookedly, touching the parts, causing noise.
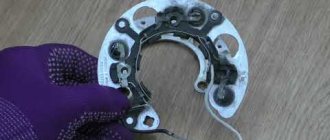
Diode bridge
The hum can also come from the diode bridge. To check whether the diode bridge is shorting, you should remove the cover on the back of the unit, remove the diode bridge, and adjust the washers under the clamps with which it is screwed. And if you add an additional puck, it will be even better.
It also happens that a wire falls off the diode bridge. It’s a banal reason, but until you figure it out, you won’t see it.
Factors affecting hum level
A humming sound occurs if the unit operates in certain modes. During one cycle of operation of the transformer, tension and compression of the core occurs twice. If the mains frequency is standard with alternating current (50 Hz), the device begins to hum.
Also read: Purpose of dielectric bots in electrical installations
The frequency of sound is twice that of electric current.
The strength of the transformer hum is determined by the following factors:
- Degree of workload;
- Overall dimensions of the constituent elements;
- Physical characteristics, material used to manufacture the magnetic core.
The hum may occur due to the following design features of the transformer:
- the effect of magnetic flux tends to move the windings of the device relative to the magnetic core. If the coil is not wound tightly enough, vibration occurs due to the loose fit of the turns with a corresponding hum (the black arrow shows the coil);
- If the core plates are poorly fitted, gaps appear between them. During operation, the vibration of the plates is accompanied by a characteristic metallic ringing, turning into a buzzing sound (the red arrow shows the core plates);
- if the copper wires of the windings are defective or damaged, the coil may spark, with popping noises with each spark. Powerful discharges are characterized by a more intense sound;
- The individual parts in the device are not sufficiently secured, resulting in vibration and noise.
A strong hum is typical of power transformers used in industrial production. But if the operation of a low-power household appliance begins to be accompanied by a significant hum, this is a reason to carry out diagnostics in order to identify and eliminate the malfunction.
Tension
This is perhaps one of the most common reasons why the alternator belt whistles on the VAZ-2110 and other domestically produced cars. Owners of foreign cars are not immune from this problem. Whistling can occur for two reasons. This is a very weak or too tight belt tension. Moreover, the problem may disappear and appear again. So, if the belt is tightly tightened, the whistle will occur only in the cold season. As soon as the engine warms up, the belt regains its shape and the sound stops. But this does not mean that you can continue to drive with such a problem. This significantly reduces the life of the belt and bearing.