Any friction pairs in a car require periodic replacement, therefore they are considered consumable (non-repairable) parts. The battery only starts the internal combustion engine, after which the generator begins to generate electricity for the on-board system and recharging the battery.
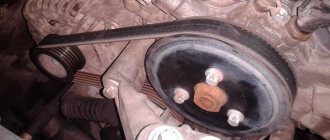
Rice. 1 Replacing the generator belt tension system roller
Therefore, the level of battery recharging depends on the quality of the belt tensioner, which transmits speed to the generator shaft, that is, whether the car will start after stopping the engine next time. The main “consumable” – the generator belt tensioner roller – can be replaced by the car owner on his own if he knows where it is located and what parts need to be removed before doing so.
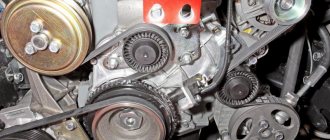
Methods for tensioning the alternator belt
- The drive is carried out from the crankshaft pulley.
- The belt tension is provided in various ways depending on the design.
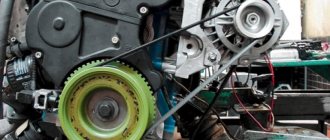
- The belt is tensioned using a generator. That is, the generator has two symmetrical support points. And one connected to the bar. Thanks to which the position of the generator changes. This design is used when using a V-belt. Previously it was used on almost all engines. This design has a big drawback. The generator supports are broken. Because they are a hinge joint. The generator begins to lean on its side. The belt wears out more intensely. Due to the uneven location of the pulley in the stream. Therefore, it is more reliable if the generator does not move and is fixed rigidly
- If the generator is fixed motionless. The belt is tensioned using a roller mounted on the engine block. The roller hub has a mounting hole offset from the center. Thanks to this, turning the hub changes the position of the roller. Therefore, tension or loosening of the belt occurs. This design increases the service life of the belt. The disadvantage is that you constantly have to check the belt tension. Therefore, they began to use a more complex mechanism in the form of a belt tensioner.
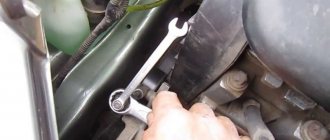
- The belt tensioner is a roller mounted on a lever. The base of the lever has a spring. Thanks to which the roller is pressed against the belt. To release the tension on the roller, you need to press the lever. For this purpose, there is a special ½-inch square hole on the lever. Which corresponds to the size of the head from the tool kit. Accordingly, you can use the wrench from the kit to press the lever. The driver is inserted into the hole and the tensioner is pressed out.
When to change the alternator belt
- Belt wear. During operation, the belt wears out and stretches. As a result, the belt slips on the pulleys. When the generator is loaded, it begins to make a characteristic whistle.
- Belt break. A common malfunction. It can occur as a result of belt aging. As a result of loss of elasticity. The threads reinforcing the belt break. A break can also occur due to a failure of the tension roller. The roller bearing jams or the roller pulley is destroyed. Belt misalignment causes the pulleys to cut it.
- A foreign object may get between the belt and pulley. As a result, the belt becomes tense and breaks.
Signs of belt wear
If there are signs of belt wear, such as:
- The belt begins to whistle on the pulley
- Belt aging is expressed in the appearance of transverse cracks on both the inner and outer sides of the belt
- Along the edge of the belt, loose threads appear.
The belt needs to be replaced with a new one
Replacing the alternator belt tensioner pulley
During operation, extraneous noise may appear. They say that the bearing or tension roller has become unusable. Or a bearing in a generator or other mechanism through which the belt passes. It could be the power steering or the air conditioning compressor. How to detect the source of noise is described in more detail in this article.
If the source of noise is the tension roller, it must be replaced.
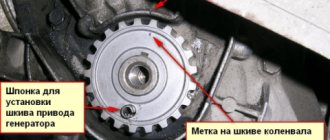
To do this, the belt tension is released. The belt is removed. If the belt is tensioned by a roller with an offset center. It simply unscrews and changes to a new one. The belt is tensioned using a special fork. The fork is inserted into special holes provided in the roller hub. The belt is tensioned by turning the hub. Then it is pressed with a nut or bolt, depending on the design.
Checking the tension of the generator belt.
You can check the correct belt tension using a makeshift method. The tensioned belt should rotate 90 degrees. If it does not tighten, then the tension is strong and needs to be loosened. If it turns more, the belt is too loose. It still needs to be tightened.
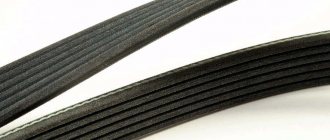
In this way, poly V-belts are checked. V-belts behave similarly.
Replacing the alternator belt tensioner.
If the pulley on the tensioner fails. The tensioner must be removed entirely. The belt is loosening. Using a wrench. Then the tensioner is unscrewed. It is replaced as an assembly or the roller is unscrewed and replaced.
Replacing the alternator belt on a BOMAG roller
An example is replacing the tensioner and belt on a BOMAG roller. During operation, the engine stalled. The hood was raised. It became clear that the belt had jumped off the pulleys and was damaged.
The engine stalled because the engine protection system was activated. The ECU turned off the engine after the generator stopped charging. The cause of the malfunction turned out to be that the tensioner pulley came off the hub. The tensioner lever is damaged. The edge of the belt was damaged when it came off the rollers.
The tensioner turned out to be unsuitable for further use. It needs to be replaced with a new one.
There was no suitable belt in the store. They offered a similar belt but 2 cm shorter. It was decided to install this belt. Because technology was urgently needed for work. The new, but short belt sat in place. The operating range of the tensioner turned out to be sufficient.
The engine started, but a problem was discovered. Since the belt was shorter, it began to cling to the tensioner body. You can't leave him in this position. Because it will lead to tensioner failure and belt breakage.
I had to install the old belt. Having previously cut off the damaged streams of the poly V-belt.
The roller worked in this position for several days. Before a new belt of the correct size was purchased.
Signs that indicate a roller is broken
There are a number of unpleasant signals that there is a problem with the video. So, the most common ones are:
- On the part of the generator there is inadequacy in operation, it is not fully charged, there is no energy supply from it to the on-board network
- Unpleasant sound, squeaking or grinding noise from the location of the alternator belt.
- Increased noise or hum in the engine compartment.
- Perceptible vibration from the roller side, visually increased mobility, when the engine is running.
- There is a clear presence of play (free play) in the roller.
- Mechanical damage, increased wear of the belt on one side.
Increased noise can also be caused by a faulty bearing in the hydraulic steering pump, air conditioning, or the generator itself. Therefore, it is necessary to conduct a thorough inspection and only then disassemble the suspicious element.
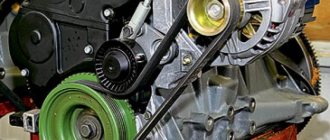
The nuances of installing the alternator belt
Replacing the alternator belt requires careful installation. This is especially true if a poly V-belt is installed. Since it drives several mechanisms into rotation. It goes through several pulleys. Therefore, before removing the belt, it is necessary to photograph and sketch the location of the belt. If you don’t do this, then you’ll have to think for a long time and unravel the charade of installing the belt. On different engines, the belt contour along the rollers has intricate shapes. It is difficult to install the belt correctly right away.
Direction of belt rotation.
It is also necessary to pay attention to the direction of rotation of the belt. On some engines this matters. The direction of rotation is indicated by an arrow. If there is no arrow, then it does not matter which way the belt rotates.
Removing and installing the drive belt through the cooling fan
The peculiarity of installing the generator belt, which rotates the generator cooling fan, is that the belt has to be thrown over it. The inconvenience arises from the small distance between the fan blades and the diffuser. But it allows you to install and remove the belt. In this case, you have to slip a belt under each impeller blade.
Features of replacing belts on different car models.
Replacing the alternator belt on different models has different installation and removal difficulties. This is due to design features.
For example: In a Priora car with air conditioning. To remove and install the belt. The engine needs to be jacked up. Remove the mounting bolts from the engine mounting brackets. And push the belt through between the right bracket and the pillow. A very complicated and unpleasant procedure. Due to limited access. Therefore, experienced drivers when replacing the alternator belt. Two belts are inserted through the engine mount. One is installed on rollers and pulleys. The other is wound up and attached somewhere convenient. In case of a belt break on the road. A spare drive belt is installed in place of the broken belt.
On an Audi A6, in order to change the drive belts, you need to remove the bumper and front grille.
This is what the drive belt looks like on a Ford Transit car
Step-by-step instructions for removing the generator from a Lada Granta car
Before altering the mount, we remove the converter from its standard place in the engine compartment. To do this, perform the following steps:
- We place the car within the perimeter of the repair area, provide safety measures, and secure the rear row of wheels with wheel chocks. Additionally, squeeze the parking brake lever.
- Open the hood and disconnect the terminals from the battery to prevent a short circuit in the circuit.
Accumulator battery
- We unscrew 6 bolts under the bottom of the car and temporarily remove the oil pan protection.
- Remove the protective cap and terminals from the contact board on the converter.
Removes clamps
- We unscrew the nut of the upper fastening (key set to “13”), and use the mounting tool to move the converter to the side. Unscrew the lower mounting bolt.
Unscrew the nut and bolt
- We remove the generator belt from the pulleys.
- We remove the converter assembly and fix it on the surface of the workbench.
Removing the converter Parts diagram
What to do if the alternator belt breaks on the road.
If, after all, the belt breaks on the road. Nothing to do. A decision needs to be made. Either replacing the alternator belt or towing the car. You can drive a car without an alternator belt. If the belt drives only the alternator. Charging from the generator to the battery disappears. But the battery capacity lasts for a long time. Until the battery is completely drained
It is more difficult if a pump with a cooling fan is also driven into rotation. The radiator will not cool. And there will be no circulation of coolant in the engine. The engine will quickly overheat and boil. In this case, it is better to tow the car. Using alternative methods of using a tie or stockings instead of a belt. Perhaps this worked for someone. You can try. If there is no other way to transport the car to the repair site. It’s better, of course, not to let the belt break.
Inspection and assessment of probable faults
Before changing the necessary part, for preventive purposes or making a full repair, it is worth first inspecting and also finding out the probable cause that caused the malfunction:
- assess the conditions under which the entire generator charging chain operated;
- find out the original source of the malfunction: bearing, belt or other components whose malfunction affected the repair;
- check the probable degree of wear of all working parts;
- pay attention to the marks from the belt on the guide and tension rollers; if there are any, it means that the belt displacement was caused by a broken bearing;
- identify probable causes that led to contamination of work surfaces that need to be replaced.
Since even replacing the alternator belt or tensioner pulley will not always bring the desired result, the reason for the failure may lie in something else. For example, if a removed belt has traces of antifreeze or oil, it is necessary to find the source from which these fluids get onto the belt and carry out the required repairs accordingly.