Articles
- 2 Algorithm for carrying out an operation to “shumka” a VAZ 2114 car
- 3 Useful tips
- 4 Table
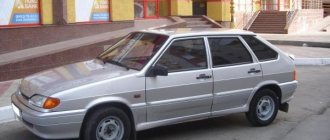
How to make sound insulation in a VAZ 2114
Do-it-yourself soundproofing of the VAZ 2114 has the most important goal - to reduce the level of audibility of extraneous sounds in the car interior. Noise comes from the power unit, the wind outside when moving quickly, and other sources.
If you know how to make noise insulation for a VAZ 2114 yourself, you can significantly reduce the noise level and save a lot of money at the same time, since services of this kind in service stations are not cheap.
Sheet selection
You must immediately understand that for different parts of the interior, it is necessary to use different materials. And that vibration isolation is not the same as heat and noise insulation. The noisiest part of the VAZ 2114 is, of course, the engine compartment and the gearbox tunnel. This also includes the wheel arches, namely the pillars. It was chosen to glue StP Bimast bomb Premium on them. I got 4 sheets. iSilver 30 was placed on the floor of the cabin. It took 12 sheets. iSilver 30 10 sheets were used for the doors and ceiling and hood. A Barrier 8 x 2 sheets for the ceiling was purchased. and BiPlast 10K to eliminate crickets. There is the same material, but with tape. It turns out more expensive. It’s easier to take one leaf and have someone cut it into strips 1-1.5 cm wide. The most Jewish part of the purchase! As a heat and sound insulating material, we chose a simple roll on the construction market. Its price is 1000-1200 rubles. Moreover, there are 30 square meters. In the end, it was left for gluing the roof))) According to the receipt 6725 materials StP + 1100 rubles market.
Processing of metal body parts
The next step is to clean all the metal in the body. After this, you can begin gluing the sides of the trunk with noise-absorbing material. The best solution is to use the “Gold” material, as it is more effective, but not too heavy. The main thing at this stage is to prevent the appearance of air bubbles between the material and the car body.
Preparing for work
- The first thing you need to do is choose clothes. Take something you don't need. You will 100% get stuck in bitumen from the edges. It's hard to peel off. I advise you to do all this in slippers, for the convenience of jumping in and out of the car.
- Tools. You will need a roll of fabric towels and a solvent (White spirit) to degrease surfaces. Set of keys: Heads for 10, 13, and a slotted Zhiguli key for removing seats. Choose from a screwdriver or screwdriver. Table spoon, for smoothing vibration-absorbing materials. A sharp construction knife, preferably 2 at a time if a group of people will be working. Rubber gloves for working with solvents. A friend spilled it on his hands, after about 20 minutes there were minor burns from it. Double sided tape. If desired, buy phosphoric acid with zinc. The price is 200 rubles at the construction site. Rust remover. Works great. It is better for her to remove the found spots during her work to avoid the germination of rot under the insulation.
- A bunch of bags. Do not be surprised. Place each interior section, screws, nuts, washers in a separate bag and label it. Better yet, take a photo of where it’s coming from on your phone. Believe me, this will cut the interior assembly process in half, or even three. Be sure to take pictures of connecting all the connectors to the buttons and so on. Otherwise, you’ll get yourself a bunch of hemorrhoids if you don’t understand wiring.
Pasting materials
Vibro
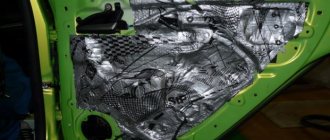
The work is painstaking. Since the vibration isolator is placed first. And it should follow the shape of the body. This is where you need a spoon. It's very convenient for her to iron everything. Advice! Immediately where you see, cut technical holes. Then you simply won’t find it. All surfaces are first wiped with a solvent in order to clean them and degrease them. The most difficult part was pushing that same Bimast under the standard insulation in the engine compartment area. Since we did not remove the torpedo. Two of them were holding their native Shumka, my friend and I were ironing it. They also placed bimast on the box tunnel, since it produces a lot of crunches and vibrations. It is better to work with it by pre-heating it with a hair dryer. It will become much softer and more pliable. There were no problems with the rest of the cabin. I would like to note that it is simply not even necessary to paste over absolutely everything, without small gaps between the sheets. This material acts as a vibration dissipator. And based on the physics course, if you take a square sheet and paste it 80%, you will not see the difference from 100% pasting. In the photo below you will see that in some places we neglected accuracy.
Thermal noise
It's much easier here. It doesn’t matter at all whether this material will lie perfectly following the shape of the body, or whether you throw it away, securing it with double-sided tape. Again, let's call on physics, air dampens sound and retains heat. So the gaps between the heat noise and the vibration are even useful. Remember about technical holes!
Separate doors
The most convenient way is to glue exactly 1 sheet of iSilver 20 to each door, then use the trimmings on the trunk, for example. I advise you to invite a friend with thin long arms. To glue doors through technical slots. Give him gloves, otherwise he will cut all his hands with the edges of those very holes. We carefully glued only the driver's and passenger's doors from the inside. They glued them inside the rear ones as best they could. The anti-corrosion coating on the doors will still have to be thoroughly wiped off. Don’t be afraid where you erase it, cover it with bitumen. Therefore, nothing will start to rot there.
A few words about the hood
Vibra should be glued only according to the shape of the slots. And cover the top with one sheet of Shumka with double-sided tape.
Installation
1. Before installing the door, pass a wire bent into a loop through the left side of its frame. We take the end of the loop out of the hole for the wiring harness.
2. Install the hinges on the door.
3. Install the door into the body opening. Having placed the tip of the “mass” wires on the stud of the left loop, we tighten the nuts securing the loops (without tightening them).
5. Close the door and make sure that its position in the opening is correct and that the gaps are even around its perimeter.
Tip: The design of the hinge fastening does not provide for adjusting the position of the door, so if the door in the opening is crooked, contact a service station (you may need the help of a tinsmith).
6. Tighten the hinge fastening nuts and install the lock retainer.
7. Using a wire, we pull the wiring harness through the door frame.
8. Using a slotted screwdriver with a thin blade, thread the outer end of the protective tube of the wiring harness into the door hole.
9. We put connecting blocks on the ends of the wires in accordance with the markings made and connect the blocks to the windshield wiper and the additional brake signal.
10. We fasten the headliner with holders.
11. Install the rear pillar linings and secure them with self-tapping screws.
12. Use a slotted screwdriver to straighten the edges of the side window seals (the edges of the seals should be located on top of the trim and headliner).
13. Check the functionality of the windshield wiper and additional brake signal.
14. After making sure that the windshield wiper and additional brake signal are working, install the tailgate trim (see “Tailgate trim - removal and installation”).
Interior assembly
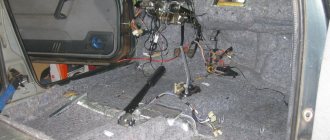
The most difficult part of the whole process. No matter how hard you try, the thickness of all surfaces has increased. And everything will have to be attracted. First, we return the standard sound insulation to its place. Then panels and parts. We glue the same strips of Biplast on the edges of the door panels. They will remove all the creaks of panels on the iron doors. I glued them in the places where the rear window sills were attached.
We started collecting from the trunk, moving forward. The driver's seats were installed last. Two men had to stand on them to make it possible to pull them down. There are "springs" under the seats. Remember how they stood and how the hooks to them stood. Because if the fastening is incorrect, you will not be able to move the seat. Remember about the bags)))
Results
There were 5 of us. We had a bunch of sheets of different insulation, one box of beer, 8 packs of cigarettes, 20 packs of Rolton, 4 Coca-Cola, one cat and one dog))
Seriously, the whole process took 3 days. With smoke breaks and even pauses for light rain.
About the result: I’ll say heaven and earth right away, of course. We went to New Riga to check the quality of our work. The vibrations and squeaks of the gearbox have disappeared. Vibration and engine noise in the cabin have been significantly reduced. The wind no longer howls at 100 km/h. Vibration is also not felt from a passing truck nearby. The interior heats up 2 times slower in the heat. Since, already in winter, the stove warms up noticeably faster and cools down for quite a long time.
The music began to sound much cooler. Most importantly, the roof became completely blank. The sound of rain disappeared completely. In the cabin you can’t hear the keys being thrown onto the roof, for example. On gravel the noise from the wheel arches has decreased. The doors have become heavier, making them softer and easier to close. In general, the general impressions are comparable to the average foreign car.
Cost of services
Making false panels for the trunk
Decorative panels negotiable False panel for amplifier day 1500–3000 rub. False trunk floor panel day RUB 1,500–4,500. False trunk panel (side, back) day 1500–3500 rub. False panel for a processor 1,500–3,000 rubles per day. False panel for a subwoofer 1,500–3,000 rubles per day. False panel of the wing per day 1500–3000 rub. False panel above the spare tire RUR 1,500–4,500 per day. False condenser panel 1–3 h negotiable
Our other services
Production of transition frames for GU (radio tape recorder) from 500 rubles. Production of podiums for acoustics from an hour from 1000 rubles. Manufacturing of spacer rings 1–4 hours from 400 rub. Manufacturing of subwoofer housing 1–7 days from RUB 3,000. Manufacturing of the rear shelf 1–7 days from 1000 rub. Selection of audio system components 5 min – 1 hour free Adjustment of acoustics (during installation) free Audio preparation from an hour from 1000 rubles. Installation (installation) of component acoustics 2–6 hours from RUB 3,500. Installation (installation) of subwoofers 1–4 hours from 500 rub. Organization of linear RCA outputs from an hour from 1000 rubles. Installation of a sound amplifier from an hour from 1000 rubles. Installation (installation) of a CD/DVD/MD changer 2 hours from 2500 rub. Installation (installation) of the processor with configuration 4–6 hours 1500–4000 rub. Reinforcement of the trunk opening (with aluminum) 1-2 days 4000–8000 rub. Enlightening (alteration) of the seat back is negotiable Manufacturing of the lifting frame 1–3 days 5,000–12,000 rub. Disassembly and assembly of interior elements from 30 minutes from 300 rubles. Installation of cooling fan negotiable Installation of condenser (storage) 1 hour 600–1500 rub.
Do-it-yourself noise insulation of VAZ 2114 according to instructions
How to make sound insulation in a VAZ 2114
Do-it-yourself soundproofing of the VAZ 2114 has the most important goal - to reduce the level of audibility of extraneous sounds in the car interior. Noise comes from the power unit, the wind outside when moving quickly, and other sources.
If you know how to make noise insulation for a VAZ 2114 yourself, you can significantly reduce the noise level and save a lot of money at the same time, since services of this kind in service stations are not cheap.
Installing the backlight
As a final step, you can install LED lighting, which will serve both its intended purpose and highlight the tuning of the trunk. In addition, an additional advantage is that the cost of such lighting is low.
It is recommended to connect the contacts using a simple scheme. In order for the lighting to illuminate the entire luggage compartment and at the same time look beautiful, it is recommended to install it in the corners of the transformed trunk. In addition, this allows you to easily fix the LED strip. However, if the owner’s knowledge of electronics is limited, then you can turn to a specialist who will quickly and for a pittance help you solve the problem.
Undoubtedly, the capacity is significantly reduced, however, in return, the owner of a VAZ car receives an original trunk, which you will not find on the average driver. But tuning also helps to improve sound insulation, which VAZ cars lack so much. In addition, the aesthetics and well-groomed appearance of a car can say a lot about the owner himself. However, whether to perform tuning or not is purely the choice of each car owner.
General information about the process
The initial one is provided by the manufacturer at the stage of assembling the machine. But gradually, due to temperature changes, any material loses its beneficial properties.
Before you start carrying out the “Shumka” on your own, it is recommended to dismantle the seats, door trims, mats and free the car from the old standard insulation.
Note : Only by carrying out a complete and thorough soundproofing procedure can one hope for a significant reduction in noise from the outside. Only in this case will the cabin be perfectly quiet and comfortable.
Soundproofing panel VAZ 2114
It is especially important to treat doors, as they often become the main installation location for speakers. It is clear that this place should be well protected not only from noise penetration, but also from plastic vibrations and other negative phenomena.
Acoustic speakers in the doors
Along with sound insulation, the interior will also receive high-quality insulation. In Russian conditions this is extremely important. To achieve this effect, you need to combine vibration and sound insulation.
Soundproofing for VAZ 2114
“Shumka” carried out on a VAZ 2114 is often called tuning. This is true, because a real modernization of the car is being carried out. Operational parameters are increased and comfortable conditions are created when the vehicle is moving.
The driver is no longer oppressed by engine noise, his nervous system is not irritated by the strumming and vibration of plastic elements. All this cannot but have a positive impact on overall driving safety.
As mentioned above, the standard “Shumka” will not be of good quality; relying on it is the last thing. The process of carrying out “Shumka” on cars with high mileage is especially relevant. In general, such cars are very difficult to drive, since the noise penetrates everywhere, interferes with the normal operation of the acoustics, creates complete discomfort, and the trip turns into a very tedious task.
On sale today you can find a sufficient amount of high-quality materials for carrying out “Shumka”. There are a lot of them and making the right choice can sometimes be extremely difficult. One of the main indicators of a good material is not only the ability to absorb sounds, but also to be light in weight (details about materials in the table below).
Note. If the material itself is heavy, making noise will be difficult. As a rule, good and proper insulation involves laying several layers of material, a kind of sandwich consisting of layers of vibration and noise absorbers. Heavy materials will create excess weight that is dangerous for the car and its body, which will inevitably affect fuel consumption and the overall dynamics of the car.
Splen with foil
Among other things, you also need to lay out materials skillfully. The fact is that if you don’t pay attention to this, the materials will simply turn into a time bomb for the metal component of the car.
Poorly laid material creates gaps through which air, moisture, etc. will penetrate. And all this will inevitably lead to the appearance of the most terrible enemy of the body - corrosion.
Correct installation of the material always means following the instructions in a step-by-step sequence, using the right tools, using a hair dryer and much more.
In some cases, especially when carrying out the noise yourself, partial sound insulation is also appropriate. In this case, the target is the most noise-producing parts of the machine. Definitely the doors, then the trunk, the rear parcel shelf, and so on.
It is important, when working on your own, not to damage the upholstery. Unfortunately, this often happens due to the inept actions of the car owner who is carrying out such an operation for the first time. In general, conducting a “Shumka” is a painstaking and lengthy process, but it’s worth it.
Before carrying out soundproofing, it is recommended to carry out a partial or complete inspection of the machine. The causes of all vibrating and knocking sounds produced by suspension elements or other vehicle components must be eliminated. They may be loose or need to be replaced. The body and its parts must also be checked.
Raised floor in Kalina hatchback
The trunk floor was assembled from 8mm plywood. All elements are cut out with an electric jigsaw. Then we tighten the plywood with leatherette using a furniture stapler or glue. Installation of the raised floor is carried out using self-tapping screws.
As a result, we get a false floor of Kalina, which is able to fit a sufficient number of things, leaving the trunk completely free. The box itself is genderless.
A little later, this scheme was slightly modified, and the design was slightly redesigned. The corners abutting the back of the seats were made round, which made removing the shelf easier and faster. It also became possible to fold the parts of the shelf so that they do not interfere at all. The spare tire is under the raised floor, and in order to get it out you need to remove the shelves and pull out the “box”. The modification also affected the box, which was slightly reduced to make it easier to reach. By the way, leatherette was also replaced by a cheaper and more practical car carpet.
There is also a simpler version of Kalina’s raised floor, which required: 640x920mm plywood, 2 small boards and 6 screws. There are no compartments, as in previous versions, which allows you to place larger items.
To find things at night, it is recommended to make the trunk lighting independent.
“Cleanliness is the key to health, order comes first.” Let's give an example of putting things in order in the trunk by creating a raised floor in the trunk.
So, I’m posting a photo report of the step-by-step creation of a false floor in my car. Maybe it will be useful to someone.
So, let's throw everything out of the trunk. We immediately decided on the height, I needed it to fit the most necessary things and not to reduce the space in the trunk too much, since I don’t plan to remove the floor very often. I decided the height of the frame would be 11.5 cm. The top board is 84 cm, the bottom board is 78 cm, all the sides are 58 cm, with these dimensions the frame fits tightly into the trunk and does not move at all.
We cut out blanks from available material, mine is chipboard. It is better to cut with a jigsaw. Sand the ends and sides.
We mark and drill holes, assemble the frame. I used euroscrews because I like working with them. Who doesn’t want it, then use ordinary wood screws.
Next, we make partitions, here we immediately estimate roughly what will lie, for example, from a tool, unless, of course, you are a fan of everything lying in a common heap. I immediately decided what I would put in and what dimensions were needed for it.
Algorithm for carrying out an operation to “shumka” a VAZ 2114 car
To isolate the interior from excess noise, you need to carry out soundproofing by following these step-by-step instructions:
- First, disassemble the car, removing those parts that make noise when driving. These could be mudguards, arches, fenders, etc. It is advisable to cover them from the inside with some kind of vibration-damping material;
- The seats will also need to be removed if the interior is fully soundproofed;
VAZ 2114 sound insulation of the panel and the interior as a whole
- Cover the floor of the car with a vibration damper and roll it in with a special tool.
Advice. To ensure that materials adhere better to metal or plastic, it is recommended to carry out work in a dry and warm room. In a damp room, it is better to preheat the foil with a special hair dryer, and only then roll it onto the surfaces of the body.
Soundproofing torpedo VAZ 2114
- The next material, as a rule, is Spleen. It has a sticky base, lays on surfaces easily, and perfectly cuts out excess noise penetrating from the outside;
- To install materials in the trunk, the lid is removed in advance, all screws and bolts are unscrewed.
Soundproofing the trunk of a VAZ 2114
Note. In general, disassembling the luggage compartment involves a separate operation. Here you will need to prepare everything thoroughly, disassemble the compartment down to the bare metal surface, pull out all the wires going into this area. As for laying materials, only clean and dry surfaces should be processed. After the material has been laid, you will need to put the wiring back in and close all the extra holes.
VAZ 2114 trunk sound insulation
- Door treatment (see Soundproofing VAZ 2114 doors can be easily done independently) is practically the most important procedure in terms of increasing the so-called “acoustic” properties of the interior. It is recommended to insulate these parts of the car with a good polyurethane-based material. The front doors of the VAZ model, which are entrusted with the role of a stand for acoustic speakers, are recommended to be rolled in two layers.
Note. In fact, the “noise” of the door also involves the initial disassembly of the upholstery, gluing both sides and the card. Door technological openings are closed only on one of the edges.
- The roof of the VAZ 2114 is also treated. In order to fully carry out the “noise” of the car ceiling, you will need to remove everything, from the mirrors to the upholstery;
Soundproofing the roof of a VAZ 2114
- No less valuable in terms of protection from the penetration of external noise and sounds of the internal combustion engine is the hood. You also need to be able to process it competently.
Sound insulation of the VAZ 2114 engine compartment and hood
Doors
Sound insulation of doors has a direct impact on the level of comfort inside the VAZ 2114 car. If you carry out similar work, you will simultaneously solve several problems:
- Get rid of some of the noise that comes into the car from the outside;
- You will be able to eliminate squeaks and knocks that are typical for the VAZ 2114 due to the peculiarities of the skin and the location of internal parts;
- Improve the sound quality of your audio system. Sound insulation of VAZ 2114 doors is especially important if speakers are built into the doors.
As in the case of the trunk, door processing includes several stages:
- Disassembly. First, remove the door trim. Just do it carefully, be sure to write down or very carefully remember the dismantling sequence. This is the first and most important condition for successful reassembly.
- Surface cleaning. After removing the factory noise and other elements, clean and degrease the metal. Be careful with the paint and do not damage it with tools. The bottom of the doors does not need to be treated with degreasing compounds.
- Applying the first layer of sound insulation. To cover the walls that go outside, I use vibration damping material. The elements are cut along the contour of the compartments and glued. The work is quite difficult, since you need to manage to paste the surfaces through small holes. Wear gloves when performing noise to avoid injuring your hands on metal components. If you are gluing not a solid piece, but small pieces, do it overlapping.
- Fighting knocks and squeaks. Wrap wires, rods, and other parts that are possible using Madeline. This will avoid knocking noises when the car is shaking. Pay attention to the areas where the parts come into contact with the body. A double layer of material is allowed here. It would not be superfluous to make a continuous gasket of the same material along the entire contour of the doors where the trim is attached.
- Vibration isolation protection for technical holes. Technological holes should be treated with pieces of Vibroplast. A useful measure that gives good results in protecting against vibrations and their consequences for a comfortable ride.
- The metal surfaces of the door on the trim side are treated with Accent. This is a sound-absorbing material. If it is not there, use Bitoplast. Only the thickness of such material should not be more than 10 millimeters.
- Sheathing processing. To prevent the casing from resonating and vibrating, apply Vibroplast Gold vibration damping material to its surface. It is not necessary to cover the entire surface, since this will make the doors noticeably heavier. The most important thing is the joints of the sheathing elements and wide, even elements.
- Assembly. Before you begin assembly in accordance with your instructions, make sure that the window regulators and other elements located in the door are in good condition.
The best sound insulation is comprehensive. Therefore, it is still recommended to protect your VAZ 2114 from internal and external noise. Start small, gradually working on the roof, hood, fender liners and other elements. By doing this, you will be able to achieve amazing comfort and silence in the interior of your car.
Useful tips
Today, many owners of the VAZ 2114 install new acoustics in the car, more powerful and productive. They buy an expensive subwoofer (see 1000-watt subwoofer and a review of the best models), a powerful amplifier (see The best amplifier for a subwoofer and how to choose it) and a lot of other useful things that significantly increase the level and quality of sound. But imagine their disappointment when all the money spent turns out to be thrown down the drain, since the sound still leaves much to be desired.
It turns out that the whole point is insufficient insulation of the car body panels, through which noise penetrates from the outside. It’s no longer possible to enjoy clear sound: rattles, vibrations, knocks - all this degrades the quality.
As mentioned above, car doors are very important in this regard.
Here's what you need to focus on:
- They must be insulated on both sides, although excessive zeal should not be shown either. Heavy doors mean they may sag over time;
Sound insulation for VAZ 2114
- In addition, we must take into account the fact that the doors of the VAZ 2114 are often covered with cellophane. The latter makes unpleasant sounds and creaks in the cold season in the frost;
- It is advisable to lay materials on the door in large pieces (as much as possible). The materials used should not be visible beyond the edges of the sheathing.
It’s not difficult to learn how to carry out “Shumka” with your own hands. Step-by-step instructions, photos, materials, and videos will help in this matter. The factory standard insulation must be completely stripped off so that new materials can be installed efficiently.
Noise when there is an audio system in the cabin
Many car owners install powerful acoustics, a subwoofer and speakers in the cabin. When the panel swings, noise appears and you cannot enjoy the clear sound of music. When you turn on the audio system, the cabin begins to rattle, despite the complete isolation of all other parts of the car. To avoid this, you need to insulate the doors from the inside.
- Remove the doors and cover them with material that prevents vibration. Keep in mind that manufacturers often cover doors with cellophane, which also makes unpleasant sounds, creaking in the cold.
- The material should be glued as a whole plate and the edges should be adjusted to the shape and curves of the doors. The insulation should not extend beyond the sheathing. This is especially important to take into account on the front doors; it is the noise from them that affects the sound quality of the acoustics.
Next, you should insulate the casing with vibroplast - foam rubber impregnated with resin. When in contact with plastic, the material does not creak, is soft and pleasant to the touch. A single sheet of vibroplast is placed on a clean and dry sheathing, and excess pieces are cut off. Then you should carefully cut out the places for the handles and pistons. Reinstall the casing in its original place.
There is no need for glue in the work, since the vibroplast has a self-adhesive base and fits well on a dry and flat surface.
Sound insulation of a VAZ 2114 car is important for the front doors, but not only for the clear sound of the acoustics. This will also help to avoid vibration when the doors come loose, which often happens even in new cars after 2-3 years of operation.
Table
Materials for vibration and noise insulation:
| Vibration isolation | Sound absorbers | Sound insulators | Anti-creak |
| Designed to reduce the level of vibrations emitted by the most important components and assemblies of any car. These include the engine, transmission, and wheels. The most important places for vibration isolation of a car are the wall of the engine compartment and wheel arches. The listed elements must be especially carefully glued with vibration-absorbing materials. | Provide excellent noise absorption performance. Figuratively speaking, they “absorb” all sounds and “destroy” them, preventing further propagation of the sound wave. The materials have an adhesive layer and an open porous structure, and are glued directly to the vibration. The main effect in car sound insulation comes from materials in this category. | A material used when carrying out soundproofing work on a car, the main task of which is to isolate it from external sounds. The distinctive ability of a sound insulator from a sound absorber is that the insulator, simply put, reflects the sound wave (that is, sends it back), and the absorber “absorbs” and “destroys” it. | This type of material, as the name suggests, is designed to successfully combat sources of squeaking - parts rubbing against each other. |
| Materials: | Materials: | Materials: | Materials: |
| Bimast Bomb STP | Bitoplast | Splen | Bitoplast 5-10 mm |
| Bimast Super | Accent | Noiseblock STP | Madeleine |
| Bimast Standard | Isotone | ||
| Vibroplast Gold STP | |||
| Vibroplast Silver STP | |||
| STP Aero | |||
| Vizomat PB-2 | |||
| Vizomat MP |
Soundproofing VAZ 2114: do it yourself
VAZ-2114 has a high noise threshold. While the vehicle is moving, the driver and passengers are forced to hear extraneous sounds. Sources of noise can be the power unit and even the wind. It’s difficult to call such a ride comfortable, so owners of domestic cars sooner or later think about how to soundproof a VAZ-2114 with their own hands.
Car maintenance yourself saves a lot of time and money. With a little experience and knowledge in repairing the VAZ-2114, you will always feel confident on Russian highways. Moreover, domestic cars seem to be created for studying the internal structure of the structure - mechanics allow you to independently eliminate almost all problems of the components.
Newbie car enthusiasts are wondering: how long does it take to install sound insulation? If you do everything slowly and in accordance with the instructions, the work can be completed completely in 5-6 hours. As a result you get:
- maximum reduction of noise entering the vehicle interior from outside;
- clear sound of the audio system;
- To listen to your favorite song while drowning out external noise, there is no need to turn up the volume.
Purpose and principle of operation
As you might guess, the main role played by the Shumka VAZ 2114 is to protect the driver and his passengers from extraneous sounds penetrating into the cabin from the outside (they can be the whistle of the wind, the noise of cars passing by, the sound of wheels moving along the road, especially if the latter is unpaved or gravel, the sound of tools lying in the trunk and much more).
Soundproofing VAZ 2114
The presence of sound insulation helps suppress these unpleasant sounds, which have a depressing effect on the mind and do not allow you to fully concentrate on the road (especially during long trips). In addition, the operation of the audio system in a soundproofed cabin will be of higher quality, and its sound will be clearer.
Speaking about the principle of sound cancellation, we can note 3 main features of noise insulation:
- Vibration protection to absorb sound waves.
- Preventing the occurrence of resonance in metal parts.
- Barrier function that prevents the spread of sounds.
In addition, the installed Shumka will also play the role of additional thermal insulation, which will better maintain the internal microclimate in the cabin both in winter and in summer.
Required tools and materials
To achieve good sound insulation, you need to prepare a whole set of tools and materials in advance:
- Stroyizol SD 90 grade.
- Splen marked 3004.
- Accent 15 LM KS.
- Be sure to buy vibroplast type Gold.
- Adgilin.
- Vizomat MP.
- Stock up on a metal ruler.
- A construction tape measure won't hurt.
- Square.
- Hairdryer, preferably a household one.
- Montage.
- Screwdrivers with different tips.
- Awl.
- Keys.
- Sharp scissors.
Step-by-step instructions for arranging sound insulation for the VAZ-2114
It is necessary to begin arranging sound insulation in the cabin with a general cleaning of the car. Clean the internal structure from dirt, remove excess layers of materials from the vehicle, for example, upholstery, panels, as well as those parts that may cause extraneous sounds - mud flaps, fenders, arches.
Nothing significant can be done with them, but it is preferable to cover the inside with vibration-damping material.
What to do next:
- Remove the seats.
- Visomat MP is characterized by the absorption of vibration noise, so treat the entire plane of the trunk floor with it. This method also makes it possible to strengthen the rigidity of the machine; noise waves move to the lower, inaudible frequency range. Experts say that sticking Vizomat MP retains heat in winter frosts and at the same time keeps cool air in the car in the summer heat.
- To properly and reliably glue Vizomat MP, you need to use a household hair dryer. First, wait for the material to soften and become elastic and only then proceed to process it with a warm air stream.
- A dry and dark room for repair work is an important requirement to obtain the desired result. It is unlikely that it will be possible to heat the foil to the required temperature in a damp and cold room.
- Vizomat MP is adjusted to the outline of the body component immediately; fixation must be done quickly, otherwise the material will not fit tightly. With this quality of gluing, you can’t expect significant sound insulation for the VAZ-2114. You shouldn’t rush either, otherwise the material will set, but will not meet its characteristics.
- If there are no large sheets available, you can lay the panels overlapping each other, one sheet should overlap the other at a distance of 15-20 mm.
- It is forbidden to seal technological recesses, components responsible for fixing parts, and hatches with Vizomat MP - after completing the soundproofing of the VAZ-2114 with your own hands, you will still need free access to these parts.
- Vibration insulation should ideally be maximum; for this, not only the floor, but also the ceiling surface should be covered with noise-insulating material, and approaching the dashboard is encouraged.
- If you decide to additionally soundproof the car interior, then the soundproofing layer must be laid on top of the soundproofing layer. Drivers who have done sound insulation with their own hands note that heat is retained in the cabin, which is impossible not to notice in winter.
- Splen, on the one hand, has a sticky layer, so it sticks on its own and is fixed without effort. To cover the trunk with Splen, you need to remove the cover, unscrew the screws and bolts. What does it mean to disassemble the trunk? After dismantling, only bare metal remains; the wires located in this part of the machine are also removed. After laying the material, do not forget to re-arrange the wiring and cover the holes.
- Door processing requires polyurethane-based material. Experts recommend treating the front doors of the car with the material in 2 layers.
When material is considered to have been installed poorly:
- If there are gaps, cracks through which air enters the car interior and corrosion processes are accelerated.
- The doors, trunk, and rear shelf should be treated (the latter makes a strong vibrating noise).
- Damage to the upholstery is what you need to watch out for when fixing the Vizomat MP, if you are not tolerant, do not like monotonous work and are annoyed by doing your own car repairs, it is better to leave the sound insulation of the VAZ-2114 for professionals.
- When starting to modernize the VAZ-2114, it is advisable to conduct a preliminary thorough inspection of the sources of vibrating and knocking noise - special attention should be paid to these details.
If the components are poorly secured, this defect must be eliminated. It happens that the element is completely worn out, and no matter how much you would like to get rid of the noise, other than replacing the part, there is no other way to solve the problem.
Remaking the floor in the trunk of a VAZ-21099
Hello Kulibins! I think it’s no secret to many people what kind of trunk the 99 is, not only is it small and not convenient, but the floor is not even and has a hole in the middle. If you put the spare tire “face up”, it seems like a more or less level floor, but there is nowhere to put all the little things. If you turn the spare wheel upside down, the carpet and all your luggage will fall through. Putting a rubber mat down is not an option; I have a gas cylinder. That’s why, when I did a complete ShVI for my car, I decided to immediately finish the trunk as well.
For this you needed:
- plywood sheet 10mm;
- piano hinges;
- jigsaw;
- can 88 glue;
- hands and desire.
To begin with, I rolled up the trunk with a 2 mm vibrator.
arches and wings splen 8mm
I cut out plywood on the mat that is in the trunk and a hatch for the spare wheel
No matter how you look at it, you can’t fit the whole thing in, that’s why I had to cut off a piece
I made a frame from 20 x 30mm bars and screwed it to the floor with self-tapping screws, I made sure to cover the screws on the back side with mastic
threw splen 8mm and native Shumka
bottom view, hatch divided into two parts
the floor is screwed to the bars with self-tapping screws
hatch in open position
modification of the plastic that covers the lights
carpet glued with 88 glue
I couldn’t think of anything better than just drilling a hole for the finger
view from salon 2
finally nothing will fail
plastic on the seat is also in carpet
attached the emergency lights and the stop for the hatch
This is how the trunk turned out. Until next time.
Sound insulation of the VAZ 2114 engine compartment, as well as the body
The main task of sound insulation in a car interior is to reduce the audibility of sounds made by the engine, wind, and other extraneous noise. Sound insulation of the VAZ 2114, like other models of this family, is provided during assembly at the factory. But over time, under the influence of high temperatures and painting, it loses its insulating properties.
If it is not possible to undergo service, then you can install the Shumka on the VAZ 2114 with your own hands, in which case it is necessary to empty the interior of seats, rugs, door trim and old factory sound insulation. The car will be quiet and comfortable only with complete and thorough insulation of the doors, arches, fenders, hood, trunk, roof and floor. The doors are insulated to improve the quality of acoustics; the sound of a running engine will not be heard after the hood is insulated.
You can not only improve the sound quality of the acoustics, but also insulate the interior if you combine vibration and sound insulation during gluing. The process of preparing for dismantling consists of selecting the necessary tools for removing the casing. Removing upholstery material from the floor and ceiling will not be difficult, since the interior trim and seat mounts have a fairly simple design.
The work to replace the sound insulation of the VAZ 2115 ceiling takes place in several stages
Remove the trim, visors, handles, and lampshade in order to provide access to the iron base of the ceiling.
Degrease the ceiling with white spirit.
Proceed with vibration isolation, preferably with outside help, since it will not be very convenient to do it alone.
The process consists of cutting off the required piece of vibroplast and removing the protective film. Afterwards, the pieces of vibroplast are applied to the ceiling and carefully rolled out with a roller for more reliable gluing.
Apply splen on the layer of vibroplast, glue it and also roll it out with a roller. If everything is done carefully and thoughtfully, one sheet will be enough for the entire ceiling.
Then, upon completion of the vibration and noise insulation work, everything is assembled in the reverse order and secured in place.
But soundproofing the floor of the VAZ 2115, in contrast to soundproofing the ceiling, is one of the most difficult procedures. Firstly, everything that is in the cabin must be dismantled, and secondly, there are a lot of different shaped elements for which it is necessary to prepare patterns for patterns.
Try to protect yourself from noise and you will certainly feel how much more comfortable it has become in your car. Quiet music, a calm conversation with your interlocutor will bring pleasure, and rain knocking on the roof will no longer irritate you while driving.
Other interesting materials:
Based on materials from the site: https://videovaz.ru
To save fuel, our readers use Artem Abramov’s method. After carefully studying it, we decided to offer this method to you too...
Sound insulation of car doors VAZ 2114, 2113 and 2115 plays an important role in increasing driving comfort. It allows you to solve the following problems:
- significantly reduce the level of noise entering the interior from the street;
- eliminate knocks and creaks produced by internal parts and parts of the door trim;
- improve the sound quality of music in the cabin, especially if the speakers are built into the doors.
Soundproofing the doors of VAZ 2114 , 2113 and 2015 can easily be done with your own hands. The materials used are relatively inexpensive and can be purchased at almost any auto store.
The recommended standard sound insulation of the front doors of VAZ 2114, 2115 and 2113, which, as practice has shown, gives a fairly good result, consists of the following steps:
The main role of sound insulation
Soundproofing a VAZ 2114 car is a kind of tuning. Every driver wants to improve the performance of their car and create comfortable driving conditions. The noise of the wind, the running engine, studded wheels and rattling in the trunk depress not only the driver, but also the passengers in the cabin.
As already noted, the sound insulation of the VAZ 2114 car is not of high quality; within a couple of years after purchasing a new car, installing a noise isolation system is simply necessary. Extraneous noise penetrates everywhere, interferes with the purity of the music and creates some discomfort, making the trip long and tiring.
There are plenty of sound-absorbing materials on the market today. The main thing is that they must be of high quality and light. To prevent corrosion, there should be no air, bubbles or gaps underneath them. The tools are standard and can be taken from a car kit. If you need to heat the material for fastening, you can use a hairdryer.
Shumka VAZ can be carried out partially. It usually affects the trunk and doors. The instructions for carrying out insulation are simple; the work can easily be done with your own hands. To soundproof your car, you can also use the services of a car service.
Soundproofing a VAZ 2114 with your own hands will significantly save costs, although the process of disassembling the car is quite lengthy and painstaking. When disassembling, it is important not to damage the upholstery in the cabin. If everything is done correctly, the car will become much more comfortable.
There is a misconception that noise in the cabin is caused by the suspension. Of course it's worth checking out. But in fact, a common cause is precisely poor insulating material, the quality of which almost all VAZ models cannot boast of.
Acoustic shelf in the trunk
Option for an acoustic shelf in the trunk
As mentioned above, a shelf is also installed in the trunk. It may be a folding version, and on the sides there will be fixed shelves with speakers.
Basic moments
So:
- Installation of the shelf is carried out using self-tapping screws and corners.
- The process of installing the shelf is simple, especially on the VAZ 2112.
- The side panels can be left in the form of boxes, or you can remove the trim and make new ones (for example, like this).
Acoustic side shelf
- When installing fixed side shelves, you should ensure their rigidity and reliable fixation to the maximum extent possible.
- There are two ways to install speakers in side shelves: open installation, where the speakers are installed after installing the shelf, and hidden installation, where the speakers are installed in place beforehand.
Noise and vibration insulation for acoustics
On this passage, full of optimism, we end our article. More detailed instructions for making acoustic shelves with your own hands can be downloaded from the Internet. Guided in addition by video and photo materials, doing everything correctly will not be difficult. The price of a car that provides acoustic comfort by default increases significantly.
How to soundproof a car interior with your own hands
To isolate the cabin from unnecessary noise, the following simple instructions will help.
- The car is dismantled, metal parts that make unpleasant sounds when driving are removed. The lower part of the body, near the wheels, is especially subject to insulation.
- Spare parts are covered with vibration-damping material - foil covered with a resinous layer.
Using a special rolling tool, scissors or a knife, you need to cover the entire inner surface of the body with foil, that is, roll a layer of foil onto it. For better setting of the material, it is advisable to carry out the process in a warm and dry room. If the room is damp, you can heat the foil with a hairdryer and then roll it onto the body. To increase noise absorption it is better to apply several layers.
The further material for pasting will be “Spleen” on a sticky base. It will well cut off unnecessary noise entering the cabin from the street. To install sound insulation in the trunk, remove the lid, unscrew the nails and screws. All wires must be pulled out to isolate all exposed areas. The trunk is disassembled down to the bare metal. The material is glued to a dry, clean surface. After gluing, the wires are reconnected and all unnecessary holes are closed.
Next, the doors are insulated with polyurethane and ventilation holes are formed. It is advisable to insulate the front doors with a double layer. They need to be disassembled, the trim and the bald door edge glued. To avoid squeaking when driving, you need to roll up the shirt and tighten the door and lock holes. Then the roof is soundproofed. Everything is removed: mirrors, visor, seal, door handles and the upholstery itself.
The ceiling is insulated. The upholstery is installed in its original place and the trunk is assembled. To soundproof the floor, you need to disassemble it and remove the old insulation. It is also advisable to cover the insulating material on top with a layer of polyethylene. Then glue the plastic panel and the areas under the seats. Next, insulate the surface of the hood.
We bring the trunk to the button
There are three ways to make the VAZ 2114 trunk lock open with a button:
- Connect the electric trunk drive to the system instead of some kind of door.
- Replace the VAZ 2114 trunk lock with a similar one from the VAZ 2110, then also connect it to the door system.
- Buy a kit for electric trunk drive, include it in the electric drive system, and display the controller (button) on the panel.
Only the third option is ideal: firstly, it does not disrupt the integral system of electric drives of the car, and secondly, it is very easy to do it yourself, you only need a little skill and desire, and everything else can be looked at on YouTube.
Hello all friends!
Well, after purchasing the candy bar, we started installing it, and there was not enough space on the back of the VAZ 2114 to install the candy bar; it fit right in and the back wouldn’t close. Well, it was decided to make a raised floor for the amplifier and monica.
what you will need: 10mm plywood had to be taken 1.5m by 1.5m, they don’t sell less 2 sheets for 750 rubles = 1500 rubles Wood screws 50 rubles Studs 2 pcs 40 rubles Angles 4 pcs 40 rubles Rail 50 by 50mm 6m 260 rubles Screwdriver Jigsaw Solid cardboard for drawing in the trunk.
Stage 2: cut out the loblik according to the drawings from the first sheet of plywood, then try on how it fits in the trunk. Stage 3: put the first sheet of plywood on the second, draw the drawings with a pencil. Then we cut it out. Stage 4: we cut out the slats to the required dimensions, taking into account ventilation for the amplifiers and holes for the wires.
Stage 7: take the hinges, try them on, taking into account that the hinges do not interfere with the installation of the floor, and screw the hinges into the plywood and slats, 3 screws each.
At this point the false floor is ready, if you are going to paint, glue self-adhesive suede or other materials, do this before screwing in the slats. Applying the desired material to a flat sheet of plywood will look more beautiful.
Next, we install and try on the false floor; if you are sure that the hinges will not interfere, it is advisable to screw in the hinges at the last moment in order to remove the top plywood cover and conveniently install the amplifiers and route the wires.
| Forum | Heading | date |
| About everything | Drawing on glass in a raised floor. | 21.07.2013 |
| crazy hands | The simplest raised floor in Lacetti | 28.09.2012 |