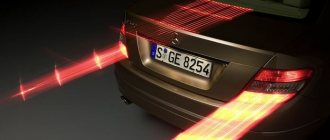
The purpose of the brake light is to warn drivers behind you about braking. It should turn on as soon as the brake pedal is pressed. If the stop is faulty, it can cause an accident. The article discusses the brake light, the principle of operation, typical malfunctions, methods for eliminating them, and provides instructions for replacing them yourself.
The principle of operation of the brake light
The brake lights are located at the rear of the car. Red lanterns. They light up automatically if the driver brakes. When the driver takes his foot off the brake pedal, they are also automatically turned off. The presence of stops is mandatory for vehicles.
The lights should be located symmetrically and burn brighter than the side lights. Brake lights are installed on the sides, on the rear window, in the center above the line of the side stops.
Primary and secondary brake lights can be a single bulb, a neon tube, or a set of LED bulbs. The car enthusiast is additionally equipped with a brake light repeater. The rear brake light can also serve as a fog light. You can install a formula 1 brake light (the author of the video is Mikhail Ermolaev).
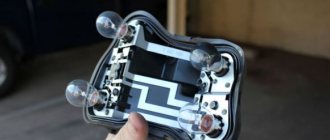
The simplest brake light includes a breaker (switch) and a flashlight. The brake light switch is often called the frog switch. The plastic body of the breaker contains two terminals, a rod and a spring. This device is installed on the brake pedal.
When the driver presses the pedal, the rod enters the breaker body, the contact closes and the light comes on. As soon as the driver removes his foot from the brake pedal, the spring pushes out the rod, the contacts open and the light goes out.
LED brake lights consist of a chip and a sensor, which in this case is a frog, it sends a signal when the driver presses the brake. As with the single lamp, the frog is mounted under the brake pedal.
Foot control device diagram
Any pedal has free play. Therefore, although the driver presses the pedal, the car does not brake immediately. The brake light comes on as soon as the brake pedal is pressed. Drivers of vehicles behind will become aware of braking before the vehicle begins to brake. This way they have time to prepare for braking.
How to check the serviceability of brake lights without outside help
You can often see cars with one or more brake lights not working. Lamps usually burn out. But there are problems in connectors, wiring, sensors. On the one hand, this is very bad and dangerous. You can easily get a “kiss” in the trunk from a car moving behind. On the other hand, it is very difficult to check the serviceability of brake lights alone.
Typically, car owners resort to the following verification methods:
- They ask a friend or just a passer-by to press the brake pedal, and they themselves go to see if all the lights are on.
- Drive up backwards to a mirrored, reflective surface, such as a store window or a wall decorated with glossy tiles, and monitor the operation of the brake lights using the rear-view mirrors.
- You can look nearby for a large, weighty object. For example, a brick or a large stone to press down on the brake pedal. But finding suitable weighting is not always possible. And few people want to carry a brick with them in the trunk.
- Some craftsmen install a toggle switch parallel to the limit switch, the activation of which simulates pressing the brake pedal. But unauthorized intervention in the electrical equipment of the car is fraught with loss of warranty. And if connected incorrectly, it can cause a short circuit and fire.
So what to do, you ask? You should check regularly!
"Wand-checker"
There is a very simple way to check the operation of the brake lights without resorting to outside help, without looking for a reflective surface or brick, without interfering with the car’s standard wiring.
To check, you only need a small stick, about 50 cm long. Maybe more, maybe less - depends on the size of the particular car. I call it a “stop tester” and always carry it in the trunk. Due to its small size, it does not interfere there. But there can be a lot of benefits from it.
Stop tester for checking the serviceability of brake lights
I think how to use the “stop tester” is clear from the picture
- Move the driver's seat back.
- Press the stop tester with one end against the brake pedal and the other against the front end of the driver's seat cushion.
- Move the driver's seat forward so that the stick presses the brake pedal. There is no need to press hard. All you have to do is select the pedal free play. Typically, this will cause the brake lights to light up.
- Start checking the operation of the brake lights and, if necessary, replacing burnt out lamps.
Possible malfunctions: signs and causes
If the feet do not burn, the reason may be the following:
- bad contacts;
- damage to the wiring located in the corrugation between the door and the body;
- burnt out lighting elements.
There is a situation when the brake lights are constantly on if the side lights are on. In this case, the headlights may not light up. If they are turned off, additional lighting fixtures operate normally.
In this situation it is possible:
- the contacts of the parking lights and stop lights have been short-circuited;
- there is no weight on the dimensions;
- the two-pin lamp is faulty;
- the circuit closed, but did not open.
If the parking lights and brake lights are on and the ignition is turned off, then you need to check whether the lampshades are shorted to the housing. The reason may be poor contact of the negative wire with ground.
Symptom Definitions
To find the reason that led to the failure of the VAZ 2114 brake lights, you need to have an almost standard set of motorists. Using the tools listed below, you can easily determine the cause of your car's brake lights not working.
Required tool:
After preparing the necessary tool, you can begin troubleshooting.
Troubleshooting
There can be a huge number of reasons for failure, but as a rule, there are problems of the same type that occur quite often and carry standard solutions.
Main reasons:
- Blown fuse link;
- Breakdown of the brake pedal sensor (frog);
- Brake light bulb filament burnt out;
- Oxidation of the contact on the lamp socket;
- Oxidation of the connector of the entire flashlight;
- Damage to the flashlight board;
- Broken wire;
All of the above reasons are, to one degree or another, the same type and the most common.
Methods for troubleshooting
Troubleshooting is not a complicated process and even novice car enthusiasts can do it (the author of the video is Avtoelektika VC).
First of all, you should check the integrity and condition of the wiring.
Using a multimeter, you need to test the wiring. Damaged or torn sections should be replaced intact or soldered. If there are traces of oxidation processes on the contacts, they need to be cleaned.
If the LEDs burn out, they need to be replaced in pairs. If the breaker fails, it must be replaced with a new one, as it cannot be repaired. Before replacing, turn off the vehicle's power by removing the negative terminal from the battery. Then disconnect the power wires from the breaker. Next, you need to loosen the lock nut and unscrew the main nut securing the switch to the bracket.
Replacing the brake light switch
Before installation, the new frog should be checked for functionality. This can be done using an ohmmeter. We connect the device to the device and measure the resistance. When the contact is closed, the resistance should be zero. If you press the rod, the contacts should open; the resistance in this case tends to infinity.
Troubleshooting
Below are examples of how to fix basic problems and how to easily find them.
Fuse
This is the most frequently damaged element in brake light failures, and also the most easily repaired. To eliminate the breakdown, you just need to replace the fuse on the mounting block.
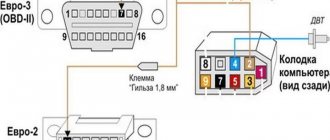
The fuse responsible for the operation of the VAZ 2114 brake lights is located on the fuse block under number F3 and has a fuse-link current of 10A.
To make sure that the fuse has blown, you need to turn on the interior lighting. If the brake light fuse is faulty, the light in the car interior will not light up because This fuse F3 is responsible for lighting the interior and the on-board computer.
Below is a diagram of the VAZ 2114 fuse box.
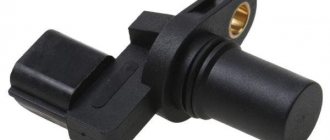
Brake pedal sensor
The brake pedal switch is responsible for turning on the brake lights when you press the brake pedal. This sensor is located on the pedal assembly of the car and is a kind of limit switch. When you press the brake pedal, the contacts on the sensors close the power supply circuit of the brake lights and light up their lamps, signaling that the car is braking.
Replacing a stop repeater with your own hands
If repairing the repeater is not practical, it should be replaced.
The replacement process consists of the following steps:
- Using a wrench, unscrew the fastenings of the rear part of the stop and remove it.
- Then we connect the positive wire of the lighting fixture to the terminal where the brake light frog is located. To do this, you need to run the wire into the luggage compartment, unscrew the trim on the right side, and connect it to the desired terminal. The disadvantage may be a bolt in the luggage compartment.
- Heat shrink should be applied to the wiring. To prevent the wires from dangling, they need to be secured with insulating tape.
- The final step is to check the device for functionality.
Photo gallery
If a repeater with incandescent lamps is installed on the car, then when connecting a device with LEDs according to the above diagram, the lamp control will not work correctly due to different loads. In this case, you should insert the positive wire into the light bulb control unit and connect it to terminal 54H.
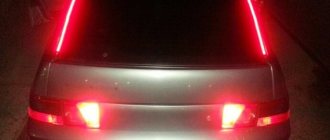
As a brake light, a strip with LEDs can be glued to the upper part along the entire length of the rear window. It needs to be connected to a standard device, and it will work in the same way. It is important to maintain polarity. To make the tape less conspicuous, it can be painted black. Attach the tape using double-sided tape. We check for functionality.
Video “Replacing a foot on a Mercedes”
This video demonstrates how to replace a brake light with your own hands using the example of a Mercedes (the author of the video is Ivan Poknya).
The brake pedal frog slowly died. I noticed it purely by chance, and my friends driving behind me started saying that the “stop” sometimes worked, sometimes it didn’t. After a while, the “feet” stopped working altogether. Then I unscrewed the frog and started clicking it, and it turns out it works, but only with a sharp click; with slow operation it does not work. I didn’t take it apart, I just added a little grease, worked it out well and put it in place. The effect of the lubricant was not enough even for a week.
On the street, meanwhile, the summer sun is blazing and during the day you can’t even see the working “stops” of the car in front, the sun is so blinding. Therefore, I decided not to delay replacing the frog, because now moving in the dark has become no less dangerous.
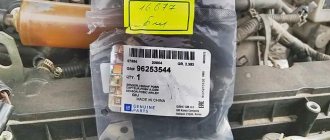
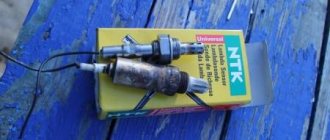
The first thing I, of course, thought about was an analogue from a domestic manufacturer. I took off the frog and went to the VAZ auto parts store. Surprisingly, both sensors had the same thread, which is exactly what I needed. For comparison:
7-8mm. Then, with the help of improvised means and someone’s mother, I pulled it onto the sensor:
That's all. Now my car again informs road users about its intentions to reduce speed)
The brake light switch, or “frog” as it is also called, is located on the driver’s side just at the beginning of the brake pedal in close proximity to the steering shaft. It is this detail that sometimes causes stop packs to fail. The photo below clearly shows its location:
To begin replacing it, you must first disconnect all the wires from this switch:
Now take a 19mm wrench and slightly loosen the nut that secures the frog in one position:
Now we press the brake pedal with one hand, and with the other at this time we unscrew the fastening nut, which is located at the very edge:
And after this, you can finally unscrew the brake light switch of the VAZ 2106, and this can be done by hand, since you don’t have to make any special efforts.
The final result of the removal is shown in the photo below:
Its price in the store is about 80 rubles. Replacement is carried out in the reverse order and be sure to adjust the timing of the brake lights after installation.
The purpose of the brake light is to warn drivers behind you about braking. It should turn on as soon as the brake pedal is pressed. If the stop is faulty, it can cause an accident. The article discusses the brake light, the principle of operation, typical malfunctions, methods for eliminating them, and provides instructions for replacing them yourself.
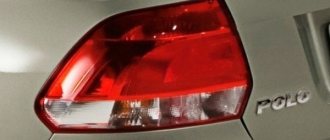
Illuminated license plate VAZ-2107
To illuminate the license plate in VAZ-2107 cars, AC12–5-1 (C5W) type lamps are used. The license plate illumination is turned on by the external lighting switch - the first button on the left under the gear shift lever. To replace the license plate light bulb, you need to lift the trunk lid, use a Phillips screwdriver to unscrew the two screws holding the backlight light and remove the lampshade from the light housing, then replace the light bulb.
The rear lights of the VAZ-2107 car are a key element of the lighting system and perform a number of functions related to the safety of the vehicle. Proper operation and timely maintenance will extend the life of the rear lights and ensure comfortable and accident-free driving. You can give your car a more modern appearance by tuning lighting fixtures, including taillights.
The purpose of the brake light is to warn drivers behind you about braking. It should turn on as soon as the brake pedal is pressed. If the stop is faulty, it can cause an accident. The article discusses the brake light, the principle of operation, typical malfunctions, methods for eliminating them, and provides instructions for replacing them yourself.
The principle of operation of the brake light
The brake lights are located at the rear of the car. Red lanterns. They light up automatically if the driver brakes. When the driver takes his foot off the brake pedal, they are also automatically turned off. The presence of stops is mandatory for vehicles.
The lights should be located symmetrically and burn brighter than the side lights. Brake lights are installed on the sides, on the rear window, in the center above the line of the side stops.
Primary and secondary brake lights can be a single bulb, a neon tube, or a set of LED bulbs. The car enthusiast is additionally equipped with a brake light repeater. The rear brake light can also serve as a fog light. You can install a formula 1 brake light (the author of the video is Mikhail Ermolaev).
The simplest brake light includes a breaker (switch) and a flashlight. The brake light switch is often called the frog switch. The plastic body of the breaker contains two terminals, a rod and a spring. This device is installed on the brake pedal.
When the driver presses the pedal, the rod enters the breaker body, the contact closes and the light comes on. As soon as the driver removes his foot from the brake pedal, the spring pushes out the rod, the contacts open and the light goes out.
LED brake lights consist of a chip and a sensor, which in this case is a frog, it sends a signal when the driver presses the brake. As with the single lamp, the frog is mounted under the brake pedal.
Foot control device diagram
Any pedal has free play. Therefore, although the driver presses the pedal, the car does not brake immediately. The brake light comes on as soon as the brake pedal is pressed. Drivers of vehicles behind will become aware of braking before the vehicle begins to brake. This way they have time to prepare for braking.
where is the switch, frog and repeater located
The purpose of the brake light is to warn drivers behind you about braking. It should turn on as soon as the brake pedal is pressed. If the stop is faulty, it can cause an accident. The article discusses the brake light, the principle of operation, typical malfunctions, methods for eliminating them, and provides instructions for replacing them yourself.
The principle of operation of the brake light
The brake lights are located at the rear of the car. Red lanterns. They light up automatically if the driver brakes. When the driver takes his foot off the brake pedal, they are also automatically turned off. The presence of stops is mandatory for vehicles.
The lights should be located symmetrically and burn brighter than the side lights. Brake lights are installed on the sides, on the rear window, in the center above the line of the side stops.
Primary and secondary brake lights can be a single bulb, a neon tube, or a set of LED bulbs. The car enthusiast is additionally equipped with a brake light repeater. The rear brake light can also serve as a fog light. You can install a formula 1 brake light (the author of the video is Mikhail Ermolaev).
The simplest brake light includes a breaker (switch) and a flashlight. The brake light switch is often called the frog switch. The plastic body of the breaker contains two terminals, a rod and a spring. This device is installed on the brake pedal.
When the driver presses the pedal, the rod enters the breaker body, the contact closes and the light comes on. As soon as the driver removes his foot from the brake pedal, the spring pushes out the rod, the contacts open and the light goes out.
LED brake lights consist of a chip and a sensor, which in this case is a frog, it sends a signal when the driver presses the brake. As with the single lamp, the frog is mounted under the brake pedal.
Foot control device diagram
Possible malfunctions: signs and causes
If the feet do not burn, the reason may be the following:
- bad contacts;
- damage to the wiring located in the corrugation between the door and the body;
- burnt out lighting elements.
There is a situation when the brake lights are constantly on if the side lights are on. In this case, the headlights may not light up. If they are turned off, additional lighting fixtures operate normally.
In this situation it is possible:
- the contacts of the parking lights and stop lights have been short-circuited;
- there is no weight on the dimensions;
- the two-pin lamp is faulty;
- the circuit closed, but did not open.
Methods for troubleshooting
Troubleshooting is not a complicated process and even novice car enthusiasts can do it (the author of the video is Avtoelektika VC).
First of all, you should check the integrity and condition of the wiring.
Using a multimeter, you need to test the wiring. Damaged or torn sections should be replaced intact or soldered. If there are traces of oxidation processes on the contacts, they need to be cleaned.
If the LEDs burn out, they need to be replaced in pairs. If the breaker fails, it must be replaced with a new one, as it cannot be repaired. Before replacing, turn off the vehicle's power by removing the negative terminal from the battery. Then disconnect the power wires from the breaker. Next, you need to loosen the lock nut and unscrew the main nut securing the switch to the bracket.
Replacing the brake light switch
Before installation, the new frog should be checked for functionality. This can be done using an ohmmeter. We connect the device to the device and measure the resistance. When the contact is closed, the resistance should be zero. If you press the rod, the contacts should open; the resistance in this case tends to infinity.
Replacing a stop repeater with your own hands
If repairing the repeater is not practical, it should be replaced.
The replacement process consists of the following steps:
- Using a wrench, unscrew the fastenings of the rear part of the stop and remove it.
- Then we connect the positive wire of the lighting fixture to the terminal where the brake light frog is located. To do this, you need to run the wire into the luggage compartment, unscrew the trim on the right side, and connect it to the desired terminal. The disadvantage may be a bolt in the luggage compartment.
- Heat shrink should be applied to the wiring. To prevent the wires from dangling, they need to be secured with insulating tape.
- The final step is to check the device for functionality.
Photo gallery
If a repeater with incandescent lamps is installed on the car, then when connecting a device with LEDs according to the above diagram, the lamp control will not work correctly due to different loads. In this case, you should insert the positive wire into the light bulb control unit and connect it to terminal 54H.
As a brake light, a strip with LEDs can be glued to the upper part along the entire length of the rear window. It needs to be connected to a standard device, and it will work in the same way. It is important to maintain polarity. To make the tape less conspicuous, it can be painted black. Attach the tape using double-sided tape. We check for functionality.
Video “Replacing a foot on a Mercedes”
This video demonstrates how to replace a brake light with your own hands using the example of a Mercedes (the author of the video is Ivan Poknya).
The reasons for replacing rear lights on a VAZ 2110-2112 can be different and the main ones are the following:
- damage due to unsuccessful parking or an accident
This repair procedure is quite simple and you can do everything yourself, having only a few tools on hand, the list of which is given below:
- Phillips blade screwdriver
- Ratchet handle
- 8 mm head
- Extension
Removing and installing rear lights on a VAZ 2110—2112
I think there is no need to explain once again that the rear lights are located in blocks, one of which is located in the wing, and the second in the trunk lid, so we will consider the removal procedure separately.
Removing the parking light and turn signal
So, first of all, open the trunk lid and open the “window” with Velcro in the place shown in the picture below:
As you can see, there is one nut that needs to be unscrewed. After this, you need to unscrew the self-tapping screw from the side with a screwdriver, with which the casing is attached. It is enough to do this in one place, as shown in the photo below:
And we move it back slightly to gain access to the remaining nuts securing the rear lights.
Now you can start unscrewing the two nuts that secure the lamp:
And then from the back side, you can carefully, without making excessive efforts, pull the lantern so that it comes out:
Since at first we did not disconnect the block with wires, we can do this now:
At this point we can consider half the work done. Now let's move on.
Removing the reverse light and brake light
First, with the trunk open, remove the power plug from the board, as is clearly demonstrated below:
Now all that remains is to unscrew the two nuts, which are clearly visible in the picture below:
And also, as was done in the previous description, we take out the flashlight from the back side. The central pad may be slightly in the way, but you don’t have to remove it if you act carefully:
If necessary, we replace it, and installation proceeds in the reverse order. What can we say about the cost: at the moment, a set of rear lights for a VAZ 2110-2112 is about 2000 rubles, but all this can be bought separately in blocks, that is, two right and two left blocks.
On all cars of the Tenth Family, the power lines for the lights contain many elements. There are lamp health relays, switches and fuses. Therefore, if the brake lights on a VAZ-2112 do not light up, you need to check the entire chain. But the reason may look simple: sometimes the lamps do not turn on because the socket does not contact ground. Circuits are easy to analyze, but finding the cause of a breakdown is difficult. Let's look into the details.
Design and characteristic malfunctions of the rear lights of the VAZ-2107
Structurally, the rear light of the VAZ-2107 car consists of:
- left and right diffusers;
- left and right conductors;
- two 4 W lamps and two sockets for them;
- six lamps with a power of 21 W and six sockets for them;
- four M5 nuts.
The brake light and side lights on the rear light should be red, the turn signal should be orange, and the reverse light should be white . The most typical malfunctions of the rear lights of the VAZ-2107:
- lack of mass on the lantern;
- lamp burnout;
- oxidation of contacts;
- broken or frayed wiring;
- failure of connector contacts, etc.
No mass
One of the reasons that the tail light does not work may be the lack of weight on it. You can check the integrity of the ground wire visually or by ringing it with a tester. The ground wire in the standard configuration of the VAZ-2107 is usually black, and it occupies the extreme position on the connector block. It is followed by wires:
- brake light (red);
- side lights (brown);
- fog lamps (orange-black);
- reverse lamps (green);
- direction indicator (black and blue).
Lamp burned out
The most common malfunction of rear lights is the burnout of one of the lamps. In this case you will need:
- Remove the plastic plug from the trunk side, which is secured with four plastic screws;
Contacts have oxidized
Oxidation or clogging of the contacts of the connector block may be a consequence of their insufficiently tight connection, as well as dust and other small mechanical particles getting inside the headlamp due to wear or drying out of the rubber seal. The processes of oxidation and contamination of contacts can be prevented through regular preventive inspections and maintenance of all elements of the lighting system.
There are many cars whose rear lights do not work at all, or only work halfway; others do not turn on their turn signals and drive with the rear fog lights on. I'm not one of those riders. I do everything so that my car works as it should, so that the moss of signals is visible and does not blind.
Ivan64
https://www.semerkainfo.ru/forum/viewtopic.php?f=7&t=14911&start=75
Broken wiring
The integrity of the wiring is checked with a multimeter if the location of the break cannot be determined visually. The purpose of each of the wires coming to the connector can be determined from the VAZ-2107 electrical equipment connection diagram.
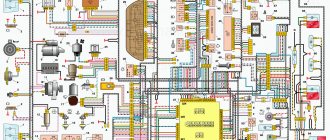
Standard version of the brake light operating diagram
Power is supplied to fuse F17 from the battery, then the current goes to limit switch contact 11, and then, if the limit switch is closed, a circuit is formed with the filament of lamps 7. But note: part of the circuit is relay K1, more precisely, its contacts 5 and 4.
A complete electrical diagram with explanations of the VAZ-2112 car is here.
If the brake lights do not light up, on the VAZ-2112, as on all Tens, check one fuse. It is called F17 and is located in the mounting block to the left of the driver.
It is important to know: voltage is always present at one of the fuse terminals. Check it out!
A few words about the “serviceability relay”
The lamp health relay is called K1, and it is the largest in the mounting block. If you remove this relay, then when you press the pedal you can dial the voltage at terminal 5 (but not 4). Look at the diagram again, and it will become clear what we are talking about.
All relay contacts are numbered. Check the voltage at the block terminals:
- 6 — “mass” potential;
- 2 — voltage “+12”, but only after turning on the ignition;
- 5 — “+12” by pressing the pedal;
- 4 — the terminal rings like a ground tap.
If the potential “0” is not generated at terminal “4,” it means that the lamp filaments are burnt out or there is a break in the wiring. Now consider something else: the ground potential has been detected, but the lamps do not light. This is where suspicions of a short circuit arise.
Common problems with brake lights
There may be several reasons:
- blown fuse;
- faulty sensor;
- frayed or broken power cord.
The most common cause is a blown fuse responsible for protecting the signal light circuit. This fuse is located on a block built to the left of the steering column. This capacitor can withstand a current of 7.5 amperes, as evidenced by the inscription on it. It is located in the bottom row, fourth from the right edge.
If after replacing this circuit element the problem has not been resolved, other possible causes of failure should be considered.
The next troubleshooting point is to check the brake light sensor. To do this, you need to check whether voltage is entering and exiting the sensor. In this case, you need to use a control lamp. If the lamp does not light up when connected in front of the sensor, then the problem may be in the wires going to the sensor. If the lamp works before the sensor, but not after, then the problem lies in this part. You can also simply disconnect the input and output of the sensor and close it “directly” using a copper wire; if after these manipulations the lights in the brake lights light up, then the reason is precisely in the sensor. The sensor cannot be repaired, and the only way out is to replace this part with a new one.
Damaged wires may also be the cause, this will be especially noticeable if the just replaced fuse blows out - this means that the wire is frayed and there is a contact to ground. If the fuse blows without pressing the brake pedal, the wire before the sensor is damaged, and if it blows after pressing, the wire after the sensor is damaged. If there is no voltage, perhaps the wire is simply broken and does not short to ground. When troubleshooting, you should pay special attention to bends and possible areas of damage to the wires.
The next cause of problems is burnt-out LEDs in the brake light; there have been cases when both burned out at once. To replace the light bulbs, you need to remove the flashlight board by squeezing it from the sides and pulling it slightly towards you. Next, you should visually inspect the light bulbs; perhaps a visual inspection will already answer the question about the reason for the non-working brake light. After this, you should replace the old lamps with new ones.
Source
We turn on the brake lights forcibly
Relay K1 is successfully replaced with a pad with jumpers. In Fig. 1 just shows its diagram. If there is no such platform, you can temporarily close contacts 4-5. First, check everything mentioned above.
Have an observer watch what happens to the lamps. Press the pedal with one touch and release it. If the lamps do not turn on, check that the fuse is working properly. It's burned out, which means you're looking for a short circuit.
How to and how not to check the “0 Volt” potential
Let’s agree right away that we only work with a voltmeter. Voltage “+12” is caused by connecting one probe to ground. The presence of potential “zero” is checked differently: any of the probes is connected to a terminal with positive voltage, and then the second probe is connected to the wire being tested.
Consider the error: one probe is connected to ground, the second to the terminal being tested, and vol. Here they conclude that there is a “mass” potential, but this is wrong! If the contact with ground is broken, the device will also show “0”. That is, the number “0” does not contain information.
Wiring test for non-working brake lights (ground test)
Let's look at the basic diagram: the brake lights and the reversing lamps have a common ground pin. If contact with this pin is broken, the reverse lamps will not turn on. Well, brake lights too.
On the left side there is a connector through which the wiring goes to the fifth door. The connector has black and red wires. Check the voltages on them. Most often the ground on the black wire does not ring. But maybe the connector itself needs to be cleaned.
Usually, if the ground breaks, another pin is used - the one that is connected to the glass heating coil.
If the “plus” does not come to the red wire, we check the “frog”. It's simple here:
- Disconnect the connector with two wires from the limit switch;
- Using 17mm wrenches, loosen the two nuts: holding the lower nut, rotate the upper one;
- The end switch is removed as an assembly and checked with an ohmmeter.
By the way, one of the connector terminals receives a voltage of “12 Volts”. Check it!
If all the steps do not lead to results, there is only one thing left: contact a qualified electrician. We wish you success.
How to remove the mounting block - all steps in one video
Left: If the turn signals work properly but the hazard warning lights do not turn on, the cause is usually a faulty hazard warning light switch. If you press the switch firmly several times, most often it will start working normally. If this does not happen, then remove the switch (2), squeezing its locking tabs and removing it from the groove, check the contacts of the pin connection (1). Right: When installing the brake light switch (2), it must be pressed against the pedal support (3) so that the switch pin also presses the switch when the pedal (4) is released. For perfect operation, the pin block (1) must be correctly connected.
Brake lights should be checked as often as possible in the interests of safety.
- The garage wall behind your car should give off a red glow when you press the brake pedal.
- When driving, check using your rear view to see if the light from your brake lights is reflected in the headlight reflectors or on the paintwork of the car behind you.
When you press the brake pedal with your foot, the spring in the brake light switch (it is mounted in the brake pedal suspension holder) presses on the control pin. At the same time, the contacts in the switch and the electrical circuit to the brake lights are closed. If the brake pedal is released, the pedal pin presses the control pin to its original position and the brake signal goes off.
Checking the brake light switch
If both brake lights do not light, check as follows to see if the brake light switch is the cause.
Replacing the brake light switch
Replacing the frog of the VAZ 2110 brake light
The brake light switch, or “frog” as it is also called, is located on the driver’s side just at the beginning of the brake pedal in close proximity to the steering shaft. It is this detail that sometimes causes stop packs to fail. The photo below clearly shows its location:
To begin replacing it, you must first disconnect all the wires from this switch:
Now take a 19mm wrench and slightly loosen the nut that secures the frog in one position:
Now we press the brake pedal with one hand, and with the other at this time we unscrew the fastening nut, which is located at the very edge:
And after this, you can finally unscrew the brake light switch of the VAZ 2106, and this can be done by hand, since you don’t have to make any special efforts.
The final result of the removal is shown in the photo below:
Its price in the store is about 80 rubles. Replacement is carried out in the reverse order and be sure to adjust the timing of the brake lights after installation.
The purpose of the brake light is to warn drivers behind you about braking. It should turn on as soon as the brake pedal is pressed. If the stop is faulty, it can cause an accident. The article discusses the brake light, the principle of operation, typical malfunctions, methods for eliminating them, and provides instructions for replacing them yourself.