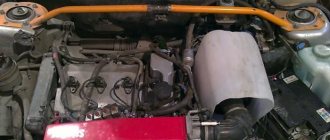
Every car owner has a moment when a hum or squeal begins to be heard from under the hood when the power plant is running.
The cause of this phenomenon, as a rule, is wear of the bearings. Most often this problem occurs with the tension pulley or generator.
High rotation speeds and loads lead to wear of these components.
Eliminating the problem of increased noise from under the hood comes down to replacing worn out elements.
But first you need to figure out which element’s bearings create noise and require replacement.
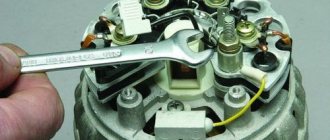
It is not difficult to check; you just need to loosen the tension on the generator belt, remove the belt and start the engine. If the noise stops after removing the generator drive, then it’s time to change the bearings.
Purpose of VAZ-2110 generator bearings
Front and rear bearings of the VAZ 2110 generator
Expert opinion
Nikolay Gray
More than 5 years of experience Specialization: body repair, customization, preparation for painting, detailing
The purpose of generator bearings is very simple: to ensure smooth and uniform rotation of the generator rotor. Both bearings: front and rear are under protective covers. And you can get to them only after dismantling the generator and removing the protective elements.
Replacement
The procedure cannot be called complicated, but it is very important to strictly follow the instructions. Based on our recommendations, as well as video tutorials, you can carry out the replacement yourself without any problems.
You have already found out what bearings are on VAZ 2110 generators, purchased a set of new spare parts, so you can start repairing.
Dismantling works
Front bearing
- Slightly unscrew the mounting nut on the generator, and also loosen the adjusting bolt.
- Reset the alternator belt and start the engine. This will allow you to verify that the problem is with the generator.
- If the noise disappears, then we move on. There is still a lot of work ahead of you.
- Let's move on to the battery, from which the negative terminal should be removed. This is important from a safety point of view and protection against accidental short circuits during repairs.
- Once the terminal is removed, unscrew all the wires going to your generator.
- If you have a crankcase guard, unscrew the mounting bolts and remove it. This will allow you to reach the lower mount of the generator and remove the device. Remove the generator by pushing it through the engine compartment.
- Using a regular screwdriver or other handy tool, you need to block the generator rotor and then unscrew the pulley.
- The next step is to look for special latches. By pulling them to the side, you will be able to dismantle the device body.
- Next, the generator brushes are unscrewed, as well as the mounting bolts holding the halves of the generator assembly. There should be 4 of these bolts in total.
- We recommend marking both halves of the generator housing to avoid problems during reassembly.
- Use a flathead screwdriver to pry up the cover and remove it.
- Practice shows that it is more convenient to remove the rotor from the front cover bearing in the following way. Take a nut and screw it onto the rotor threads. Then hit it with a hammer, first placing a wooden block under it.
- Find a part whose diameter will coincide with the diameter of the bearing being removed. For example, a 27 millimeter head may be perfect.
- Gently start tapping the element so that the bearing comes out of its seat.
- Take the new bearing and prepare to reinstall it.
- The first step is to treat the new bearing with lubricant so that it lasts as long and reliably as possible.
- To install a new component, you will need the old bearing. Place it on top of the new device and lightly tap with a hammer to install.
That's it, the front bearing has been removed and replaced. Let's move on to the back.
Press-fitting
When is it necessary to change?
If a car generator begins to creak and howl during operation, this is the main sign that the bearings urgently need to be replaced . Howling, as a rule, occurs due to the lack of lubrication in the separators of these parts. Alternatively, the bearing cage may simply fail due to wear or fatigue stress. There is one nuance here that should definitely be mentioned. Sometimes on a VAZ 2110, what is heard from the generator area is not a howl, but a thin, barely audible creak, which the car owner can mistake for the creak of a failed bearing. But most often it’s the pump creaking or the sound coming from the pulley on the timing belt. To understand that it is the generator bearing that is creaking, you should remove the belt. If the sound does not disappear, then the problem is in the bearings.
Types of lubricants
You should always remember that any replacement of bearings must be accompanied by a change of lubricant. And you need to know that a specific lubricant is provided for each type of bearing.
CIATIM or OKB are the most common lubricant options used by Russian car owners.
CIATIM lubricant
It is important to understand that when choosing a lubricant, you must first pay attention to such things as viscosity, additives, thickener and much more.
For example, if you select a lubricant with the wrong viscosity, then at a certain ambient temperature it will not be effective. In addition, viscosity has a direct meaning specifically for operating temperature.
The same can be said about the composition of the lubricant. It can be resistant to oxidation, wear-resistant or not, and have many or few additives. All this is of great importance.
Lubricant selection step by step
Here's how to select bearing grease.
First, the viscosity is selected. Its parameters are the most important property of a lubricant. As is known, rolling bearings are used in generating automotive devices and electric motors. In order to determine the specific type of lubricant for them, it is customary to use proven methods that imply the amplitude of rotation of the parts or DN. Having calculated it, and then the operating temperature, you can use these parameters to find out the data from a special table.
Composition of additives in lubricants
The second step is to identify the additives. They are essential components of any lubricant. For example, for high-speed bearings, it is common practice not to use extreme pressure additives or adhesive oils. Conversely, if an open gear drive is implied, then the use of such additives is a necessary condition. Additives are components that significantly increase the effectiveness of a lubricant. But they must be selected taking into account the requirements.
To become familiar with the main requirements for additives, and lubricants in general, it is recommended to scroll through the API.
The third step is density. This parameter is as important as the previous two. The density of the lubricant can be used to judge the thickener concentration, viscosity, and much more. To determine the density of the lubricant, a scale developed by the NGLI Institute is used.
All three of these parameters are important to consider when choosing a bearing lubricant. You should not be of the opinion that this is just oil, and any composition will lubricate rubbing surfaces.
The lubricant must be selected according to the conditions described above. You have to take into account temperature, speed, load and chemical exposure.
Solid oil, according to most experts, by modern standards, is unsuitable for lubricating generator bearings. On the other hand, no one prohibits it, because any grease is suitable for these purposes: lithol, violet, etc. The main thing is to remember what was written above - lubricant is also a material, and has its own shelf life and degree of effectiveness.
Solid oil
Rolling bearings are lubricated with grease compounds, but plain bearings, located, for example, inside a heater or windshield wiper motor, are lubricated only with liquid compounds.
| Lubricant type | Base oil viscosity (40°C), cSt | Speed factor (NDM) |
| Low speed, high pressure, industrial lubrication | 1000-1500 | 50000 |
| Medium Speed, High Pressure, Industrial Bearing Lubricant | 400-500 | 200000 |
| EP, NLGI #2, universal grease | 100-220 | 600000 |
| High speed, high temperature, long lasting lubrication | 600000 | |
| High speed, long lasting lubrication | 15-32 | >1000000 |
| Working temperature | DN (speed factor) | NGLI class* |
| -30 to 100°F (-34.4 to 37.7°C) | 0-75000 | 1 |
| 75000-150000 | 2 | |
| 150000-300000 | 2 | |
| 0 to 150°F (-17.7 to 65.5°C) | 0-75000 | 2 |
| 75000-150000 | 2 | |
| 150000-300000 | 3 | |
| 100 to 275°F (37.7 to 135°C) | 0-75000 | 2 |
| 75000-150000 | 3 | |
| 150000-300000 | 3 | |
| *Depends on other factors such as bearing type, thickener, viscosity and base oil type | ||
Influence of bearing condition on the choice of base oil viscosity
| ISO VG (cSt@40°C) | Application area | Load | Speed | Oil separation* | Pumpability* |
| 22 | High speed spindles | Low | High | High | High |
| 100 | Large high speed electric motors | Low | High | High | High |
| 150 | Wheel bearings | Low | High | High | High |
| 220 | Paper machines, industry | Low | High | High | High |
| 460 | Steel rolling mills | Low | High | High | High |
| 1000 | Mining equipment | Low | High | High | High |
| 1500 | Low speeds, heavy/shock loads | Low | High | High | High |
| * Oil separation and pumpability are also affected by grease density and thickener type | |||||
| ** Arrows indicate direction. | |||||
| Bearing type | Relative grease life |
| Single Row Deep Groove Ball Bearing | 1 |
| Single Row Angular Contact Ball Bearing | 0.625 |
| Self-aligning ball bearing | 0,77-0,625 |
| Thrust ball bearing | 0,2-0,17 |
| Single Row Cylindrical Roller Bearing | 0,625-0,43 |
| Needle Roller Bearing | 0.3 |
| Tapered roller bearing | 0.25 |
| Spherical Roller Bearing | 0,14-0,08 |
What types of bearings are in the top ten: part numbers and sizes
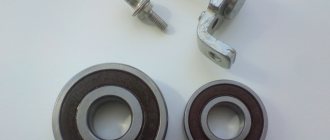
Bearings in generators of VAZ 2110 cars are closed type, ball, single row, have a double-sided seal.
- The front marking is 6202 2RS (in domestic catalogs under number 180202).
- Rear bearing - 6103 2RS (aka - 24940220).
An important point: when choosing bearings, you should pay special attention to the manufacturers of their hubs. Typically, VAZ 2110 bearing hubs are produced in Samara, their marking is SP3-4.
You can also find hubs on the market from 23 GPP (this is Vologda) and 3 GPP (this is Saratov). It is strictly not recommended to buy bearings on which the hubs are not marked. You also cannot buy Chinese generator bearings, which are now found everywhere, since the quality of these bearings does not stand up to criticism.
Necessary tools and sequence of actions for replacement
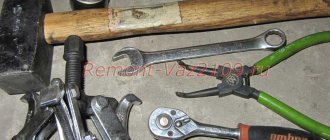
To independently dismantle old bearings and replace them with new similar parts, you will need to stock up on the following tools:
- open-end wrenches (set);
- flat blade screwdriver (size – medium);
- device for safely removing the generator pulley;
- vice;
- hammer.
Having taken everything you need and driven the car into the garage, you can begin. The sequence of actions when replacing bearings will be as follows:
- The positive terminal of the battery is removed.
- The timing belt is removed by alternately unscrewing the fastening nut and fixing bolt using open-end wrenches.
- All wires connected to it are unscrewed from the generator, the generator itself is removed from the fasteners and taken out.
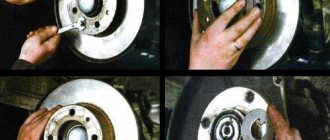
- Using a vice, a wrench and a puller, the pulley is unscrewed and removed.
- Remove the generator cover where the front bearing is located. It is removed using a mandrel, the diameter of which will be approximately equal to the outer ring of the bearing itself and the hammer. A new one is immediately installed in place of the old bearing.
- Next, the rear bearing is removed by first dismantling the stator. Removal from the pulley is carried out in the same way, using a special device. Installation of a new rear bearing is carried out either under a hydraulic press or any alternative method that will avoid damaging the thread surface from possible damage.
Work progress
- Remove the generator from the car (see Removing and installing the generator).
- Mark the relative positions of the generator covers.
- Press out the three latches.
- Remove the plastic casing.
- Remove the two screws securing the voltage regulator.
- Remove the voltage regulator with brush holder...
- ...by disconnecting the wire from the regulator terminal.
- Unscrew the four screws securing the rectifier unit and the screw securing the capacitor.
- Bend the three leads of the stator winding so that they make it possible to remove the rectifier unit.
- Remove the rectifier unit with the capacitor.
- To replace the capacitor, unscrew the contact bolt nut, remove the washer and spacer sleeve. Remove the capacitor wire lug from the contact bolt.
- Unscrew the four tightening screws (the screws are tightened with a large torque). Spring and flat washers are installed under the screw heads.
- Using a screwdriver, remove the generator cover from the slip ring side.
- Clamp the generator rotor in a vice (not too tightly, so that the rotor does not rotate) and unscrew the pulley mounting nut. Remove the spring washer and pulley.
- Remove the thrust washer.
- Remove the rotor from the drive side cover.
- Remove the spacer ring from the rotor shaft.
- Inspect the slip rings. If they have burrs, marks, scratches, signs of wear from brushes, etc., the rings must be sanded. If the damage to the rings cannot be removed with sandpaper, you can grind the rings on a lathe, removing a minimum layer of metal, and then grind them.
- Check the resistance of the rotor winding with an ohmmeter (tester) by connecting it to the slip rings. If the ohmmeter shows infinity, it means there is a break in the windings and the rotor needs to be replaced.
- Check with a test lamp whether the winding is short-circuited to the rotor body. To do this, turn on the test lamp to a 220 V AC power supply (you can use a battery and a 12 V lamp). Connect one wire to the rotor body, and the second to each ring in turn. In both cases, the lamp should not light. If in at least one case the lamp is on, it means there is a short circuit and the rotor needs to be replaced.
- Inspect the stator. There should be no traces of the armature touching the stator on the inner surface of the stator. Otherwise, replace the bearings or generator caps complete with bearings.
- Check if there is a break in the stator winding. To do this, turn on the test lamp to a 220 V AC power supply (you can use a battery and a 12 V lamp). Connect a test lamp one by one between all winding terminals. In all three cases the lamp should be on. If in at least one case the lamp does not light, it means that there is a break in the winding and the stator or winding needs to be replaced.
- Check if the stator windings are shorted to the housing. To do this, turn on the test lamp to a 220 V AC power supply (you can use a battery and a 12 V lamp). Connect the lamp to the terminal of the stator winding, and the wire from the current source to the stator housing, but the lamp should not light. If the lamp is on, then a short circuit has occurred and, therefore, the stator or winding must be replaced.
- Inspect the drive-side generator cover and bearing assembly. If, when rotating the bearing, play is felt between the rings, rolling or jamming of the rolling elements, the protective rings are damaged or there are traces of lubricant leakage, and cracks are found in the cover, especially in the places where the generator is attached, it is necessary to replace the cover assembly with the bearing (the bearing in the cover is rolled) .
- Check the ease of rotation of the bearing on the slip ring side. If, when rotating the bearing, you feel play between the rings, rolling or jamming of the rolling elements, the protective rings are damaged, or there are signs of lubricant leakage, the bearing must be replaced. To do this, use a puller to press the bearing off the rotor shaft and press on a new one using a suitable mandrel, applying force to the inner ring of the bearing.
- Inspect the generator cover from the slip ring side. If cracks are found, the cover must be replaced.
- Reassemble the generator in the reverse order of removal. At the same time, orient the generator covers in accordance with the previously made marks. Install the spring washer of the generator pulley with the convex side facing the nut. Tighten the nut to a torque of 39–62 N·m (3.9–6.2 kgf·m).
Which wheels are better to choose: forged or cast?
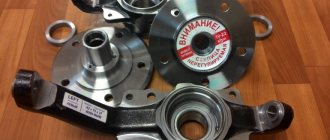
What do you need to know when choosing new parts?
Initially, in the design of the 2110 generator, as mentioned above, two bearing devices are usually installed. In older versions of the car, parts marked 6302 or 6303 (these are front units), or 6202 (rear units) are used; in more modern versions, 6203 bearings are installed at the rear.
As for the sizes, they are as follows:
- for 6303 (or the domestic analogue under number 180302) the dimensions are 17*47*14;
- for marking 6302 (or domestic analogue 180303) - 15*42*13;
- for marking 6202 (Russian parts are marked as 180202) the dimensions are 15*35*11;
- for 6203 (domestic equivalent - 180203) dimensions - 17*40*12.
How to tell if your generator needs service or repair
Diagnosing problems with PG is quite simple. First of all, their occurrence is indicated by the appearance of extraneous sound from under the hood in the area of the generator - whistling and howling. If the noise intensity increases as the engine speed increases, there is no doubt that there is a problem with the bearings. One possible way to solve this is to lubricate the bearings. The best option is to replace them, especially since the kit is inexpensive (depending on the manufacturer, it will cost up to 3-4 hundred rubles).
But even new bearings can only be supplied with preservative grease. Check their condition and, if necessary, lubricate them to extend the trouble-free operation of the device. However, not every lubricant is suitable for use in such conditions. A car enthusiast needs to know how to lubricate a generator bearing.
Cleaning and lubrication of bearings! | Topic author: Falit
LUBRICANT! Previously, bearing lubrication was considered a must, but modern players no longer lubricate bearings after washing, preferring to play on “dry” bearings with low response. Naturally, this only applies to String style players.
CLEANING CERAMICS! And one more thing: what to do if you are the happy owner of a clogged gold or ceramic bearing? Blowing and the following steps will help you: * Buy a compressed air cylinder at a computer store, or an enema at a pharmacy. * Didn't find either one or the other? Dont be upset. If you are not in the habit of spluttering as you exhale, you can use your own mouth. * Remove the anthers. * Direct a stream of air from a can, enema, or mouth into the bearing. * Repeat if necessary. * Wear boots (optional).
WASHING! * Buy gasoline for lighters. We recommend the original Zippo in a black oblong tin with a folding plastic spout, as it is almost perfectly clean and is guaranteed to clean your bearing from dust without clogging it with impurities. If you don’t have one at hand, then “Royal”, “Portland”, “Unilite” gasoline in the same cans as Zippo, only in different colors, will do. It is highly recommended not to use alcohol, motor gasoline, or gasoline for Russian-made lighters. In the case of Zippo, the quality is guaranteed, in the case of Royal and others like it, the quality depends on the batch, but in general there are rarely mistakes, and in the case of the rest, it’s better to wash the bottoms in a dirty puddle than with these means. * Find a small film or glass perfume jar with a wide neck. * Remove the boots from the bearing by prying the pressure rings with a needle. hold the rings with your hands, otherwise you risk being left without them - pressure rings tend to spring back and fly away in an unknown direction. * Place the bearing in a jar with gasoline. If the gasoline level covers the height of the bearing, that is enough. Just in case, throw some anthers with rings in there, because it won’t hurt. * Gently close the jar and shake it thoroughly for a minute. * Take the bearing out of the jar, put it on a sharpened pencil and rotate it until the characteristic sounds of torsion of a clean bearing appear. If the bearing is not clean, repeat the cleaning procedure again. *Put the boots back on. This step is not necessary, but is still recommended, since the boots protect the bearing from dust and dirt getting into it, and also slightly reduce noise. If you don't care how often to flush the bearing, or if your pressure rings flew off during disassembly, or if you're just lazy, don't put them on.
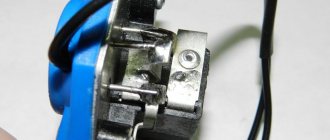
Signs and Symptoms of a Malfunctioning Alternator Overrun Clutch
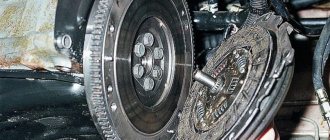
The generator overrunning clutch is a mechanism that dampens shocks from the pulsating rotation of the crankshaft in time with the power stroke of the piston. Installed on a number of cars that have additional units, for example, an air conditioning compressor.
The main symptoms of the malfunction are vibration and rattling felt inside the car when the air conditioning compressor is turned on. This symptom most often occurs if the car is in gear, the brake is pressed, or it is moving slowly.
The simplest and most accessible way to diagnose an overrunning clutch is to raise the speed to 3000-4000 and turn off the engine. If the clutch is working correctly, you can hear a delayed sound, reminiscent of a turbine stopping due to inertia. If you have an assistant, it is visually possible to see the inertial rotation of the generator when the drive belt of additional units comes to a complete stop.