The VAZ 2101 fuel pump rod is the main part of the membrane drive.
Now we will talk about what the VAZ 2101 fuel pump rod is, and what problems it can cause for the driver of the car. If you have not yet come across such a detail, then be sure to read it, a lot of interesting things will be told. Moreover, this is worth reading not only for owners of kopecks, but also for nines and tens, with carburetor engines.
The principle of driving the fuel pump is the same for all. And all the breakdowns, accordingly, are also the same, despite the obvious differences between the cars. Of course, the reliability of engines of eights, nines and tens is higher, but the rod still tends to wear out. Let's start with what a fuel pump on a VAZ 2101 is, and how it pumps fuel through itself.
A little about the design of the fuel pump
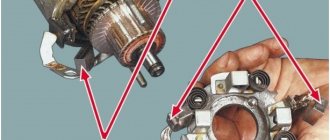
The inner world of a penny fuel pump
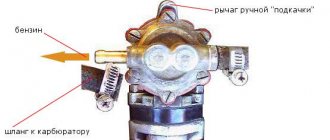
The body of the VAZ 2101 fuel pump consists of two halves. On the bottom there is a diaphragm drive lever. There are two small valves in the top cover - inlet and outlet. By the way, they are included in the repair kit. But it is better not to use it, since the effectiveness of replacing several components and gaskets is extremely low. As practice shows, even highly professional repairs will not give good results.
The fuel pump will still not work as it should. And if you think that the electric fuel pump on the VAZ 2101 can save the situation, then you are mistaken. These are unnecessary problems that you simply don't need. Such a fuel pump must be installed if an engine with a two- or seven-wheel drive (injection) is being installed. In all other cases, it is useless to do this - there are a lot of costs, there is no effect.
Therefore, the only right solution is to completely replace the VAZ 2101 fuel pump. Its price in stores is 450-500 rubles, no more. The repair kit is cheaper, but the guarantee that it will pump the pump is small. But if you install a new one, the problem will disappear for several years. According to reviews from car owners, the most reliable fuel pumps for the VAZ 2101 are those produced by DAAZ. But it is worth noting that Pekar and Weber are also praised by drivers. True, it doesn’t happen every once in a while, sometimes a true G (marriage, in the sense) comes across. With repair kits the situation is even worse.
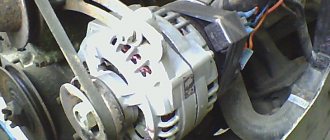
External view of the fuel pump of a VAZ 2101-2107 car
And if there is a chance to purchase a low-quality fuel pump, but it is small, then you can buy a repair kit of a very low grade. From my own experience, I will say that I personally purchased kits in which the valves either did not fit into their grooves at all, or fell into them like a spoon in a mug. I don’t know, it’s quite possible that fate doesn’t like me very much, but this happened not only to me. Therefore, I decided that the best way to repair the VAZ 2101 fuel pump is to purchase a new one. And install a new rod. And gaskets.
Signs of breakdown
Replacing the fuel pump on a 16-valve VAZ-2112 with your own hands
Among the obvious breakdowns, the presence of which may require replacing the VAZ-2106 fuel pump, one can highlight one - a leak. If the housing is constantly wet, covered with gasoline that drips onto the engine block, it is necessary to carefully inspect the unit and make repairs. It is quite possible that the seal was lost due to loose tightening of the fastening screws. In this case, you don’t even have to disassemble the entire assembly, but wipe it dry and tighten the bolts with a screwdriver. If desired, you can change the engraving washers. If a leak appears from cracks in the housing, then it is better to completely replace the VAZ-2106 fuel pump. The price of a new one is not very high, but the resource is quite decent.
The next two malfunctions, typical of mechanical pumps, are diaphragm rupture and valve failure. If the membrane is torn, gasoline will begin to flow into the lower chamber of the fuel pump. And the unit will stop creating pressure in the system. There are two valves in the top cover - inlet and outlet. If one of them stops working normally, the necessary pressure will also not be created in the system. Very often the valves stick when exposed to high heat. In this case, you can moisten a rag with water and place it on the pump body - this is the only effective way out of this situation.
The VAZ 2106 automobile fuel pump is one of the main components of the fuel supply system, which pumps fuel from the tank to the carburetor. Directly in the carburetor unit, an aerosol mixture of fuel and air is formed, which enters the power plant.
Symptoms that clearly indicate a faulty pump and rod
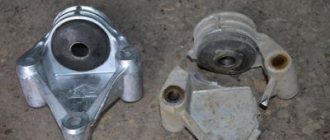
Fuel pump and gasket set
The main sign of a faulty fuel pump is that the engine begins to stall at high temperatures, and after stopping it does not start. It sits for a while, cools down, and only then is it possible to start the engine. Of course, another breakdown has a similar symptom - a violation of valve adjustment. Only in this case does it feel as if the engine is trying with all its might to pull the car, but cannot, it is beyond its capabilities. And when the fuel pump starts to malfunction, the engine simply stalls.
The reason for this is excessive heating. As we said, the VAZ 2101 fuel pump consists of two valves. Well, one or both became warped due to heating and stopped opening. Cool them slightly and you can continue moving. Remember how often you saw a wet rag thrown over a gas pump? Now you know what purpose this is for.
But there is also a VAZ 2101 fuel pump rod, a truly wonderful contraption. It is made of steel. And if in the Soviet years it was hardened, now no one needs it. The price of the stock is at least 25 rubles. Well, who will spend kilowatts of energy on a part whose final cost is 25 rubles? Nobody! What happens then? But an unpleasant picture emerges - the fuel pump lever simply erases the rod, reducing its length.
And if you have gaskets under the fuel pump housing, then you are just lucky! When you pull one out, the rod will protrude from the insert more. And that’s it, the pump will continue to pump gasoline normally. But what if there are no gaskets? Who knows what could happen, for example, they forgot to put them on? And that’s why the rod was worn out. What to do then? Try taking it out and inserting it the other way. You know, this action helped several times.
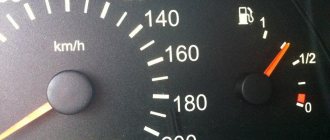
A sign that the fuel pump rod has worn out is that the car accelerates to a certain speed. I had such a thing that I drove around the city normally, but as soon as I got on the highway, my maximum speed was 90 km/h, and that’s all. You step on the gas, but the engine stalls, it doesn’t have enough gasoline. I released the pedal a little - it drives calmly and shows no signs of breakdown. Moreover, a pump rod malfunction cannot always be detected when driving around the city or at idle speed. A short-term increase in engine speed will not give the same effect as long-term driving at high speed.
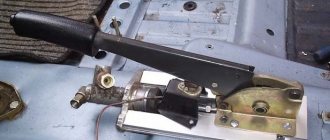
Replacing the fuel pump rod
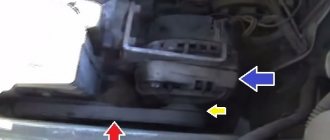
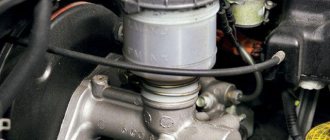
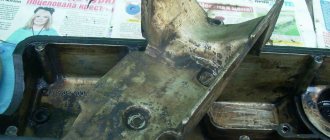
Installation location of the gasoline pump on a VAZ 2101
So, you need two gaskets to replace - thin and thick. To be honest, I don’t remember the exact thickness, but if you say so in a store, the seller will understand you. The fact is that there are usually no other gaskets available J. The main thing is to ensure that the new rod protrudes beyond the spacer by no more than 1.3 mm. But it is unacceptable for the protrusion of the rod to be less than 0.8 mm. Take the average value - one millimeter. This will be quite enough for the normal operation of the fuel system.
Posts 8
1 Topic by pfz 2009-09-09 19:38:40
- pfz
- User
- Offline
- Registered: 2009-06-28
- Messages: 4
- Reputation: [ 0 | 0 ]
Topic: Fuel pump rod
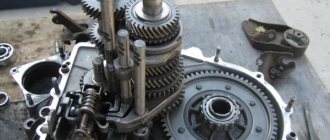
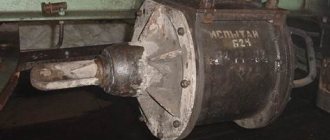
VAZ-2109 carb camshaft new
This problem constantly flattens the fuel pump rod (this iron rod) on the camshaft side. Accordingly, the pump stops pumping. I'm tired of changing them. Sednya already installed 4. I tried it on with the new one, but the old one had 2-3mm off. people say that the spare parts are crap and only hardening the rod will save them. I would like to hear your opinion.
2 Reply from Lacoste 2009-09-10 02:52:35
- Lacoste
- User
- Offline
- Registered: 2009-04-12
- Messages: 10
- Reputation: [ 0 | 0 ]
Re: Fuel pump rod
This problem constantly flattens the fuel pump rod (this iron rod) on the camshaft side. Accordingly, the pump stops pumping. I'm tired of changing them. Sednya already installed 4. I tried it on with the new one, but the old one had 2-3mm off. people say that the spare parts are crap and only hardening the rod will save them. I would like to hear your opinion.
I had this happen. Only the pump got terribly hot. I changed the pump and rod and then had no problems.
3 Reply from maniboo 2009-09-10 06:40:03 (2009-09-10 06:40:45 edited by maniboo)
- maniboo
- Moderator
- Offline
- Registered: 2008-11-10
- Messages: 2,196
- Reputation: [ 0 | 0 ]
Re: Fuel pump rod
which rod is that pusher? Did you set it up by eye or by letter? There should be a certain number of spacers and some of them of different thicknesses to set the correct distance.
4 Reply from Driver 2009-09-10 17:24:17
- Driver
- User
- Offline
- Registered: 2008-12-08
- Messages: 460
- Reputation: [ 0 | 0 ]
Re: Fuel pump rod
Still, I think it’s a problem with the pump.
5 Reply from pfz 2009-09-10 17:46:47
- pfz
- User
- Offline
- Registered: 2009-06-28
- Messages: 4
- Reputation: [ 0 | 0 ]
Re: Fuel pump rod
yes it's a pusher. the pump is new. I installed the old one the same way. I installed the gaskets that were included in the kit, one thinner and the other thicker. installed correctly
6 Reply from maniboo 2009-09-11 06:27:51
- maniboo
- Moderator
- Offline
- Registered: 2008-11-10
- Messages: 2,196
- Reputation: [ 0 | 0 ]
Re: Fuel pump rod
4 pumps in a row? I doubt that they are all marriageable, unless of course they were bought in one place, maybe it’s a batch. As far as I remember, the kit includes gaskets, but when I changed the pump I had to buy a different thickness, because... those that were in the box did not provide the required gap. In mm I don’t remember how much it should be, I can’t tell you
7 Reply from GUTA 2009-09-11 16:30:42
- GUTA
- User
- Offline
- Registered: 2008-11-12
- Messages: 402
- Reputation: [ 0 | 0 ]
Re: Fuel pump rod
Why did he get eaten the first time? because of which? This is almost wear-resistant weight. The car will be completely rotten, the engine will have been capitalized 10 times, and this pump rod - a fucking stick - will still work. Here you need to find out the reason, if you installed a new pump and it was immediately chewed up, then the problem is in the pump and it is not a fact that you installed everything correctly. I'm talking about gaskets. You need to accurately measure the output of the pusher with a barbell or ruler. and then install gaskets of the required thickness. Like that:
Before installing the pump, we measure the minimum amount of protrusion of the pusher (when turning the crankshaft) from the end plane of the heat-insulating spacer.
The protrusion is regulated by selecting sealing gaskets of different thicknesses.
Gaskets are available in thicknesses of 0.30, 0.75 and 1.25 mm. We install a 0.30 mm gasket between the heat-insulating spacer and the engine, and a 0.75 mm gasket on the outer side of the spacer (facing the fuel pump) and check the minimum protrusion of the pusher from the spacer, which should be 0.8–1.3 mm. To do this, slowly turn the engine crankshaft, pressing the pusher with your finger and periodically checking its protrusion above the plane of the gasket. If the minimum protrusion is less than specified, the outer gasket is replaced with a thinner one, if more, with a thicker one.
8 Reply from kos127 2009-10-24 12:06:27
- kos127
- User
- Offline
- Registered: 2009-01-12
- Messages: 6
- Reputation: [ 0 | 0 ]
Re: Fuel pump rod
It seems to me that the pushers are completely G. As an option, remove the distributor and look at the camshaft cam, maybe there’s something wrong with it (it’s crumbled, for example). I understand that this is unlikely, but still. On my car the cam itself is polished to a shine.
How to check the performance of the fuel pump without removing it?
First of all, you need to carefully inspect the fuel pump. Particular attention should be paid to the fit of the cover 4 to the body 3. The skew of the cover, its weak tightening, and an incorrectly installed nylon mesh filter 2, which also serves as a sealing gasket, contribute to the leakage of gasoline in the connector of the cover and the body or in the mating of the cover and the bolt 5 of its fastening.
Fuel may also leak through the outer spacer 1. This occurs when the working diaphragms 8 are damaged. If the screws 7 securing the housing to the bottom cover are loosened, air may leak into the vacuum cavity, and therefore the fuel pump will work intermittently, supplying fuel to the mixture with air.
If you find traces of oil leakage, check first of all that the fuel pump is securely attached to the cylinder block, and then determine the condition of the sealing heat-insulating gaskets. The fact is that oil often leaks in these places when the seal is broken.
Without removing the fuel pump, you can check its functionality. To do this, simply disconnect the fuel line coming from the carburetor and, using the manual pumping lever, check the strength of the fuel supply. Remember that manual pumping is impossible if pusher 1 (Fig. below) is at the top of eccentric 2, and the diaphragm rod is correspondingly in its lowest position.
Fuel pump pusher position
In this case, you need to use the starting handle to turn the engine crankshaft just one revolution. This will allow the eccentric and the rod to take a position in which the manual fuel pumping mechanism will be operational.
A working fuel pump delivers gasoline in a full pulsating stream without noticeable air. To be more confident, you can check the operation of the fuel pump using a mechanical drive by turning the engine crankshaft with the starter. At the same time, you should not be embarrassed by the fact that a stream of gasoline will not appear from the first revolutions.
If you suspect a malfunction of the internal elements of the fuel pump, it is, of course, necessary to remove it, disassemble it and eliminate the defects.
Electric fuel pump for VAZ 2106
Due to the simplicity of the “six” design, a more productive electric gasoline pump can be installed on it. However, car enthusiasts themselves do not recommend installing a modern unit unless there is a good reason:
Mechanical fuel pumps are intended exclusively for carburetor car models, while electric ones are designed to serve injection cars. In this case, the installation method will differ:
- the mechanical pump is fixed on the surface of the cylinder block;
- The electric pump is mounted inside the cavity of the fuel tank.
The electric fuel pump is smaller in size compared to the mechanical one
On the VAZ 2106 carburetor engine, you can install an electric fuel pump of both domestic and imported origin. Thus, the new generation Pekar electric pump, as well as the German Bosch device, have gained wide popularity among car enthusiasts. The only difference is the price: if Pekar costs from 2 thousand rubles, then Bosch is cheaper than 3 thousand rubles; you won’t find it in a car store.
Installation of an electric fuel pump
Installing an electric fuel pump on a carburetor engine will require additional equipment. In addition to the pump itself, the following elements will be needed:
- five-meter hose with a hole diameter of 9 mm;
- fuel pump relay (in addition to the existing one);
- 7 mm drill (+ drill);
- filter element for injection engine;
- fuel filter for carburetor;
- steel pipe 250 mm with metal thickness 0.8 mm;
- a hose with a hole diameter of 12 mm for supplying fuel;
- adapter device from 8 mm to 12 mm.
Only after preparing the necessary mechanisms and components can you begin installing the electric fuel pump on the VAZ 2106. To make work easier, it is possible to install the device in the engine compartment:
- Remove the fuel level sensor in the tank.
- Drill a hole in the sensor cover with a 7 mm drill.
- Solder a steel tube into the hole with a soldering iron. In this case, bend one end in such a way as to form a return drain as far as possible from the fuel intake. Bend the upper end of the tube parallel to the lower one.
- Install a modified fuel level sensor into the cavity of the gas tank.
- Connect the rubber tube to the return adapter from the main fuel hose.
- Place one end of a five-meter hose onto the fuel intake fitting, and the other onto the steel tube on the sensor cover.
- Install the fuel pump on the engine shield, positioning it horizontally. Fix the pump housing on a bracket using rubber gaskets to ensure a reliable connection.
- Install the fuel filter for the injector onto the rubber hose.
- Place a five-meter hose onto the second fuel supply fitting. Secure it under the hood.
- Connect the electric fuel pump to the gas tank using a 12 mm hose. Use an adapter to connect.
- Connect the power supply to the new pump through the force field to the 12 V contact.
Video: electric pump for the “classic”
2106 car owners themselves recommend installing an electric pump at the outlet of the fuel tank:
Troubles with the gasoline pump can occur to any driver, both domestic and imported cars. The best option for solving all problems is, of course, contacting a car service. But if the driver is used to servicing and repairing his “swallow” himself, then do-it-yourself repairs are quite accessible. In addition, with this approach you can save a certain amount of money.
Removing and installing the fuel pump
Removing and installing the fuel pump is a simple operation. The fuel pump, together with the gaskets, is mounted on two studs and secured with nuts, which must be unscrewed with a 13 mm wrench. To remove the fuel pump, you need to disconnect the supply and discharge fuel lines, unscrew the fuel pump mounting nuts, remove the spring washers, and then the fuel pump itself.
When removing it, be careful, as you can damage the thin gasket, which often sticks to both the pump and the thick heat-insulating gasket. The thermal insulation gasket itself, as a rule, can be easily removed by hand without the use of any tools. In the worst case, make it easier to remove by lightly tapping it with the handle of a screwdriver. Do not forget also that under the thick thermal insulation gasket there is another thin installation gasket, which is also a sealing gasket.
Disassembly and repair of the fuel pump
Before disassembling, it is necessary to thoroughly rinse the fuel pump, for which you can use the gasoline in its cavity. It is best to start disassembly with the top cover 4, screwed with a bolt 5 with an 8 mm socket head. Under the lid there is a nylon mesh filter.
Let us remind you that the deformed cover and the broken filter must be replaced with new ones. Under the strainer in the fuel pump housing you will see a pressed and rolled suction valve 6. There are cases when, due to valve failure, you have to replace the entire fuel pump housing since the valves are not supplied separately as spare parts, and replacing them at home is quite difficult .
To remove the fuel pump housing, you need to unscrew six screws 7 with a screwdriver. Before separating the housing from the bottom cover, try to replace their relative positions. This will come in handy during assembly.
The discharge valve is pressed and rolled on the inside of the removed housing. Wash the housing thoroughly in clean unleaded gasoline.
Remember that even the smallest grains of sand trapped between the valve and the seat disrupt the tightness of the valves, which leads to failure of the fuel pump.
Using a thin screwdriver or a match, you can check the mobility of the valves and the tightness of their fit to the seat under the action of the springs. If you can check the operation of the suction valve again on the assembled fuel pump, then the operation of the discharge valve can only be checked now, with the pump disassembled. When blowing air into the discharge pipe, monitor the behavior of the valve, which should sit in the seat and not allow air to pass through.
To inspect the diaphragm assembly, it is advisable to remove it from the bottom cover of the fuel pump; to do this, simply turn the rod 90°. Together with the diaphragm assembly, the outer and inner spacers 1, as well as the diaphragm spring 9, are removed.
Carefully inspect the working and auxiliary diaphragms. Remember that they should not have scratches, cracks, tears, or local hardening. The presence of one of the listed defects requires replacing the defective part with a new one. It should be remembered that the diaphragm assembly is collapsible. The diaphragms and internal spacer sit on the stem and are tightened with a nut. If the fuel pump suddenly fails along the way and you determine that the cause is a deformed diaphragm, plastic film can be used as a temporary measure.
Make a homemade diaphragm from a piece of film. At the same time, do not throw away damaged diaphragms, but place homemade ones between them. This recommendation should only be used as a last resort, but if you have a spare diaphragm assembly, play it safe and replace the entire assembly.
Other causes of fuel pump breakdowns, defects, malfunctions
There are cases when, in cars with high mileage, the fuel pump does not ensure engine operation at maximum crankshaft speed. The cause in most cases is a weakened diaphragm spring. The normal free length of the spring should be 47 ± 0.5 mm. If the spring is truly weakened, it must be replaced with a new one. A temporary option to eliminate the defect is to stretch the spring by hand and install it in place.
Sometimes the cause of a malfunction of the fuel pump is a violation of the length of the pusher outlet. The fact is that during operation, hardening is formed on the pusher, which naturally changes the length of its exit. This pusher needs to be replaced. If a defect is discovered on the way and there is no new pusher at hand, you can, as a temporary option, remove the hardening and try to adjust the length of the pusher using a set of shims.
At the end of the description of the repair operations performed with the gas pump, car enthusiasts should be reminded of one more type of defect, which occurs quite often. Some fuel pumps work well only before the first disassembly, and after secondary reassembly, despite the absence of visible defects, they stop working altogether or work at half capacity.
If you are unlucky and your car has just such a stubborn fuel pump, connect the body of such a fuel pump to the mating surface of the bottom cover without a diaphragm assembly and you will see the cause of the defect: there will be a gap between the mating surfaces.
Such deformed surfaces must be ground in. The zinc alloy from which the body is made is easy to abrade and the grinding process does not take much time.