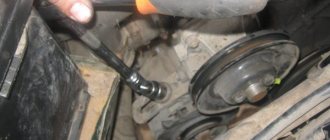
This is the unit we are talking about
To provide electrical energy to the electrical appliances of the VAZ 2105 car, as well as to recharge its battery while the engine is running, there is a generator in the car. Until 1987, the VAZ 2105 was equipped with units of the G 222 model, and later with the 37.3701 model. In both cases, the generator is a three-phase electrodynamic device in which the sinusoidal voltage of each phase is rectified using a built-in rectifier. This part is a three-phase diode bridge of a VAZ generator, consisting of six silicon diodes. The voltage is produced by exciting the rectifier by the three stator windings when the rotor poles change underneath them. The rotor poles change polarity as it rotates inside the stator, and to increase the value of magnetic fluxes, it has an electromagnetic excitation winding inside the magnetic cores. The rotor rotates through a belt drive from the front pulley of the engine crankshaft (injector) together with the pulley of the cooling system pump.
The electrical circuit of the VAZ 21053 car differs from the instrument circuit of the 2105 model in that it contains an electronic engine control system (ECM) and various additional sensors. Therefore, on the VAZ 21053 the power supply system has a different terminal shape than on the 2105. The ignition switch of the first model, when the starter is turned on, turns off secondary circuits and devices.
In general, the VAZ 21053 and 2105 generators are identical. But how to connect a generator to a VAZ 21053, because in this model the injector needs more current produced? How to connect a generator from the “ten” to 80 A? The mounting and connection diagram of the VAZ 21053 are the same as it, so there will not be any special problems here.
Unit malfunctions
If the voltage level is different from the norm, then you should compare the voltage of the generator and battery. A difference in readings between the generator and battery voltages will indicate poor contact at terminal No. 30. The terminal should be disconnected from the generator terminal and cleaned.
Let's consider the case when the voltmeter needle does not rise at all after starting the engine. The device does not produce energy. The generator needs to be checked. Possible causes of the malfunction may be:
- winding breakage;
- short circuit to housing;
- valve breakdown;
- brush wear;
- failure of the relay regulator.
You can check the integrity of the winding turns with an ohmmeter. The resistance of a serviceable rotor and stator winding will be 5-10 Ohms. The insulation (resistance between the windings and ground) will show infinity.
The diode bridge should be removed for inspection. Otherwise, it will not be possible to measure semiconductors. Each part is checked separately.
Rectifiers are considered suitable if the diodes show infinity on one side and about 500 Ohms on the other. The diode block cannot be repaired. The entire device is replaced.
The cause of brush assembly malfunction is wear of the brushes. Repair comes down to replacing the brushes. First remove the knot.
Experienced motorists recommend periodic inspection of the VAZ-2107 generator. Car preventative maintenance is also necessary before a long trip.
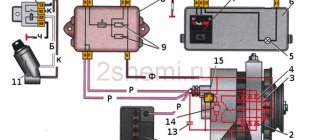
When repairing a VAZ 2107 car generator, you will need this generator set diagram and a detailed current path in the field winding circuit.
1. Battery. 2, 5. Basic rectifier semiconductor diodes. 6. Generator stator winding coils. 7. Semiconductor integrated voltage regulator (charging relay). 8. Excitation winding (rotor) of the generator. 9. Noise filtering capacitor. 10. Mounting block (relays and fuses). 11. “Battery charging” indicator lamp. 12. Voltmeter (on-board voltage indicator). 13. Ignition relay (ignition switch relay). 14. Ignition switch.
Current path of the excitation winding with the ignition on and the engine not running: Terminal “+” of the battery – pink wire – terminal “30” of the generator – pink wire – contact “1” of connector “Ш10” of the mounting block – internal current-carrying tracks of the mounting block – contact “4” » connector “w1” of the mounting block – brown wire – pin “30” of the ignition relay (installed under the dashboard) – closed contacts of the ignition relay – pin “87” of the ignition relay – black and blue wire – pin “6” of connector “w1” of the mounting block – fuse “pr 10” of the mounting block – contact “1” of connector “w 4” of the mounting block – orange wire – contact “4” of the instrument panel connector (black) – conductors and conductive tracks of the instrument panel – contacts of the “battery charging” warning lamp holder - filament of the "battery charging" lamp - socket contacts - instrument panel conductive tracks - contact "2" of the instrument panel connector (white) - white-brown wire - contact "3" of the mounting block connector "w5" - internal conductive tracks of the mounting block - contact “7” connector “Ш10” of the mounting block – white-brown wire – terminal “61” of the generator – connecting bus for additional rectifier diodes – short conductor – charging relay terminal – internal semiconductor junctions of the charging relay – first brush – first contact ring of the rotor – generator excitation winding – the second contact ring of the rotor – the second brush – the “minus” contact – car body parts – the “-” terminal of the battery.
After starting the engine, a positive potential appears at the point “connecting bus of additional rectifier diodes”, current flows from it further to the brushes. The control lamp is shunted (shorted) by open additional diodes and goes out.
Comments and reviews
The generator rotor, which is an electromagnet with one winding located on the rotor shaft. Pressure is applied with a mounting blade in the middle of the segment. Since AC generators have many advantages over DC generators, this was the reason for the choice.
From the moment of its creation until the year, the VAZ was equipped with an aggregate G, after a year this generator model was replaced with a device. By the way, the cover is not so easy to put in place, it is easier to glue a piece of rubber to it so that it does not rattle and then the lamp goes out. Actually, here it is. To remove the drive belt, move the unit slightly. As the rotor rotates, a voltage appears at the output of the stator coils, which begins to power the excitation winding, consumers and charge the battery. Increased noise during operation of the generating set. The bearings have become unusable. In addition, an additional gas tank and battery were installed. Produced from year to year.
DIY connection diagram for the VAZ-2105 generator (carburetor, injector): video instructions
To protect the cover ears from breaking when tightening the bolts, a rubber buffer sleeve is inserted into the hole in the cover ears 1. Otherwise, check the windings and rectifier of the unit. To control the battery charge level, you need to carefully monitor the amount of rectified voltage, maintained around 14.2 V.
If the resistance has a low value, close to zero, it means that a breakdown has occurred in the diode bridge or the stator winding has shorted to ground. The lamp goes out, indicating that all devices are powered by the generator. Now the battery received a voltage of more than 15 V, which led to the boiling of the liquid in it. However, after purchasing and installing a new regulator, another problem arose - battery overcharging.
The regulatory relay compares the voltage within the on-board network of your car with the reference one. Rear marker light left lamp. Headlight wiper relay relay coil. Excessive wear will indicate that the damaged belt needs to be replaced. Repair of generator VAZ 2107
What generators can be installed on a VAZ 2105
The question of choosing a generator for a VAZ 2105 arises when the standard device is not capable of providing current to the consumers installed on the car. Today, many car owners equip their cars with powerful headlights, modern music and other devices that consume high current.
To equip your car with a more powerful source of electricity, you can install one of the following options:
- G-2107–3701010. The unit produces a current of 80 A and is quite capable of providing additional consumers with electricity;
- generator from VAZ 21214 with catalog number 9412.3701–03. The current produced by the device is 110 A. For installation, you will need to purchase additional fasteners (bracket, strip, bolts), as well as make minimal changes to the electrical part;
- product from VAZ 2110 for 80 A or higher current. For installation, a suitable mount is purchased.
One of the powerful options for generator sets that can be equipped with a VAZ 2105 is a device from a VAZ 2110
Connection diagrams for VAZ 2105
Healthy ! Battery inrush current
Electrical diagram for connecting a VAZ 2105 carburetor
| Position number on the diagram | Explanation of the position on the diagram |
| 1 | small carburetor switch |
| 2 | electric pneumatic valve |
| 3 | fuse and relay block VAZ 2105 |
| 4 | ignition stick |
| 5 | ignition lock |
| 6 | ECU with electric pneumatic valve VAZ 2105 |
| 7 | Ignition solenoid |
| A | to terminal 30 magneto |
| B | method of conditional numbering of terminals in used |
When the engine is equipped with a carburetor 21051-1107010, then instead of the control unit 21.3761 for the pneumatic throttle, a control unit 501.3761 for the carburetor solenoid valve is mounted.
The control unit 501.3761 is required to turn off the valve at a crankshaft speed of 1900 min-1, and turn it on at 1700 min-1
Connection diagram for the VAZ 2105 carburetor control unit for testing
| Position number on the diagram | Explanation of the position on the diagram |
| 1 | ECU 2105 |
| 2 | adapter connector with voltmeter |
| A | car wiring harness |
Contacts for connecting the computer to the carburetor solenoid valve
| Position number on the VAZ diagram | Explanation of the position on the diagram |
| 1 | to the ignition coil contact |
| 2 | minus |
| 3 | — |
| 4 | + 12 V from pin 15 of the ignition switch |
| 5 | Small carburetor switch |
| 6 | carburetor solenoid valve VAZ 2105 |
| 7 | — |
Starter wiring diagram
Sound signal connection diagram
Connection diagram for headlight cleaners and washers VAZ 2105
Malfunctions and repairs
First, we note that even with serious malfunctions of the generator, you can repair the VAZ-2105 yourself. So, the first possible breakdown is interturn short circuits, or a break in the armature winding. Symptoms - the generator refuses to produce current. The red battery light is on on the instrument panel. Such short circuits can be determined using an ohmmeter by measuring the current resistance. Sometimes a break is detected by visual diagnostics.
After disassembling the generator, it is necessary to inspect the connection points of the wires of the brushes and contact plates, as well as the soldering of the coil leads to the slip rings. How is a VAZ-2105 repaired? If there is a break, it can be repaired using an ordinary soldering iron. But if this is a short circuit “to the body”, only replacing the stator or armature assembly will help.
The next malfunction concerns the rectifier unit. Symptoms - the device does not generate current when the brush assembly is working and there is no break in the winding. In this case, the cause of the malfunction is the diode bridges. In the event of a break, they will not pass current through themselves or will pass in both directions (accompanied by a short circuit). The rectifier unit is completely replaced. Spare parts for the VAZ-2105 are cheap. The price of a new diode bridge will be about 400-500 rubles.
Ignition circuit for VAZ 2105
Electrical circuit of contact ignition VAZ 2105
| Position number on the VAZ diagram | Explanation of the position on the diagram |
| 1 | spark plugs |
| 2 | ignition distributor VAZ 2105 |
| 3 | capacitor |
| 4 | breaker cam |
| 5 | Ignition solenoid |
| 6 | relay and fuse block VAZ 2105 |
| 7 | ignition switch |
| 8 | ignition switch |
| A | to pin 30 magneto |
Contactless ignition circuit for VAZ 2105
| Position number on the diagram | Explanation of the position on the diagram |
| 1 | spark plugs |
| 2 | distributor sensor |
| 3 | screen |
| 4 | contactless sensor VAZ 2105 |
| 5 | switch |
| 6 | Ignition solenoid |
| 7 | fuse box and relays VAZ 2105 |
| 8 | ignition switch |
| 9 | ignition switch |
| A | to pin 30 magneto |
Scheme for checking the contactless ignition sensor VAZ 2105
| Position number on the diagram | Explanation of the position on the diagram |
| A | check on the car |
| b | checking the removed sensor |
| 1 | distributor sensor |
| 2 | adapter terminal with voltmeter |
| 3 | car wiring harness |
| 4 | terminal connector connected to the sensor-distributor |
| 5 | resistor 2 kOhm |
| 6 | voltmeter with a scale of at least 15 V and an internal resistance of at least 100 kOhm |
Do-it-yourself VAZ 2101 generator repair
Repairing a VAZ 2101 generator with your own hands is quite simple. All work can be divided into five stages:
- Removing the generator from the car.
- Disassembling the generator.
- Troubleshooting.
- Replacement of worn out and faulty elements with new ones.
- Generator assembly.
First stage: dismantling the generator
To dismantle the VAZ 2101 generator you will need:
- open-end wrenches for 10, 17 and 19;
- mounting blade.
Before dismantling the generator, you must disconnect the negative cable from the battery.
To remove the generator you will need to perform the following steps:
- Remove the right front wheel from the vehicle.
- Securely secure the car on a jack and additional supports.
- Climb under the car on the right side and find the generator housing.
- Loosen, but do not completely unscrew the housing fixing nut.
- Loosen, but do not completely unscrew the nut on the bracket stud.
- To loosen the V-belt, slightly move the generator housing.
- Disconnect the power cable going to the generator.
- Disconnect all wires and contact connections.
- Remove the fixing nuts, pull the generator towards you and remove it from the studs.
Video: dismantling the VAZ 2101 generator
Stage two: disassembling the generator
The removed generator should be wiped with a soft cloth, removing the main layer of dirt. To disassemble the device you will need:
- open-end and ring wrenches 19;
- extension;
- heads for 8 and 10;
- hammer.
Disassembling the VAZ 2101 generator is quite simple
The disassembly itself is carried out in the following order:
- Unscrew the four nuts on the back cover of the generator.
- The nuts securing the pulley to the body are unscrewed.
- The pulley is removed.
- The housing is divided into two parts (one will contain the stator, the other will contain the rotor).
- The winding is removed from the part with the stator.
- The shaft with bearings will be pulled out from the part with the rotor.
Further disassembly involves pressing out the bearings.
Video: disassembling the VAZ 2101 generator
https://youtube.com/watch?v=pUAgp4kTgzo
Third stage: generator troubleshooting
At the troubleshooting stage, faults of individual generator elements are identified and eliminated. Moreover, some of the work can be performed at the disassembly stage
Particular attention should be paid to:
- signs of wear on the surfaces of parts;
- the appearance of carbon deposits on wires and contacts;
- the presence of dirt and working fluids inside the generator housing;
- cracks, nicks and other mechanical damage to parts.
All damaged and worn elements must be replaced with new ones.
When troubleshooting, you do not need to pay attention to the generator housing: after several years of service, it may have an unsightly appearance, but at the same time it will protect the insides of the device well.
Stage four: generator repair
The difficulty of repairing the G-221 generator is that it is difficult to find spare parts for it. If bearings can still be purchased on the Internet, then choosing a suitable winding or rectifier will be very difficult.
Video: repair of VAZ 2101 generator
Therefore, the list of situations for repairing a VAZ 2101 generator is very limited. So, if bearings jam or brushes wear out, replacement elements can be easily found in car dealerships.
Generator faults
Unfortunately, mechanisms have not yet been invented that would not fail under the influence of time and constant loads. The VAZ 2107 generator is designed for many years of operation, but in some cases this is hampered by minor breakdowns and malfunctions of its components.
You can identify problems with the generator without the help of service station specialists: you just need to carefully monitor all the changes that occur with the car while driving.
The charging indicator light on the instrument panel came on
In the interior of the VAZ 2107, there is a terminal for several signaling devices on the dashboard. One of them is the battery charging indicator light. If it suddenly lights up red, it means there is not enough charge in the battery or there is a problem with the generator. But the alarm does not always indicate a problem with the generator itself; most often the lamp goes off for other reasons:
- slipping of the generator belt drive - you will need to stop the machine and adjust the degree of belt tension;
- there is damage in the warning lamp relay, so it does not work correctly - it is recommended to “ring” the relay in the mounting block and, if necessary, replace it;
- breakage of contacts in the excitation winding is a more serious damage that requires removing the generator from the car, disassembling it and searching for a break;
- severe wear of the brushes in the brush holder - they will need to be replaced, which is quite simple;
- short circuit in the rectifier (most likely, one of the silicon diodes has burned out) - it is recommended to disassemble the generator, test the diodes and replace the failed element.
The driver will immediately notice the signal, as the lamp begins to glow bright red on the instrument panel
The battery is not charging
VAZ 2107 drivers often encounter this problem: the generator seems to be working properly, but there is no power to the battery. The problem may lie in the following malfunctions:
- the alternator belt has stretched - you need to check the degree of its tension or replace it with a new one;
- loosening the fastening of the wire tips - just tighten all the fastening connections and thoroughly clean the contacts and connectors;
- malfunction of the battery itself;
- Damage in the wiring - it is recommended to ring all the wires between the battery and the generator and replace the damaged areas.
If there is no charging, the problem may lie in both the generator and the battery.
The battery is boiling over
Battery boiling over is a sign that the battery does not have long life left. After this, the battery will not be able to function fully, so it will have to be replaced soon. However, so that the replacement does not lead to the same sad consequences, it is necessary to find the cause of the boiling, which may be:
- contamination of the contact between the ground and the housing of the generator regulator - cleaning of the contact is necessary;
- damage to the voltage regulator board itself - replacement of the board is recommended;
- defective battery - if the battery began to boil away immediately after replacement.
It is better not to use the battery after boiling, as its resource is very limited.
When driving there is noise and grinding noise from the generator
The generator has a rotating rotor, so it must make noise during operation. However, if these sounds become increasingly loud and unnatural, you should understand the cause of their occurrence:
- loosening the nut on the pulley - you need to tighten the nut and check the degree of belt tension;
- deterioration of the bearings - in this case, the driver may hear a loud grinding noise and even a howl while driving; it will be necessary to press out the old bearings from the shaft and install new ones;
- short circuit in the winding - the entire stator needs to be replaced;
- creaking brushes - it is recommended to clean the brushes from adhering dirt.
Generator belt
The flexible drive is designed to rotate the pulley of an electricity source, ensuring the functioning of the latter. Insufficient tension or a broken belt leads to a lack of battery charge. Therefore, despite the fact that the belt life is about 80 thousand km, its condition must be periodically monitored. If damage is detected, such as delamination, protruding threads or tears, it is better to replace it with a new product.
The alternator belt has a long service life, but if there is visible damage, the product needs to be replaced
Many years ago, when I first purchased a car, I encountered an unpleasant situation - the alternator belt broke. Fortunately, this happened near my house and not in the middle of the road. I had to go to the store to buy a new part. After this incident, I always carry an alternator belt in stock, because it does not take up much space. In addition, when I carry out any repair work under the hood, I always check the condition of the flexible drive and its tension.
The VAZ Five uses an alternator belt 10 mm wide and 944 mm long. The element is made in the shape of a wedge, which allows it to more easily engage with the generator pulley, pump and crankshaft.
How to tension the alternator belt
To tension the belt you will need the following tools:
- mount;
- head for 17 and knob.
The procedure consists of the following steps:
- Check the tension level of the drive. Normal values are those at which the belt between the pump pulley and the crankshaft pulley bends by 12–17 mm or by 10–17 mm between the pump pulley and the generator pulley. When taking measurements, the pressure should not be more than 10 kgf in the location indicated in the image. To do this, press with the thumb of your right hand with moderate force.
The belt tension can be checked in two places by pressing on it with the finger of your right hand. - If there is excessive tension or loosening, make adjustments.
- Loosen the upper fastener of the generator with a 17mm head.
- We insert a pry bar between the pump and the generator housing and tension the belt to the required values. To loosen the tension, you can rest a wooden block against the upper mount and lightly tap it with a hammer.
- We tighten the nut securing the generator set without removing the pry bar.
- After tightening the nut, check the tension of the flexible drive again.
Generator VAZ 2106: purpose and functions
A car generator is a small electrical device whose main task is to convert mechanical energy into electrical current. In the design of any car, a generator is needed to charge the battery and feed all electronic devices while the engine is running.
The generator's task is to ensure uninterrupted operation of all electrical systems of the machine and the battery.
How exactly does the generator work on a VAZ 2106? All processes of energy conversion from mechanical to electrical are carried out according to a strict scheme:
- The driver turns the key in the ignition.
- Immediately, the current from the battery through the brushes and other contacts enters the excitation winding.
- It is in the winding that the magnetic field appears.
- The crankshaft begins to rotate, from which the generator rotor is also driven (the generator is connected to the crankshaft by a belt drive).
- As soon as the generator rotor reaches a certain rotation speed, the generator enters the self-excitation stage, that is, in the future, all electronic systems are powered only from it.
- The generator performance indicator on the VAZ 2106 is displayed in the form of a control lamp on the dashboard, so the driver can always see whether the device has enough charge for full operation of the car.
Standard device for the "six"
Design of the G-221 generator
Before talking about the design features of the VAZ 2106 generator, it should be clarified that it has unique clamps for mounting on the engine. On the body of the device there are special “ears” into which studs are inserted and tightened with nuts. And so that the “ears” do not wear out during operation, their internal parts are equipped with a high-strength rubber gasket.
The generator itself consists of several elements, each of which we will now consider separately. All these devices are built into a light-alloy cast housing. To prevent the device from overheating during long-term operation, the case has many small holes for ventilation.
The device is securely fixed in the engine and connects to various car systems
Winding
Due to the fact that the generator has three phases, windings are installed in it immediately. The purpose of the windings is to generate a magnetic field. Of course, only special copper wire is used for their manufacture. However, to protect against overheating, the winding wires are covered with two layers of heat-insulating material or varnish.
Thick copper wire rarely breaks or burns out, so this part of the generator is considered the most durable
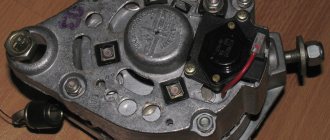
Relay regulator
This is the name of the electronic circuit that controls the voltage at the output of the generator. The relay is necessary to ensure that a strictly limited amount of voltage reaches the battery and other devices. That is, the main function of the relay regulator is to control overloads and maintain an optimal voltage in the network of about 13.5 V.
A small plate with built-in circuitry to monitor the output voltage
Rotor
The rotor is the main electric magnet of the generator. It has only one winding and is located on the crankshaft. It is the rotor that begins to rotate after the crankshaft starts and gives movement to all other parts of the device.
The rotor is the main rotating element of the generator
Generator brushes
The generator brushes are located in brush holders and are needed to generate current. In the entire structure, it is the brushes that wear out the fastest, since the main work of generating energy falls on them.
The outer side of the brushes can quickly wear out, which is why there are interruptions in the operation of the VAZ 2106 generator
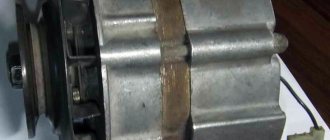
Diode bridge
A diode bridge is most often called a rectifier. It consists of 6 diodes that are placed on a printed circuit board. The main job of a rectifier is to convert alternating current into direct current to maintain stable operation of all electronic devices in the car.
Due to its specific shape, drivers often call the diode bridge a “horseshoe”
Pulley
The pulley is the driving element of the generator. The belt is tensioned simultaneously on two pulleys: the crankshaft and the generator, so the operation of the two mechanisms is continuously interconnected.
One of the generator elements
Which generator is better to install on a VAZ 2106 - Lada master
The generator of any car, even a diesel one, is the gray eminence under the hood. Without it, the car won't even take a step. It can be annoying when the engine is tuned well and runs within decency, but for some reason the electrical equipment refuses to work properly. If we are talking about our VAZ 2106, then with a high degree of probability the whole problem lies in the G 221 generator, which was installed on the descendants of the Fiat 124.
Electrical diagram of VAZ 2106
As a matter of fact, if we look at the electrical circuit of the VAZ 2106, which we have given below just in case, it turns out that it differs from the 2101 circuit only in the presence of additional electrical appliances, which entailed some changes. And the generator in the base of the six is the same as in the 2101, its name is G 221.
There can be no complaints against it as long as it works. But the fact is that the design of an electric machine is not at all designed to use such a number of consumers. As a result, insufficient current is supplied to the relay regulator, which in turn leads to undercharging and slow death of the battery. Disorder.
How to connect a standard generator G221
This is expressed quite clearly. Especially if the owner installs additional, non-standard consumers in the car that work almost constantly. It can be:
- fog lights;
- powerful audio system;
- preheater;
- refrigerator, TV, additional heater.
In short, any step that leads to an increase in electrical energy consumption threatens premature battery discharge, even on the road, with the engine running and at high speeds. That’s why it’s worth understanding how the VAZ 2106 generator connection diagram works and what alternatives there are.
Replacing a VAZ 2106 generator with a G222
The easiest option is to replace the standard generator. On new. It makes no sense to talk about the generator design as an electric three-phase synchronous machine. Not about that now. We are faced with the problem of connecting the standard G 221 generator in order to avoid mistakes when installing another, more powerful and stable G 222 generator, which was already installed on the VAZ 2105.
How is it better than the standard six? Actually nothing. With the exception of a few nuances that can be decisive when the load on the on-board electrical circuit increases. It can be installed on a VAZ 2106 engine using one of two methods:
- Install a generator with a built-in relay instead of the standard one.
- Install the modernized G 222 generator.
Actually, it’s much easier not to complicate life by altering the wiring, albeit minor, but to take the simple path.
Modification of the G222 generator for the VAZ 2106
Relatively simple. Make some adjustments to the design of the 222nd generator. Externally, these two units are almost identical. They are distinguished only by a built-in battery charging relay. It is installed in the 222nd generator along with the brush block and it is clearly visible from the back, even if you don’t read the markings.
The difficulty of installing a 222 generator is that you need to thoroughly know the connection diagram. After studying all the nuances of the circuit, you can simply connect the standard remote battery charging relay to the new generator without making any changes to the circuit. This is the simplest and most rational way.
The difference in these two generators is not only the presence of an integrated charging relay. The fact is that the G221 operates with an output of 42 A, and the generator from the 2105 G222 produces 50 amperes. The increase in power was achieved by increasing the cross-section of the rotor winding, and structurally, this is the same generator that was installed on all Zhiguli classics.
Checking the functionality of the 2106 power system
In order for the G 222 generator to be installed without making changes to the connection diagram, it is enough to install the brush block from the six generator. It installs instead of the integrated one without any problems. At the same time, it is better to replace the remote charging relay.
After replacing the generator and connecting it according to one of the provided diagrams, it is enough to check the functionality of the system as a whole. To do this, it is necessary, with minimal current consumption by third-party electrical appliances, to check the voltage at the battery terminals at medium engine speeds. This is approximately 2.5 thousand revolutions per minute. The voltage at the battery terminals at these speeds should be 14 V.
Thus, you can solve the problem of insufficient power of the standard generator and replace it with a more powerful G222 from the VAZ 2105 engine. Good luck to everyone!
ladamaster.com
Generator replacement
Before starting work, you need to install the VAZ-2106 on a ramp or pit. Be sure to apply the handbrake.
Disassembly is carried out as follows:
- disconnect the terminals from the brush holder and the “zero”;
- find the fastening nut under the rubber insulation and remove all other wires;
- remove the belt.
Now you need to unscrew the nuts securing the unit discussed in this article and pull out the adjusting bar. Afterwards, all that remains is to dismantle the bushing and bolt that are located below.
Then you will have to remove the old generator from the VAZ and put a new one in its place.
https://youtube.com/watch?v=KOjzQdcqMPs
Voltage regulator malfunction
Sometimes the so-called “chocolate” fails.
How to determine if the voltage regulator is faulty? Symptoms - the generator gives an excess or insufficient charge. The battery often boils or does not charge at all. The battery light is on on the instrument panel. It is worth noting that this is the most common breakdown.
How much do such spare parts cost for a VAZ-2105? The price of the new integral regulator is 150 rubles. Note that it is the same for all classic AvtoVAZ models and even for the Zaporozhye Tavria.
How to determine that the regulator is broken? To do this, you need to start the VAZ-2105 engine with a timing belt and turn on all electrical appliances at medium speed: headlights, stove, interior lights. Next, using a voltmeter, we measure the voltage level on the battery itself, and then between the output terminal and the ground of the generator. If the readings are from 12.5 to 14 Volts, then the element is working. If the values are too high or low, the voltage regulator must be replaced.
VAZ 2105 wiring diagram
Electrical wiring diagram of the heater fan motor VAZ 2105
| Position number on the diagram | Explanation of the position on the diagram |
| 1 | block of relays and fuses VAZ 2105 |
| 2 | heater motor switch |
| 3 | additional resistor |
| 4 | heater motor |
| 5 | ignition switch |
| A | to terminal 30 Dynamo |
Instrument cluster wiring diagram
Electrical wiring diagram for warning lamps of the brake system of VAZ 2105
Generator device
The main structural elements of a car generator are:
- rotor;
- stator;
- frame;
- bearings;
- pulley;
- brushes;
- voltage regulator.
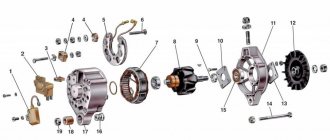
Design of the VAZ 2105 generator: a - voltage regulator and brush assembly for generators manufactured since 1996; 1 — generator cover from the slip ring side; 2 — bolt for fastening the rectifier unit; 3 - slip rings; 4 — ball bearing of the rotor shaft on the side of the slip rings; 5 - capacitor 2.2 μF ± 20% to suppress radio interference; 6 — rotor shaft; 7 - common terminal wire for additional diodes; 8 — terminal “30” of the generator for connecting consumers; 9 — plug “61” of the generator (common output of additional diodes); 10 — output wire “B” of the voltage regulator; 11 - brush connected to terminal “B” of the voltage regulator; 12 — voltage regulator VAZ 2105; 13 - brush connected to terminal “Ш” of the voltage regulator; 14 — pin for attaching the generator to the tensioner; 15 — generator cover from the drive side; 16 — fan impeller with generator drive pulley; 17-pole rotor tip; 18 — bearing mounting washers; 19 — spacer ring; 20 — ball bearing of the rotor shaft on the drive side; 21 — steel bushing; 22 — rotor winding (excitation winding); 23 - stator core; 24 - stator winding; 25 - rectifier block; 26 — generator coupling bolt; 27 — buffer sleeve; 28 — bushing; 29 — clamping sleeve; 30 - negative diode; 31 — insulating plate; 32 - phase output of the stator winding; 33 - positive diode; 34 - additional diode; 35 — positive diode holder; 36 — insulating bushings; 37 — holder of negative diodes; 38 — terminal “B” of the voltage regulator; 39 — brush holder
To know how the generator functions, you need to understand the purpose of each element in more detail.
Rotor
The rotor, also known as the armature, is designed to create a magnetic field. On the shaft of this part there is an excitation winding and copper contact rings, to which the coil leads are soldered. The bearing unit, installed in the generator housing and through which the armature rotates, is made of two ball bearings. An impeller and a pulley are also attached to the rotor axis, through which the mechanism is driven by a belt drive.
The generator rotor is designed to create a magnetic field and consists of rotating coils
Stator
The stator windings create an alternating electric current and are combined through a metal core made in the form of plates. To avoid overheating and short circuits between the turns of the coils, the wires are coated with several layers of special varnish.
Using the stator windings, an alternating current is created, which is supplied to the rectifier block
Frame
The generator housing consists of two parts and is made of duralumin, which is made to facilitate the design. To ensure better heat dissipation, holes are provided in the housing. By means of an impeller, warm air is expelled from the device to the outside.
Generator brushes
The operation of a generator set is impossible without elements such as brushes. With their help, voltage is supplied to the rotor slip rings. The embers are enclosed in a special plastic brush holder and installed in the corresponding hole in the generator.
Voltage regulator
The relay-regulator controls the voltage at the output of the unit in question, preventing it from rising above 14.2–14.6 V. The VAZ 2105 generator uses a voltage regulator combined with brushes and fixed with screws on the back of the power source housing.
The voltage regulator is a single element with brushes
Diode bridge
The purpose of the diode bridge is quite simple - to convert (rectify) alternating current into direct current. The part is made in the shape of a horseshoe, consists of six silicon diodes and is attached to the back of the case. If at least one of the diodes fails, the normal functioning of the power source becomes impossible.
The diode bridge is designed to rectify alternating current into direct current from the stator windings for the on-board network
Diagram of VAZ 2105 injector
| Position number on the diagram | Explanation of the position on the diagram |
| 1 | motor cooling fan motor |
| 2 | relay and fuse block VAZ 2105 |
| 3 | empty control |
| 4 | ECU VAZ 2105 |
| 5 | octane potentiometer |
| 6 | spark plugs |
| 7 | ignition module |
| 8 | DPKV |
| 9 | gasoline pump with fuel level meter |
| 10 | tachometer |
| 11 | check engine warning light |
| 12 | ignition relay |
| 13 | speed meter |
| 14 | diagnostic block |
| 15 | injection nozzles VAZ 2105 |
| 16 | canister purge valve |
| 17, 18, 19 | injector system fuses |
| 20 | ignition relay for injector system |
| 21 | Gasoline pump connection connector |
| 22 | Relay for electric intake pipe heater |
| 23 | electric intake pipe heater |
| 24 | intake manifold heater fuse |
| 25 | Lambda probe |
| 26 | DTOZH VAZ 2105 |
| 27 | TPDZ |
| 28 | air heat meter |
| 29 | absolute pressure sensor |
| A | to battery + contact |
| IN | to pin 15 of the ignition switch |
| P4 | fan motor switch |
Repair of generator on VAZ 2107
The generator can be repaired without outside help. The device can be easily disassembled into spare parts, so you can replace old parts even without relevant work experience. However, it is worth keeping in mind that a generator is primarily an electrical device, so in no case should you make a mistake during assembly.
The standard procedure for repairing a generator on a VAZ 2107 fits into the following diagram.
- Removing the device from the car.
- Disassembling the generator (troubleshooting is also carried out at the same time).
- Replacement of worn parts.
- Assembly of the structure.
- Vehicle installation.
Removing the generator from the car
Dismantling work takes about 20 minutes and requires a minimum set of tools:
- open-end wrench 10;
- open-end wrench 17;
- open-end wrench 19;
- mounting blade or pry bar.
It is best to remove the generator from the car when the engine is cool, as the device gets very hot during operation. In addition, you will need to jack up the car in advance and remove the front right wheel so that it is convenient to work with the generator housing and mounts.
- Remove the wheel and make sure the car is securely on the jack.
- Find the generator housing and its mounting bracket.
- Use a wrench to loosen the lower fixing nut, but do not unscrew it completely.
- Unscrew the nut on the bar, also leaving it on the stud.
- Move the generator housing slightly towards the motor.
- At this time, the alternator belt will loosen, allowing it to be removed from the pulleys.
- Disconnect all wiring from the generator.
- Unscrew the loose nuts.
- Pull the generator housing towards you and remove it from the studs.
Video: dismantling the generator
Disassembling the device
To repair the generator, you need to disassemble it. During work you will need:
- open-end wrench 19;
- socket wrench 19;
- ratchet (you can add an extension);
- head at 8;
- head at 10;
- small hammer.
With this approach, you will always be sure that every detail fits exactly in its place.
Disassembly of the G-221A generator is carried out in accordance with the following algorithm.
- Unscrew the four nuts from the rear cover of the generator and remove the cover.
- Remove the pulley by unscrewing the fixing nut.
- After dismantling the pulley, the housing is divided into two parts: one part comes out of the other. The rotor should remain in one hand, the stator in the other.
- Remove the pulley from the rotor shaft. If the pulley is tight, you can gently tap it with a hammer.
- Remove the shaft with bearings from the rotor housing.
- Press out the bearings.
- Disassemble the stator into parts, being careful not to touch the winding.
During the disassembly process, you can immediately identify the main faults of certain components. Accordingly, all those parts that:
- covered with heavy soot;
- worn out;
- have nicks, cracks and deformations on the surface.
Books and diagrams for repairing VAZ 2105
Here you can download books and diagrams for the maintenance and repair of the VAZ 2105 .
- Cars VAZ 2105 and VAZ 2104. Multicolor album. 1995
- 82 pp.
- Size – 49.575 MB
- Format - pdf
- 2011
- 2002