Purpose
In an injection engine, fuel must be supplied to the combustion chamber under pressure; this is necessary so that the fuel injectors accurately spray the fuel into small particles for easier mixing with air. The pressure is pumped up by the fuel pump, which has quite powerful characteristics and is capable of pumping up pressures of up to 10 bar. Of course, this pressure is not used in a car, it is regulated by a special sensor that resets it at 4 bar.
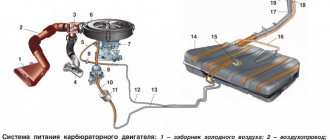
Operating principle
The fuel supply unit operates as follows:
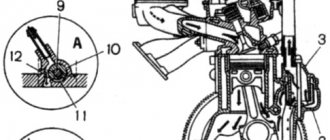
- The gas distribution mechanism drives the pump pusher through a cam.
- The lever lowers, the spring compresses, and the inlet valve begins to let fuel through.
- The membranes create a vacuum in the fuel pump chamber. Gasoline enters the unit through a filter from the fuel tank.
- When the cam moves in the opposite direction, the spring expands.
- Pressure is created in the chamber. The inlet valve closes.
- Fuel is injected into the carburetor through the exhaust valve.
The process is repeated with each movement of the shaft with the eccentric.
Design
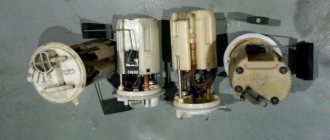
The fuel pump is an internal part that contains a special electric DC motor, on the shaft of which a fuel pump is mounted. The fuel pump is made of metal and plastic, it is sealed, this is necessary so that fuel does not get inside the electric motor.
In the picture you can see in detail what the VAZ 2107 fuel pump looks like inside.
TNND device
TNND consists of:
- Drive shaft;
- A rotor with a certain number of blades;
- Stator;
- Distribution disk;
- Adjustable drive gear;
- Connection couplings.
Low pressure fuel pump design
When the rotor begins to move, its blades begin to move closer to the stator and, under the influence of centrifugal force, certain chambers appear. Since there is a certain voltage inside, the fuel from these chambers is sent directly to the fuel injection pump. For this purpose, special channels in the distribution disk are used. In this case, a small amount of fuel is directed to the pressure reduction valve if the pressure is created greater than that set by the system.
Since both devices are inextricably linked, to maintain the necessary conditions, a fuel drain choke (in the form of a nozzle) screwed into the high-pressure pump is used. Thus, the design of this part makes it possible to create the necessary conditions in the chambers depending on the speed of the drive shaft. This design is suitable for diesel engines, but there are other types, which will be discussed further.
Symptoms of a problem
A breakdown of the fuel pump on a VAZ 2107 significantly affects the operation of the car’s engine. It should be noted that the fuel pump does not immediately fail; most often this happens gradually, accompanied by the following symptoms:
- The car accelerates poorly;
- The car jerks when driving at constant gas;
- Power is lost;
- The engine does not start well;
- Unstable idle;
The signs of a “dying” fuel pump are similar to the signs of running out of fuel.
What exactly is HEP-02A?
The pump operates using an electromagnet and actuates a cylinder with a valve. The fuel pump is designed for use on carburetor cars of any brand, which makes it a universal element of the fuel system, regardless of the standard fuel pump. The body is sealed and riveted.
In fact, this is a disposable pump, but with the help of sandpaper you can grind off this edge and disassemble it.
Some craftsmen even repair it. There are 2 common breakdowns. This is a burnt element in the circuit, or damage to the rubber valve. But often they are not repaired, they just buy a new one.
Examination
Checking the fuel pump is quite simple, since the fuel tank in the 2107 is easily accessible and access to the fuel pump glass is very convenient, checking the fuel pump will not be difficult.
Checking this part consists of measuring the fuel pressure and the performance of the pump itself.
Electrical check
To make sure the pump is working, turn on the ignition and listen for a characteristic buzzing sound in the tank. If this does not happen, the fuel pump fuse may have blown, or the pump itself may have failed.
The fuel pump fuse on the VAZ 2107 is located under the glove box of the car and has the number F3, and the rated current of the fuse is 15A. It is necessary to install a fuse only of equal rating.
If the fuse is intact, then you need to check the presence of power at the pump connector; to do this, you need to remove the block and use a multimeter to measure the presence of voltage.
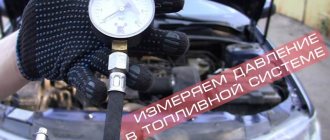
Pressure check
To check the fuel pump, you need to check the pressure that it pumps into the system; for this you need a pressure gauge, which is connected to the fuel rail fitting through a rubber hose.
- To do this, remove the cap from the fuel rail and unscrew the spool from it;
- We connect the pressure gauge through the hose and fasten it with a clamp;
- We start the car;
The pressure in the system should be from 2.7 to 3.3 bar, if less the fuel pump needs to be changed. It should also be noted that the culprit of low pressure may be the RTD.
Disassembling the fuel pump
- First you need to start disassembling. The next step is to clean all the elements. Cleaning liquid or kerosene in combination with a rag or brush is perfect for this. We can leave more thorough cleaning for later; after all, you will still have to wash the inside of the pump.
- We begin disassembly by unscrewing the sump cup - usually this is the nut at its tip. Then remove the filter from the mesh and the seal of the glass. Now we can knock out the lever pin - not to make a mistake with the lever axis, however, this one is usually sealed, we knock out the last one, passing through both sides of the base. Now we can remove the lever with the diaphragm arm, spring and axle bushing.
- Sometimes you have to move it up and down to get it out. The next step is to unscrew the case from the base - for this we unscrew 6 screws around. It may be that it is not easy to detach both parts - try touching one or the other until it releases. However, we do not insert sharp objects between them, as we may damage the membrane, which may be needed. Separating the two parts, you will see a diaphragm with a spring at the base of the pump and valves in the housing.
- We can now remove the seal seat, gasket and washer from the diaphragm cable by releasing the spring. As you might guess, in order to remove the valves, it is enough to unscrew the two screws securing the fork. If the valves do not fall out on their own, you will have to carefully pry them off with something. First you need to start disassembling. The next step is to clean all the elements. Motor washing liquid or kerosene combined with a cloth or brush will work well. We can leave more thorough cleaning for later; after all, you will need to clean the inside of the pump as well.
Price
The price of a fuel pump for a VAZ 2107 can reach 2,000 rubles for an original part, but there are many analogues on the market that cost from 1,000 rubles.
Article and characteristics
| Parameter name | Data |
| vendor code | 21073.1139 |
| Operating voltage, (V) | 13,5 |
| Productivity, (l/hour) | 60 |
| Maximum pressure, (bar) | 10 |
| Rated operating current, (A) | 6,5 |
Fuel pump selection
The designs of pumps for the VAZ-2107 differ from different manufacturers. Over the years of using cars, specialists and lovers of classic cars have developed their own point of view on the state of the spare parts market.
For injector
Many VAZ owners of the classic line prefer to install suitable parts from imported cars on their cars.
The fuel pump for the “seven” (21073-113909-02 VAZ-2107 engineer 7246 TSN) can be replaced, for example, with a unit from Honda Original and other brands.
Replacement numbers:
- 17040S50930;
- 17040S3A000;
- 17708SFB013;
- 17040S2R000;
- 17040S2K000.
The cost of analogues is often lower than the price of Russian manufacturers and higher in quality. An electric pump for Honda can be bought for 800-900 rubles, and the original unit costs 1250-1390 rubles.
For carburetor
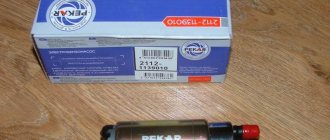
With carburetor versions of cars, you can choose the domestic manufacturer DAAZ, a subsidiary of VAZ from the city of Dimitrovgrad. But most car enthusiasts consider PEKAR fuel pumps to be the most appropriate for the price/quality ratio.
Owners of classic VAZs note that fuel units from DAAZ differ in engineering errors - vapor locks often form, pumping does not work in cold weather, and they heat up in summer.
PEKAR pumps are more expensive - about 1000 rubles. The DAAZ product can be purchased for 600 rubles. Accordingly, the price of the repair kit also differs: PEKAR - 350 rubles, DAAZ - 120 rubles.
Replacement
Replacing the fuel pump on a VAZ 2107 will not cause any difficulties if you follow the instructions below, even for a person far from car repair.
To replace you will need:
- Open-end wrench “7” mm;
- Open-end wrench “10” mm;
- Open-end wrench “17” mm – 2 pcs.;
- Flat and Phillips screwdrivers;
Replacement instructions
Relieve the fuel pressure in the system. To do this, remove the fuel pump fuse F3, then start the car engine and let it run until it stalls;
- Remove the negative terminal of the battery;
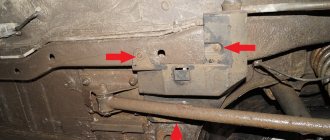
- We unscrew the fuel tank fastenings for ease of work;
- We unscrew the fuel pipes with two “17” mm wrenches;
- Remove the excess pressure relief tubes;
- We move the fuel tank to the side;
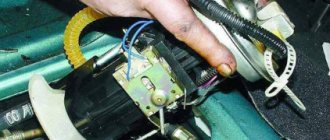
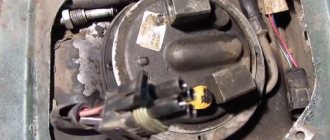
- Disconnect the power connector from the fuel pump glass;
- Unscrew the nuts securing the cup to the fuel tank body with a 7 mm wrench;
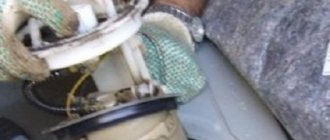
- We take out the glass along with the fuel pump;
- Unscrew the fuel hose clamp from the pump;
- We install the new fuel pump in the reverse order, not forgetting to install a new mesh;
Fuel pump assembly
Fuel pump assembly
Essentially, there are no more parts that can wear out or cause problems. Assuming that we have everything we need, we proceed to assembly.
- We will need the following gaskets: for valves - it is best to earn extra money in the same way as the old ones, and for the sump bowl - you need to buy or add additional ones. Cork gaskets are best suited, but you can often find rubber gaskets in stores - they will also perform their function. We begin the assembly by connecting the lever to the diaphragm arm by inserting the bushing. It's worth using a little lubricant. Then we insert all this into the hole of the lever and, having positioned the holes of the bushing and the pump base in an axial manner, drive in the pin.
- If everything moves correctly, without resistance we can install the diaphragm with spring and socket. We insert the assembled assembly into the base of the pump, paying attention to which direction the diaphragm rod hole faces. When compressing the spring, it is necessary to pass the cable so that the tip of the hand passes through its hole. At this point we have the pump base filled, it's time to take the housing.
- We install the valves keeping in mind the gaskets and making sure the valves are mounted with the good sides in the holes. We screw the clamp to press the valves to the body and secure them correctly. Their opening direction must correspond to the direction of flow. So we have the complex main parts - the body and base, which we now screw together, installing the body in the correct position to the base, as it was before dismantling - the technical drawing is best to help.
- After properly twisting all the housing bolts alternately, press the sump seal into the socket, then place the glass and tighten it. With glass sumps, be careful not to break them. If we didn't move the hand pump arm, we basically have a complex pump, if it was disassembled, it needs to be reassembled, keeping in mind the proper mounting of the axle. Now all we have to do is check the functionality of our device. To do this, it is best to pump a little gasoline, thereby flushing the inside of the pump from any remaining water or kerosene with which we washed the parts. You need to make sure that the fuel does not return!
- After regeneration, we can screw a properly functioning pump to the engine, keeping in mind a fairly thick insulating pad; if it is too thin, we must buy a new one. For installation, we use, of course, new gaskets. The seals between the block and the pump should be additionally lubricated with high-temperature resistant silicone to prevent oil leakage. Now you can enjoy proper engine operation.
Types of systems
For decades, while the VAZ 2107 model was produced (from 1982 to 2012), it was equipped with three types of ignition systems:
- mechanical with contacts - breakers;
- contactless;
- controlled by an electronic unit (ECU).
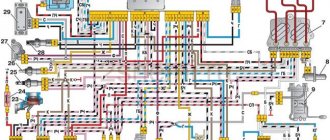
Contact ignition circuit installed in the first VAZ 2107 models
In the mechanical version, the contacts opened by the cam of the distributor shaft break the low voltage circuit, initiating the formation of a powerful pulse in the secondary winding of the coil. This discharge is directed to the electrodes of the spark plug, which ignites the fuel in the cylinder where the piston has risen to top dead center (TDC) and the compression stroke is completed.
Scheme of non-contact ignition of the seven with a carburetor
The contactless circuit operates on the same principle, only the signal to break the circuit is supplied by the Hall sensor, and it is implemented by the switch. Therefore, setting the ignition on carburetor “sevens” is done almost identically. Another thing is cars with an injector, where a new system has been introduced that does not have not only contacts, but also a distributor and any moving parts. Here, the moment of spark formation is determined by the ECU controller, which is guided by the signals of various sensors.
Ignition system VAZ 2107 with injector