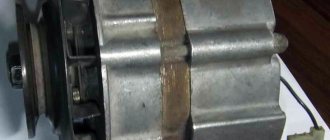
Generator belt
If there is noise under the hood of your VAZ 2109 while driving, replacing the alternator belt will most likely be the solution. What could be causing this? The first reason is that the generator belt tension is weakened. Although you can tighten it on the spot, it is still advisable to finish the movement and return to the garage. Replacing the alternator belt in a VAZ 2109 is a process that you can easily do on your own.
Is it possible to continue driving after the belt breaks?
A broken alternator belt does not mean that the car cannot be driven, but the problem is that the distance you can drive will be short. The batteries will not have enough energy for a long trip, so head to the repair site immediately. If possible, turn off all electrical appliances, lights, audio system, navigation, furnace, air conditioning. Try to turn off and start the car as little as possible - this is an additional load on the battery.
Consequences of driving without an alternator belt
As a rule, driving without an alternator belt does not pose any negative consequences to other engine components and systems. The only thing is that you can completely drain the battery. Also, in some cases, if power steering is provided, the steering wheel may be harder to turn. But in any case, after a break, put everything aside and start installing a new one in order to avoid negative consequences.
It is difficult to give a definite answer to the question of how long a car can drive without an alternator belt. Here, a lot depends on the make of the car, the charge level of the battery and the degree of charge of the battery. In some cases, a car can travel more than half a day, and in others no more than half an hour. But you shouldn’t take risks and experiment; go straight to the place where you can install a new belt that will fit your car.
Install only the drive that is specialized for your vehicle model.
Bosch drive, suitable for many models
Installing a new one does not involve any special difficulties or irreparable consequences and can be done independently or by service station specialists; here the choice is only yours.
diagram of how to check whether the belt is tensioned correctly
Incorrect alternator belt tension can cause a lack of charging. The ability to determine the correct tension force will be useful both for do-it-yourself repairs and if the low battery level indicator lights up on the dashboard.
What does tension affect?
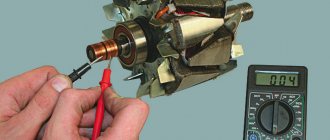
Excessive force will lead to rapid failure of the generator bearings. A breakdown in the initial stage manifests itself as a hum from the generator. When replacing a belt, it is advisable to check the condition of the bearing. To do this, unscrew the pulley by hand. Rotation should occur evenly and silently. If a hum still appears during engine operation, you can remove the belt, and then for 10-15 seconds. start the engine. This way you can determine whether the noise is coming from the alternator bearing or timing rollers.
Insufficient tension leads to belt slippage and accelerated wear. The first sign of such a malfunction manifests itself as a squeak when cold or when wet. Excessive stretching will result in no charging
That is why it is important to know how to check the tension of the alternator belt
Types of construction
There are two types of generator drive:
- individual - the generator is connected to the crankshaft pulley by a separate belt drive. The tension is carried out using a special adjusting bolt, the rotation of which will move the generator away or closer. In other cases, the force is regulated by the position of the body;
- common - one service belt is used for the generator, crankshaft, cooling system pump and power steering pump. In this case, the force is set automatically by the tensioner, which is fixed with a special roller.
How to determine the correct tension level:
- Using a ruler, the difference between the resting and tensioned positions is measured. In this case, the applied force, the measuring point, as well as the standard difference are indicated in the vehicle repair and operation manual. The photo shows a diagram for a Chevrolet Niva. You can measure the tension at points A and B, that is, in the middle between the pulleys in the most convenient place for you. The measured value for point A should not exceed 10-15 mm, and for point B – 12-17 mm. The applied force (98.1 N, that is, 10 kgf) can be measured by tensioning the belt using a hand-held spring scale;
- twist test. If you do not have accurate information about tolerances, you can use the traditional method. It is considered that the generator belt is tensioned correctly if it cannot be twisted around its axis by more than 90º in the middle of the generator pulley and the crankshaft. The degree of effort exerted is difficult to describe, but with experience this feeling comes automatically;
- using a frequency meter. Owners of VAZ cars have probably heard about the Lada Norma-Pinar device. The device is designed to measure vibration frequency. The data obtained allows us to determine the degree of tension. To check, you need to bring the sensor to the belt, and then run your finger along it, like along a guitar string. The automaker regulates the normal frequency for each internal combustion engine model. This method is used infrequently, since purchasing a device for repairing a personal car is impractical. But such a device can be built with your own hands.
Tension
Let’s look at how to properly install a car’s alternator belt using the example of two types of construction:
- loosen the tensioner bolt by unscrewing the locknut. Rotating the bolt itself will tighten and loosen the belt. After setting the tension, secure the tensioner bolt with a wrench and tighten the locknut;
- loosen the bolts securing the generator to the brackets. Place a pin between the generator housing and the engine. Pull the belt using lever force, after which you can tighten the generator fastenings;
- in systems with a single service belt drive, tensioning can be carried out automatically. The design contains a special tensioner, to loosen it you need to loosen the roller bolt and then remove the tensioner using a wrench.
In the case of a ripple belt, start and stop the engine before making a final check of the tension level. This will ensure that the belt is in the correct position in the pulley grooves.
—:
| Checking and replacing the switch on a VAZ 2108, VAZ 2109, VAZ 21099 car. VAZ 2108 ignition switch LED road signs Popularization of the Moskvich brand UAZ Hunter - a military classic in a modern interpretation PAZ 32053-04 - the most reliable bus Engine running and testing Personal experience in choosing tires Easy movement of cargo |
Checking and repairing the starter on VAZ cars Engine suspension Replacing the front wheel bearing Car mats, production features. Life is movement. Film for the body of a car Used auto parts for foreign cars are an affordable alternative to new parts Tools in a car are a simple necessityAll about the Moskvich 412 BMW repair at the best prices Microloan for car owners Replacing brake fluid yourself using the example of Nissan Quashquai How to recognize which engine is installed on a VAZ car DVR: why is it needed and which one is better to choose? Rent a wedding car The most common causes of malfunction of the VAZ-2101 Police gentlemen Review of the Cubex V45 DVR from NeolineFord Aspire. Mission impossible? Trucks require special attention. About transport logistics Mechanical anti-theft systems What kind of tuning for VAZs is in fashion in 2015 How to connect DRLs to Largus? Safe storage service in Moscow Cargo transportation using Gazelle Choosing xenon headlights for a car Types of hood deflectors Advantages of a car store market.ria.com Summer tires that suit most carsThe situation on the truck market in RussiaQuality Citroen spare parts wholesaleWindshield protectionFeatures and advantages of summer tiresHow to install a deflector on the hoodMake money on a car in slot machinesTuning for Mercedes BenzATV safari - a great vacationUsing a car DVRNewborn in a carGarbage removal in ShchelkovoHow to evaluate competence and honesty sellerPreparing your car for a big tripSagging car doors - how to avoid?Choosing an ATV is a responsible stepSlot machines are an innovation or a traditional form of entertainmentCasinos in ChinaThe cost of painting is influenced by many different factors, each differentlyHow to learn to competently control your expenses in an online casinoAmericans will be able to bet on the OlympicsHow to play casinos without fear Helped me How to install a tow bar? Registering a car with the traffic police: what do you need to know? Mobile tire fitting is simple and convenient. How to choose the perfect car mat? Features of summer tires Luxury SUV Formula 1 pilot started testing tires How to take a Mazda car on credit New Jeep Cherokee Diesel Choosing GPS navigator How to replace pads in a Lada-Kalina car Compare Niva and UAZ on highways and off-road Buy a used Scania tractor in specialized centers at competitive prices How to choose wheels for a VAZ? How to repair a VAZ steering rack How to give a second life to a car interior Do-it-yourself tire repair: how to fix a puncture How can you find the ideal service station for your car? Two main attractions of the Moscow KremlinIveco daily air suspensionHow to check the operation of a car engine?How to choose a floor plinthThe main failures of the iPhone 5 and ways to solve themTypical problems of the VAZ-2110 carHow to choose a piston compressor?Routine diagnostics during pregnancyWhat weights are used for pipelines?Review of standard bearingsHow to look slimmer: dress correctlyAll about Maintenance for Lada Largus The most favorable air tickets are on Tickets.by Professional repair of hydraulic cylinders Quick call for a tow truck with the application from the CarTaxi company What features do alarm systems with auto start have?
How to replace the alternator belt?
Timing belt marks engine 4e. replacing and adjusting the timing belt by tags: Toyota Corolla. step-by-step instructions for replacing the belt
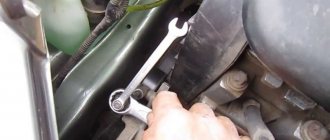
Removal: 1) First, slightly loosen the main nut securing the generator.
Note! Perform the same operation with the lower nut! (“Where is the bottom nut?”)
2) Now, holding the generator with your hand, move it a little closer to the block. 3) And then remove the generator belt from all the rollers.
Installation: 1) The first thing to do is put a new belt on all the rollers. 2) Using your hand or a mounting spudger, move the generator away from the block.
3) And then, holding the generator with your hand or with a mounting spatula, tightly tighten the main nut securing the generator.
Checking the generator belt tension:
1) When you have already tightened the belt, take and bend its middle, with medium force.
Important! 1) Remember, the generator belt should not bend less than “10 mm”, and more than “15 mm”!
For newbies! Question: Where is the main, as well as the lower, mounting nut of the generator located? Answer:
Periodically, during the operation of the vehicle, it is necessary to check the tension of the VAZ 2108 generator belt and, if it becomes loose, tighten it. A loose belt quickly wears out, and the charging of the battery and, in general, the operation of the entire electrical system of the car deteriorate. At the same time, a strongly tightened belt contributes to rapid wear of the generator shaft bearing.
To check, tighten and replace the alternator belt:
- A normally tensioned belt, when pressed in the central part between the generator pulley and the crankshaft pulley, should bend by one to one and a half centimeters, provided that you press on it with the pad of your thumb. This belt deflection corresponds to 100 N (10 kgf).
- If the belt is loose, too tight or worn, it will need to be adjusted or replaced accordingly. To do this, loosen the tightening of the generator mounting nuts, then push it up a little and, if necessary, remove the belt. We put on a new one and adjust it.
- To adjust, you need to slightly tighten the generator mounting nut so that it moves along the adjustment bar with little effort.
- We press the generator with the help of a mounting spatula and achieve the desired belt tension, after which we tighten the upper nut securing it to the adjusting bracket, and then the lower one.
After the belt has been adjusted, it is necessary to turn the crankshaft a few turns and check the tension again and, if necessary, make additional adjustments. At this point, the repair work on adjusting and replacing the VAZ 2108 generator belt is completed.
If your belt breaks on the road, then as an option to get to a car repair shop, you can use the rubber from the inner tube, which must be cut to a thickness slightly larger than the width of a standard belt and pulled onto the crankshaft and generator pulley. You can also use regular rope or women's tights. Also, do not forget to reduce the current consumption in the system by turning off as many consumers as possible.
Sources
- https://vaz-russia.ru/remont-vaz-2108/zamena-remnya-generatora-na-vaz-2108-vaz-2109-vaz-21099.html
- https://vaz-russia.ru/remont-vaz-2108/zamena-remnya-generatora-na-vaz-2108-vaz-2109-vaz-21099-2.html
- https://zubilovaz.ru/remen-generatora-vaz-2108
Now comes the fun part - installing a new belt.
We check that all marks match. We first place the belt on the crankshaft and pump. Then we tighten the right descending branch of the belt and put it on the camshaft pulley and tension roller. We check all the marks again and tighten the belt with a roller. The tension is considered sufficient if, with the force of two fingers, you can twist the longest branch of the belt by a maximum of 90 degrees. It’s easier to take the right branch of the belt with two fingers and twist it, if more than 90 is not very bad, but less is very bad. An overtightened belt will wear out quickly and will also reduce the life of the pump.
We place the bottom protective plastic cover. And on the crankshaft pulley we mark the twentieth tooth after skipping two teeth. We count counterclockwise.
This mark corresponds to the top dead center of the first cylinder. We put the pulley in place and the mark should be against the crankshaft position sensor. More precisely, against the small iron core of the sensor. Sometimes it gets into the gap between the teeth, this is considered acceptable. We tighten the pulley in the same way as we unscrewed it, with the help of a partner.
We turn the crankshaft two turns and check the marks; this is where our mark on the pulley comes in handy.
If everything is in trouble, we collect everything that we took apart. As they say in smart books, install the parts in the reverse order of removal. Don't forget to add antifreeze.
We start the car, accept congratulations from family and friends and head off to adventure.
How to replace the alternator belt?
Timing belt marks engine 4e. replacing and adjusting the timing belt by tags: Toyota Corolla. step-by-step instructions for replacing the belt
Removal: 1) First, slightly loosen the main nut securing the generator.
Note! Perform the same operation with the lower nut! (“Where is the bottom nut?”)
2) Now, holding the generator with your hand, move it a little closer to the block. 3) And then remove the generator belt from all the rollers.
Installation: 1) The first thing to do is put a new belt on all the rollers. 2) Using your hand or a mounting spudger, move the generator away from the block.
3) And then, holding the generator with your hand or with a mounting spatula, tightly tighten the main nut securing the generator.
Checking the generator belt tension:
1) When you have already tightened the belt, take and bend its middle, with medium force.
Important! 1) Remember, the generator belt should not bend less than “10 mm”, and more than “15 mm”!
For newbies! Question: Where is the main, as well as the lower, mounting nut of the generator located? Answer:
Periodically, during the operation of the vehicle, it is necessary to check the tension of the VAZ 2108 generator belt and, if it becomes loose, tighten it. A loose belt quickly wears out, and the charging of the battery and, in general, the operation of the entire electrical system of the car deteriorate. At the same time, a strongly tightened belt contributes to rapid wear of the generator shaft bearing.
To check, tighten and replace the alternator belt:
- A normally tensioned belt, when pressed in the central part between the generator pulley and the crankshaft pulley, should bend by one to one and a half centimeters, provided that you press on it with the pad of your thumb. This belt deflection corresponds to 100 N (10 kgf).
- If the belt is loose, too tight or worn, it will need to be adjusted or replaced accordingly. To do this, loosen the tightening of the generator mounting nuts, then push it up a little and, if necessary, remove the belt. We put on a new one and adjust it.
- To adjust, you need to slightly tighten the generator mounting nut so that it moves along the adjustment bar with little effort.
- We press the generator with the help of a mounting spatula and achieve the desired belt tension, after which we tighten the upper nut securing it to the adjusting bracket, and then the lower one.
After the belt has been adjusted, it is necessary to turn the crankshaft a few turns and check the tension again and, if necessary, make additional adjustments. At this point, the repair work on adjusting and replacing the VAZ 2108 generator belt is completed.
If your belt breaks on the road, then as an option to get to a car repair shop, you can use the rubber from the inner tube, which must be cut to a thickness slightly larger than the width of a standard belt and pulled onto the crankshaft and generator pulley. You can also use regular rope or women's tights. Also, do not forget to reduce the current consumption in the system by turning off as many consumers as possible.
Sources
- https://vaz-russia.ru/remont-vaz-2108/zamena-remnya-generatora-na-vaz-2108-vaz-2109-vaz-21099.html
- https://vaz-russia.ru/remont-vaz-2108/zamena-remnya-generatora-na-vaz-2108-vaz-2109-vaz-21099-2.html
- https://zubilovaz.ru/remen-generatora-vaz-2108
Installation
Now directly about how to return a new timing belt to its place. There is nothing complicated here either, but we still recommend watching visual videos and studying the instructions.
- As soon as you have examined the condition of the unit and decided to change something, proceed to assembling the mechanism.
- It is easier to do the work so that all the inscriptions are turned in your direction, that is, towards the right wing of the car.
- Replace the pulley unless it needs to be replaced.
- Next, put on the belt. Moreover, it should be put on the lower gear first, and then on the upper one. Not the other way around.
- Make sure there is no sagging.
- Place the timing belt behind the water pump and tension pulley.
- Tighten the tension roller using a special wrench.
- If you do not have such a key, use a simple key and a screwdriver.
- Be sure to adjust your new strap properly. The adjustment is carried out until the moment when you can no longer turn it at an angle of more than 90 degrees. This is the best option for tightening the strap for the VAZ 2109.
- Turn the pulley several times. This will ensure that the marks on the timing gear and flywheel are in the correct position.
- If for some reason the tags do not match, we have bad news. You will have to remove the strap again and adjust the position again.
Reassembling the unit The main difficulty in replacing a timing belt is not the complexity of the processes being performed, but the time that needs to be spent on repairs.
A competent approach, attentiveness and the use of a high-quality new belt will allow you to easily restore the operation of the gas distribution mechanism and save hundreds of rubles on visiting a car service center.
Loading …
When to change the drive belt on a car?
One of the main problems when belts used in various types of drives wear out is the presence of extraneous sounds that arise during operation.
The task of the installed pulleys is to transmit rotational motion to the attachments of the power plant.
If you get into such a situation, one or more belts may break. When should you change the drive belt to avoid getting into a difficult situation?
Belt drive. The drive belt on a machine is a part of the belt drive necessary to be able to transmit rotation from the motor.
The process is ensured by the action of friction or meshing force, for which V-shaped or timing belts are used. The opinion that the timing belt does not belong to the drive belt is also incorrect.
Drive belts are divided into several groups:
- Timing belts, which is a belt transmission of the gas distribution mechanism;
- Belt drives of auxiliary systems, that is, engine attachments.
There are three types of belts used on cars:
- Timing belt having a toothed shape;
- Poly V-belt, the purpose of which is to transmit rotational motion from the power plant to attachments;
- V-belt with a similar purpose.
In Russia, these types of belts also have second names - flat (for poly-V-ribbed) and rivulet (for V-belt).
The difference from the timing belt is that it requires more careful attention and timely replacement as planned. Despite this, they also have their own time frame within which they must be replaced without waiting for failure
The occurrence of a squeak or whistle becomes a sign that the belt may have become loose and is slipping along the pulleys.
Consequences of cracks in the drive belt. If there are such defects on car drive belts, cracks or abrasions will appear on them. Another sign of this type of breakdown is a whistling sound during operation. This indicates that the belt requires replacement. If replacement is not carried out in time, the associated equipment will stop working. For example, if its service life has expired, then after some time it will break.
Typically, if the drive belt breaks, a loud bang will be heard from under the hood. For example, if the alternator belt breaks, no current will be supplied. The corresponding symbol will light up on the instrument panel.
The second consequence of a break is the cessation of operation of the power steering, which can make it more difficult to rotate the steering wheel. But the most serious consequence can be a break in the belt that rotates the water pump, which makes it impossible for cooling fluid to circulate throughout the engine. In this case, it will overheat greatly. The machine must be stopped and measures must be taken to eliminate the breakdown as quickly as possible.
Bottom line. A product of this purpose can last quite a long time on modern cars, and the mileage is approximately 25 thousand kilometers. In reality, the service life of this type of belts differs from the declared one. Much also depends on the correct installation.
Belts installed on the drive may have their own shelf life when stored in a warehouse. That is why, when stored for more than 5 years, chemical changes begin in them, which will not allow this part to work out the required amount of kilometers.
Ten years of success. Report from
See all photo news >>
Modern production technologies and advantages of Bosch components
The use of high-quality synthetic materials in the production of Bosch belts allows for reliable operation of the drive system and long service life. In research centers, scientists and developers are using the latest polymer bases, and are also developing methods for connecting different structures into a single external form. Bosch produces both poly-V-ribbed and bevel-toothed belts, which provide a high coefficient of friction and transmission of the required torque. The engines of modern cars are becoming more and more compact. Reflecting this trend, manufacturers are increasingly eliminating tensioners in accessory drive systems, preferring to use high-tech multi-V belts with an elastic backing. They have become a suitable technical solution and are used in many modern car models.
As a company with direct contacts with engine developers and car manufacturers, Bosch has the most up-to-date information on the technical requirements of drive systems. That is why the characteristics of Bosch belts clearly correspond to factory parameters.
Taking into account the specifics of vehicle operation, the temperature and chemical stability of the materials used in the manufacture of belts is taken into account. Bosch components perform just as reliably in the hottest climatic conditions of the equator as in polar latitudes. In the latter, maintaining the vehicle’s energy balance is a primary task for service station repairmen
Over many years of operation around the world, Bosch drive belts confirm their best qualities. In addition, Bosch belts meet the highest demands on wear resistance. This ensures uninterrupted operation of the auxiliary drive system for a long time.
In the latter, maintaining the vehicle’s energy balance is a primary task for service station repairmen. Over many years of operation around the world, Bosch drive belts confirm their best qualities. In addition, Bosch belts meet the highest demands on wear resistance. This ensures uninterrupted operation of the auxiliary drive system for a long time.
Extending the life of the alternator belt
So, in order for the alternator belt to last a long time, you need to take care of it. Carefully check for debris and dirt in the belt tracks. Check the tension of the alternator belt promptly and carefully. A properly tensioned alternator belt should rotate 90 degrees. A too-tightened alternator belt will quickly become unusable and lead to a series of breakdowns. The consequences of a tightened belt can be sad. This is mainly the failure of the bearings of the generator, pump, air conditioning clutch and power steering. If the alternator belt is not tightened, the belt may squeak when the headlights or air conditioning are turned on, that is, when a load appears on the belt, it will slip along the pulley, which will quickly render it unusable. It is advisable to buy belts from trusted manufacturers and only ones suitable for a car of a specific brand. It is not recommended to install used belts.
Excessive tension
Replacing the idle speed control on a VAZ 2108, 2109, 21099
A very strong tension will also not lead to anything good. An increased load appears on various rubbing parts of additional mechanisms. The first sign of constriction is an unpleasant hum. Most often, the generator belt tension roller makes noise. But this is the least of the troubles that can happen. It is much worse when the bearings of the generator, air conditioning compressor or power steering, or the bushing of the water pump begin to make such noise. In these cases, repairs will be much more serious and expensive.
Therefore, adjusting the tension of the alternator belt is a very important element in vehicle maintenance. Even if automatic tensioning is installed, such as on the J20a engine or Peugeot 306, it is necessary from time to time to check the special marks on the belt tensioner housing, indicating the time for replacement if necessary.
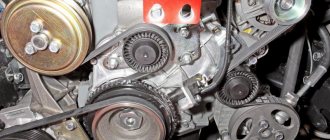
Replacing the VAZ 2109 timing belt: timing marks, subtleties and nuances
Checking the generator belt tension: how to prevent breakage
Unlike a timing chain drive, in cars with a belt drive, it is the timing belt that is quite the weak point. If a break occurs, the engine will not only stop working, but may also require serious repairs. The reason is that on many engines the valves bend when the timing belt breaks, with all the ensuing consequences.
To avoid problems, the condition of the belt and rollers must be monitored, and the timing belt must be changed strictly according to the regulations.
In this case, it is important to correctly align the timing belt
Next, we will look at how to change the VAZ 2109 timing belt, as well as what timing marks on the 2109 timing belt you need to pay attention to when replacing in order to install the belt correctly
Dismantling
To correctly replace the timing belt, you first need to dismantle the element. The process can take quite a lot of time, although the work itself is not very difficult.
- Remove the casing covering the belt, pulleys, dismantle the tension roller and other elements related to the gas distribution mechanism.
- The cover is held in place by three mounting bolts, so removal should not be a problem.
- Remove the alternator belt. This will give you access to the desired object - the timing belt. To do this, lower the retaining bolt down a little and move the generator towards the engine. This will loosen the belt, making it easy to remove.
- Align the gas distribution mechanism to the marks. First you need to install the crankshaft in the required position. This is done by turning it and looking through the hatch on the clutch housing.
- Stop rotating as soon as the mark on the crankshaft flywheel aligns with the marks on the housing. This indicates that the piston of the first cylinder is at TDC - top dead center.
- Make sure that the mark on the camshaft gear is aligned with the mark on the metal housing.
- Having set the marks, you can begin the procedure of dismantling the old worn timing belt.
- Release and move the tension roller to the side. This will release the tension on the strap. As a result, it can be removed from its position.
- Next you need to remove the belt from the crankshaft gear. To do this, the pulley is first removed.
- There should be no problems with dismantling the pulley, since it is removed this way. First remove the right wheel, turn the steering wheel to the right and you will gain access to the side shield. The shield is removed, and behind it is the crankshaft pulley. Relevant for carburetors and injectors.
- If your VAZ 2109 has an injection engine, you will need to fix the crankshaft to remove the pulley. It is not difficult to do such a procedure. Insert a long screwdriver into the special hatch where the flywheel mark is located. This will lock the crankshaft in the required position, so you can easily unscrew your pulley.
- On a carburetor VAZ 2109, fixation should be performed directly on the pulley.
- Before you begin removing the timing belt, examine the condition of the water pump and tension pulley. You should also check whether the axis of the tension roller and timing gear are in good condition.
- If there is damage, defective elements must be replaced.
- Check the current condition of the camshaft and crankshaft seals.
Methods for eliminating belt eating
Below are examples of eliminating the causes of belt wear and eliminating the causes of belt eating.
Fake belt
A poor-quality belt may be the culprit of the problem; in order to check this, you need to turn the belt over and try to start the engine; if the belt starts to slide in the other direction, then most likely the plane of the belt is uneven and has a cone shape, which leads to it slipping and being eaten. This problem is treated by replacing it with a new, higher quality belt.
Incorrect tension
The timing belt must be tensioned as recommended by the manufacturer. This information can be found in specialized books on VAZ car repairs or on the Internet. Over-tightening the belt places a load on the bearings and can cause wear on both the rollers and the pump.
crooked hairpin
As a result of the efforts when tightening the roller, it happens that the roller pin becomes slightly bent and, as a result, the roller tilts. This problem will lead to belt misalignment.
Thread damage
Damage to the threads, as well as bending the stud, can change the trajectory of the belt. This problem is solved by unscrewing the stud and running the threads with a sword. In the worst case, it is necessary to dismantle the cylinder head to bore or restore the threads.
Water pump
When the pump receives any damage or wear, no action other than replacing it can be taken. If the culprit is the pump, it must be replaced.
Pump misalignment
The problem is that when installing a new pump, most car enthusiasts often use sealant or do not clean the surface of the old gasket. All these points can affect the tightness of the water pump to the block body, which can affect the trajectory of the timing belt. You should thoroughly clean the surface on the cylinder block from the remains of the old gasket and do not use sealant; just install the gasket that comes with the pump.
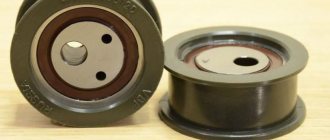
Working on rollers
The rollers, like the pump, are subject to aging and wear, and in case of such problems, the rollers only need to be replaced; any other methods of correcting belt wear due to the rollers are impossible
Camshaft gear wear
The camshaft gear is made of soft metal, which can quickly wear out and wear out. Most often, the gear wears out already at a mileage close to 150 thousand. If this problem occurs, the gears must be replaced.
Crankshaft gear
Most often, the crankshaft gear wears to a cone and the belt begins to move outward, which leads to friction on the spacer washer between the gear and the accessory drive pulley. Because of this situation, the belt can squeak and howl, and in most cases of this situation, the belt eats up.
- Where is the temperature sensor located on the Daewoo Leganza?
- Where is the battery located on a Toyota Hiace?
- Speedometer Ural 5557 does not work
- Replacing the power window cable on a Mazda Demio
- VAZ 2110 fuel pump device
If the timing belt breaks
In those cars, when the camshaft freezes, the crankshaft continues to rotate with a strong blow to the pistons, bending and breaking the valves that were open at that moment. And this led to quite expensive repairs. In later engine models with a volume of already 1.5 liters, this no longer happens, thank the designers. But still the feeling is not pleasant. However, there is no need to panic. Of course, you can tow the car to a service station, pay the technicians and wait for the result. But if you have a little patience and skill in working with keys, you can do this repair yourself.
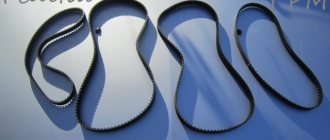
Types of alternator belts
data-full-width-responsive="true">
Two types of belts are used to drive the generator.
The first type of drive belt is a regular V-belt. Often this type of belt is used on cars that were produced earlier. These belts are used on cars where the drive from the crankshaft pulley was carried out only by the generator. The disadvantage of this product is the high probability of slipping.
Alternator V-belt
One of the variants of the V-belt, which replaced the usual one, is the toothed one. The timing belt also has a V-shaped profile, but it has teeth on the inside. These teeth provide improved power transmission and less slippage. However, it is also used on cars in which the drive from the crankshaft pulley is carried out only by the generator.
Tooth type generator belt
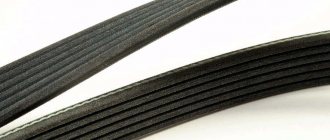
The second type of drive belt, which is increasingly used on cars, is a poly-V belt, also known as a multi-ribbed belt. This type of belt is much wider than a V-belt, but thinner, which provides it with greater flexibility. Several grooves were made on the inside, the profile resembling a wedge, but small in size. Because of these grooves, this belt received the popular name - multi-groove.
Alternator serpentine belt
High flexibility allows it to be used to drive a generator, as well as other attached engine elements - hydraulic booster, liquid pump and compressor.
All types of belts are made according to the same principle - the main material is special rubber, inside which 2-4 layers of strong reinforcing thread are placed.
When to replace
The VAZ 2109 alternator belt is replaced every 10-15 thousand kilometers or after six months of operation of the vehicle. Such recommendations are given in all technical applications for vehicle operation. The alternator belt on a VAZ 2109 is replaced when rips, peelings of rubber and the top fabric covering are detected on it, which are formed when lubricating oil gets on it
Therefore, it is so important to replace the belt on time and constantly inspect it. The alternator charging pulley rotates through the belt.
The principle of operation of the generator is the conversion of mechanical energy into electrical energy; simply put, the battery is recharged. Because of this, the belt plays the most important role in the operation of the machine. When it is stretched and incorrectly adjusted, the battery is not fully charged.
Preparation
The presence of at least one of the points listed above forces the car owner to prepare for repair work. Replacing the VAZ 2109 timing belt does not require special conditions (inspection hole, overpass), complex tools, or expensive devices. It is enough to have a flat area, good lighting, the usual set of open-end and socket wrenches (including a cylinder and spark plug), a flat-head screwdriver, a jack, a spare belt, and a tension pulley. The only exception is the adjusting device for turning the eccentric around the axis and then securing it with a nut. If there is no tension unit, screws of the appropriate diameter are inserted into the holes to help keep it from turning with a screwdriver. It is more convenient to carry out the event together. The assistant can be useful for pressing the brake and clutch pedals, changing gears, and organizing convenient lighting. You should remember the differences in the designs of the VAZ 2109 car with a carburetor and injector.
What are the signs of a broken belt?
You can determine that the timing belt has broken by the following “symptoms”:
- Abrupt stopping of the engine and inability to start it. Attempts to start the power unit only worsen the situation, since the piston causes new damage to the failed valve.
- After a belt breaks, engine operation may be accompanied by a metallic knock and ease of rotation of the crankshaft by the starter. This is due to the lack of compression in the engine cylinders, as a result of which nothing holds the pistons.
Video: how to determine if the timing belt has broken
The video from the Renault Repair channel describes in detail how to independently determine whether the timing belt is damaged or broken.
LOCATION
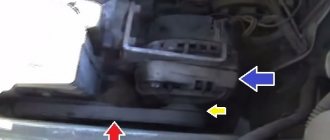
Finding the Alternator belt in a VAZ 2114 is not difficult; when you open the hood, it is immediately visible. There are 2 criteria by which you can easily see it - firstly, it differs from all other belts in that one of its sides is toothed, and secondly, it connects not only the crankshaft and camshaft, but also passes through several small auxiliary parts . If you still don’t understand where it is, let’s first find the generator itself, it is located to the left of the car engine, not far from the right headlight, on the right side of the passenger compartment - accordingly, the belt is located on the generator itself (logically).
Also, before talking about changing, it is necessary to mention that in any case, no matter how carefully the car is operated, and no matter how often you drive it, the alternator belt will begin to deteriorate
Perhaps it will slide, or maybe it will be eaten away, it doesn’t matter, the main thing is that in any case it will become unusable. Therefore, its condition must be monitored very carefully, because no one wants it to break on a long journey
How it works
To better understand why an alternator belt is needed and how it works, it is worth finding out how the engine belt drive system generally functions and what it bases its operation on.
Obviously, the source of everything that runs on a car is the internal combustion engine. As you know, it operates due to the fuel mixture, which is constantly supplied to it during operation. As a result of fuel consumption, be it gasoline or diesel, the engine converts its energy into mechanical energy. First, this energy is converted into translational movement of the pistons in the cylinder, and then through connecting rods this movement becomes rotational.
At the same time, the camshaft moves the valve tappets, which are responsible for the inlet and outlet of the fuel mixture into the corresponding manifolds. Thus, the camshaft controls that fuel enters the cylinders exactly at those moments when the piston frees up the maximum amount of space and the maximum amount of vapor can fit.
The crankshaft - a metal rod of a relatively small diameter - is precisely the element that is responsible for transmitting dynamic characteristics from the engine to the wheels and serves to drive all mechanisms that are tied to additional equipment and ensure their long service life. Such equipment can be a power steering pump, an air conditioner and, of course, a generator, which supplies all electrical systems of the car with current and recharges the battery.