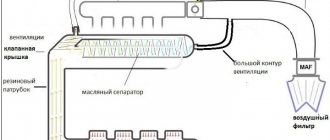
The crankcase ventilation system of the VAZ 2108 2109 21099 engine is designed to ventilate the crankcase from gases escaping from the cylinders. From the crankcase, gases flow through a hose into the valve cover, where they pass through the oil separating network and are drawn into the carburetor air filter. If the oil separator filters are dirty and oil no longer settles on them, oil will end up in the carburetor air filter. If the air filter is filled with oil, the crankcase ventilation system must be cleaned. But as a rule, many often do not do this, but disconnect the hose between the valve cover and the air filter and direct it to the side. The hole in the air filter is plugged with a champagne cork - and everything is in order. The air filter seems to be clean and no more oil is coming out. However, that's it for now. Sooner or later, the crankcase ventilation system will become completely clogged, then the VAZ 2108 2109 21099 engine will begin to press oil. Typically, it goes to the distributor through the camshaft oil seal.
Presses oil into the VAZ 2109 distributor
In general, the preconditions for cleaning the crankcase ventilation (ventilation) system are as follows: - Air in the oil filter; — The bunker is in oil. The procedure for cleaning the window of a VAZ 2108 2109 21099: 1) First you need to disconnect all the hoses from the engine valve cover and remove the carburetor air filter.
Remove the tubes from the lid
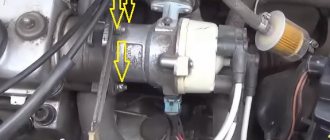
2) Unscrew the accelerator pedal cable clamp from the engine cover.
Unscrew the accelerator pedal cable
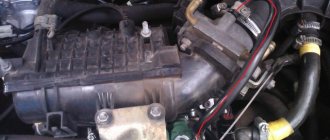
3) Unscrew the two nuts securing the valve cover to the engine and remove it.
Removing the valve cover of the VAZ 2109
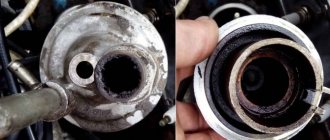
4) The lid will be covered in dirty oil.
Valve cover VAZ 2109
It will be necessary to remove the cover covering the oil separators and clean them of any stuck-on dirty oil.
Remove the oil separator strainer cover
To clean, it is necessary to disassemble the screens and moisten them with kerosene or gasoline until they are cleared of adhering oil.
Ventilation in the oil separating network of VAZ 2109
Some people pour gasoline on the nets and set them on fire: the oil burns, just rinse the nets a little with gasoline and that’s it.
Burn the oil from the network
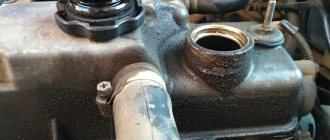
5) You also need to be patient and try to clean the valve cover of the VAZ 2108 2109 21099 from adhering oil, especially the place where the oil separating mesh is installed.
6) There is also a small outlet on the valve cover, which is connected through a hose to the carburetor throttle valve. In my case, it was also completely clogged with hardened oil, and I had to clean the branch with a thin steel wire for about half an hour. 7) Next, you need to replace the clean oil separating mesh of the VAZ 2108 2109 21099 deflector and close it with a lid.
Clean the oil separator network
Before installing the valve cover in place, it is necessary to clean the surface of the motor from old sealant and dirt. It is also necessary to clean the rubber gasket of the valve cover itself. 9) Next, apply a thin layer of sealant around the edges of the valve cover to improve the seal. We put the cover in place and tighten the nuts securing it. 10) Connect all the hoses, connect the accelerator pedal cable and put the air filter in place. 11) For best seal, it is best to let the sealant dry for a couple of hours before driving. The work on cleaning the VAZ 2108 2109 21099 deflector has been completed. You will quickly notice that the engine consumes less oil during operation and less oil needs to be added.
Category: Engine and its systems | Tags: VAZ 2109 repair, VAZ 2109 device
Contamination of the oil separator on engines 2108, 21081, 21083 of VAZ 2108, 2109, 21099 vehicles leads to malfunction of the crankcase ventilation system due to a decrease in its permeability and gas removal efficiency. As a result, the crankcase gas pressure increases, which leads to engine oil leakage through the engine oil seals and gaskets.
In addition, the efficiency of cleaning crankcase gases that enter the engine valve cover from engine oil is reduced and they are released into the air cleaner housing, contaminating the filter element, contaminating the carburetor and spark plugs. Hence the “failures”, triple work and other failures.
dirty oil separator screens, its body and valve cover of engine 2108, (21081, 21083)
The procedure for cleaning the oil separator (oil deflector) of engines 2108, 21081, 21083
— Remove the valve cover from the engine
Read more: “Removing the valve cover from the engine.”
— Cleaning from contaminants
We wash the valve cover inside and out with engine oil and deposits with gasoline or diesel. Do not wash the rubber seal as it may break.
— Remove the oil separator (oil deflector)
Using a “10” wrench, unscrew the two bolts that secure the oil separator housing, remove the housing and the underlying oil separator mesh.
— We wash, clean and blow through the grids and the oiler body
For this we use gasoline, kerosene or diesel fuel. Clean the mesh cells with a wire brush. In case of severe contamination, you can use a special brush attachment on the drill and clean it with it. We blow the parts with compressed air (tire pump or compressor).
We also clean the crankcase gas supply and exhaust pipes in the engine valve cover.
After cleaning, install the oil separator into the engine valve cover and install it again.
Notes and additions
— If you detect a leak of engine oil through the oil seals and gaskets of the engine, as well as the appearance of oil in the air filter housing, lubrication of the electrodes of the spark plugs, on engines 2108, 21081, 21083, not only clean the oil separator, but also check all the elements included in the car crankcase system ventilation. See articles below.
More articles about the crankcase ventilation system of engines 2108, 21081, 21083 of VAZ 2108, 2109, 21099 cars
— Cleaning the crankcase ventilation system of VAZ 2108, 2109, 21099 cars
— Oil in the air filter housing, causes
— Increased oil consumption by carburetor engines of VAZ 2108, 2109, 21099 cars, reasons
— Drive oil for oil seals and engine oil seals, reasons
— Blue smoke from the muffler, causes
Replacing the oil pump on VAZ 2108, VAZ 2109, VAZ 21099
Welcome! 1. Have you ever had this happen? You are driving your car and suddenly the warning light comes on, indicating that the oil pressure in the system is low. Many people first go to fill the engine with oil, but after filling they sit behind the wheel and see that the light has not stopped burning, what is the reason?
2. In fact, there can be a lot of reasons here, starting from the oil pressure sensor, which may fail and therefore the oil pressure lamp will light, and ending with the oil pump itself, which may simply be faulty or the parts located in it may work incorrectly. Incorrect operation of parts is treated by repairing the oil pump itself. (How to repair an oil pump, see the article: “Oil pump repair”)
Where is the oil pump located? It is located behind the crankshaft pulley, and because of this, you can clearly see the oil pump only when the pulley is removed from the car engine. Just below, look at the photo, which shows the oil pump itself, which is attached to the cylinder block by six bolts securing it.
Cleaning crankcase ventilation. — logbook Lada 2109 Rhapsody 2000 on DRIVE2
On a warm weekend day I decided to carry out maintenance on the valve cover. I’ve never done anything like this, but after reading it on the Internet, I decided to do everything myself.
So for work we will need: a set of keys, a new valve cover gasket (I bought a white silicone one), new pipes (although you can clean the old ones), 2 new rubber bushings for the cover, a couple of liters of gasoline, a stiff brush, an old toothbrush and a piece of wire for cleaning thin pipe coming out of the lid.
so in order: 1. Remove the pan with the air filter.2. Loosen the clamps and remove the pipes and hoses from the valve cover.3. Using a 10mm wrench, unscrew the 2 nuts securing the cover and the accelerator cable bracket. Remove cover 4. Turn the removed cover over and use a 8mm head to unscrew the 2 bolts and remove the oil separator housing.
taken from Murzilka
5. We take out the grids, I had 6 of them and thoroughly wash everything (the grids, the body and the lid itself from the inside).
taken from Murzilka
Here is a photo of the screens before and after cleaning: Photo of the cleaned valve cover and oil separator: 6. We collect everything in reverse order.
I installed new pipes (easier than cleaning the old ones), a new cover gasket (although the old one was also silicone and was in excellent condition), and changed the oil a bunch, new air and fuel filters.
Price: 1,500 ₽ Mileage: 188,500 km
Insufficient crankcase ventilation can cause oil leakage from the fuel pump.
VAZ 2109 oil leaks from the fuel pump
Below are the points that affect the fact that oil leaks from under the fuel pump:
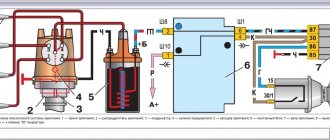
Carburetor engines are equipped with two ventilation systems. The first ensures idle operation, the other operates only at high speeds. They consist of rubber tubes; the lower tube carries gas from the crankcase to the intake manifold. They exit through the upper tube into the air filter box, from there they pass through the idle system and also enter the intake manifold.
Oil in the fuel pump VAZ 2109
The increased revolutions of the crankshaft piston system, producing gases, are ejected into the intake manifold, bypassing the carburetor. This occurs due to the activation of the PSV valve. It shuts off the ventilation when the engine is idling. If the valve does not operate, a poor nutrient mixture is formed.
Oil from a VAZ 2109 fuel pump
The engine vibrates at this moment and then stops working altogether. There is an oil separator screen in the valve cover. It prevents dust-like oil accumulations from the generated gases from entering the valves. When the operating temperature of the engine is high, the oil separating mesh becomes clogged and stops performing its direct functions.
Oil from under the fuel pump VAZ 2109
- Because of this, the pressure under the valve cover increases, and oil accumulates in the intake manifold and in the air filter box. The temperature around the engine rises and it becomes enveloped in smoke. A large channel ventilation tube is inserted into the intake manifold before the throttle valve, a small one with a diameter of 1 mm passes after it.
- Due to its small diameter, this channel tube is susceptible to clogging with oily dust. The small channel provides for the removal of gases from the crankcase when the engine is idling. Large exhaust gases occur when the throttle valve is open. When the channels are contaminated, the removal of gases from the crankcase body completely stops.
Oil under the fuel pump VAZ 2109
Overfilling with engine gases leads to leakage:
seals and gaskets fail.
Cleaning the ventilation
Oil flows from under the fuel pump of a VAZ 2109
For this reason, oil leaks out, and with excess pressure of accumulated gases, it is knocked out under the gaskets of the gas pump. So to eliminate oil leakage, you need to clean all the ventilation ducts in the engine:
- It is necessary to disconnect the hose running from the air filter to the valve cover and remove it.
- There is a metal mesh inside, you should remove it.
- Rinse thoroughly in gasoline.
- Rinse the hose itself and check that it does not have through cracks.
- Remove the hose from the manifold outlet towards the inlet manifold.
Note. There is also a steel mesh there, also clean and rinse it. Do the same procedure with the hose.
- Clean the steel pipes on the cover. If they do not comply with the working condition, replace them with new ones.
- Put all the hoses in their places, twist the clamps.
- Check engine operation at all permissible speeds.
In the same way, you can check the operation of the gas exhaust and ventilation system with the following test:
- Cut out a sheet of cardboard;
- Place it on the oil filler neck;
- Start the engine;
- Increase to 1000 rpm;
- The cardboard should be pressed tightly (due to the rarefied pressure of the engine crankcase).
If the piston group wears out, this speed will not be able to be developed. This means that the flow of the oil mixture will continue. Then it is necessary to carry out a major overhaul of the engine. You can do all the main work to eliminate oil leaks in the fuel pump yourself. We must always count on the success of the work done. To do this you need to watch the video. Please read the attached instructions thoroughly. You should also familiarize yourself with the photos, which indicate the main fragments of the work and show the location of parts, passages, and pipe connections. Carrying out maintenance of the car yourself is necessary after careful, careful study of the supplied materials. As for such services in car services and service centers, the price is quite high.
Reasons why oil flows through the breather
Cleaning the crankcase ventilation system of VAZ 2108, 2109, 21099 cars
The engine oil located there under pressure begins to be expelled through the crankshaft and camshaft seals, the valve cover gasket, its oil filler plug, and is thrown into the air filter housing. As a result, the carburetor becomes clogged, the engine begins to “trouble” and stall, the spark plugs become covered with soot, power and throttle response decrease, engine oil waste increases, etc.
Similar symptoms may occur when the engine piston group wears out (rings, pistons, cylinders), but since you need to start looking for the cause of the malfunction from the simplest, you should first clean the ventilation system, since this is less expensive and problematic than a major engine overhaul. The piston can then be checked by measuring the compression in the engine cylinders.
The procedure for cleaning the crankcase ventilation system of an engine with a Solex carburetor 2108, 21081, 21083 and similar ones
We sequentially remove and clean the elements of the small and large branches of the crankcase ventilation. For cleaning we use acetone or gasoline, a toothbrush, and copper wire. We blow with compressed air from a pump or compressor, simultaneously controlling the ease of its passage.
— Cleaning the breather
There is no need to remove it from the engine, just clean the crankcase gas exhaust channel from contaminants with a brush soaked in gasoline. Blow with compressed air. See photo above.
— Cleaning the large exhaust hose
We disconnect it from the pipe on the engine valve cover and from the breather. We wash it with gasoline (pour it inside and shake it, then pour it with water). Blow with compressed air.
the large exhaust hose of the crankcase ventilation system of VAZ 2108, 2109, 21099 cars is removed from the pipe on the cover and the breather
— Clean the crankcase gas exhaust hose into the cavity of the engine air filter housing
Disconnect the hose from the fitting on the valve cover. Remove the air filter housing. Disconnect the hose from the body. We clean the hose itself and the pipe under it on the air filter housing.
hose for exhausting crankcase gases into the engine air filter housing and its pipe on the removed and inverted air filter housing
— Clean the crankcase gas exhaust hose into the throttle body
Disconnect it from the fittings on the carburetor and on the valve cover. We spill, we blow.
— Cleaning the oil separator
To access the oil separator, you must remove the engine valve cover. After unscrewing the two 10mm bolts, disconnect the oil separator from the inner surface of the valve cover. We wash the oil separator with gasoline. Blow with compressed air. Refer to "Cleaning the Oil Separator for Engines 2108, 21081, 21083".
— We clean the fitting and channel with a calibrated hole in the Solex carburetor
Can be cleaned using copper wire without removing the carburetor from the engine. After cleaning, blow with compressed air. In case of severe contamination, the carburetor will have to be removed to clean them.
cleaning the channel and crankcase gas outlet fitting behind the throttle on a Solex carburetor using copper wire
After cleaning, we install all the elements of the engine crankcase ventilation system back, if necessary, replacing the hose clamps or the hoses themselves, if damaged. During the operation of the car, we check whether the oil leakage under the oil seals and seals has stopped. If not, check the serviceability of the engine piston group.
Notes and additions
— On engines 2111 of VAZ 2108, 2109, 21099 cars, cleaning the ventilation system is done in the same way, taking into account the fact that there is no carburetor, but a throttle body with a fitting for a thin hose of the small branch of crankcase ventilation from the valve cover.
— After cleaning the ventilation system on a carburetor engine, it makes sense to clean the air jets of the GDS carburetor of the Solex carburetor and replace the filter element of the engine air filter.
More articles on engines of VAZ 2108, 2109, 21099 cars
Drops oil in the air filter
When regularly replacing the air filter, some car enthusiasts cannot understand where the oil came from. Naturally, bewilderment arises - “How did it end up here?”
Oil seals of various types
In order to understand, you need to understand a little about the structure of an internal combustion engine with a carburetor and an injector - a direct connection will be immediately discovered. Moreover, the more the engine has worked, the more pronounced the connection is. The issue is the formation of crankcase gases, which appear during the combustion of fuel entering the engine crankcase. Usually they are completely removed from the cylinders, but due to severe wear of the engine, coking, and stuck rings, a significant part of the gases remains inside, thereby creating increased pressure, which leads to damage to the seals. Damaged oil seals cause the engine to begin to consume oil. Let's look at each case in more detail - for engines with an injector and a carburetor on the VAZ 2109, they are very similar.
Causes
- Excessive wear on the piston rings of an engine with a carburetor and injector leads to unsatisfactory collection of excess lubricant that gets from the cylinder to the crankcase. Increased pressure appears, as a result of which the oil is squeezed out through the oil deflector and the venting valve. A clogged drain of the main oil deflector of the VAZ 2109 does not allow the lubricant to return to the crankcase; as a result, it exits with crankcase gases.
- Clogged paths that remove gases from the crankcase beyond the throttle, as a result, lubricant with gases ends up in the filter.
Oil leak at the rear of the engine - shaft wear out
Such a breakdown cannot easily be dealt with, since it occurs due to the natural formation of a groove in the oil seal made by the shaft. Here you cannot do without disassembling the engine, since you need to change the entire shaft element. When you contact a good car service center, its specialists will definitely offer to clean the system of gases accumulated in it. The ventilation blockage must be removed.
You can find a service station on the aggregator Uremont.com, where car owners are provided with:
- online application form for work;
- interactive map with addresses of partner technical centers;
- chat with professionals (including consultation with an auto expert);
- user reviews and ratings;
- feature articles, etc.
Source
see also
- Ventilation in the grow box calculation
- Repair of supply and exhaust ventilation system
- Metal pipes for ventilation
- Car ventilation and air conditioning system cleaner
- Woodworking shop ventilation project
- Ventilation pipe umbrella
- Installation of air conditioners and ventilation
- Fuel tank ventilation
- Fan with check valve for ventilation in the toilet
- Cabin ventilation valve
- How to clean bathroom ventilation
Repair of oil pump for VAZ 2108, 2109, 21099 cars
Based on the fact that the entire work of the oil pump consists of rotating the gears in the housing, with minimal clearances, its repair on VAZ 2108, 2109, 21099 cars comes down to defectiveness and rejection of worn parts after several control measurements.
Despite the fact that this unit has a long service life and rarely fails, the use of low-quality motor oil, and the considerable mileage of the engines of these no longer young cars (far exceeding 100,000 km - the trouble-free service life of the oil pump) leads to gradual or sudden (for some) his refusal.
To repair the oil pump, you will need special tools: a micrometer (with limits from 0 to 25 mm), a caliper. As well as a metal ruler and a set of flat probes. If they are not there, then it is better not to repair the oil pump, but to replace it with a new one (since the price of special tools will be higher than the price of a new pump).
Features of oil pump repair for VAZ 2108, 2109, 21099 cars
— We remove the oil pump from the car engine, disassemble it and wash it (with diesel fuel or kerosene). Blow with compressed air
Particular attention should be paid to washing the pressure reducing valve holes, as debris getting under the valve is one of the most common causes of oil pump failure
pressure reducing valve holes for flushing
— Visually inspect the oil pump.
Its parts (working surface of the housing, gears) should not show signs of severe wear: scratches, cracks, crumbling. The pressure reducing valve and the hole for it should not have pronounced longitudinal marks.
the working surface of the oil pump housing 2108 under the drive and driven gears should not have deep marks
Next, we check how worn the driven and driving gears are, and their workplace.
— We measure the size of the gap between the plane of the housing and the gears.
We apply the ruler with its edge to the plane of the pump housing and use a feeler gauge to measure the gap between the ruler and the gears. The clearance for the drive gear is 0.12 mm, the driven gear is 0.15 mm.
measuring the gap between gears and ruler
— We measure the thickness of the drive and driven gears.
We use a micrometer. The thickness of the drive gear is 7.45 - 7.47 mm (nominal), the maximum size is 7.42 mm. The thickness of the driven gear is 7.45 - 7.47 mm (nominal), the maximum size is 7.35 mm.
measuring the thickness of the drive and driven gears of the oil pump 2108
— We measure the diameter of the driven gear seat and the thickness of the partition between the drive and driven gears in the pump housing.
We use a caliper. The diameter of the driven gear seat should not exceed 75.1 mm. The minimum thickness of the dividing wall between the driven and driving gears (segment) is 3.4 mm.
measuring the mounting hole of the driven gear and the thickness of the segment in the oil pump housing
We carry out additional checks (optional).
— We check the presence or absence of deformation of the plane of the oil pump housing cover.
Place it on a flat surface and rock it. There shouldn't be any gap. If there is deformation, it can be eliminated by grinding.
the plane of the oil pump housing cover 2108 for grinding— We measure the diameter of the hole for the pressure reducing valve (12.03 mm).
— It is also advisable to measure the size of the pressure reducing valve spring
Without load - 44.72 mm and under load 4±0.24 kgf - 31.7 mm.
pressure reducing valve spring length
Rejected parts should be replaced with new ones, measurements taken again, lubricated with engine oil and installed on the engine. Before installation, clean the oil intake receiver.
In addition, it is advisable to replace the crankshaft oil seal pressed into the pump housing.
Notes and additions
— More unpleasant reasons for the emergency oil pressure light to come on and the pressure in the engine lubrication system to decrease include cranking or wear of the liners on the crankshaft and wear of the crankshaft journals (this is already an engine overhaul).
— The oil pump pressure reducing valve plug is tightened with great force. Before unscrewing, carefully clean it from dirt and use a high-quality edger with un-licked edges for unscrewing.
More articles on engines of VAZ 2108, 2109, 21099 cars
What to do if oil leaks from the engine of a VAZ 2109
The engine is probably the real heart of our vehicle. If it doesn’t work in any way, then our car won’t even be able to move, or it will break along the way. And so, if you see oil leaks in front of the hood, then immediately start repairing it; otherwise, you need to continuously pour oil, which is by no means inexpensive, and this will lead to increased wear on the rubbing parts of the engine.
The oil in the power unit accumulates in the oil pan, and from there it reaches all the remaining components. The pan is attached to the crankcase with bolts, the gap between them is sealed with a rubber gasket or special sealants. It is in this particular place that it can appear to drip. It is not good if there is a through-and-through defect in the pan, so in this case all the oil will flow out without any residue.
It’s as if as soon as the oil pressure indicator lights up on the device panel, you need to immediately turn off the engine and make a visual educational program on the object of oil pouring. It is easier to find drips in transport; oil prints remain in the water. The truth is, repairing a boat is many times more difficult than repairing a car.
The crankshaft is located slightly larger than the pan; a pair of its ends protrude from the block. Near the main journals there is a seal in the form of rubber cuffs. The cuffs have the ability to work together, and oil starts to penetrate from there.
Another leak factor is damage to the crankcase ventilation. During operation of the power apparatus, exhaust gases do not escape into the exhaust pipe; fractions of them accumulate from inside your engine, therefore, the influence in the crankcase increases. In the established episode, the effect becomes such that oil is about to be thrown out through the cuffs. In this case, it is necessary to make ventilation and all gases will begin to retreat into the exhaust system.
At the very top there is a picture of a cylinder block. This is probably a very important component of the engine, so it’s as if the timing valves and the sorting shaft are located here. It is worth noting that cooling jackets and oil lines extending from the inside of the head extend from the block. The upper shot of the block is attached to the bottom shot, with a rubber seal between them. Oil also has the potential to occur. Oil often fills the spark plugs and the engine begins to operate intermittently. As soon as we have found an oil leak from the engine, it is necessary to eliminate this suddenly appearing automobile problem. The truth is that it is probably necessary to work only with the mind. As soon as you squeeze the valve cover, as if it’s not at all difficult, you need to remove the engine, disconnect the gearbox and change the cuffs behind the flywheel. Resetting the block head is also not entirely elementary. It is necessary to completely solder the coolant from the cooling system, disconnect the huge number of pipes and air ducts adjacent to it. Next you need to unscrew, and then tighten correctly, countless nuts on the studs.
Overall, repairing an engine is probably a very tedious operation that is needed for a specific part of the skill. During repairs, it is necessary to thoroughly clean the engine forepeak, remove oil marks, then add fresh oil, change the oil pumping filter and drive a short distance. If the oil begins to squirt, then on a clean engine it will, therefore, where from. It is under no circumstances possible to pour old oil drained from the engine onto the territory, since it would probably be a big blow according to nature. There are special collection stations for similar fuels and lubricants, and we take used oil there.
Source
Principle of operation
Why does it drive and squeeze oil out of the breather? To answer this question, let's figure it out. How the breather works and why it spits oil. As many people know, gases accumulate in the engine crater during operation. To remove them, a special ventilation system called a breather is used. This allows the pressure inside the engine to be relieved. Since the crankcase constantly contains a suspension of air and small droplets of oil, it is not surprising that part of the lubricant gets into the breather along with the air.
how to replace it yourself
Fuel pump "nine"
Probably all owners of domestic cars have encountered a situation where the car cannot be started after some inactivity. The battery is working properly, the starter vigorously cranks the crankshaft, but the engine does not want to start.
This can happen for 2 main reasons: either there is no spark, which means that the ignition system does not work, or the combustible mixture is not supplied and, accordingly, the engine power system does not work.
We will talk about malfunctions of the fuel supply system. Let's consider a situation when the engine does not start because the VAZ 2108-15 fuel pump does not work. We will also learn how to replace the fuel pump of a VAZ 21099 car with your own hands.
Malfunctions, removal and repair of a mechanical fuel pump
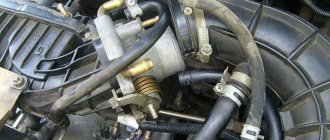
On VAZ 21099 cars, the carburetor was equipped with mechanical diaphragm-type fuel pumps by the manufacturer. The main malfunctions of this type of pump are associated with rupture of diaphragms, breakage of the rod, spring and depressurization of valves.
The main advantage of mechanical fuel pumps is that they are easy to repair. If any element fails, you can buy a domestic repair kit at the nearest spare parts store and replace all faulty parts within an hour. The fuel pump on VAZ 2108-99 cars with a carburetor fuel supply system is located in the engine compartment, in the same place where the ignition distributor is located.
Removing the mechanical fuel pump.
First, open the hood and remove the negative terminal from the battery.
Then loosen the clamps and disconnect the fuel hoses from the pump pipes
After this, unscrew the 2 nuts securing the fuel pump and carefully, so as not to damage the gaskets, remove it
Pump device
Now it needs to be disassembled.
Unscrew the bolt on the top of the pump cover and remove it along with the strainer. Unscrew the 6 screws and separate the upper and lower parts of the case
Carefully remove the diaphragms along with the spring and rod, turning them 90°
After disassembly, it is necessary to carefully inspect all parts and replace damaged ones. Reassemble and install the pump in reverse order.
Electrical faults and replacement
Submersible electric fuel pumps were installed by the manufacturer on VAZ 21099 injector cars. Unlike their mechanical counterparts, these units are not dismountable, so they cannot be repaired. Mostly, such fuel pumps break down due to overheating and the use of low-quality fuel. In addition, very often faults arise not in the unit itself, but in its wiring.
If the electric fuel pump on your car hums and stops pumping fuel, you first need to check the serviceability of the electrics. Perhaps the wiring has shorted, the fuel pump relay has broken, or the fuse has simply blown. If the electrical is OK, the fuel filter needs to be replaced. If this does not help, then you need to change the pump itself. Please note that the VAZ 2108-15 electric fuel pump is located in the fuel tank, so to replace it you will have to crawl under the car.
The procedure is as follows.
- First, drive the car onto a pit or lift.
- Then remove the negative terminal from the battery.
- Then remove the back seat and find the place where the inspection hatch is located. Unscrew the screws securing its cover and move it to the side.
- Disconnect all wiring terminals from the fuel pump and fuel sensor.
- Unscrew the nut securing the fuel supply pipe and move the pipe itself to the side.
- Find the drain pipe fitting under the bottom and unscrew it.
- Next, remove the gas tank.
- Unscrew the fuel line tip nut and disconnect it from the fuel pump.
- Unscrew all fastening nuts, remove the sealing ring and remove the electric fuel pump together with the storage cup from the fuel tank.
Reassembly must be done in reverse order.
Note: to prevent gasoline from spilling out of the fuel lines, after the 4th operation you can connect the battery and start the engine. After 4-5 minutes, the engine will exhaust all the gasoline remaining in the system.
Way to solve the problem
When starting to clean the breather, first of all we look for a device under the hood and remove the air filter from it. Before doing this, de-energize the car by disconnecting the negative terminal from the battery and turning off the ignition. There is an intake manifold under the filter - we will also dismantle it. After this, you can see the prompter itself - as a rule, its cover is secured with two bolts, which will have to be unscrewed. After removing the cover, the oil bumper will become visible - it is secured with a pin.
Read more: 220 Volts in Watts
It is necessary to unscrew the nut located on the stud, but there is no need to remove the stud itself, because it will be difficult to put it back without dismantling the pan. We make a cleaning rod out of wire, which we use to clean the tube. There is a brush on the breather cover to extinguish the flame - we clean that too.
All that remains is to check the device. We start the engine, remove the plug from the oil filler neck, and cover the neck itself with your palm. You can feel with your hand whether there is pressure. Then the assistant should press on the gas until the speed reaches 100-130 km/h and check the compression again by applying the palm of his hand. A little pressure should already be felt.
To avoid problems with the release of working fluid through the prompter, it is necessary to constantly monitor its level
It is also important to pay attention to checking the filter and gearbox
Owners of old domestic cars, after several years of ownership, can easily write a directory of “diseases” of a particular car model. One of these “sores” is an engine malfunction in which engine oil is squeezed out through the breather. This phenomenon is most often simply called by people: “oil is driven through the breather” or “oil is thrown out through the breather.”
The problem is quite unpleasant and is accompanied by a large number of engine-related problems. It is this problem, as you probably already guessed, that we will talk about in this article. You will learn why oil comes out of the breather and how to solve this problem. Go.
As a rule, the problem occurs with the onset of cold weather, the breather freezes and the oil is squeezed out. This manifests itself in the form of oil drips that are visible from the outside of the engine. Failure to respond to this phenomenon in a timely manner can lead to serious engine damage.
Sulfuric acid problem
During fuel combustion, some of the gases that expand enter the space under the piston. These gases contain many substances, including vapors of various acids. As a result, the amount of sulfur that is present in the fuel affects the amount of sulfuric acid and sulfuric acid that penetrates the oil. Accordingly, the more sulfur in the fuel, the more of its acids enter the oil.
Sulfuric acid accelerates the oxidation of motor oil, thereby reducing its service life. The result is a fairly simple relationship: the less sulfur the fuel contains, the longer the oil can work.
It is impossible to say anything about the sulfur content of a fuel based on its type alone. All the driver can do is look at the corresponding document at the gas station.
Breather VAZ 2109
The engine crankcase ventilation system of the VAZ 2108 2109 21099 is designed to ventilate the engine crankcase from gases that have broken into it from the cylinders. From the engine crankcase, gases are supplied through a hose to the valve cover, where they pass through an oil separating mesh and are sucked into the carburetor air filter. If the oil separating mesh becomes dirty and oil no longer deposits on them, the oil will enter the carburetor air filter. If the air filter is filled with oil, then it is necessary to clean the crankcase ventilation system. But as a rule, many people often do not do this, but disconnect the hose between the valve cover and the air filter and direct it to the side. The hole in the air filter is plugged with a champagne cork - and all is well. It seems that the air filter is clean and the oil is no longer spitting out as much. However, this is for the time being. Sooner or later, the crankcase ventilation system will become completely clogged, and then the engine will begin to pressurize oil. As a rule, it goes into the distributor through the camshaft oil seal.
In general, the prerequisites for cleaning the crankcase ventilation system (breather) are as follows: — The air filter is in oil; — Distributor in oil. The procedure for cleaning the VAZ breather: 1) First, you need to disconnect all the tubes from the engine valve cover and remove the carburetor air filter.
2) Unscrew the gas pedal cable from the engine cover.
3) Unscrew the two nuts securing the valve cover to the engine and remove it.
4) The lid will be covered in dirty oil all over the inside.
It will be necessary to remove the cover covering the oil separating nets and clean them from adhering dirty oil.
To clean, you need to disassemble the nets and bathe them in kerosene or gasoline until they are clear of adhering oil.
Some people pour gasoline on the meshes and set them on fire - the oil burns out and then just wipe the meshes a little with gasoline and that’s it.
5) You also need to be patient and try to clean the valve cover itself from adhering oil, especially the place where the oil separating mesh is installed.
6) There is also a small outlet on the valve cover, which is connected through a tube to the throttle body of the carburetor. In my case, it was also completely clogged with hardened oil and I had to clean the outlet with a thin steel wire for about half an hour. 7) Then, you need to put the cleaned oil separating breather mesh in place and close it with a lid.
Before replacing the valve cover, it is necessary to clean the surface of the engine from old sealant and dirt. It is also necessary to wipe the rubber gasket of the valve cover itself. 9) Then apply a thin layer of sealant along the edges of the valve cover to improve sealing. We put the cover in place and tighten the nuts securing it. 10) We connect all the tubes back, fasten the gas pedal cable and put the air filter in place. 11) For better sealing, it is better to give the sealant a couple of hours to dry before driving the car. Work on cleaning the breather of VAZ 2108 2109 21099 is now completed
You will immediately notice that the engine will consume less oil during operation and will need to be topped up less
Troubleshooting
- The first thing you need to pay attention to is the color of the exhaust, blue or black smoke, a sign of burnt valves or problems with rings.
- Next, you should check the compression in all cylinders. The value on gasoline internal combustion engines should be within 11-13 MPa.
- Disconnect the pipes from the valve covers, air vent and breather. Assess the degree of contamination. If the pipes are very dirty or clogged with oil deposits, use gasoline to clean them or a special carburetor cleaner.
- Check the condition of the oil separator. Unscrew the required bolts to get to this unit. Remove the oil separator and assess its condition. If necessary, clean or rinse followed by drying.
- Inspect and, if necessary, flush the breather valve. There are situations when the valve gets stuck, resulting in exhaust gases entering the crankcase and creating excess pressure. Remove the part and wash it; in most cases, this will resolve the issue of squeezing oil out of the breather.
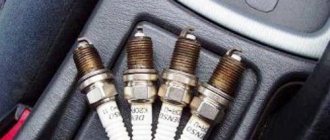
Helpful advice! To distinguish stuck rings from a burnt-out valve, it is enough to perform several manipulations. After checking the compression in the cylinders, determine the cylinder with the lowest value. Then inspect the spark plug of this cylinder; if the rings are lodged in this cylinder, the spark plug will be covered with a thick oil layer. If the valve is burnt out, the spark plug will appear normal without any major abnormalities.
Finally…
The problem of oil escaping through the breather worries many motorists and causes a lot of trouble, but if the problem is detected in a timely manner and the right approach is taken, serious consequences can be avoided. It is important to ensure that the oil level is normal; as soon as you find that the engine is taking oil, monitor its level and constantly monitor it so that it does not fall below the permissible level. Also pay attention to the breather and filter; oil on the air filter in large quantities also does not bode well. Regularly monitor the condition of the engine and all systems, and also promptly correct any malfunction. This will save you from engine overhauls and unnecessary waste.