Considering the versatility of the MTZ 82 tractor in performing many technological operations, the control system contains a lot of levers, pedals, drive handles not only for the controls of the machine’s movement, but also for drive power take-off devices, a hydraulic system, a lighting and alarm system, as well as additional switch levers individual components of the machine outside the cabin. For a non-professional, the presence of many handles and pedals in the cab of a car causes bewilderment and confusion.
For a clearer understanding of the purpose of the tractor controls, they can be divided into several groups:
- Controls for tractor movement and fuel supply
- Levers for switching PTO operating modes and switching their rotation speed
- Hydraulic and power positioner shift levers
- Additional transmission controls
- Tractor electrical controls
- Switching levers for individual components
Motion Controls
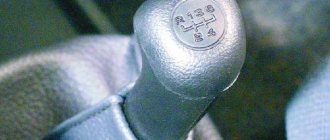
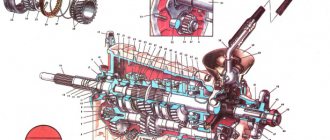
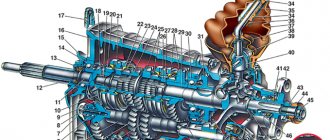
Like all cars with a wheeled chassis, the direction of movement is controlled by the steering wheel, which is adjusted by the angle of inclination. The gears are engaged by the clutch release pedal 38 on the left side of the cabin floor and the gear shift lever 39 located on the right side relative to the driver’s seat. In older modifications of the MTZ 80(82), the switching mechanism was located in the center of the cab floor. The tractor is equipped with a two-stage gearbox with straight-cut sliding gears. The gearbox has 9 forward and two reverse speeds; with the additional inclusion of a reduction gear, the number of gears doubles to 18 forward and 4 reverse.
The reduction gear is turned on using lever 32 located at the base of the control panel in the center. Switching is carried out by longitudinal movement of the lever, also with the clutch disengaged. By moving the lever forward, the slow mode of operation of the gearbox is activated.
The brake pedals are located on the right side in the form of two interlocked pedals 36.35 for controlling the left and right brakes. Also on the right wall of the cabin there is a self-locking parking brake 42
Changing the fuel supply is carried out by two bodies: the gas pedal 34 is located on the right side near the brake pedals, which is used in transport mode; The manual lever for fixed fuel supply 44 is located on the right wall of the cabin or in the old modification on the left side of the panel; it is used when it is necessary to set stable diesel speed when performing technological operations. The extreme forward position is the maximum fuel supply, the rearmost position is the minimum fuel supply.
Basic faults of the gear shift lever and repairs
As a rule, drivers are faced with the fact that during operation the lever can:
- difficult to move (requires a lot of effort);
- The gearshift lever begins to dangle, making it difficult to work with;
- the gear shift lever creaks;
Please note that if any problems occur with the gearbox lever, you must immediately stop using the vehicle and restore functionality.
The fact is that driving a car with a faulty gearshift lever is extremely dangerous, since in certain situations the inability to timely select and turn on/off a gear can cause an accident, etc.
As a rule, the lever stops working normally for two reasons:
- mechanical breakdowns or natural wear and tear of individual elements;
- malfunctions resulting from too much force applied, damage to the lever, etc.
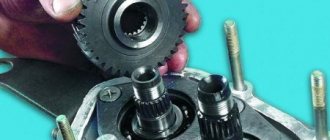
You can check the gearbox lever, as well as, in some cases, repair it yourself. First of all, normally the gear shift knob should move freely. Jamming is not allowed. If the lever moves with obvious difficulty, there is a high probability of failure of the spherical washer or ball joint. These elements need to be changed.
Another temporary measure is sometimes to apply a thick lubricant, which manages to neutralize the squeaking of the gear shift lever. By the way, creaking also often indicates wear of the above elements. Let's add that if the gears switch off on their own, you will need to check the spring, which may jump off. To solve the problem, the spring is simply put in place.
Repairing the gearshift lever itself often involves replacing failed elements. In this case, the lever will need to be removed. To access the plastic bushings and axle, you must first remove the shift lever boot.
To remove the lever, the plastic protective plate is dismantled, then the hinge cage is released. Next, you will need to move the jet rod to the side, after which the entire lever is completely removed.
We also recommend reading the article about why reverse gear does not engage. In this article, you will learn about the main reasons why you cannot engage reverse gear.
You will also need to check how the axle moves. If the movement of the axle is not hampered in any way, the bushings will need to be replaced (before installation, all replaced elements must be lubricated with grease).
To replace the spring, this element must be pulled out. To do this, the locking ring is removed, as well as the hinge with the lever. If it is necessary to replace the ball joint, carefully move the spherical washer apart with your fingers, after which you can remove the worn element. When installing a new support, the part must be lubricated in advance.
If you need to replace the rods, you will need to locate the clamp from underneath the car. The specified clamp will need to be loosened, and then disconnected from the hinges. Now you can unscrew the fastening nut and remove the rod. After installing a new rod, assembly is carried out in the reverse order.
After replacing all elements and lubrication, the lever should move smoothly and clearly, without dangling, which allows you to comfortably and quickly select and engage gears. Also, if necessary, it is periodically necessary to lubricate and adjust the gearshift lever, linkage and other elements during vehicle operation.
PTO control levers
The lever for turning on the rear power take-off shaft 46 is located at the right wall of the cab. The lowered position of the lever corresponds to the disengaged PTO, and the raised position correspondingly turns on the rear PTO. The lever for switching operating modes of the rear PTO 55 , or what is called the “cam clutch control lever,” is located at the base of the seat. Switching is carried out with the engine turned off by transverse movement of the lever relative to the axis of movement of the tractor. The middle position of the lever is neutral, the extreme right position corresponds to the independent operating mode, and the extreme left position corresponds to the synchronous operating mode. The rotation speed of the rear PTO is switched by lever 58 (in a separate figure), located on the lower wall of the housing of the intermediate part of the transmission in the cabin. One extreme position corresponds to a speed in independent mode of 540 rpm, the second extreme position is 1000 rpm. The selected position is fixed by tightening the control nut of the driver. In tractors equipped with a side PTO, the engagement lever is located on the cab field on the left side.
Hydraulic and power regulator levers
Three distributor spool switch handles 27,28,29 are located on the right side of the control panel near the tractor windshield. Each lever has four positions. The levers are constantly in a neutral position, in which the working fluid supplied by the pump to the spools is passed into the drain cavity, and the working cavities of the hydraulic cylinders are locked by the spool and are in a fixed position. Moving the lever up corresponds to the “Lift” command - the spool opens the flow of oil into the cavities of the hydraulic cylinders for lifting. The first lower position corresponds to the “Lower” command. The second extreme position corresponds to the “Floating” hydraulic operating mode. The far right lever 29 of the standard distributor controls the hydraulic cylinder of the rear linkage, two free ones are intended for connecting additional equipment mounted with the tractor. On tractors equipped with a hydraulic increaser of the grip weight of the GSV , its control handle was located in addition to the three hydraulic distributor levers.
On the right side of the seat, on the same panel with the manual fuel supply handle, there is a position lock for the handle 43 of the power regulator and a lever for the regulator itself 45 . The rearmost position of the power regulator lever is “raising the implement” when lifting, hold the handle with your hand. After lifting, the handle is released - it moves and is fixed in the “transport neutral” position. The intermediate position forward from the “transport neutral” is the “regulatory zone”. The extreme forward position is “forced lowering”. After lowering is completed, the handle automatically positions itself at the beginning of the control zone. The flywheel of the position regulator switching valve 52 is located under the driver’s seat and has three positions: the right position – “position control”; left – “power regulation”; medium – “off”. Handwheel 53 adjusts the correction speed of the power regulator. At the base of the driver's seat, closer to the right side, there is a leash 40 for controlling the fixation of the hitch in the transport position.
How to remove the gear knob?
I searched and found nothing but the answer that it cannot be removed!
How to remove it? I want to cover it with leather. The steering wheel has already been retightened, but its original one.
Removing the automatic transmission handle
on page 3, message 66
Removing the manual transmission handle
on the first page below
Last edited by Alexan; 12/23/2015 at 19:10.
z18XER AT Station Wagon (AH) CHIP tuning done 07/26/2016 returned STOCK!
Well then, another answer: “it’s not removable!” I was puzzled by this myself! My handle became worn and stretched, and cracks appeared around the top cap! I looked at it both in the program and at the showdown (I was thinking about buying a used one, upholstering it and installing it right away)! Can't be removed. Comes with the rod (link) and the entire mechanism!
Yes, I also heard somewhere that it was written there.
Well, in general, I read at some Opel club that a girl’s manual transmission knob fell off in order to get to the service center, her husband beat it with his fist, and then the dealer’s car service center could not remove it. I decided to try it. Everything is filmed! This is the technology. We remove the “stick” itself from the wings. To do this, look at the very bottom of the “stick”, under the upper leather cover. Down there the “stick” is held in a ball joint. It is below the ball with the slide. Two latches are visible on the right and left. They need to be pressed out and the lower ball joint can be pulled up, along with the “stick”. Don't be alarmed. It crawls through the curtain. In your hands you have a “stick” with a knob with a reverse stop and half a connection with the slide. Now we remove the knob. We clamp the free section of the “stick” in a vice. It turns out to clamp the handles near the knob. We insert two plates into a small gap between the yews and the knob. I took two files and pulled the knob together like a lever. It sits tightly, just on the notch at the end of the “stick”. Now a shiny ring with a leather case attached. The white ring under the case is simply snapped onto the knob along with the shiny one. And a cover is sandwiched between them. It is better to pull it (the cover) out of this clamp with force. Then carefully use a small screwdriver to pry the white ring down. Actually, I did the opposite. He pulled the cover off the car, pulled off the ring, trimmed the cover along the seam and removed it through the knob. And only then, having freaked out this morning, he began to tear the handle. But I guessed that there were two latches down there. I snapped them off. I took the whole thing off and then removed the knob of the handle!
All. Thanks to all. If my experience is useful to anyone, I will be glad.
Transmission controls
In addition to the speed shift levers and the clutch release pedal, additional transmission controls include:
- 41 engagement handle for MTZ 82, which is located on the right side of the seat
- In the case of the steering control with HPS, for short-term forced locking of the rear axle differential, a lock 5
- In the configuration of the tractor with power steering, to control the locking of the rear axle, there is a handle for switching 3 in automatic operating mode, installed on the tractor control panel
The auto-locking handle has two locking positions: the extreme position is “locking off”; middle position - “automatic locking mode is on.” The extreme clockwise position "forced locking" when released is released under the action of a spring.
If the tractor is equipped with a speed reducer, the engagement rod is brought out to the cabin field on the left side, in the same place where the engagement rod is routed in the case of installing a side PTO gearbox.
Self-rethreading of the gear knob
Before starting the upholstery, it is necessary to remove the gear knob. As a rule, it is easily pulled out if you pull it towards you with force. However, depending on the car and the gearbox installed on it, the technology for removing the handle may change. In any case, this step will not cause you any particular problems. As an example, take a look at how easy it is to remove the handle on a Skoda Octavia.
Video: how to remove the gear knob
After you have removed the handle, you can begin making the pattern and the binding itself. But first, prepare the necessary set of tools.
Tools and materials for upholstery
In order to tighten the gearshift knob you will need the following tools and materials:
- material for upholstery (leather, eco-leather or Alcantara);
- tailor's scissors and stationery knife;
- film (you can use food film);
- glue;
- felt-tip pen or marker;
- tape (it is advisable to use masking tape);
- durable nylon threads;
- durable needle;
- thimble for protection when sewing;
- sewing machine.
Re-upholstery process
First of all, you need to make patterns for the future cover. The easiest way to do this is if you have an old case. In this case, your actions should be as follows.
- Remove the old cover from the handle and open its seams.
- Apply the resulting parts to the wrong side of the material and trace along the contour.
- Carefully cut out the resulting parts.
Controls for individual tractor components
To activate the tractor compressor, a flywheel with an arrow is placed on its body. When an arrow is indicated on the flywheel, “forward” corresponds to the off position, “backward” to the on position. Switching on is carried out with the engine turned off or at minimum diesel speed.
The hydraulic pump of the hydraulic system is turned on by a lever located on the right side of the tractor in the upper part of the housing of the intermediate part of the transmission. The position of the leash up corresponds to the on position, down - to the off position.
The engine radiator shutter is controlled by handle 4 , located in the cockpit on the control panel on the left side.
On the left side of the tractor, with the starting engine installed, there is a handle for engaging the bendex clutch for engagement with the diesel flywheel. For convenience, this lever can be pulled out into the driver's cabin.
Control of lighting, light signaling and electric engine start
The machine's electrical power is turned on using the "ground" button 47 , located on the right side at the back of the driver's seat. switch 31 for starting the main or starting engine is located on the control panel to the right of the steering wheel and has three positions: the first - clockwise, turns on the power to the control panel; the second - supplies power to the starter; turning the toggle switch counterclockwise turns on the power to the radio.
There is a turn signal switch located under the steering wheel on the left side.
Toggle switches on the horizontal plane of the control panel on the left side of the steering wheel from left to right:
- hazard warning button 9
- light switch 8 with two positions 1- illumination of devices and side markers, 2-additional inclusion of headlights
- windshield washer switch 7
- switch 6 of the electric torch heater of the engine
Handles on the vertical plane of the control panel from left to right:
- handle 2 for controlling the cabin heater valve
- handle 1 (if it is necessary to urgently turn off the engine, the handle is pulled out to cut off the fuel supply)
- handle 37 for fixing the steering column tilt
The top panel near the ceiling of the cabin is equipped with toggle switches from left to right:
- Toggle switch 21 front wiper
- Toggle switch 22 for turning on the heater fan
- toggle switch 23 rear working lights
- toggle switch 24 front working lights
- Toggle switch 24a for turning on the “Road Train” sign
The tractor's operating control panel is equipped with sensors and warning lamps to monitor the functioning of the engine and the operation of machine systems.
Mercedes-Benz 220S Cabriolet Hydrak
Any city dweller knows that driving to work in the morning rush hour in a car with a manual transmission can take as much energy and nerves as the entire subsequent working day!
But in the evening, again, making your way home through traffic jams... Automatic transmissions are much more convenient in everyday use, but they are more complex, weigh more and contribute to increased fuel consumption. Automakers have been trying for many years to combine the advantages of an automatic transmission and a manual transmission in one unit, for example, in 1957, Mercedes-Benz offered customers a transmission with an automatic clutch - Hydrak. Mercedes-Benz 220S Cabriolet Hydrak 1958
The car did not have a clutch pedal and to change gears you simply had to move the gearshift lever from one position to another. The Hydrak consisted of a vacuum coupling, hose system, solenoids, electrical circuits and a fluid coupling. When the gear shift lever was moved, the solenoids were activated, the vacuum was redistributed, and the clutch released the clutch. Instead of a clutch disc, a fluid coupling was used and the gears shifted quite smoothly.
From 1957 to 1960, Hydrak was installed on the 220 Ponton model, which got its name for its monocoque three-box body without protruding wings, as well as on the W111 Heckflosse (“Fin”) in 1959-1961. On paper everything was beautiful, Mercedes made life easier for the driver by eliminating the need to press the clutch pedal. However, in practice, the most complex system, despite the famous German quality, turned out to be unreliable and was abandoned. In addition to the fact that only a small number of Mercedes-Benzes produced were equipped with the Hydrak gearbox, many “ungrateful” owners actively exchanged newfangled boxes for regular ones... So, today a classic Mercedes-Benz with a Hydrak gearbox is of particular collectible value!
The photographs show just such an example, a superbly restored 1958 Mercedes-Benz 220S Cabriolet with a 2.2-liter six-cylinder engine and the same Hydrak gearbox. Interestingly, the restoration was carried out in... Thailand, and now the car is being sold in the USA at the Bring-A-Trailer auction. It was originally a black convertible, but the Thais repainted it a lovely beige color. Judging by the photographs, Thailand also has craftsmen capable of carrying out restoration work at the highest level - proof is the prizes the car received at themed events in America.
Gearshift lever on the steering column
At the time of writing (Sunday September 29, 2019) the current auction bid is $78,000 with 4 more days of bidding to go. I think the final price for the 220S will exceed $100,000.
The presented fragment of the work is posted in agreement with the distributor of legal content, LitRes LLC (no more than 20% of the original text). If you believe that the posting of material violates someone else's rights, please let us know.
You paid, but don’t know what to do next?