The most common reason for replacing the cooling radiator on a Niva car is its failure due to breakdown or corrosion. There are craftsmen who solder all defects themselves, but in most cases they prefer to install a new radiator. Below is a detailed guide for removal and installation, as well as a list of all the necessary tools to complete this job.
Radiator of the Niva stove
The heater radiator of VAZ 2121, 2131 is not a critical vehicle component. But in cold weather, driving a car with a faulty heater is unlikely to be a pleasure. In addition to the sheer coldness in the cabin, the windows may fog up, which leads to poor visibility, and this is a matter of safety for the driver, passengers and other road users.
Structurally, the radiator is a heat exchanger, or more simply put, a battery, whose task is to heat the air passing through its grille. Externally, it looks the same as a similar unit on other cars.
The same type of heater radiator is used for “Niva” and “classic” VAZs
The Chevrolet Niva radiator is not suitable for the VAZ-2121, 2131 family. This should be taken into account when selecting spare parts in the store.
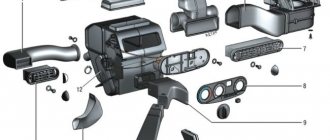
Radiator location
The heater radiator on the Niva is located under the dashboard behind the center console between the driver and right passenger seats. This is the standard location for the heater in most cars. Compared to many other car models, access to the radiator in the Niva is quite simple. This will take about 10–15 minutes for a semi-skilled specialist.
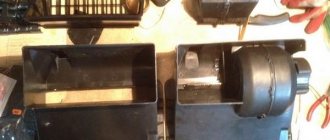
The radiator of the Niva stove is located in a plastic casing under the center console
Radiator design and functions
The stove radiator is a unit in which heat is transferred from the heated liquid to the surrounding air. It consists of two horizontal rows of tubes intersecting with vertical metal plates (ribs). On the sides, the structure is limited by panels that provide the functions of tanks. The incoming and outgoing pipes of the cooling circuit are connected to one of the tanks.
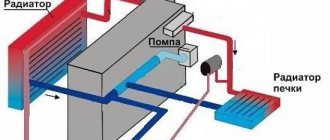
There are two unconnected cavities inside the tank. Antifreeze enters through the inlet pipe into the cavity connected to the upper row of tubes. On the other side of the radiator there is a return tank, through which antifreeze flows into the second row of tubes and moves in the opposite direction to the second cavity of the tank and the outgoing pipe. After leaving the radiator, the antifreeze enters the main cooling system of the car. Antifreeze circulating in the tubes ensures heating of the entire grille, thanks to which heat transfer from the radiator reaches maximum effect.
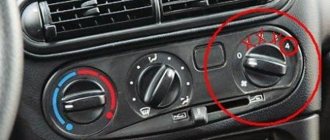
The radiator is installed in the instrument panel console in a plastic casing and sealed around the perimeter with foam tape. Air heating depends on the degree of opening of the valve that regulates the flow of liquid through the radiator. The valve is installed at the radiator inlet and is controlled by the upper lever on the center console.
Cold air comes from the external environment, passing through a hot radiator, heats up and enters the car interior
The main and only function of the heater radiator is to heat the air flow entering the cabin through the air ducts.
Radiators are made of aluminum or copper. The aluminum product does not hold temperature well. A copper radiator works more efficiently, but is more expensive. The advantages of a copper radiator include its maintainability: the ability to seal cracks in the tubes.
Comparison of manufacturers
In stores you can find spare parts produced by several companies. Products differ in two parameters: price and workmanship. Let's look at a few of the most popular brands.
Hola is a trademark of the Dutch company H&H Group. 15 European factories produce radiators, belts, shock absorbers and other auto parts. Inexpensive products of this brand are of good quality. According to customer reviews, spare parts of this brand at a comparable price are superior in quality to Chinese products. Price - 2000 rubles.
DAAZ - Dmitrov Automotive Assembly Plant, part of the United Automotive Technologies concern, was founded back in 1967. In addition to radiators, the company produces filters, brake pads and other spare parts for Russian and foreign cars. The products of this brand are used in cars that come off the AvtoVAZ assembly line. Price - 2500 rubles.
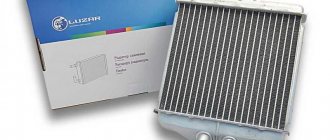
Luzar is a Russian company that was founded in 2003 on the basis of the Lugansk Radiator Plant. Products of this brand comply with GOST-R and the manufacturer gives them a 2-year warranty. Price - from 2100 rubles.
Bautler is a British company that produces, among other things, spare parts for the Chevrolet Niva. Price - from 2200 rubles.
Reviews from car owners vary. Some consider DAAZ radiators to be the most reliable, others consider Bautler, Hola or Luzar.
Taking into account the fact that replacing a part takes a lot of time and effort, it is worth taking the sports version of Luzar. It is designed to withstand heavy loads and is therefore more reliable.
Hola products are distinguished by the fact that each tube has its own rubber seal, rather than being fixed with a single seal. In Luzar-Sport, the honeycomb is soldered to a base that is attached to the tanks.
Typical radiator malfunctions
There are two main radiator malfunctions:
- Clogged grille and radiator tubes.
- Radiator leakage.
Since the Niva is often operated in difficult road conditions, the likelihood of contamination of the grille from dusty outside air is very high. Clogging of the cells reduces the heat transfer area of the radiator, and as a result leads to a decrease in the heat released from the air ducts into the passenger compartment. In such cases, the stove radiator is dismantled and washed under high pressure.
Clogged radiator tubes are also common. If the outlet pipe is barely warm or cold, then the radiator tubes are clogged. This happens for various reasons, including the entry of foreign objects into the cooling line during repair work. In such cases, the tubes themselves are also washed. To do this, it is not necessary to remove the heater radiator. It is enough to separate the radiator pipes from the cooling system and supply water under pressure into one of the radiator pipes.
A leak in the radiator tubes can be determined by a coolant leak, which usually forms on the right side of the center console in the passenger foot area. As a rule, a leak is accompanied by the smell of antifreeze (antifreeze) in the cabin. Don't rely on the smell of antifreeze alone. Coolant vapor is very volatile and can be misleading as to the source of the leak. The smell of antifreeze also indicates a leak in the engine compartment.
The leakage of the heater radiator occurs due to natural wear and tear of the metal from which it is made. Constant cycles of heating and cooling, exposure to various chemicals and consumable liquids eventually lead to the destruction of the metal and the formation of cracks. Cracks in a copper radiator can be soldered. The aluminum radiator will have to be replaced with a new one.
Typical malfunctions of the VAZ-2121 heater radiator can be eliminated in a garage environment
Installation.
First you need to prepare a new radiator. To do this, we remove the rubber feet from the old one and put them on the new part, since new radiators are not equipped with them. Next, we reassemble in reverse order. During installation, it is best to position the clamps so that access to them is as convenient as possible in case of the next replacement.
When assembling the power steering system, there is no need to pump fluid; if a small amount of air gets inside, it will escape after a while into the expansion tank. Therefore, after replacement, it is necessary to monitor the fluid level for some time and, if necessary, add it to the maximum mark.
After assembling the system, it is necessary to fill in new coolant. It must be filled through the expansion tank. After filling, it is important to start the engine so that the pump works and wait until the engine warms up to operating temperature and the thermostat opens. At this moment, the large circle will be open and you will need to add antifreeze to the system to the required level.
Removing the radiator of the VAZ-2121 stove
The procedure for removing the heater radiator on a VAZ Niva does not require any special skills or abilities. It is important to prepare the necessary materials and tools in advance. Most instructions for repairing car heaters contain a recommendation to drain the coolant before starting work. In practice, many car enthusiasts limit themselves to draining only that part of the antifreeze that is located in the radiator itself and the nearby pipes of the cooling system.
Preparing tools
To replace the radiator, you will need the following tools:
- pliers;
- slotted screwdriver;
- Phillips screwdriver;
- a set of markers for identifying wires;
- spanner set to “7”;
- socket wrench set to “10”;
- socket wrench set to “7”;
- socket wrench set to "10".
Procedure for dismantling the radiator
All operations must be performed in the following sequence:
- Unscrew the left self-tapping screw securing the storage shelf. The self-tapping screw is unscrewed with a Phillips screwdriver
- Unscrew the two self-tapping screws on the right shelf fastening. The right side of the shelf is attached to the upholstery
- Unscrew the central fastener of the shelf from the front panel. The central part of the shelf is unscrewed from the front panel
- Carefully lower the right side of the shelf. The right edge of the shelf moves down freely
- Remove the left side of the shelf from the center console panel. There is a special spike on the left side of the shelf
- Unscrew the self-tapping screw securing the floor tunnel lining to the radio mounting panel. The lower part of the panel is also fixed with a self-tapping screw
- Unscrew the screws of the left and right fastenings of the central panel. The process is shown on the right side, the left side is similar
- Remove the radio panel. The panel is moved to the side
- Disconnect the wire connectors from the radio panel. The wire blocks are detached to remove the entire radio panel
- Completely dismantle the panel. After disconnecting the wires, the panel can be easily removed
- In the engine compartment, loosen the clamps securing the hoses to the radiator pipes. Loosening the clamp is shown using the example of the lower pipe; a similar operation is performed with the upper
- Unscrew the screws securing the seal from the front panel. The screws are unscrewed with a socket wrench with a “7” head
- Remove the seal. The removed seal allows you to remove the radiator pipes from the engine compartment
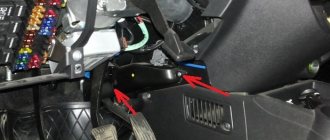
- In the cabin, loosen the nut securing the crane drive rod. The fastening nut is unscrewed with a “7” key
- Remove the heater valve drive rod. The rod is removed from the crane lever
- On the right side of the fan casing, remove the heater tap rod from under the bracket. The rod is disconnected from the fan casing
- Disconnect the spring brackets securing the casing. The staples are pryed off with a slotted screwdriver
- Remove the casing and fan. The casing with the fan is moved to the side
- Remove the radiator. After removing the fan, the radiator is carefully removed from its compartment
- Unscrew the faucet from the radiator. The tap and pipes are turned off with a key to “10”
- Remove the heater valve. The removed tap is checked for leaks
- Remove the lower nut securing the faucet to the radiator. The bottom nut often falls out and gets lost
- Disconnect the outgoing pipe.
The two fastening nuts are unscrewed with a “10” wrench
After dismantling, you should carefully inspect the radiator for blockages in the grille and leaks from the tubes. Based on the results of the inspection, a decision is made on the possibility of repair or installation of a new radiator.
Video: installing a radiator
https://youtube.com/watch?v=ghjSAyJUPVo
The process of replacing the heater radiator on a classic Niva has been studied far and wide by many car owners. In fact, the procedure is similar to the entire family of AvtoVAZ classics. However, caution and safety precautions should be observed when working. After completing the repair, before driving on public roads, you must make sure that all components and mechanisms of the vehicle are operating normally. Only then should you begin daily use of the machine.
Do-it-yourself repair and replacement of the Niva Chevrolet car heater
Diagnosis of faults, repair and replacement of the Chevrolet Lanos heater radiator with your own hands
Preparatory work
If there are visible signs of damage, even without a coolant leak, the cooling radiator requires replacement.
Before you start work, make sure that you have all the tools at hand, WD-40 fluid for the best removal of soured parts, a container with a volume of at least 5 liters for draining used coolant, as well as an additional container for draining the power steering fluid.