What are the faults of the Gazelle gearbox?
Gazelle gearboxes are rightfully considered one of the most reliable and durable, but even they can become unusable due to high loads. In order for the replacement of the Gazelle gearbox to go without a hitch, you must know the hardware of the car, study the diagrams, be careful and patient, and also follow the safety rules and understand the principle of operation of the Gazelle 4x4 gearbox.
Gazelle repair may be required in some cases:
- difficulty changing gears. This snag occurs due to the lack of fluid in the cylinder or due to the presence of air in the hydraulic drive. In addition, you can check the locking bolts, which often need additional tightening, as well as the transmission intermediate shaft. You can observe how the device jerks in neutral, and the transmission howls. Another sign is that in 4th gear, fifth or second, the device makes a howl, a lot of noise;
- The gearbox engages with noise and crackling noise when starting. In this case, the synchronizer blocking ring on the transfer case could be worn out or deformed. Also check the power take-off. It is advisable to replace the blocking ring or power take-off box, and to ensure that the new element fits in without problems, use lapping paste. In addition, check the condition of the input shaft, how the mortar works, whether the car is noisy in neutral;
- random shutdown of the manual transmission. If you notice such a problem, first of all check the fastening nuts to the clutch housing, as well as the condition of the gazelle gearbox linkage. In addition, the couplings could wear out (worn out teeth), as well as the locking springs (they can either wear out or weaken). You may also need to adjust the intermediate shaft and input shaft;
- the appearance of extraneous noise. In order to get rid of them, it is necessary to replace bearings or damaged gears, add oil to the crankcase or check its alignment with the crankshaft.
To repair a Gazelle gearbox, you must know everything about the structure of the transfer case, because disassembling the gearbox is not an easy task. This is also necessary to determine the type of failure. The most popular reason for Gazelle owners to replace the gearbox is oil leakage. It occurs due to worn out seals or bushings, worn out gaskets, as well as poor sealing of the plugs. In this case, you will need to add or change the oil in your car, as well as replace the bushing.
Transmission bulkhead
To make repairs and replace parts, you need to know how to disassemble the Gazelle box itself. Yes, you will have to disassemble it anyway.
There is a chain of actions here:
- bearing cover – rear input axis (bushing) – breather – crankcase separation – fastening the gear shift fork (after putting the car in reverse mode) – lever body and gasket – clamp fittings – switch rods (order – 1, 2, 5, rear, 3, 4) – reverse axle and remove the rear shaft bearing retainer ring – remove the shafts themselves.
The diagram may seem complicated, but if you look at the box in person, everything will become clear. This is what self-removal or replacement of the Gazelle gearbox looks like.
Installation of the entire system is carried out in reverse order. The main thing is to remember to carefully lay out the removed parts so that you don’t get confused during the reverse process.
How to replace a gearbox on a Gazelle
How to remove the box? Replacement of the gearbox is carried out on an overpass or inspection pit. First, drain the oil from the crankcase. Now we remove the cardan. To do this, arm yourself with a file and put a notch on the connecting unit and the continuation of the gearbox on the gazelle. Now remove the support fasteners using keys thirteen and twelve. Using keys seventeen and fourteen, remove the fixation of the cardan to the flange of the main gear gear. We remove the shank and insert a rag into the hole. Now we need to get the lever to install the gearbox. To do this, we get rid of the cover and the top of the lever inside the cabin, unclench the bushing, remove the rubber cushion, floor seal and cover, cap and the lever itself.
Next, disconnect the speedometer from the transmission along with the rear light switch. Now you can remove the transfer case. How to disassemble the gearbox housing? To do this, get rid of the fixation of the exhaust pipes and bracket, disconnect the transmission from the clutch housing, and create protection from a wooden block for the cylinder head. We proceed to removing the transverse fixation of the transfer case and remove the device. Be careful as its weight can reach 30 kg. Install a new element. Be careful not to damage or miss the stepped transfer case.
Now we begin assembling the Gazelle gearbox. The box is assembled in the reverse order. Please note that the shafts must be installed at the same time; to do this, tie them up in advance. Inspect the input shaft, shank, bushing, crankcase, output shaft and all gears. Wash them in kerosene or diesel fuel. If there are signs of rust, sand it down. The fasteners are coated with sealant, and the elements are coated with transmission oil.
Before installing the splines, lubricate them with CV joint-4, and while assembling the cardan, make sure the marks match and pay attention to the gear ratio. It is an important indicator of the adequate operation of a mechanical device. After repairing the Gazelle gearbox, replenish the amount of oil in the crankcase.
Published on August 27, 2016
Where to send you a message - mail.
Video instructions for gearbox repair
Gearbox VAZ 2110 5 mortar device diagram
It is more convenient to work together.
We screw the filler and drain plugs into place.
Remove the power unit support.
Remove the reverse light switch.
Remove the speedometer drive.
Remove the coupling with the bearing and the foam rings of the front cover.
Using a 12mm wrench, unscrew the three bolts securing the bearing cover (the bolts are installed on the sealant).
Read more: How to distinguish a forged wheel from a cast one
Remove the cover with gasket.
When installing it later, pay attention to the coincidence of the oil drainage channel in the cover and the hole in the crankcase
Using a screwdriver, we remove the cuff of the input shaft from the cover (when disassembling the gearbox, we replace all cuffs regardless of their condition).
Using a mandrel or a head of suitable diameter, we press in a new cuff.
Using a 13mm wrench, unscrew and remove the bolt securing the reverse gear axis bushing to the front crankcase
Using a thin screwdriver, pry up and remove the retaining ring of the input shaft bearing
Using a 12 key, unscrew and remove the breather.
Using a 12mm wrench, unscrew the ten bolts connecting the front and rear crankcases (the two bolts passing through the mounting sleeves are longer than the others).
11
Carefully tapping with a hammer through a brass mandrel, uncouple the front and rear crankcases
In this case, you must not strike the end of the input shaft, as the synchronizers will be damaged.
We disconnect the gearbox housings
Carefully, trying not to damage, remove the sealing gasket
We remove the adjusting shims from the bore under the intermediate shaft bearing in the front crankcase (they may not be there).
In this case, the axial clearance in the bearings is established only by the inter-crankcase sealing gasket.
In 2013 Russia saw the new Gazelle Next. The developers of this model focused on the car's cabin. Everything for the comfort of the driver and passengers. But it was not taken into account that cars such as Gazelle Next drive long distances. And for this you need not only comfort in the cabin, comfortable seats, but also order under the hood of the car. The factory installed a 5-speed Gazelle Next gearbox. The new manual transmission has an assembly with parts from different manufacturers. When passing 40 thousand, switching speed from 2 to 3 or from 4 to 5, the driver begins to hear noise, crackling and other strange sounds. To determine what kind of sound it is, you need to have at least a superficial idea of what it is?
This is what Gazelle-Next looks like
Checkpoint performance test on site.
Raise the rear wheels of the car (jack up and place the rear axle of the car on supports), start the engine and slowly engage the gears one by one (create an imitation of the car’s movement). Test the performance of each transmission for about one minute. WHAT WILL IT GIVE!? Firstly because the gearbox parts have been thoroughly washed, then the initial operation of the gearbox will be dry, despite the fact that the oil has already been filled (oil will not get into all the gaps at once, if you pay attention, only the intermediate shaft is in an oil bath, and it is the oil distributor in the gearbox, in As a result, the operation of the primary and secondary shafts is dry, although where gears and bearings were available, they were lubricated during the assembly process), and when the vehicle is operating without load, it will allow the oil to be painlessly distributed inside the gearbox system, and secondly, in case of unforeseen circumstances (sudden output failure of any element, breakdown, etc.) the operation of components and assemblies will be without load, which will avoid more serious breakdowns.
Possible malfunctions during operation of the transfer case
Transfer case malfunctions are similar to problems with a conventional transmission. Among them are:
- breakage or chipping of gear teeth;
- gear shifting spontaneously;
- Noise is noticed when the gears operate;
- 2 gears are switched on simultaneously;
- Gears are difficult to engage.
Oil leaks from the transfer case due to damage to the sealing gasket or wear of the seals. A crack in the housing may also be the cause.
Gear noise when shifting gears occurs when the clutch breaks down or is not adjusted correctly. It is necessary to replace the failed part. But noise when the Gazelle moves may indicate poor lubrication of parts or wear of bearings.
Knowing these and other faults, you can easily prevent more complex breakdowns of your car. We hope that these simple features of operating the Gazelle transfer case will be useful to you!
Speed tables
When driving in a five-speed gearbox, the speeds change slightly and the maximum speed remains the same around 150 km/h. However, the comfort of movement is greatly improved and noise in the cabin is reduced. Speed table with 4-speed gearbox
Speed table with 5-speed gearbox
It is not advisable to spin the ZMZ-402 engine more than 3,000 rpm, because this affects the service life of the motor. Therefore, I highlighted the most comfortable speed in 5th gear with a green quadrangle and in it I placed the speeds for 4th gear at engine speeds of 2,500 and 3,000. Thus, due to the accelerating 5th gear, it is even possible to save fuel.
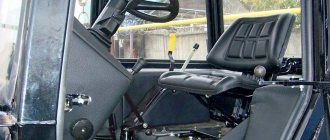
GAZ 3110 | Gear shift
Gear shift and lever position
Manual transmission
The gear shift positions are shown on the handle. Before engaging reverse gear, you must lift the ring under the lever handle.
When changing gears, fully depress the clutch pedal and then release it smoothly. It is not recommended to drive the car with one hand on the gearshift lever, as this increases wear on the gearbox.
When shifting from fifth to fourth gear, do not push the lever laterally to avoid accidentally engaging second gear, which could cause the engine to overspeed and cause engine damage.
Before engaging reverse gear, make sure that the car is at rest and your foot is not on the accelerator pedal. Move the lever from neutral to the right all the way, and then engage reverse.
The table below shows the driving speeds at which you should engage the next gear for maximum fuel economy.
Dismantling the box
The gearbox is one of those parts of the car whose repair begins with complete removal. For newcomers to the automotive business, the task may seem titanically difficult, but this is not entirely true. It is enough to thoroughly study the diagram of the box itself (in this case, the gazelle gearbox, consisting of 5 steps) and its connections with the rest of the vehicle in order to understand how to remove it. So, let's begin.
Stages of removing the gearbox from a Gazelle:
- First of all, you need to drain the oil from the crankcase.
- Next comes the dismantling of the driveshaft. There is one nuance here: before starting removal, you MUST mark with a file or other tool the locations and directions of the location of the hinge and the box extension. And in general all commutations (rear axle and flanges). Then, we proceed to removing the intermediate support fasteners. You can purchase the set of tools required for this yourself, or they can be included in the standard gearbox repair kit. Next you need to separate the shaft from the main gear flange. Left a little. You need to remove the shank of the box. To do this, you need to slightly pull it back and carefully pull it out. The resulting hole needs to be plugged with some rags or unnecessary old clothes.
- We take out the gear shift lever. Everything is simple here - remove the cover and the top of the lever from the cab, unlock the bushing and remove the rubber cushion along with the second bushing. All that remains is to remove the seal with the cover and, turning out the cap, remove the lever itself
- It remains to disconnect the remaining elements from the gearbox - the speedometer and the light switch (reverse). Now you can remove the box itself. To do this, you need to unscrew the receiving pipes and the bracket to the box using the appropriate fasteners. Then we separate our gearbox from the clutch housing by removing the necessary fasteners. But now we will need a medium block of wood, or a small log - this is needed to protect the block head. Now, having removed the transverse fastening, we remove the box itself. Given the significant weight, it is advisable to prepare in advance.
Manual transmission mechanism
A 5-speed gearbox is a gear reducer that transmits torque from the engine to the wheels. The new gearbox has:
- 2 craters connected by bolts;
- primary, intermediate, secondary shaft. The first and second mechanisms are connected to the cardan and crankshaft.
Appearance of manual transmission on Gazelle NEXT
The intermediate shaft has teeth for first and reverse gears, as well as a gear block and a speedometer drive:
- synchronizers;
- speed fastening components;
- single gear activation blocker;
- device for damping vibrations.
Watch the video: Repairing the gearbox on Gazelle Next.
In 2016, when improving the Gazelle Next, the developers slightly changed the gearbox design:
- changing the width of the gear rims;
- installed the intermediate plate of the second and intermediate shaft;
- bearings were supplied of improved quality for increased load capacity;
- flange contact of cardan transmission.
- Synchronizers from Hoerbiger.
- Joystick handle.
This is what the Gazelle Next gearbox looks like
The designer also strengthened the rear axle for load capacity, and with all this there is a Chinese diesel power unit.
This modernization gave a positive result - high reliability, increased service life, torque transmission of 330 Nm.
External view of the Gazelle Next power plant
During the first inspection of the car, experts give recommendations on how best to run the car and at what speed the speed should be changed. Many car enthusiasts do not pay attention to this fact, since everyone considers themselves professionals. As a result, a problem occurs with the box - it makes noise, knocks, and behaves incorrectly.
Breaking
If the manual transmission is noisy, there are reasons for this:
- the bearings performed their functions to the end;
- lack of oil.
The second problem is much easier to solve than the first. Check the amount of oil and “add” it.
We advise you to watch: how to repair a manual transmission on Gezali.
The first option requires replacement of spare parts. This is done either in a service center by specialists (if the car is under warranty, this is a big plus for the owner), or manually (but not by yourself). Only a person who knows the business can disassemble and assemble the checkpoint. This procedure requires knowledge, patience and perseverance.
So, the first thing to do is drain the oil. After this, remove the cardan. Mark the hinge points and the box extension, remove the clamp. Unscrew the cardan mount and remove the shank (move it back and pull it out). The result will be a niche. Next, remove all the necessary parts in the cabin, turn off the speedometer and light elements. After these steps, the box is removed and disconnected.
Gearbox design for Gazelle Next
In order to begin disassembling the gearbox, it needs to be made clean (washed thoroughly). Disassembly is carried out step by step only by a knowledgeable person. At the slightest mistake, the gearbox may not work correctly on the Gazelle Next or, in general, show no signs of life. After disassembling the box into parts, they should also be washed from traces of oil.
The cause of the strange sound is being found. It could be:
- wear of the secondary shaft bearing.
- Bearing play.
- Bearing idling.
Watch the video: how to replace the rear axle gearbox.
Other problems with component parts may also occur. Worn and broken components are replaced with new ones.
Selecting transmission oil for manual transmission
SAE 75W-90
Regular transmission inspections ensure safe and comfortable driving. The main factor in maintaining the transmission system in good condition is the use of high-quality oil.
For GAZelle, it is recommended to use gear oil with a viscosity of SAE 75W-90. It provides reliable protection against gearbox wear and corrosion and has good fluidity at low temperatures.
Changing the transmission oil can be done by yourself; it is prescribed at 60,000 km. However, it is possible to carry out this procedure earlier, for example, if you often travel cross-country.
Thus, the GAZelle model 3302 should not be overloaded. A properly functioning gearbox will ensure the normal operation of other vehicle systems. The main reason for expensive mechanical repairs is the driver’s neglect of regular maintenance. Malfunctions with the gearbox also occur due to the fact that low-quality fuel was used. The entire transmission system suffers from this. The problem can be avoided if you constantly monitor the fluid level in the GAZelle 3302 gearbox.
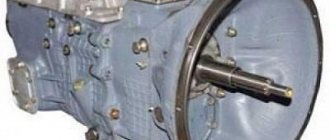
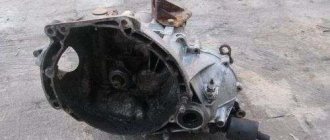
Design and principle of operation
As with any car, the Gazelle’s gearbox performs the most important transmission functions. It converts and transmits torque to the wheels from the engine. Therefore, a lot depends on the quality of operation of this unit. For example, the comfort and safety of people, because any malfunction of the gearbox carries the risk of accidents.
The small Russian car is equipped with a manual 5-speed gearbox. Despite the manufacturer's assurances that it is durable and unpretentious, most owners claim the opposite. The reliability of the unit is poor primarily due to constant excessive loads, since commercial vehicles can be operated for 24 hours straight.
The main elements of the checkpoint are:
- double crankcase;
- gears;
- main shafts and intermediate;
- synchronizers, balls, springs;
- gear shift mechanism.
The crankcase is made of aluminum alloy for lightweight purposes. It consists of two parts: front and rear with extension. They are securely connected with 10 bolts through a 0.33 mm paronite gasket. To ensure alignment of the shaft ends and rod holes of the switching mechanisms, they are centered with special bushings pressed into the crankcase.
The shafts are equipped with other unique parts. For example, the secondary shaft is limited from axial movements by retaining rings and special thrust half-rings. A collar is also provided. The input shaft is equipped with a drive gear for the speedometer drive. All shafts, including the intermediate one, have gears, and at the ends there are roller or ball bearings and retaining rings/half rings. A special place is occupied by bushings, fixing pins, spring washers and 0.2 mm shims. The drive and driven shafts are connected at their ends to the engine crankshaft and crankcase. The intermediate shaft is located inside the box body.
The gear shift mechanism, in addition to the lever, is equipped with springs, a seat, seals, a thrust cone, and bushings. There are a lot of washers, plugs, and dowel pins. Speeds are switched using forks - there is a separate one for fifth gear and reverse gear. The locking device or fuse consists of two plungers and a locking pin. To prevent accidental engagement of reverse gear, a separate bushing with a spring is provided.
Recommendations for extending the service life of the unit
Without proper care, the Gazelle gearbox quickly breaks down. Some explain this by the mismatch of the unit for a truck. As you know, the box used here, albeit modified, is from a passenger car. Therefore, the slightest overload or prolonged operation has an extremely negative effect on the resource. Already by the 80,000th mileage, gears begin to fly out, crackling and noise appear.
Other recommendations:
- do not load the car above the norm of 1.5 tons;
- drive on good roads, avoiding gravel and complete off-road conditions;
- monitor the clutch, refill technical fluids on time.
Repairing and disassembling the Gazelle gearbox is not an easy task, but following the instructions, you can handle the operation yourself. If something doesn’t work out, you can always take the box to a service center or call a specialist to your home.
GAZ Gazelle 3302 “Kostya old man” › Logbook › Gearbox repair
Having installed new wheels, we began to deal with the second big problem, namely, difficult gear shifting; upshifting occurred normally, but downshifting was difficult. I suggested to Kostya that he sort through the box himself; first of all, there is no need to pay the service, because... There are big problems with money, then of course I wanted to do it well, but the service department does it too quickly, 4-5 hours for everything, removal, repair and installation, and of course I really enjoyed it myself))). But Kostya was a little freaked out, he still didn’t know me well, and didn’t quite believe that this could be done by the two of us, but he agreed, he liked cost calculations and he also wants to learn how to do independent repairs. First of all, I want to say a big thank you to my father, at my request, he agreed at work to put the car in a pit for the weekend, which we really needed, and his work is located not far from our garages. And so on Friday evening we put the Gazelle in the pit, and while Kostya was driving from work to the garage, my father helped me remove the box and take it to the garage, and there was heat and all the tools. So, Kostya had almost arrived, and while he was still driving, I managed to drain the oil.
It looks like the oil hasn't been changed since the previous gearbox repair.
And so Kostya and I, in a few hours, disassembled and defected all the parts of the box, so that the next morning we could go to the store and buy everything we needed.
This is me, in the process of disassembling the secondary shaft
We bought everything we needed.
Two new forks with nuts, two rings for the couplings, one synchronizer, three bearings and all seals with gaskets (parts missing in the photo)
The washing up
Kostya single-handedly washed all the parts of the gearbox first in gasoline, then a second time in a wax and, of course, the body too. At that time I was doing something else with the car, which I will write a separate blog about later, so as not to mix everything up.
I don’t know how others rearrange the rings on the couplings, I just heard a complete reassembly...
I did it in 2 seconds, squeezed out the inside a little, placed a new ring in alignment and squeezed out all the insides into it.
And here it is assembled, so to speak, a new secondary shaft.
We didn’t have time to take any more photos, because... It was already late and we really wanted to go home. Both bearings on the intermediate shaft were replaced. One came off quite easily, but the second one had to be tinkered with. It was impossible for the puller to catch on to it, and I couldn’t think of anything else how to block the bearing and carefully cut it off with a grinder.
Everything was assembled into a housing, with new seals, with new gaskets, everything was sealed, the reverse sensor was also sealed.
We installed the gearbox back on the car and filled in new oil.
The rocker lever was covered in burrs...
I think it shouldn't be like this...
I carefully polished off all the burrs, generously lubricated everything with saltedol and installed it in place.
The gearshift lever ran all over the cabin, did not hold on at all, it could be removed while driving, hit the passenger, and put back in))). It was customary to make the most reliable and durable way to attach it, a piece of oxygen hose of a suitable size. I won’t describe it, because... The Internet is full of video information about this...
A hose instead of all these plastics and rubber bands and a new casing.
I dressed very tightly and a little not completely, because... It’s winter outside, and the hose is hard, in the summer I’ll put it on all the way...
Diagnostics and bearing replacement
To carry out visual diagnostics of the bearing, you need to drain the transmission oil and remove the casing from the gearbox, and dismantle the box itself. Without professional experience, it is better not to do this work yourself, as serious damage to the transmission system can be caused. You can order repair and restoration work from a specialized service.
When disassembling and assembling the box, strict adherence to safety precautions and accuracy is required.
It should be noted that SKF bearings can be installed on the Gazelle. Component parts from this brand are in demand among consumers. The demand is explained by the fact that the offered spare parts withstand temperature effects well. The SKF input shaft bearing has an increased service life, requires virtually no lubrication, and tolerates high rotation speeds well. Thanks to the treatment of their surface, there is a decrease in vibration and noise during their operation.
Thus, the need to replace the primary or secondary shaft of the gearbox arises if they have external damage. These mechanisms should not show any contamination. Since they experience constant loads, gearbox spare parts may prematurely lose their functions. Also, poor lubrication or improper installation can cause premature failure of these mechanisms. A set of gazelle gearbox bearings should be purchased from an official manufacturer, who provides a guarantee for their products.
The comparative cheapness, coupled with the spaciousness of this car, classified as a commercial vehicle, made it a real “workhorse”. It is in demand and is used throughout the CIS. Another sign of a classic work machine is the ease of finding spare parts. When you need to repair a Gazelle gearbox, and the gearbox is the worst of the components of this Russian light-duty car, you can safely go through everything, from bearings to synchronizers. These parts are available for sale at any auto store.
The most common symptoms and troubleshooting methods
Despite the structural simplicity of the unit, repairing a Gazelle gearbox with your own hands involves serious work. Without the proper knowledge and skills, it is better not to touch the unit, so as not to make it worse. To replace damaged parts, the box must be dismantled and disassembled.
There is a noise in the box
Most often, a sign of a mechanical malfunction is a dull hum or crunch, indicating weak fixation or destruction of the bearings. An unpleasant cracking sound is also possible, indicating damage to the synchronizer rings. Often the box howls, and in completely different ways. The strength of the sound and its character depend on the speed of movement, the specific gear, and the duration of driving.
It is noteworthy that the characteristic noise does not always indicate a gearbox malfunction. Especially if the elements of the box have recently been replaced. In this case, the howling will only be a sign that the parts have not yet gotten used to it. Often, the crunching of the gearbox is confused with malfunctions of the clutch or other related units. And any experienced Gazelle driver will confirm that until you disassemble the box, the specific cause of the noise can only be determined with a 50 percent probability. But a competent bulkhead will help you immediately find the problem area. Before this, of course, you need to check the oil level. If it's ok, you need to disassemble the gearbox. Anything can turn up during the troubleshooting process. For example, there may be a mismatch in bearing markings, missing washers, or incorrect sizes.
Thus, noise in the Gazelle gearbox is caused by wear of bearings, gears, synchronizers or their destruction, breakdown, as well as a low level of MTF or its poor quality. The alignment of the crankshaft and crankcase is rarely disturbed, but it doesn’t hurt to check the runout of the mounting hole for the box.
Difficulty shifting gears
If it becomes difficult to change gears, this indicates one of the problems:
- synchronizers or gears of a certain gear are worn out;
- the lever or other switching mechanisms are damaged - most often the fork;
- problem with the clutch - it does not engage completely, the pedal drive cable is loose, the driven disc is damaged.
Often, poor gear engagement is due to design flaws in synchronizers. When the clutch plate is pressed against the flywheel or pressure plate, the bearing in the crankshaft creates resistance. This is enough to block the inclusion of speeds.
It also happens that it is difficult to change gears on a warm engine, but when it is cold everything goes like clockwork. The point here is that initially there is a thick layer of lubricant between the synchronizer thrust ring and the gear. After the temperature rises, the oil liquefies, the ring and gear are rubbed almost dry, and the coupling rests against the teeth of the ring. Either a high-quality grip, such as HOLA, or another MTF compound will help.
Speeds do not turn on
In this case, you need to urgently check the fluid level in the clutch reservoir. It is possible that a leak has occurred through a damaged main circulation center or control center. It is possible that air has entered the system, then you can get by with a little blood by expelling it through the fitting.
If the fluid is ok, then the problem is with the gearbox, or more precisely, with the switching mechanism. More often the fork breaks down - it bends or is pierced by the rod, and then it becomes impossible to engage a certain gear. It is not uncommon for the tide-limiter on the synchronizer to grind off.
Instructions
- We go into the hole.
- Pour out the oil (one liter is enough).
- We get rid of the wheel bolts and remove the nut from the bearing (front hub only).
- Where the lower ball joint is located, unscrew the two bolts.
- Now we direct the lower lever down. And pull out the end of the drive.
- Get under the car and pull in the drive.
- Using a screwdriver, remove the oil seal itself.
There is a new oil seal in your hand.
Now we take the new part and insert it. There is no need to press all the way. Now everything is the other way around, push the box back, point the lever up, tighten the bolts, put on the bearing. And most importantly, don’t forget to pour the oil back in!
Done, the Gazelle gearbox repair was done with your own hands.
We wish you a smooth and problem-free ride! Remember that many problems can be solved on your own, without resorting to service centers and expensive procedures. You can learn everything even the first time.
Design overview
The assembled design of the new sample synchronizers (hereinafter referred to as NO) looks like this:
The hub with the clutch, the ring gear and the synchronizer itself were changed. Next, let's look at the differences in more detail. There are 6 holes on the crown of the NO gear into which a brass ring is inserted:
Old-style gears have a different type of crown; instead of holes, they have a cone with which a brass ring is in contact:
For comparison, on the sides there are NO synchronizers, in the center there is a brass ring of the CO synchronizer:
The main difference between synchronizers is that in the old one a brass ring rotates with the clutch, in the new one it rotates with the gear, and the outer and inner rings rotate together with the clutch:
The difference between the HO hub is the grooves for the projections of the inner ring:
The wear of the NO synchronizers is determined by the gap from the end of the outer ring to the gear:
As measurements have shown, the inner ring practically does not wear out:
The brass ring is wearing out, as can be seen from the cross-section of the oil channels:
The second place of increased wear is the teeth of the outer ring
With regular replacement and sufficient oil level, there should be no wear in the remaining synchronizer components:
When assembling the secondary shaft, it is important to position the rings correctly, as in the photo. Otherwise, trouble may happen, but more on that in the next part:
Next, I will try to explain how the synchronizer works. Common to all synchronizers is the movement of the teeth of the synchronizing ring relative to the coupling - but it must be within one tooth of the coupling and when the coupling moves, it must fall on the outer side of the tooth of the synchronizing ring, with further sliding of the tooth along the tooth, displacing the synchronizing element to the center, into the gap between clutch teeth. Depending on the direction of torque transmission, these will be different positions:
The fundamental difference between the NO and CO synchronizers is that the CO synchronizers have a working surface on one side, while the new type synchronizer has a brass ring clamped on both sides, that is, the working surface is twice as high. Also, the new type of synchronizers have vertical slots for oil drainage, which increases the speed of gear engagement:
Active Antenna Feature
An active antenna receives a radio signal and, using a special amplifier, increases its power. The amplifier can be assembled based on semiconductor transistors or more complex microcircuits. The signal applied to the input increases its power due to the DC current applied to it through the amplifier components.
Each active antenna requires additional power supply from a battery. For this purpose, modern car radios have a special positive contact that supplies voltage to the active antenna only when the device is turned on. Despite the fact that the current consumption of the antenna is very small, it must be connected in such a way that it does not work in vain.