mileage 15 km after repair
Already traveled almost 1000 km Catalog numbers and spare parts manufacturers:
1. Primary shaft: 1.1.
Front single-row radial roller bearing: Catalog number
: 2108 - 1701031, 42205, NJ 205 (international name)
Manufacturers:
• EPK plants (Saratov, Volzhsky, Aviation Bearing Plant) produce the following varieties: 42205 KM (SPZ), 42205D1 (ZAP), 6-42205 A1E1USH1 (SPZ and VPZ), the latter is the most common and in demand.
• 10 GPP (Rostov-on-Don) offers modification 42205 AEM. These products occupy an intermediate position in the quality-price range. • The Samara SPZ-4 plant produces the simplest modification of this type, with a polyamide separator. They are very cheap, but knowledgeable motorists prefer not to use them. • If you are offered a “Vologda bearing” of this type, then it is a Chinese counterfeit (23 GPZ does not make them now). Catalog numbers
: SKF NJ 205 ECP; KOYO NJ205; Toyota 97123-06205; 6205ZZ; 93306-205U6-00 (Yamaha); 6205ZZCM
1.2. Rear radial ball bearing single row: Catalog number
: 2108 - 1701033, 50305, 6305 (international name) Quantity: 2 pcs.
Manufacturers:
• 3 GPP (Saratov) and VBF (Vologda), as well as HARP (Ukraine) - prices and quality are higher.
• GPZ (Moscow), SPZ-4 (Samara) (low quality, low price), • It is not recommended to buy bearings with other markings, since these are most likely Chinese products, which bear the markings of the companies ordering their production. The imported analogue is designated 6305. Closed 6305 ZZ and 6305 2RS (metal or rubber plugs). A bearing with a thermal gap is designated 6305/C3 (analogous to 76-305). Metal plugs - ZZ, rubber plugs - 2RS. Products of the SKF, FAG, KOYO brands are much more expensive and reliable than others. Catalog numbers
: SKF 6305 N; NTN-SNR 6305N; Toyota 90099-10142; 6305DDU; 6305NR; 90601-0012 (Subaru); 97100-06305; 5-81229-104-0
2. Secondary shaft: 2.1. Front single row radial roller bearing: Catalog number
: 2108 - 1701180, 42305, NJ 305 (international name)
Manufacturers:
• EPK plants (Saratov, Volzhsky, Aviation Bearing Plant) produce the following varieties: 42305 KM (SPZ), 42305LM (SPZ), 6-42305 A1E1USH1 (SPZ and VPZ ), the latter is the most common and in demand.
• 10 GPP (Rostov-on-Don) offers modification 42305 AEM. These products occupy an intermediate position in the quality-price range. • The Samara SPZ-4 plant produces the simplest modification of this type, with a polyamide separator. They are very cheap, but knowledgeable motorists prefer not to use them. • Some suppliers will also offer you the Craft brand. These Chinese bearings are the cheapest, but are completely unsuitable for installation in car gearboxes. Catalog numbers
: Koyo NJ 305; Coram NJ 305
3. Gearbox secondary shaft bearing, single-row needle without rings in a plastic cage (for speed gears): Catalog number
: 2108 - 1701108 Quantity: 5 pcs.
Dimensions: 30x36x25 Catalog numbers
: K32X37X27 (SKF), PW-P1108 (Pilenga)
4. Single-row tapered roller differential bearing: Catalog number
: 2108 - 2303036, 7207, 30207 (international name) Quantity: 2 pcs.
Catalog numbers
: NSK 30207, KOYO 30207JR; HR30207J; MB 393957; MT 202119; MA 125934 (Mitsubishi)
5. Seals: 5.1. Drive seal: Catalog number
: Corteco 12015250\Corteco 12015250B 5.2.
Input shaft oil seal: Catalog number
: Corteco 19034619B\Corteco 19034619 5.3.
Gear selector rod oil seal (yoke oil seal): Catalog number
: Corteco 12010803\Corteco 12010803B
6. Reverse gear Pilenga Catalog number
: GB-P 0850
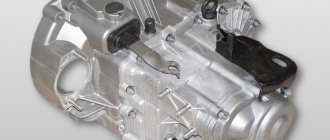
7. Engine mounts. Manufacturer: BRT 7.1. Side engine mount bracket for LADA Samara 2108-1001040-10RU 7.2. Rear engine mount bracket for LADA Samara 2108-1001031-10RU 7.3. Front engine mount bracket for LADA Samara 2108-1001015-10RU
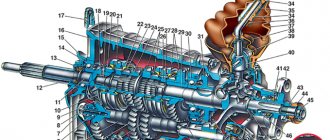
Features of power plants
The VAZ 2112 (Lada) car can be equipped with 16 valve power units, which have a volume of 1.5 liters, and the power reaches 93 horsepower. The power supply system of this car is injection. It is recommended to use AI-95 gasoline. In the urban cycle, it consumes about 10 liters per 100 km. The VAZ gearbox in this case is mechanical.
Cars with a 1.6-liter engine, which is equipped with a manual transmission (5 speed) and produces 89 horsepower, have become widespread. VAZ is less demanding on fuel quality, so AI-92 can be filled here.
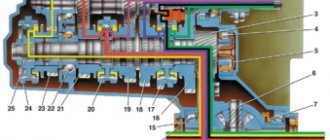
Manual transmission diagram Gear shift diagram
In what cases should the gearbox be removed?
Before removing the gearbox, you should make sure that the malfunctions are related specifically to it and are not caused, for example, by insufficient oil level, loose gearbox mounts, or defects in the clutch release drive.
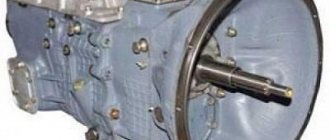
Gearbox VAZ 2110
The need to remove the gearbox occurs when the following malfunctions occur:
- transmissions switch off spontaneously;
- unclear gear shifting;
- increased noise, appearance of extraneous sounds;
- when overtaking, the clutch disappears;
- gears are difficult to shift;
- oil leaks.
In addition, the gearbox should be removed in the following cases:
- when replacing the clutch;
- when replacing an old gearbox with a new one;
- if it is necessary to eliminate the leak of the crankshaft rear oil seal;
- when replacing the front gearbox oil seal;
- when replacing the release bearing;
- when replacing the flywheel;
- when replacing the bushing;
- in cases where the box interferes with any repair work.
Removing the gearbox
How to remove the box? Before disassembling the gearbox, it must be cleaned. It is important that water does not get inside the box.
Main stages:
- Power from the battery is turned off.
- The block is disconnected from the speed sensor.
- Transmission fluid is drained.
- The bolts securing the jet thrust are removed.
- It is necessary to remove the constant velocity joints from their standard location.
- The existing ball joint bolts are loosened.
- Using a tool, unscrew the nuts holding the clutch cover to the gearbox housing.
- The bolts securing the gearbox to the engine are disconnected.
- The power plant must be lifted (use a jack).
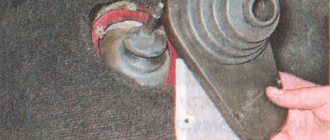
- The engine mounts must be removed.
- To pick up the gearbox, you can use a screwdriver.
- The speed box slides off the guides. The input shaft should disengage from the clutch.
The process of filming from a regular location requires caution. That is why this procedure should not be carried out alone. Repair of a VAZ gearbox, its dismantling and assembly should be trusted to professionals. This will reduce the chance of damage to any components of the gearbox.
Thus, if it is necessary to remove the gearbox on a VAZ 2112, the vehicle is placed in an inspection hole. Next, you need to disconnect the battery terminal, mudguard, stabilizer, and nuts. The sensors need to be disconnected. Also, the gear shift lever must be removed. The oil is drained (about 5 liters are required).
Do-it-yourself instructions for replacing (removing and installing) VAZ 2110,2112 gearbox
If the transmission is removed in order to repair the clutch, release bearing or flywheel, then it is not necessary to drain the transmission oil and pull the drive out of it.
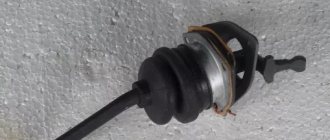
It is necessary to remove the gearbox on a VAZ 2110 with an assistant. Procedure: 1.Remove the starter, battery and drain the oil. 2. Disconnect the clutch cable from the release fork. To do this, loosen the tightening of nuts 1 and 2, then remove it.
3. Slide the cover off the cable sheath and unscrew the fastening nut. Remove the cable from the bracket on the gearbox.
4. Disconnect the wires from the speed sensor. You need to compress the spring clips.
5. Unscrew bolt 1, which secures the ignition bracket to the VAZ 2110 gearbox, and two bolts 2 and 3, which secure the box to the engine.
6.You also need to disconnect the reverse sensor connector; it is located at the bottom of the car.
7. Unscrew the bolts securing the jet rod to the gearbox, there are two of them.
8. Loosen the bolt of the gear shift rod clamp and disconnect it from the rod hinge, while it needs to be moved back.
9.The next step is to remove the wheel drives, and instead of the left one we put a plug, which can serve as an old CV joint, and tie it so that it does not fall out. It is not necessary to remove the right drive; you can disconnect it from the gearbox, take it to the side and hang it from the body.
10.To make it easier to remove the gearbox on a VAZ 2110,2112, unscrew the left ball joint from the steering knuckle.
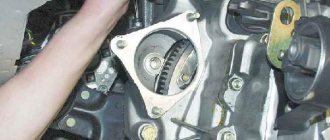
11.Unscrew the lower right mount of the gearbox. You should know that on engines with an injection system, a support bracket 2 is installed, which we remove from the stud.
12.If necessary, unscrew the top nut of this bracket.
13. Unscrew the bolts securing cover 1 from clutch housing 2, there are only three of them.
14.Next, you need to unscrew the bolt of the lower left fastening of the VAZ 2110 gearbox to the engine.
15.We hang the engine as follows: install a board on the front fenders, placing rags under it, as shown in the photo below.
16. We tie the power unit to it using a strong rope, cable or, as in the photo, using an old seat belt. The ropes must be in tension.
17.Unscrew the nut securing the left engine mount from the bottom of the car.
18.Then you need to unscrew the two nuts of the rear support of the power unit.
19. We unscrew the fastening of the rear engine mount to the VAZ 2110, 2112 gearbox, while using another wrench we hold the nuts from turning and remove it.
20.Insert a pry bar or screwdriver between the cylinder block and the clutch housing, slide the gearbox off the guide bushings, supporting it.
21. We move the VAZ 2110, 2112 gearbox as far as possible to the left side of the car, passing the rear cover over the stretcher, and the input shaft will disengage. If the shaft does not come out, then push the engine in the opposite direction from the box. As soon as the shaft is disengaged, the box can be removed from under the car.
22.Reinstalling the gearbox is done in the reverse order. 23.Then we install the drive wheels. 24. Fill in the transmission oil, if drained. 25.Then follows the adjustment of the clutch release drive. 26.Adjusting the gear shift lever.
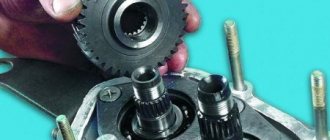
Disassembling the box
It is necessary to disassemble the gearbox if you are replacing worn components. The process begins after the box has been removed from the vehicle. The VAZ 2112 gearbox is installed vertically on the clutch housing, the bolts and nuts are unscrewed. The back cover, bracket, and stem must be dismantled. Using a spanner, unscrew the installed mounting bolt on the 5th gear fork. To unscrew the shaft nuts, use a socket socket. Next, the fork, coupling, and hub are removed. It is necessary to dismantle all fixing, fastening elements, and the locking ring. The box housing is removed. All fastening bolts, rod, and protective cover are removed. Access to the shafts, differential, and gear selector is available.
To replace the rod hinge on a VAZ 2112, you should use a 10 mm spanner. When replacing the differential, you must remove the satellite axis and two satellites from the metal body. Next, the driven gear bolts are unscrewed. If the satellites or driven gear are damaged or the gear teeth are worn out, they must be replaced. Before installing new consumables, they must be lubricated with transmission oil. It is quite possible to repair a faulty box yourself.
Instructions for removing the gearbox
The procedure for removing the gearbox is labor-intensive and time-consuming. It’s easier to replace it with a VAZ 2110 by visiting a car service center, but you can do it yourself.
Tools
To carry out the procedure, you will need tools consisting of:
- a set of wrenches, socket or open-end wrenches;
- set of heads with extensions;
- flat screwdriver;
- mounts;
- pliers;
- jack;
- clean rags.
In addition, you should prepare a container to drain the used oil. You can use a plastic 5 liter bottle.
Tools should be prepared in advance so that they are nearby while working.
Sequencing
To remove the gearbox, you need access to the underbody of the car, so it needs to be lifted. This can be done using a lift, or driving the car onto an overpass or inspection groove.
Since the removal work is quite complicated, you will need an assistant.
The following video demonstrates replacing the clutch, the first step of which is removing the gearbox.
Removing the front wheel drives of a VAZ-2110 car
We remove the drives to replace them or when dismantling the gearbox. Repair or replacement of the drive is required if there are knocking noises when cornering, increased vibration that occurs when the joints wear out
Wear of the hinges is caused by sand and dirt getting into the internal parts of the CV joint, when the rubber boots rupture.
We carry out the work on an inspection ditch or a lift.
To do this, remove the engine splash guard:
Using a 10mm socket, unscrew the five nuts for the front fastening of the mudguard to the body.
Use a 10mm wrench to unscrew the screws on the front plastic shield.
Using a 10mm wrench, unscrew the screws for the rear fastening of the plastic shield
Using a 10mm wrench, unscrew the two bolts securing the mudguard to the side members
To do this, drain the oil from the gearbox, use a 17 key to unscrew the plug and drain the oil into a container (volume - 4 l).
After draining the oil, screw the plug back in
We unscrew the front hub bearing nut, to do this we remove the hub cap
Use a narrow chisel to straighten the dented collar of the nut.
We lock the rear wheels with the handbrake, engage first gear and place shoes under the wheels.
Use a 30mm socket to loosen the hub bearing nut.
Loosen the wheel mounting bolts.
We hang up the front of the car and remove the wheel.
Unscrew the two ball joint mounting bolts
We move the steering knuckle with the stand to the side and remove the drive from the hub.
Having placed the drive on the stretch...
Resting the mounting blade on the clutch housing boss, we push the inner joint housing out of the gearbox.
Be careful not to damage the protective ring on the inner joint housing.
Use a screwdriver to pry up the retaining ring, which secures the drive in the gearbox.
...and remove it from the splined end of the inner joint housing.
If you need to dismantle the second drive or remove the gearbox, you must install a plug in the hole that approximately follows the shape of the shank of the internal joint housing.
To do this, you can use a wooden plug.
We dismantle the left drive in the same way as the right one.
In this case, it is convenient to rest the mounting blade on the wheel mounting bolt inserted into the recess of the gearbox housing.
Press out the inner joint housing and remove the left drive.
When installing the drive, it is advisable to replace the retaining ring on the shank of the internal hinge housing with a new one.
We insert the shank of the inner joint housing into the hole in the gearbox and drive it to its place by pushing the entire drive or tapping the end of the outer joint with a copper hammer.
Tightening torques for main threaded connections when replacing drives:
— hub bearing nut 225.6–247.2 Nm (23–25.2 kgf∙m);
— bolt securing the ball joint to the steering knuckle 49–61.74 Nm (5.0–6.3 kgf∙m);
— wheel mounting bolt 65.2–92.6 Nm (6.65–9.45 kgf∙m).