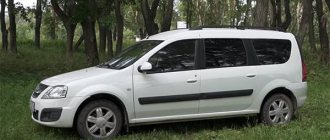
When driving a car, the VAZ 2107 gear shift lever is needed in order to be able to vary the speed using the gearbox. Like any part of a car, it is susceptible to malfunctions, so this article is about how to remove the gearbox lever of a VAZ 2107 and, if necessary, repair or replace it.
The lever itself is a short segment coming out of the switching mechanism (in everyday life a rocker), and its continuation with a knob is called a rod. If it loosens too much, it can lead to difficult gear shifting or it may simply fly off the lever. Such consequences usually result when gear shifting is difficult for some reason, or the damper spacer sleeve has simply become loose over time, or the problem is in the rocker.
Where is
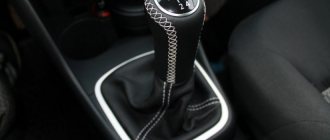
It is located in the car interior, below the dashboard, to the right of the driver (or to the left if the car is right-hand drive). It is used to change gears in the gearbox.
The shift lever is a reliable and stable part. But due to careless and careless use, it also breaks. If you suddenly begin to grab the control lever or press on it, then repairs cannot be avoided. Before you start replacing the VAZ 2107, you need to understand how to remove it from the box.
Gear shift knob
Common illnesses include rattling and loose handles. Let's call this the first stage. If you do not fix the problem immediately, you will have to completely replace the element in the future. This part, like others in the car, must be treated with care and calm. Don’t pull it, hurry up and press it into the “feeder”. If the gears do not shift smoothly and comfortably, then you probably did not press the clutch all the way, or there are problems with the gearbox. And you need to repair it, not the handle.
Device location and characteristics
The gearshift lever of the VAZ 2107 is located directly in the car's interior. It is used to be able to change gears while moving. The gear lever fails only in rare cases, and the reason for this is negligence towards the product. If the product fails, it must be replaced. But before replacing, it is necessary to remove the product in question. We’ll find out in more detail how to remove it, as well as replace it on the “seven”.
On the “seven” the gear shift knob has a common problem - rattling and chattering. If you fix such a malfunction using improvised means, then replacing the device will not be necessary. Before you begin replacing the device, you will need to find out the exact causes of the malfunction. After all, sometimes not only the part in question can “fail,” but also the gearbox or clutch.
If you are convinced that it is the gearshift lever that is faulty, then only then should you start replacing it.
Replacement features
Before you begin the replacement, you need to stock up on tools such as wrenches and a screwdriver. We start with the following steps:
- Set the lever to neutral position.
- After this, you need to slide the top cover up. There is no need to completely remove the cover.
- The next step is to move the cover, which is located below, to the top. This cover is also called a thermal protection valve. In the photo below it is shown with a red arrow.
- Now you need to press the device, pushing it to the bottom. After this, you need to insert a screwdriver into the lower part of the product, where the plastic sleeve is located. The bushing is located at the very bottom of the device, as shown in the photo below.
- It is necessary to move the locking sleeve to the lower part, and then remove the product from the box.
- If the device emits strong vibrations, it needs to be replaced with a new one. In this case, you can exchange the part for a product of shorter length, as on foreign cars. A short device is much more comfortable to operate than a standard product.
Many motorists replace the standard gear shift levers with more modern ones, which allows them to uniquely customize the interior of the Seven.
After the standard product is dismantled, we install a new handle in its place. Let's look at what the installation is.
Instructions
- Place the VAZ 2107 car on stands.
- Eliminate the exhaust system and remove the thermal protection valve.
- First remove the cover from the handle.
Removing the cover
- Remove the retaining clip and washer. And take out the shift rod, it is located on the side.
- Place a wrench at the bottom and turn it 90 degrees. Press out the spherical liner.
- Pull out the handle.
- Lubricate the liner with lubricant.
- Install the handle with the insert (the arrows should indicate the direction of the longitudinal axis).
- Press down on the liner from above. Secure it.
- Attach the cover so that the arrow points forward.
- Place the washers and insert the rod. Screw on the bracket.
- Replace the thermal protection valve, as well as the exhaust system.
- Secure the cover and put on the handle. Record the state.
Now you know how to make this replacement on a VAZ 2107. We hope that our article was useful. Let your car work long and well.
Video “Replacing the gearshift lever”
We offer you to watch a video that shows how to change the lever.
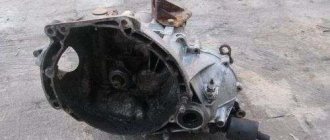
The gearbox is one of the most important components of a car, the smooth operation of which determines the durability and reliability of the car. If it becomes necessary to remove the gearbox to replace it or carry out repair work, you should be sure that in this case it is impossible to do without dismantling the gearbox, since removing the gearbox is a rather complex and time-consuming process, especially if it is performed for the first time. Replacing or repairing a gearbox at a service station is an expensive undertaking, so many owners of VAZ-2107 cars prefer to carry out this work themselves. What should a car owner know who will remove the G7 gearbox for the first time without outside help?
When it may be necessary to dismantle the VAZ-2107 gearbox
Dismantling the VAZ-2107 gearbox may be necessary if necessary:
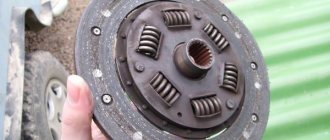
In the case of replacing the clutch, you don’t have to remove the box completely, but only move it to the side so that the gearbox input shaft comes out of the clutch basket, but access to the clutch parts in this case will be limited. Complete dismantling of the gearbox allows in this case to carry out a visual inspection of components such as the clutch housing, as well as the oil seals of the gearbox input shaft and crankshaft, and, if necessary, replace them.
Signs that the gearbox itself needs to be repaired or replaced may include oil leaks, extraneous noises, wheels locking when driving, etc. When the first symptoms appear, you should not delay repairs in order to prevent the gearbox from failing.
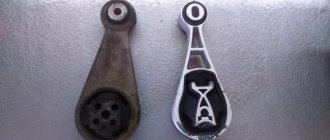
Fastening the VAZ-2107 gearbox
The front part of the box is fixed to the engine with clutch housing bolts. When removing the gearbox, these bolts are unscrewed last. From below, the box is supported by a cross member or bracket, which is attached to the body with 13 bolts and nuts. The cross member has a part called a cushion: it is on it that the body of the gearbox rests. When the pad wears out, vibration may occur during movement, so it should fit snugly against the gearbox housing. The cushion is attached to the bracket with two 13mm bolts. The rear part of the gearbox is connected to the driveshaft with three 19mm bolts.
Video: how to remove and replace the VAZ-2107 gearbox cushions
Repair
If you want to repair, adjust or replace the rocker arm, you will need to remove the assembly.
Dismantling is carried out as follows
- Remove the gear shift knob cover.
- Park the car in a hole or raise the front of the car using a jack.
- Remove the front console. It is held in place by mounting bolts.
- Now remove the rocker itself. In the case of the VAZ 2110 model, AvtoVAZ used 6 bolts to secure it.
- When removing, be sure to check the condition of all components.
- Folding back the dust cover gives access to the bracket, oil seal and universal joint.
Changing the boot
Now about the repairs. There may be several recommendations, depending on the current state of the device and its components.
- At best, repairs will require a repair kit for the control lever. It doesn't cost much.
- If the bushing is deformed, replace it with a new one.
- Check the axle hole in the rocker arm for wear.
- Check for play in the drive shaft. Otherwise, a simple repair kit is no longer enough, i.e. The entire control arm needs to be replaced.
- The control lever cover is often the cause of excessive noise and rattling when shifting gears. The replacement is quite simple and can be done even by a novice.
How to remove a VAZ-2107 gearbox yourself
Before you begin dismantling the gearbox, you should prepare the tools and materials that may be required during the work, and also decide on the location for disassembly.
You can remove it (it’s even easier for one person - no one gets in the way), put a board across the hole, and drag the box onto this board. But it’s probably very difficult to stick one in, the problem is not even the weight of the gearbox, but putting the gearbox on the shaft so that the box “sits”
[x]
https://www.lada-forum.ru/index.php?showtopic=49447
What tools will you need?
To remove and replace the VAZ-2107 gearbox you will need:
- a set of open-end and ring wrenches, among which there must be keys for 10, 13, 19;
- a set of sockets of the same size as the keys, as well as cardan joints with an extension;
- pliers, screwdrivers, tweezers;
- funnel and container for oil;
- jack and wooden beams;
- rags.
Preparatory work
Work on removing the VAZ-2107 gearbox is carried out, as a rule, in an inspection hole, on an overpass or using a lift . The sequence of actions may be as follows:
- the car is raised with a jack on both sides, wooden beams are placed so that the rear part remains suspended;
After this you need:
- disconnect the oxygen sensor;
Removing the gearbox control lever and other work in the interior
Inside the car, you need to disassemble the gearbox control lever. To do this, lift the handle cover and secure the locking sleeve at the very bottom of the lever with a screwdriver. Then you need to remove the bushing from the lever, and remove the lever itself from the mechanism. Using tweezers, remove the rubber lever damper from the pulled out rod. Next you need:
Eliminating rattling
How to remove the gearbox lever of a VAZ 2110
Some people don’t even realize that eliminating the rattling of the gearbox lever in a VAZ 2110 is a completely feasible task, and does not even require special skills. Replacing the VAZ 2110 generator bearing and its. Release the shift knob from the cover in the cabin; Gearbox VAZ 2110. Can be replaced. Of course, you will have to tinker a little, but then being in the car will become much more pleasant. We also remember: what helps one car may not be useful for another car. Therefore, we experiment.
The simplest solution is to install a spring, which is designed to hold the gearbox lever, preventing it from dangling. This type of tuning has a particularly nice feature - you don’t need to disassemble almost anything! Many people wrap the handle with a medical tourniquet before installing the spring to make the fixation tighter.
Installation of washers (plastic or rubber) on the gearbox axle. You will need a plastic lid for a regular glass jar (you can also use other elastic plastic or thick rubber). From it, after a little disassembly of the handle (produced from the salon), several washers are cut out. Replacing the rear struts of a VAZ 2110 in detail -. The first is the size of the sleeve. Here, after lubricating it with lithol, it is fixed. In addition, two more washers are inserted into the slots around the edges of the gear shift mechanism on both sides of the bushing. In this case, you may have to sharpen the bushing a little.
We purchase a repair kit for the scenes. Moreover, it is specifically for the VAZ 2110. It usually includes all those parts that most often need replacement: bushings, washers, a ball joint for the gearbox lever, a lining and a spring that holds the handle in a fixed position and does not allow it to dangle. First, you need to lift the protective and decorative cover in the cabin. After which, using a repair kit, the worn parts are replaced with new ones. Noise from the front bearing of the VAZ 2110 generator on the generator. Replacement of bearings. Gearbox for VAZ 2110 16kl. engine mounts Next Replacing the ball joint race of the gearbox lever 2110. The operation and maintenance manual for the VAZ 2114 states that the gearbox oil should be changed after 75 thousand kilometers. However, sometimes this has only a small effect.
Place the car on an overpass (pit) and unscrew the ball joint of the gearbox lever from the bottom of the car. Sometimes replacing it helps eliminate rattling. This support is included in the repair kit.
The length of the sleeve connecting the rod to the handle is adjusted. This tuning is carried out from the salon and includes the following actions:
- Raise the gearbox handle cover;
- Disconnect the lever together with the rod;
- Remove the indicated bushing;
- Remove the plastic bushings;
- Remove any remaining grease from the metal bushing;
- Measure about 2 mm from the edge on the metal sleeve and mark this place with a line;
- It will be more convenient if you wrap the sleeve with electrical tape (adhesive tape) strictly along this line;
- File off the excess with a grinder, electric sandpaper, or, if you don’t have such devices, with a strong file;
- Remove the electrical tape and put everything back together, not forgetting the lubricant.
This tuning really helped many: the handle does not wobble, there is no metal rattling, since the bushing’s edges no longer touch the rod.
How to put the gearbox in place
Install the gearbox in the reverse order.
Clutch disc alignment
If the clutch was removed during the dismantling of the box, then before installing the gearbox in its place, the clutch disc will need to be aligned. It is known that on the “seven” (as well as on the rest of the “classics”) the input shaft of the gearbox protrudes beyond the gearbox and is driven by the driven clutch disc using splines. Even further down, the input shaft is located in the crankshaft bearing. The point of centering is that the feredo should hit the center of the crankshaft bearing. If this does not happen, installing the input shaft of the box will be impossible: even if you hit the splines, the shaft will not fit into the bearing.
To center the disk, you will need any metal rod (optimally a piece of the old gearbox input shaft). The feredo is placed inside the basket, after which the basket is suspended from the engine housing. The rod is inserted into the hole and seated in the bearing. In this position, the basket is firmly fixed to the body.
The fact is that, as I already said, classic gearboxes are practically eternal. Axles can change, engines, bodies can change, but the gearbox lasts the longest. And it doesn’t happen that it works halfway, either it works or it doesn’t, therefore, from disassembly you can buy a gearbox in good condition with no defects at all. You can, of course, buy a new one, but it was already made in Russia, and those that were disassembled were taken from Soviet-made cars, so I would trust them more.
Kolya Goffman
https://blamper.ru/auto/lada-vaz/2107/qa/remontirovat-li-kpp-5494c151fa1ad9625b8b457b
Installation of gearbox and gearbox control lever
Before putting the gearbox in place, it is necessary to clean the gearbox input shaft and apply a layer of CV joint-4 lubricant to it. All steps to install the box in its place are a mirror image of the points performed during disassembly, i.e. the reverse sequence of actions is carried out. After installation, pour the required amount of oil into the box.
To reinstall the gearbox control lever, it is necessary to place all the previously removed bushings inside the lever housing in the reverse order. After this, the lever is mounted on the gear shift mechanism and is fixed to it using stuffing. Next, the lever covers are restored and the removed mat is laid.
Video: removing and installing the VAZ-2107 gearbox control lever
If the VAZ-2107 gearbox is being removed (let alone installed) for the first time, it is better to do this with the help of an experienced specialist, so as not to damage any expensive part or injure yourself. If the driver is bothered by any noise, vibration or other malfunctions of the car, he should try to eliminate them in more accessible ways, and only if the measures taken do not produce results, proceed to repair the gearbox. The VAZ-2107 gearbox is considered to be a fairly reliable, but at the same time complex unit, so it is not recommended to disassemble it without an experienced specialist.
Independent handle adjustment
Some drivers don't shy away from quality rebuild kits for installation, and they have come up with a unique shift knob setup to reduce shift harshness and vibration on the shift knob, instead of the standard plastic bushings and rubber bands, insert a piece of hose that fits the outside and inside diameters. This update also makes things easier for the future.
In addition, you can make the switching process more convenient along the length of the standard handle. To do this, remove the lever, cut the metal hacksaw to 5-6 cm in length and cut the thread at the end, in the same way as on the cut part (it is also impossible to cut the thread if desired). These updates are advisory in nature and have their pros and cons. Produce them or not every driver.
When choosing products for foreign cars, you must make sure that they can be reliably installed on the VAZ-2107. Otherwise, an incorrectly installed mechanism will lead to an emergency while driving.
Signs and causes of failure of the VAZ 2107 gearbox handle
A manual transmission allows you to exercise complete control over the vehicle's handling. Using a special lever, speed modes are changed. You should find out what problems may arise with this mechanism on the box, what are the ways to eliminate them.
Among the signs of a broken gearshift lever on a VAZ 2107 are:
- impossibility or difficulty of changing speeds;
- excessively free movement of the handle;
- the lever rotates freely;
- another transmission is activated.
The main reason for these manifestations is the presence of mechanical failure of the mechanism as a result of wear of its component mechanisms. As a rule, the gearshift lever needs to be replaced.
The lever may be loose due to a worn bushing. When this component is deformed, vibration is often observed from the handle. The consumable must be replaced.
If there is noise from the gearbox when the lever is in neutral with the engine running, it is advisable for the car owner to check the condition of the oil and bearings. It is worth changing the oil in accordance with the established regulations.
Shift Lever Removal Procedure
How to remove the gearshift lever from a VAZ 2107? A screwdriver is required to carry out this procedure. Also, you need a repair kit.
To dismantle the VAZ gearshift lever, you should perform the following steps:
- We move the handle to neutral (N).
- We move the cover.
- Remove the damper bushing downwards (a screwdriver is required).
- To remove the bushings, the rod with the knob is dismantled.
- Replacement of worn parts is carried out in the reverse order.
As a rule, if it is necessary to dismantle the rocker, a key is required. This procedure begins with removing the decorative panel, followed by dismantling the boot. To remove the device you need to unscrew it using a tool. If parts of the scenes are deformed, it is advisable to replace them.
Installing the gearshift lever
Since the gear lever in the cabin is located inconveniently. In particular, when switching to 5th gear, the driver touches the front passenger's knee, a number of car owners decide to tune this device (shortening), or you can purchase a product from another car that fits in size (transfer of the gearshift lever).
To model 2107 you can transfer the slide from the “nine”. However, you should cut the pipe (for example, using a grinder). As a result, the handle stroke becomes shorter, making it more convenient for the driver to switch. Thus, the car owner can carry out the transfer of the gearshift knob independently. The process of replacing this spare part does not take a long time.
Adjustment
1. Move the gear shift lever to the neutral position. 2. Loosen the tightening of the drive rod clamp of the gear shift mechanism (see above, paragraph 10). 3. Inside the car, an assistant sets the lever almost vertically (moving it slightly back) and holds it in this position. 4. 13 mm
tighten the nut of the coupling bolt of the drive rod mounting clamp, holding the bolt from turning with a wrench of the same size. 5. Check that all gears shift easily. If necessary, repeat the adjustment. Note: When engaging third or fifth gear, your hand should not rest on the instrument panel console. When engaging reverse gear or fifth gear, the gear shift lever should not fall onto the front seat cushions (set to the middle position).