Print this article Font size 16
VAZ 2109 and 21099 cars are equipped with four- and five-speed manual transmissions. All gears, except reverse, are equipped with synchronizers. The box is also combined with the differentials.
Useful tips
It is extremely important to monitor the serviceability of the gearbox, and if signs of breakdown are detected, fix them immediately. Do it yourself or with the help of a car service - this is your personal decision.
When operating a car in city conditions, you have to change gears more often. Therefore, it is recommended to use motor oil here. This ensures that the synchronizers remain effective longer. Transmission oil is better suited for highways, increasing the life of bearings and gears, although the synchronizer lasts less.
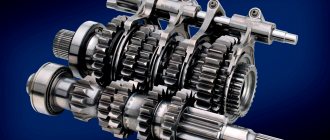
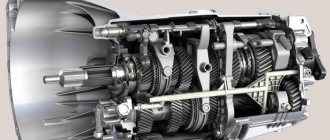
Internal structure of the box
Problems with reverse gear on automatic transmission
In practice, gearbox malfunctions associated with engaging reverse gear occur on both manual and automatic transmissions. "Automatic machines" have different designs. Robotic boxes are similar in design to “mechanics”. But the automatic transmission has its own list of breakdowns when it works hard or the reverse gear has disappeared.
- The fluid level is below normal, or it is contaminated and has lost its working qualities. The automatic transmission device is sensitive to the quality of the lubricant and its level. Therefore, it is better to start finding out the cause by checking the transmission fluid. An excessive oil level also contributes to improper operation of the unit. The service life of the fluid is limited to a mileage of 60 thousand km, but sometimes it is necessary to change it more often, as the lubricant becomes cloudy and contaminated.
- Wear of friction discs. The correct operation of reverse gear, as well as the “D” (drive) mode, depends on this. Worn clutches may prevent 3rd, 4th and reverse gears from engaging. In this case, eliminating the breakdown consists only of replacing the clutches.
- The splines on the drive drum are cut off. The car can move forward, but it will be impossible to go backward.
- Worn friction brake band. There is no reverse movement, but forward movement works.
- The brake band piston cuffs are torn or worn. This will only be noticeable when you engage reverse.
- Control solenoids or hydraulic units are jammed.
Sometimes the lack of communication between the torque converter and the oil pump gear also affects the reverse operation.
Device
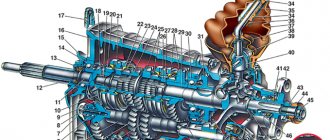
To understand the essence of repairing, disassembling and assembling a gearbox, first of all you need to get acquainted with its structure. In the case of the VAZ 2109, the box structure is as follows:
- On the input shaft there is a block of drive gears that are in constant mesh with the driven gears of the gears when moving forward;
- The second shaft has driven gears with needle bearings. There is also a pair of synchronizers located there;
- The secondary shaft is created together with the drive gear of the main transmission;
- The driven gear of the main gear is attached to the flange of the two-pinion differential box;
- Differential bearings are always mounted with interference, which is adjusted by selecting rings of different thicknesses.
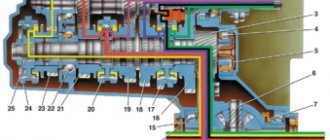
Checkpoint diagram
First gear does not engage when driving
Often, when you turn on first gear while the car is moving, it jams and does not work. There are no problems when starting to move from a place. Some “experts” even put forward the theory that you should only start moving from the first gear, and should not use it during maneuvers.
This problem occurs because the injectors do not have time to equalize the torque of the gears, and the driver forcibly tries to connect them. The flywheel spins much faster than the drive shaft and the teeth can fly if the force is large.
Don't rush to press the lever. Bring it to neutral, push it lightly into first gear, and wait for the synchronizers to do their job and the gear to engage.
For old boxes there are instructions for switching with re-gas. When downshifting while driving, move the handle to neutral, step on the gas, increase the speed, and then smoothly change gear. This method is used by owners of preserved vintage cars, the price of which has recently increased significantly.
Malfunctions and their elimination
Gearbox repair largely depends on the nature and type of fault. There are several options for the breakdown of this unit, in each of which appropriate actions should be taken to eliminate them.
| Malfunction | Possible reasons | What do we have to do |
| There is noise in the gearbox |
|
|
| Gears are difficult to shift |
|
|
| Spontaneous gear disengagement occurs |
|
|
| Gears are switched on with noise and crackling |
|
|
| There is an oil leak from the gearbox |
|
|
In most cases, problems with the gearbox are eliminated by dismantling and disassembling it. Do not take on this type of work without the proper skills and experience.
How to adjust the link?
You should drive the car onto a lift, pit or overpass. It is not recommended to carry out the procedure alone; you will need an assistant to switch the lever. You must proceed as follows:
- Crawl under the bottom, loosen the clamp located on the gearbox rod and remove the drive from the rod.
- Pull off the boot or remove this part altogether, unscrew the screw on the cardan.
- Use a hammer to carefully knock down the cardan shaft and remove the boot, if this was not done initially.
- If necessary, replace the oil seal.
- Installation is carried out similarly, but in reverse order.
After the above steps, you will need the help of a second person. He should sit behind the wheel, set the gearbox lever to neutral and tilt it slightly to the right. It should be held in this position until the universal joint clamp is properly tightened.
Dismantling
To dismantle the box, we recommend that you rely on the instructions, strictly follow the sequence and reinforce your skills with visual videos.
- Disconnect the negative terminal from the battery and drain the oil from the gearbox system.
- Unscrew the bolts that hold the crankcase guard in place and remove it.
- Disconnect the ground (wire) from the clutch housing.
- At the end of the clutch cable, loosen the tension on the nuts slightly.
- Remove the cable end from the clutch lever.
- Disconnect the block from the traction relay.
- Disconnect the wire going to the starter traction relay.
- Dismantle the starter itself directly.
- Disconnect the drive rod from the joint tip. We are talking about traction, which switches gears.
- Disconnect the cable from the car's speedometer drive.
- Unscrew the tie rod ball joint.
- Remove and press the steering rod hinge pin out of the strut swing arm.
- The shank of the inner CV joint of the front wheel drive should be pressed out and moved to the side.
- Disconnect the second CV joint.
- Remove the clutch housing shield.
- Release the gearbox from the fasteners holding it to the engine.
- Remove the box.
Carefully remove the gearbox
Be sure to move it horizontally away from the motor before directly removing the box. Then disengage the input shaft. Be careful not to damage the clutch spring petals.
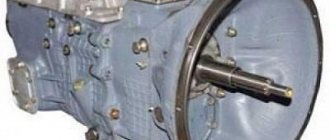
Removing the VAZ 2109 gearbox
First of all, you need to remove the mudguard and engine crankcase protection (if installed).
drain the oil from the box, remove the drive nuts and wheels. If removal takes place in a pit, it is necessary to jack up and hang the front part of the car on trestles or other reliable stands. Be sure to disconnect the battery terminals. The next order is:
– remove the clutch cable
Disassembly
Having removed the gearbox, you can proceed directly to the main thing - disassembly. This will allow you to change damaged elements as you work, identify existing faults and solve problems on your own.
- Clean and thoroughly wash all external surfaces of the gearbox.
- Place the box in a vertical position and remove the back cover.
- Remove the clutch cable bracket, then use a rubber hammer to knock the rear cover off the gearbox.
- Remove the old gasket. She will be replaced.
- Engage any of the two gears - 3 or 4.
- Unscrew the bolt that holds 5th gear, then turn it on.
- Simultaneously turning on the indicated speeds will allow you to fix the shaft and prevent it from turning.
- Unscrew the nut on the secondary shaft, and then on the primary one.
- Remove the 5th speed synchronizer along with the fork.
- Remove the fork from the coupling. Remove the synchronizer as carefully as possible. If you allow the clutch to move away from the hub, the spring-loaded balls that secure the synchronizer will simply fall apart.
- Remove the 5th speed synchronizer locking ring.
- Remove the 5th speed driven gear from the output shaft.
- Remove the thrust ring located on the needle bearing.
- Remove the needle bearing itself from the 5th speed gear.
- Remove the drive gear from the drive shaft and remove the bearing plate.
- Now the needle bearing bushings should be removed from the secondary shaft, and the thrust washer should also be removed.
Jewelry work
- Take out the ring that secures the input shaft bearing, and then a similar ring for the secondary shaft.
- Unscrew the locking plug and remove the ball and locking spring. Next you can get a couple more clamps.
- Remove the rear engine mount.
- Unscrew the reverse gear lock plug, tilt the box and thus remove the lock ball and spring.
- Remove the clutch housing and gearbox housing mounting bolts.
- Acting as carefully as possible, separate the two units. To do this, there are grooves in the crankcases into which the ends of a screwdriver are inserted. By shaking, you can disconnect the elements without any problems.
- Remove the gearbox housing.
- Unscrew the bolt securing the 1st and 2nd speed shift fork.
- Remove the fork and stem.
- Unscrew the bolt securing the 3rd and 4th speed forks.
- Separate the rod head from engagement with the lever, remove it along with the fork from your gearbox.
When disassembling the box into parts, be sure to pay attention to the condition of the elements. If you detect faults in time and replace gearbox components, you can get by with inexpensive but very effective DIY repairs.
Disassembled gearbox
What to pay attention to
So, following the instructions, we disassemble the gearbox of your VAZ 2109. Along the way, pay attention to the following points:
- Bearings. When they wear out, a noise from the box occurs. Plus, worn bearings negatively affect the condition of other gearbox elements;
- Synchronizers and sealing washers. If their condition leaves much to be desired, then the gears shifted poorly precisely because of them. Replace them;
- Clutch system, cotters, coupling hub clamps. All this must be replaced separately if there are signs of wear or defects;
- Blocking rings, synchronizers. If there are chips or nicks, don’t even think about alternative solutions, replace them immediately;
- Bearing tracks. Over time they wear out. If signs of wear are found, perform a complete replacement. In this state, they were only a short time away from breaking;
- Gap between gears and locking rings. Normally it is no less than 0.6 mm. In case of deviations, there is only one solution - replacing the rings;
- Retaining rings. If elasticity is lost, these elements must be changed, since they will no longer be able to perform their functions.
When assembling the gearbox, do not forget to lubricate the new gaskets with a layer of lithol. And when pressing the oil seals, do it with the working edge inward. The metal clip should be located on the outside.
During the process of reassembling the gearbox, all rubbing components should be treated with oil, and do not forget about the sealant for connecting the clutch housings and gearbox. Doing everything yourself is quite possible.
Step-by-step instruction
The gearbox weighs relatively little - 27 kg, but it is still not easy to remove it with your own hands, so invite an assistant. All work is carried out after installing the machine on the ramp or above the pit. Additionally, the car still needs to be jacked up and placed on supports so that the wheels are in the air.
First of all, remove the mudguard, the motor crater protection and disconnect the battery. Further:
- drain the gearbox oil;
- remove nuts from wheels and drives;
- remove the clutch cables and also the speedometer;
- disconnect all the ball joints by tightening the bolts holding them to the knuckles;
- dismantle the longitudinal tie;
- pull out all the drives included in the gearbox (you will need the help of a friend), remove the central nuts and remove them completely;
- unplug and remove the starter.
After this, all that remains is to disconnect the gearshift linkage and the gearbox itself from the engine (it is held in place by four nuts). But before this action, the power unit must be secured.
It is either hung out, leaning on the spar (or rather, on its glasses) or propped up from below with a jack.
The gearbox still needs to be disconnected from the body supports, and only then can it be removed. This is done in this way: the box is rocked a little and moved away from the engine by 10 cm - this is enough for the input shaft to leave the disc and clutch basket
In order not to damage the latter, you must act very carefully
The gearbox is installed in place after all problems and malfunctions associated with it have been fully eliminated.
Before the reassembly process you should:
- make sure that all elements affected by the dismantling process are in good condition;
- check the alignment of the clutch;
- Renew the lubricant on the splines of the release and input shaft bearing flanges.
When installing a gearbox on a car, the following scheme is used:
- the power unit is lowered on a jack or stretcher with a slope of 15 degrees;
- the box itself is lifted and inserted until it stops (do not try to tighten the engine and gearbox with bolts until it sits tightly in its designated place);
- tighten all four elements securing the gearbox to the engine;
- install “pillows” (supports) under it;
- attach the clutch cable and adjust its tension (its pedal is normally located a centimeter above the brake);
- return the previously removed starter together with the rear speed sensor to its place;
- install the flywheel protective housing;
- screw the speedometer cable and ground wire;
- connect the shift gear mechanism - its lever is aligned according to the marks made during dismantling;
- assemble the drive, install ball joints, couplers;
- put the car on the wheels and tighten the bolts on them;
- tighten the drive nuts;
- add fresh oil.
Features of replacing transmission fluid
Transmission oil must be changed at regular intervals, usually every 15-20 thousand kilometers. However, it may exhaust its resource earlier. This can be determined using a probe. Take a piece of white cloth and use a dipstick to transfer a drop of oil onto it. It is necessary to change the lubricant in cases where a drop of oil:
- colorless or has a black tint;
- contains metal particles or grains of dust;
- opaque and viscous;
- sticky to the touch;
- absorbs into fabric for a long time;
- cloudy or foamy.
Most often, reverse gear is difficult to engage if the oil has become cloudy. This is a sure sign that it has entered the engine. If the problem is not detected in a timely manner, you will soon need to carry out a complete gearbox repair or even an expensive transmission replacement.
Recommendations from experts
Sometimes the driver is forced to drive a car with a faulty gearbox in order to get to the repair site. But how to turn on the speed if the clutch is faulty or the synchronizer is worn out?
- If first gear does not work, you can carefully move away in second gear.
- If difficulties arise when turning on the engine while the engine is running, you can do this with the engine stopped and then start it. But this method can only be used by experienced drivers, as it can damage the transmission.
- Double squeezing and re-gasping. It is necessary to set the gearshift knob to the neutral position, then press the clutch pedal, and lightly press the gas (up to 2500 rpm according to the tachometer). After this, you need to slow down and disengage the clutch again, and then engage the gear. If this does not work, then you need to repeat all the operations again. While driving, experienced drivers know how to change gears without a clutch mechanism.
- When engaging reverse, the lever may not reach all the way. Then you need to slightly release the clutch pedal, the gear will turn, the teeth will engage, and the handle will reach the end.
- After pressing the pedal, it is recommended to wait 3 seconds and then engage reverse gear.
- You can try turning on the reverse by first setting the handle to 4th, then to the rear.
- Repeatedly squeezing the clutch and returning the gearshift lever to neutral sometimes also helps solve the problem.