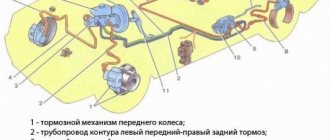
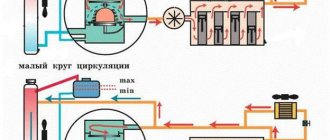
Bleeding the brakes of a Lada Kalina car
We bleed the hydraulic drive of the brake system after its repair, which resulted in a violation of the tightness of the system and if air is suspected of getting into the system.
In the latter case, you must first determine and eliminate the cause of air getting into the hydraulic drive and only then begin pumping it.
The presence of air in the hydraulic drive of the brake system is determined by the behavior of the brake pedal: it becomes soft (you can’t feel the stop at the end of the pedal stroke) and drops below its normal position.
To complete the work you will need an assistant, as well as:
— a special wrench for the bleeder fitting or an 8 mm socket wrench;
- a transparent vinyl tube of suitable diameter;
— container for draining brake fluid;
— new brake fluid recommended by the manufacturer.
— inspection ditch or overpass (preferably).
1. We prepare the car for work.
2. Disconnect the wiring harness connector from the brake fluid level sensor connector and remove the reservoir cap
To prevent air from entering the hydraulic drive of the brake system, when bleeding the drive, make sure that the brake fluid level in the reservoir does not fall below the MIN mark.
If the rear axle of the car is suspended (the car is on a lift or mounted on stands), the pressure regulator will block the path of brake fluid to the rear wheel cylinders. Therefore, to bleed the rear wheel cylinders, it is necessary to open the regulator valve.
3. To open the pressure regulator valve, insert the blade of a slotted screwdriver between the lever and the plate, recessing the regulator rod.
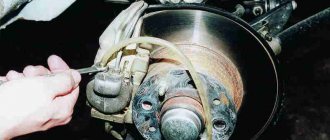
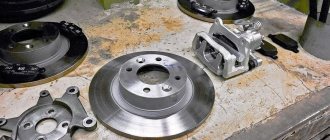
4. Clean the brake cylinder fitting of the rear right wheel and the surface around it from dirt.
5. Remove the protective rubber cap from the bleeder fitting.
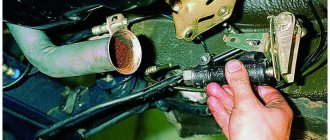
6. We put a special or 8 mm socket wrench on the bleeder fitting, and then a transparent vinyl tube (the diameter of the tube should be such that it fits tightly on the fitting), lower the other end of the tube into a transparent container partially filled with brake fluid.
7. An assistant presses the brake pedal several times and, after the last press, holds the pedal in the lower position.
8. Loosen the fitting, unscrew it approximately half a turn until liquid begins to flow out of the fitting.
9. After the brake fluid stops coming out of the tube, tighten the fitting.
10. The assistant again presses the pedal several times and holds it pressed.
11. We repeat the steps described in paragraphs 7 and 8 (see above).
12. We carry out bleeding until the release of brake fluid with air bubbles from the cylinder fitting stops, after which we finally tighten the fitting.
13: Remove the vinyl tube and spanner from the fitting, and put a protective rubber cap on the fitting.
14. Next, pump the brake cylinder of the front left wheel.
15. Similarly, we pump the cylinders of the secondary circuit:
rear left and front right wheels in the specified order, monitoring the fluid level in the master cylinder reservoir.
16. By pressing the brake pedal, we check the operation of the hydraulic drive and the absence of fluid leakage from the bleeding fittings.
If the pedal is soft or it drops below its normal operating position, we re-confirm that the system is tight and repeat pumping the hydraulic drive.
Why isn't one of the rear wheels bleeding?
The reason for the failure, if the rear left wheel on the Kalina does not bleed, is most often the reaction of the brake fluid pressure control device.
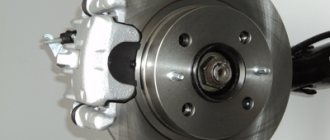
Rear brakes on Kalina
This occurs due to misalignment of the drive lever. Before pumping, it must be adjusted, and if unsuccessful, replaced.
One of the tubes is clogged or squashed
Often, driving on uneven roads and failure to comply with speed limits lead to damage to brake pipes and hoses. Kinks and other damage to tubes and reinforced hoses cannot be restored and must be replaced.
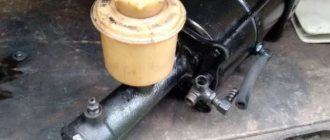
Pressure regulator faulty
Adverse environmental influences or inappropriate fluid for filling the brake system can lead to damage to the pressure regulator with the need for its subsequent replacement.
The pressure regulator drive is faulty or out of adjustment
When the rear left wheel on a Kalina does not bleed, you need to carefully inspect the pressure regulator drive device, which is a combined lever openly located under the bottom of the car and exposed to an aggressive environment.
Adjusting the brake pressure drive
Due to contamination and corrosion, its correct operation is impaired. You can try to restore it by adjusting it (it is adjusted with a nut at “13”, which fixes the position of the lever relative to the head of the pressure regulator rod).
Replacing brake fluid
To complete the work, you will need an assistant, as well as a rubber bulb.
1. We prepare the car and the necessary equipment to perform the work.
2. Remove the tank cover
To prevent air from entering the hydraulic drive of the brake system, when replacing the brake fluid, make sure that its level in the reservoir does not fall below the MIN mark.
3. Use a blower to remove the working fluid from the master brake cylinder reservoir.
4. Fill the tank with new fluid up to the top edge of the tank.
5. We pump the circuits of the hydraulic drive system, starting with the rear wheels of the car.
6. We pump each wheel cylinder until new (lighter) brake fluid begins to emerge from the fitting.
7. After replacing the fluid in both circuits, we check the operation of the hydraulic drive and bring the fluid level in the master brake cylinder reservoir to normal.
Replacing the brake pressure regulator
The replacement of the sorcerer on VAZ-2110 cars and other vehicles equipped with an RTD is carried out on an overpass. You need a 13 mm spanner, a powerful screwdriver and a special 10 mm wrench designed for unscrewing brake pipes. Before starting work, the assembly must be cleaned of dirt and rust, doused with WD-40 or another penetrating compound, and then wait half an hour.
Work begins by unscrewing the bolt securing the bracket to the spring. Afterwards, the brake pipes are dismantled, the position of which is recommended to be pre-marked.
Bleeding hydraulic brakes Kalina 1117
Tool:
- Medium flat screwdriver
- Split spanner 8 mm
Parts and consumables:
- Brake fluid
- Rags
- Bottle
- Hose
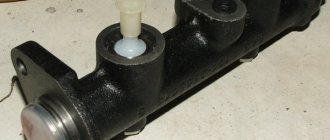
- Master brake cylinder
- Brake slave cylinder
Note:
To complete the work, you will need an extra pair of hands, so it is advisable to find an assistant. In addition, it is most convenient to work with many components through an inspection ditch or overpass.
1. Bleeding the brakes is necessary to remove air from the hydraulic drive after it is depressurized, when replacing the master cylinder, brake cylinders, hoses, tubes, as well as when replacing the working fluid or when the brake pedal becomes “soft”.
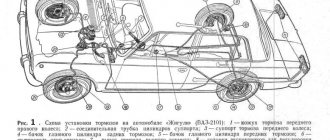
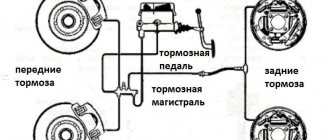
2. When the engine is not running, we remove air from the system, first from one circuit and then from the other in the following sequence:
- right rear wheel brake;
- left front wheel brake mechanism;
- left rear wheel brake;
- brake mechanism of the right front wheel.
3. If air gets into one of the circuits, it is enough to bleed only this circuit, and not the entire hydraulic drive. If the rear wheels are hanging out, insert a screwdriver between the lever and the plate spring of the pressure regulator in the hydraulic drive of the rear wheel brake mechanisms, fixing the regulator piston in the recessed position. We check the level of working fluid in the hydraulic brake reservoir and, if necessary, add fluid.
4. We clean the brake bleeder fitting of the right rear wheel from dirt and remove the protective cap from it.
5. Using an 8-mm spanner, loosen the tightening of the bleeder fitting. We put a hose on the fitting, and immerse its free end in a container partially filled with working fluid.
6. An assistant must vigorously press the brake pedal all the way 4-5 times and keep it pressed.
7. Using the “8” wrench, unscrew the bleeder fitting 1/2-3/4 turn. In this case, liquid with air bubbles will flow out of the hose, and the brake pedal will move forward. As soon as the liquid stops flowing out of the hose (the pedal should be pressed all the way), tighten the fitting, and only after that can the assistant release the pedal.
8. We repeat pumping until air bubbles no longer appear in the liquid coming out of the hose. We remove the hose, wipe the bleeder fitting dry and put a protective cap on it. We pump, as described above, the brake mechanism of the left front wheel.
9. Similarly, we bleed the brake mechanisms of the other circuit. When pumping, you need to monitor the fluid level in the tank and add fluid if necessary.
10. If, when you press the brake pedal, you feel its “softness” and increased travel, it means there is air left in the system. In this case, we repeat pumping until the pedal becomes “hard”, i.e., when pressed, go no more than half the distance to the floor. If air cannot be removed, check the tightness of connections, pipelines, hoses, master and working cylinders. We tighten leaking connections, replace faulty master and working cylinders.
The article is missing:
- Photo of the instrument
- Photos of parts and consumables
- High-quality photos of repairs
How is the process carried out?
In the classic version, a couple of people are required for the operation. Pour a small amount of brake fluid into the open container of the brake master cylinder. The assistant sits in the passenger compartment and periodically presses the pedal at the command of the car owner.
It is first necessary to clean the cylinder fittings from possible contamination. Next, we unscrew them, and the assistant in the cabin at this moment lowers the pedal to the floor. At the moment when air in the form of bubbles with liquid stops coming out from under the fitting, and a continuous stream begins to flow, tighten the thread.
A similar technique is applied to other wheels. Experts recommend initially pumping air from the wheel furthest diagonally from the driver . Next, the operation is carried out with the second rear wheel, and then we get to the front passenger wheel and, at the finish line, to the driver’s wheel.
During operation, you need to pay close attention to the level of filling of the main tank. If there is not enough liquid there, there is a risk of air from this container entering the system during pumping.
Before you bleed the brakes yourself, you need to take into account that drivers also use another scheme. It also starts from the far corner from the driver, and then returns diagonally. The third operation returns back, and the fourth will be the front passenger area.
Bleeding the brakes on Kalina
Welcome! Bleeding the brakes - this procedure is carried out after removing (Disconnecting) things that relate to the brake mechanism, in other words, let’s say you wanted to disconnect the brake hose from the caliper in order, for example, to replace the caliper separately, in general, when disconnecting the hose, it is recommended to completely drain the brake fluid, but you can essentially don’t do this, you’ll just have to plug it with a plug when it’s disconnected and thus fluid won’t flow out of it, but after this disconnection the brake system becomes airy, that is, air gets into it, and air with brake fluid is a very bad sign , by the way, if the brake hose suddenly breaks a little somewhere, then the system will become airy in the same way, and therefore (depending on how airy it is) the brakes will very noticeably disappear, but if a lot of air gets into the brake system, then in this case the brakes will literally it won't happen at all.
The first method of independent work
Let's consider the first option of work, in which you need to fix the pedal with something long and hard, for example, a metal rod made of wire rod. You will also need a couple of cans of brake fluid. One is for cleaning the brake system, as flushing will be required.
We unscrew the cylinder fitting, and before that we place a container into which we intend to collect the waste squeezed out by the new one. As soon as the old TJ is glass, we collect a second container for long-term use.
You will need to actively press several times (no more than 4), with the last effort we fix the pedal with a previously stored stop. It helps replace a real partner who would hold the pedal in a given position.
Now we pump the brake so that all the excess gas dissolved in the liquid comes out. After this, we duplicate the technique on the remaining wheels.
How to bleed the brakes on a VAZ 1117-VAZ 1119?
Note! Bleeding the brakes is carried out, as we have already noted in another article, in the same way as replacing the brake fluid, and therefore, since our website already has an article dedicated to replacing the brake fluid, we will not describe in detail the article on bleeding the brakes, but still some nuances which you need to know, we will indicate in this article, but first read from beginning to end another article on replacing brake fluid, a link to it is given in the text just above!
1) In general, you read another article and already know about the brake circuits and the pumping procedure, that is, the assistant gets into the car and presses the brake pedal 5 times, he does all this sharply but with an interval of 1-2 seconds, At this time, you loosen the fitting and the brake fluid begins to flow into the bottle; when replacing the fluid, it needs to be drained until new water flows out (Clean), but you are pumping the brakes, so you will have to wait until all the air bubbles are gone (They can be visible through a transparent hose or you can see them directly in the container into which you will drain the brake fluid), as soon as the air bubbles disappear, finish bleeding and move to the other wheel and bleed it, and so on until everything you won’t be able to bleed four wheels, although if you are confident in one of the circuits, then you can leave it alone, for example, you can bleed the left rear wheel and the right front (This is one brake circuit), and not touch the right rear and front left at all (This is second circuit).
2) After bleeding, wipe off particles of brake fluid from all fittings with a rag and close them with protective caps, if you suddenly lost one of the caps, then go to a car store and buy it, we don’t recommend driving without it at all, otherwise dirt can get into the brake fluid if the fitting is bad will be twisted, and also during the procedure, be sure to monitor the level of brake fluid in the system and try not to let it drop to zero (About 5-10 centimeters should always remain), but if it happens that all the fluid runs out in the system, then you can start pumping the brakes again, because at this time air will get into the system and all the wheels that you previously passed will have to be passed through again.
Additional video clip: The brakes are bled on all front-wheel drive cars that are produced identically at VAZ, so we have placed a video clip just below, which does not show clearly, but tells in detail how to properly bleed the brakes on a car and how to replace them brake pads for new ones, the video shows the VAZ 2108 car from beginning to end.
Adjusting the regulator sensor or adjusting the sorcerer.
I would like to immediately make a reservation about services. Have you seen anywhere where masters adjusted the sorcerer in the way described in the book? Usually several options are offered or all together:
— replace rear pistons
- Replace worn rear brake pads
- place a washer between the rod and the sorcerer’s plate
etc. And NO ONE will be engaged in ADJUSTING the sorcerer. Maybe I'm behind the times, of course. but if someone shows me that treasured service where they do THIS, then he (the service) should immediately be given a rolling flag