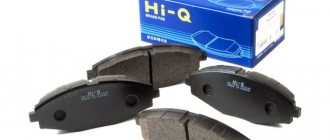
Replacing brake pads is a mandatory procedure on any car. They are installed both front and rear, providing vehicle braking. However, they are subject to wear and tear, which can seriously impair braking performance. Different cars have different mileage before the procedure. It is prohibited to use the vehicle if the thickness of the parts does not exceed 1.5 mm. In this case, new components should be installed. Today we’ll talk about how to replace rear brake pads on a Lada Priora sedan and station wagon, and watch a video for a better understanding.
Why do rear pads wear out rapidly?
Several factors influence the wear rate of the rear pads. In the first place here is the driver’s illiterate work with the brake system. Considering the fact that the Priora is equipped with a fairly powerful engine, most drivers prefer aggressive driving with rapid acceleration and sharp braking. With this type of driving, the operation of the car’s braking system leads to the fact that the rear pads wear out very intensively. Many inexperienced car owners, due to ignorance, practically do not use engine braking.
The second factor is the replacement of the rear pads on the Priora with low-quality spare parts. Questionable manufacturers of cheap elements may use low-quality and sometimes simply unsuitable materials to produce the friction layer of linings. This can not only reduce the manufacturer's recommended replacement schedule, but also render the brake drums unusable. Let's look at the main signs that require urgent replacement of the rear brake pads on a Priora.
Vehicle preparation and tools
Before you start replacing the rear pads with your own hands, you need to prepare a tool. We will need:
- a set of standard keys;
- minus and Phillips screwdriver;
- pliers;
- wooden mallet or rubber mallet;
- metal brush;
- Additionally, you can get graphite lubricant, VD-40 fluid and a special hook for removing the tension springs.
Pad diagnostics
You can assess the degree of wear of the rear pad by the condition of the front one - on a similar AvtoVAZ model it wears out much faster than the rear one. For this purpose, the brake mechanism has a special window with a rubber plug.
The last one needs to be pulled out. Through the viewing slot you can roughly estimate how much time is left before replacing the rear pads on the Priora. If the thickness of the lining is 1.5 millimeters or less, then the front pads also need to be changed. They also require replacement if the linings on them are oily or have deep chips or grooves. It happens that the friction lining peels off from the metal base. This is also a reason for replacement.
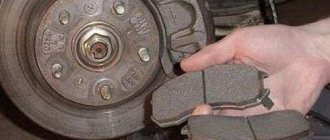
To assess the condition of the drums and pads, you need to remove the rear wheel and drums. There should be no mechanical defects on the surface of the latter. If the wear on the working surface is quite severe and there are deep grooves on it, then the part needs to be replaced.
It is also a good idea to check the brake fluid level. The new pads are thicker than the old ones, and to replace the rear pads on a Priora, you will need to press the brake pistons into the cylinder. Liquid may leak from under the expansion tank cap. The handbrake should be released. The parking brake cables must be released as much as possible.
Priora with ABS sensor
If you received a Priora with additional options, then before you begin dismantling the rear pads, you must remove the ABS sensor. If you don't do this, you will most likely damage it during repairs. The sensor installed on the brake mechanism is held on by just one screw. It can be unscrewed using an E-8 star socket.
Unscrew the sensor using the ABS coupling head
Peculiarities
The first step is to remove the rear wheel and fix the car. If the vehicle is equipped with an anti-lock braking system, then the rear brakes have design features, and this must be taken into account. On a car with ABS, disconnect the wheel speed sensor from the brake shield. This is done so as not to damage the sensor or wiring. Under the drum there is a master disk for the ABS sensor. How to dismantle it? Remove the sensor using the E8 head.
Difficulties in selecting parts
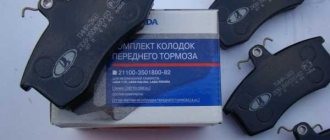
Before you begin replacement, you must select a suitable set of pads. There are many options for the Lada Priora on the market. Conventionally, they can be divided into two categories - parts equipped with ABS and those without this system. It is not difficult to understand what type your Lada Priora is - the diagram of cars with an anti-lock braking system includes an ABS sensor and a wire connected to it.
The basic principles of selection are common to the two categories. The product must be well packaged, have protective holograms and quality certificates. When purchasing a whole set with release springs, it is advisable to check them. We often came across sets from China where the spring brackets were turned in the wrong direction.
There is no need to look for how much the cheapest kit for a VAZ will cost. It is better to give preference to original parts or famous analogues. Even at a higher cost, the pads will provide excellent service life and excellent braking dynamics.
Selection for cars with ABS
Below is a list of pad sets with the best price-quality ratio.
| Part name and number | Minimum price, rub. |
| AT 2090-118BP | 400 |
| AutoReal AV18-350-2090 | 450 |
| Pilenga BSP1005N | 600 |
Selection for cars without ABS
If your Lada Priora is not equipped with an anti-lock braking system, then you should purchase special pads. The most popular sets are the following.
| Parts brand | Initial cost, rub. |
| Fortech FB-2102 | 500 |
| Pilenga BST1002N | 550 |
| Bosch 0986487219 | 800 |
Replacing rear pads without ABS and with ABS
Using a 7 key or similar head, unscrew the guide wheels. You need to unscrew it carefully. If it cannot be unscrewed with a key, then it is better to use the head - the threads can be easily damaged. Then the drum is dismantled. If it does not come off, then hit it with a hammer from the back side through the bars. The blows must be applied evenly. When replacing the rear pads on a Priora with ABS, you must also remove the disc.
Then the pistons of the rear brake mechanism are compressed. This can be done with two screwdrivers. The piston should be recessed inside the cylinder on each side. To carry out a similar procedure, you can press on the pads with screwdrivers. It is convenient to rest the latter on the shoulder of the brake flap.
Then, using a screwdriver, disengage the hook of the upper tension spring. The latter will be connected to the block. And after that you can remove the spring. The upper stops of the pads are removed from the piston slots and the spacer bar is removed. Similar operations are carried out with the lower tension spring.
Using the same screwdriver, disengage the pressure spring. It is also connected to the block. Now you can remove the front pad. If you release the spring from the rear block, you can remove it too. The handbrake drive lever can be removed from the hole in the cable end. Then you can proceed to installing new parts. It is definitely recommended to change the pads only as a set on the left and right wheels. A total of four pads are changed.
Replacement
Replacement is carried out using a lift or on an inspection pit. Regardless of the location of the parts, we will need the same set of tools. It includes Phillips and flat-head screwdrivers, a deep socket for 7, long-nose pliers and pliers, spanners for 17 and 13. You may have problems dismantling the rear drum, so prepare a socket for 30 in advance. It is recommended to purchase a wrench for the “seventh” head .
Rear pads
- We lift the rear part of the Lada Priora and place additional supports. We remove the drum - it is held in place by two pins, which are shown in the photo below;
If you cannot install the drum after installing the new components, you will need to loosen the handbrake cable. You will find it under the bottom of the Priora.
Setting the parking brake
After replacing the pads, the handbrake may need to be adjusted. Adjust it with an adjusting nut. The full travel of the parking brake should be approximately 2-4 clicks. A properly adjusted handbrake should not block the wheels when lowered. They should rotate easily.
After replacing the rear brake pads on a Priora, extraneous sounds may appear when braking - this is normal. The parts should rub against the drum. After some time (300 kilometers) such sounds should disappear.
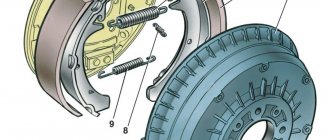
Arrangement of elements of the rear brake mechanism
This picture shows a detailed arrangement of the elements of the rear brake mechanism with a description of each element. This will be necessary to understand the principle of operation of the mechanism.
Elements of the rear brake mechanism with ABS: 1 — brake mechanism protection; 2 — ABS system sensor; 3 — front block; 4 — pad spacer; 5 — rear wheel brake cylinder; 6 — hand brake drive; 7 — rear block; 8 — ABS sensor disc; 9 — rear brake drum;
Progress
Initially, you need to remove one or two wheels at once. Once you have completed this task, you need to twist the pins and remove the brake drum. This is done by churning. Use a spacer and a hammer to avoid bending the structure.
Next we perform the following steps:
- Two springs are attached to the brake pad. They must be removed one by one. First, the upper part is used, then the lower one.
- Next comes the turn of the pressure spring. Let's take it off.
- Now the front block is available in front of you, and it will not be difficult to dismantle it.
- Once the first block is removed, the spacer bar must be removed.
- Now comes the turn of the second pressure spring, which holds the rear pad. We disengage.
- We remove the lever of the part from the hole in the tip of the handbrake cable and remove the cotter pin.
- The last step is to remove the washer and pin. All. The rear block is accessible for dismantling.
Before installing new parts, it is necessary to clean the system of dirt and dust accumulated inside. Assembly is carried out in the reverse order, but with some nuances. Firstly, it is not so easy to return the compression spring back into engagement, so the lower compression spring will help us here. Hook it onto the end of the clamping rod and use a screwdriver to pull it towards the block. The pistons must move to the middle of the cylinder, this is done using special mounting blades.
How to change pads on a VAZ 2112
As soon as the work is completed, it is necessary to calibrate the pads. A few presses of the brake pedal are enough to do this. If any points remain unclear to you, you can watch the video instructions on our website. There is nothing complicated in the work, you just need to allocate a little time.
Replacement of rear brake pads on a Lada Priora car is carried out under the following conditions: the rivet connection of the friction linings with the base of the pad has become loose, the thickness of the friction linings has become less than the maximum permissible 1.5 mm, as well as when the working surface is damaged or oily. It is recommended to replace the pads on each side, regardless of the condition. Simultaneous replacement will prevent the occurrence of skidding when braking due to different technical conditions of the pads. To carry out repair work, prepare a standard set of tools and perform the following sequence of actions:
- Engage first gear and place chocks under the front wheels. Then remove the wheel from the side to be repaired.
- Check the brake fluid level in the reservoir. If it is at the maximum mark or higher, then the liquid must be pumped out. This step is necessary to counteract the leakage of fluid when squeezing the brake pistons when the drum is subsequently seated in place.
- Unscrew the two locking pins and remove the brake drum.
Next we proceed to dismantling the pads. The first step is to remove the upper and lower tension springs. To do this, using pliers, carefully remove the ends of the springs from engagement with the springs.
Next, remove the front pad guide spring, and then carefully remove the pad itself.
Remove the expansion bar. Next, remove the rear shoe guide spring and the shoe itself, disconnecting the parking brake drive rod end from it.
Brake pads whistle when braking
It is necessary to remove the drive lever from the rear block using the handbrake. To do this, use pliers to remove the locking pin, washer and bushing. Replace the lever with the new one.
At this point, the repair work on removing and replacing the rear brake pads on the Lada Priora has been completed. Replace them, and then perform the installation in the reverse order. Since the outer diameter of the friction linings has increased, problems with installing the brake drum are possible. For ease of installation, it is necessary to compress the pistons of the brake cylinders using two mounting blades. And also use a sharp knife to grind off the chamfer on the pads. Also check the condition of the drum; perhaps a chamfer from wear has formed on its working surface; if it is present, grind it off with a file, while working carefully so as not to damage the working surface.