Print this article Font size 16
The CV joint is a constant velocity joint. People simply call it a grenade. This is due to the appearance of the device. Its task is to transmit rotational motion from one axle shaft to another, and they are at a constantly changing angle in relation to one another.
This element is always under load, which is why its failure is rather a matter of time. This is even despite the fact that high-quality carbon steel is used in the production of CV joints, which can withstand severe regular loads over a long period of time.
But the grenade on the VAZ 2110 still fails. The main reasons are pollution, sand that gets inside the structure, loss of lubrication, damage to elements, torn rubber boots.
Kinds
In a VAZ 2110 car, the CV joint may need to be replaced. But which one exactly? After all, in the “ten” there are two of them - internal and external. They are necessary in order to effectively overcome all obstacles. Here one CV joint will clearly not be enough.
Internal and external
- The first grenade is internal, and it transmits torque to the shaft from the transmission.
- The second grenade is external and engages with the car's wheel hub.
Despite the fact that their operating principle is the same, they differ in design and price.
How to replace the outer and inner CV joints on a VAZ 2110-VAZ 2112?
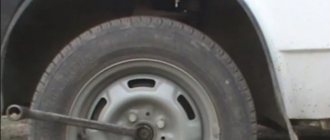
Removal: 1) It doesn’t take that long to change the CV joint, but it’s just a very painstaking job that requires not only removing the CV joint itself, but also the wheels and disconnecting the ball joint, and many other small operations will have to be done, but you will need to start first with draining oil from the box, this is done so that when you get ready to remove the CV joint, the oil does not leak out of the box, but you carefully drain it yourself (For information on how to do this, read the article: “Changing the oil in the box on a VAZ”) , then remove the crankcase protection if it is present on your car (It will just get in the way) and then unscrew the hub nut a little (It is indicated by a red arrow, but only use a screwdriver to open the collars that will not allow it to be unscrewed and also do not forget to remove the plastic cover , which closes this nut from dirt getting into it), and then remove the wheel itself from the car, but just remember which side you are going to change the CV joint, and remove the wheel from the car from that side (For information on how to remove a wheel, read in article: “Correctly replacing a wheel on a car”).
2) When you’re done with the wheel, move to the top of the car and loosen the three nuts that secure the strut to the cup (Indicated by arrows), but don’t unscrew, just loosen two or three turns (If necessary, loosen more), then unscrew completely two bolts that secure the ball joint to the steering knuckle (see small photo) and once the work is done, unscrew the hub nut completely and remove the washer located behind it (Don’t lose it, by the way, it’s very convenient to pry it off with a magnetic screwdriver), and finally Turn the steering wheel all the way to the right or left.
Note! The steering wheel must be turned to the right if you are going to remove the CV joints on the left side (Look as the car is moving), and to the left if you are going to remove and change the CV joints on the right side!
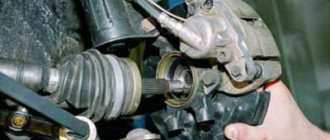
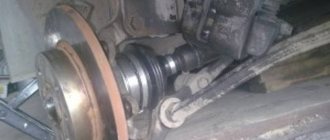
3) Next, remove the brake hose (Be careful not to stretch it too much, otherwise it will break) from the bracket on the rack (see small photo below) and carefully pull out the part of the rack as shown in the large picture, At the same time, also remove the splined part of the outer CV joint (indicated by the red arrow) from the hole in the hub, pulling, as we have already said for this, part of the strut (it is most convenient to pull it by the brake disc, it is indicated by the blue arrow) towards you and lower the outer joint in such a way, so that it lies on the lever and no longer enters the hole in which it was previously located.
4) As soon as the splined part of the outer CV joint is removed from the hub, remove the inner part in exactly the same way, but although it is not even approximately removed in the same way, in general, to remove the inner part from the hole in the gearbox into which it fits, take a mounting blade , a thick chisel or something similar and insert it (the chisel is indicated by a blue arrow for clarity) between the inner CV joint and the box, thereby using the mounting blade or chisel as a lever, ensure that the splined part of the inner joint comes out of the hole in the box, but only be careful not to damage the oil seal, otherwise you will have to replace it with a new one, although if you want, inspect the oil seal just in case; if possible, if it is deformed (if there is a new one nearby), replace it with a new one.
Note! Remove the drive (this is the correct name for a design with two CV joints) through the bottom of the car in the inspection ditch, as shown in the photo below:
Installation: 1. The drive is installed in the reverse order of removal; if necessary, the outer and inner CV joints are removed from it and replaced separately with new ones, but in this article we will not tell you how to do it, because on our website there is already such an article dedicated to the outer and internal CV joint, and it is called: “Repairing the wheel drive and replacing both CV joints on a car,” so if you need to replace them separately or disassemble them, for example, then study that article in detail, but we will return to the topic again and tell you how to do it installing the drive in its place, this is not so difficult to do, to do this you will first need to change the retaining ring (Indicated by the green arrow) of the inner CV joint with a new one, after replacing, apply grease to the spline (Indicated by the red arrow) and on the smooth surface of the shank (Indicated by the red arrow) blue arrow).
2. Now you can insert the shank of the inner CV joint into the box, but just be careful not to damage the oil seal and by the way, when installing the inner CV joint, make sure that the retaining ring with the gap upwards is directed, as soon as the inner CV joint is inserted, make sure that it does not fly out and that the retaining ring holds it, well, do all further work in the reverse order of removal and do not forget to replace the hub nut with a new one, because you cannot re-tighten the old one and do not forget to lock the new one by the way.
Note! We would like to add one more thing, in order to drive the inner CV joint all the way (it just happens that it goes in very hard and not all the way), you will need to hammer it through the outer one, this is done in this way, take a hammer and a wooden plank (You can replace the plank with any other object take one in which you are sure that it will not lead to deformation of the outer CV joint) and through it (in the photo, instead of a wooden plank, another object is taken, as you have already noticed) the outer CV joint is driven inwards, thereby the inner one enters the gearbox all the way, but Just don't overdo it and don't deform the box!
"Grenade" defects
Before replacing CV joints on a VAZ 2110, you need to make sure that they are made with high quality and can effectively perform their job in a new place.
Alas, sometimes replacing the inner CV joint on a VAZ 2110 does not give the expected result, since product defects .
The literature indicates that CV joints are made from special high-strength alloys that practically do not wear out. But in practice everything looks a little different. Whatever one may say, there are no eternal parts, and CV joints are no exception.
Defects may be as follows:
- Low quality of alloys used in manufacturing;
- Banal fakes and defective components;
- Poor quality or complete lack of lubricant, which leads to rapid failure of even a new grenade;
- Damaged anthers, due to which all kinds of debris get into the grenade.
Regarding the replacement of CV joint boots on a VAZ 2110, we recommend watching a video that will help you cope with the problem that has arisen. This issue should be approached thoroughly.
Constant velocity joint or CV joint
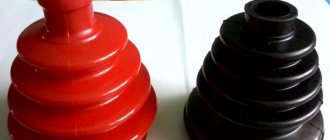
VAZ 2110 grenade boot
The design of the car provides that the hinge is subject to a significant load and is made of very strong alloys. A well-maintained and good CV joint (grenade) can last longer than the car itself. To achieve this result and save money, because the procedure for replacing a hinge is expensive, you must follow some rules. One of these rules is to systematically check the condition and timely replacement of the grenade boot. The most important enemies of a car grenade are dirt, dust, water and sand that enter the working part while driving. To protect against such destructive factors, anthers are installed, which are protective rubber cones that very tightly cover the CV joint mechanism of the vase. If you find that the grenade boot is torn, it must be replaced immediately. During periodic technical inspections, you need to carefully inspect the boots and replace them if necessary.
Note. If folds, cracks, deterioration in the elasticity of the rubber and other deformations and damage are found on the anthers, replacement should not be shelved.
Functionality check
of the inner and outer CV joints should be examined separately , since the procedures and signs are somewhat different.
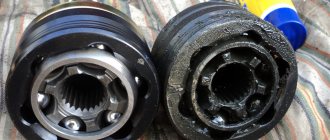
External grenade
The most obvious and main sign of wear of this element is the appearance of a sound similar to a crunch. It appears because the grooves have worn out and the balls do not move along them as well as before. The crunching becomes noticeable when entering turns, sharply pressing the gas pedal or passing difficult road sections.
Grenade
If you want to verify that the outer CV joint is faulty, do the following:
- When starting from a standstill, deliberately create jerks, but not strong ones;
- Try to accelerate sharply and slow down;
- Move the shaft transversely between the CV joints. If you feel any play, then the grenade is definitely worn out.
Internal grenade
It is noteworthy that the internal hinge is more durable and less subject to wear. Most often, the inner CV joint declares its malfunction when simply driving in a straight line or when passing through difficult sections. A check for play, similar to an external grenade, will allow you to verify problems.
But to understand whether an element really needs to be replaced, do this:
- Raise the drive wheels, which will allow you to bring the inner CV joint to its maximum angle;
- Start the engine;
- Turn on first speed;
- If the hinge is at the limit of wear, you will hear a characteristic crunch. This is a signal that you need to change the grenade.
How to completely remove the drive
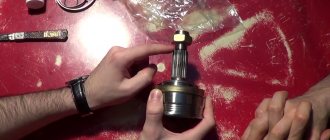
You have already removed the outer hinge. But the internal one is still in the gearbox. Before removing it, drain the oil from the gearbox (at least 2/3 of the total volume). The easiest way to remove the inner CV joint is to use a short, wide chisel and a hammer. How to use these tools? Position the chisel so that it rests against the joint and lug on the transmission housing. Using sharp blows of a hammer in the direction from the wheel to the gearbox, remove the hinge. Usually 2-4 hits are enough. You should not use a mounting spatula. Practice shows that with its help the CV joint is removed much worse. That's all. The drive is in your hands. You can begin further repairs.
Replacement procedure
Let's say right away that it is impossible to repair the CV joint. So don't even try. The most correct and reasonable decision is to purchase a new grenade and install it in place of the failed one.
The first thing we recommend starting with is watching a video about replacing the CV joint on a VAZ 2110. This way you will clearly understand how the procedure is performed and in what sequence. Then, according to the instructions we have presented, you can get to work.
- Since the CV joint is located at the bottom of the car, you will need a lift or a pit in the garage from where you can begin replacing the element.
- Be sure to secure the car. To do this, you can engage fourth gear and tighten the handbrake all the way.
- If you have driven the car into a pit, place wedges or wooden blocks under the wheels to block the wheels.
- Remove the protective cap and unscrew the nut on the hub.
- After removing the hub nut, unscrew the wheel fasteners.
- Raise the wheel that requires CV joint replacement using a jack.
- Now unscrew each of the six bolts of the part, after which only the flange will hold it.
- Remove two bolts from the lower knuckle support.
- Turn the steering wheel all the way, which will allow the element to fall out on its own.
- Remove the boot, which is located in the grenade structure.
- Remove the retaining ring.
- Unscrew the hinge from the shaft spline to avoid damaging other components.
- Check the operation of the entire system to determine the causes of the breakdown.
- Install a new CV joint using the steps in reverse order.
Note to the car owner
In order to carry out repairs, you will need the following tools and spare parts:
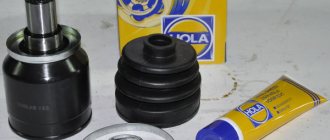
- Hinge kit – CV joint, boot, tube of lubricant, ring, nut, clamps.
- Key "30" with a long handle.
- Hammer and punch.
- A set of keys for “17”, “19”. Preferably caps.
- Jack.
- Wheel chocks.
- Reliable supports.
- Puller for tie rod end.
If there are faults in other components (balls, tie rod ends), these elements must also be replaced. To avoid having to disassemble the suspension again, do everything at once.
Replacing the CV joint and outer boot on a VAZ 2110 with your own hands (video)
The CV joint is a constant velocity joint. People simply call it a grenade. This is due to the appearance of the device. Its task is to transmit rotational motion from one axle shaft to another, and they are at a constantly changing angle in relation to one another.
This element is always under load, which is why its failure is rather a matter of time. This is even despite the fact that high-quality carbon steel is used in the production of CV joints, which can withstand severe regular loads over a long period of time.
But the grenade on the VAZ 2110 still fails. The main reasons are pollution, sand that gets inside the structure, loss of lubrication, damage to elements, torn rubber boots.
Assembly nuances
Before reassembling, we also recommend watching a video about replacing the inner CV joint on a VAZ 2110. Plus, follow a few tips.
- A plastic plug must be installed at the end of the shaft.
- Before installing a new CV joint, the element must be lubricated with special compounds.
- You need to install the retaining ring before installing the new unit - the grenade.
- Having installed the drive, it is mounted on the gear, achieving complete fixation. At this point you will need to use a hammer.
You can see for yourself that replacing a grenade does not pose any special difficulties. However, unless you have absolutely no experience repairing your car yourself, doing the work yourself is highly not recommended.
The best solution would be to find a good service station, where real professionals work. Trust them to replace grenades to guarantee high quality repairs and efficient operation of the entire chassis of your car.
Well, if this is not the first time you are repairing your “ten”, then such a procedure as replacing a CV joint will become an easily feasible task for you. Just remember to follow the recommendations from the instruction manual for your VAZ 2110.
The CV boot is a special element designed to protect constant velocity joints from the effects of dirt dust and various external factors. It is made of rubber and is mounted on the outer and inner CV joints, thereby holding all the lubricant inside, which is necessary for operation.
The video shows the process of replacing the CV joint boot on front-wheel drive cars of the VAZ family.
Nissan X-Trail › Logbook › Inner left front grenade - damn it)))
I don’t even know where to start)) How much time I wasted: - searching for useful information on the Internet; — visited all the investigations in the city; — called investigations in cities that are closer; — how many people have I troubled with my problem))). etc. Finally I made up my mind and ordered a low-quality substitute for Febest (0211-T30LH). By the way, it’s cheaper at www.repart.ru/.
Internal CV joint, gearbox side (0211-T30LH)
When purchasing the car, I immediately noticed the torn boot of the inner left grenade. Well, okay, I thought))).Then I’ll put on the dust cover and that’s it)))…that’s not the case. I called some stores in the city (I was looking for a boot), everywhere from 1500 rubles. and higher. I decided to wait and order through existential for 750 rubles. Febest (0215-071T)
Internal CV joint boot (0215-071T)
While I was waiting for the boot, I wrapped a bag))) with lubricant)). I noticed a slight vibration especially during acceleration. Well, it’s a small thing)))… I waited for the boot. I changed it, it took about 2 hours to replace it… Then I went for a ride)) only then I read on the Internet about the vibration during acceleration. Everyone who wrote about vibration mentioned the torn left boot! In existential terms, the cheap Febest substitute at that time cost 4,700 rubles, a couple of months later it began to cost 3,200 rubles.)) Having already driven 6-7t.km. The vibration has increased and it’s not bad))) (by the way, the boot is still intact) I was thinking about a used drive unit, but if X-trails have this problem, then it makes sense to take a used one. I read on the Internet that the left front drive fits from Nissan Cefiro (A33), from Nissan Primera (P12) and, with minor modifications. I was more inclined towards the drive from the Nissan Cefiro (A33), because... The internal grenade will be stronger)).
But nowhere in Kurgan was there a used drive (((in other cities a used one from 5-7 t.r. immediately disappears. To order through the website www.japancar.ru/ it also costs about 5 t.r. and so on will come...unknown((In the end, I made up my mind and ordered Febest (0211-T30LH) 2860 rubles, I couldn’t continue to worry myself and those around me)) Only reviews about those who installed Febest were not found as a substitute((about the fact that Febest is complete shit..., this okay)) let’s see how long it lasts and if the vibration goes away))
As soon as it arrives, I’ll change it right away))
What will you need at work?
When replacing the internal CV joint of a VAZ 2110 car, you need to select the right equipment and tools, without which the next job is impossible. Repairing the unit does not seem likely; it will only need to be replaced .
To perform the following operations, you will need a set of equipment and tools:
- A new internal grenade, which includes a clamp and lubricant, will ensure subsequent trouble-free operation of the system over a long period of time;
- A lift, or a special inspection hole with a jack, will be required to lift and secure vehicle , guaranteeing safety during the work;
- A set of standard tools used to replace the internal CV joint. Includes wrenches, screwdrivers, pliers and much more needed for repairs.
Replacing the boot of the outer CV joint of a VAZ 2110
https://www.aliprice.com/go.php?z=WQqaSf8lhhext=1 Which is cheaper? Change the CV joint boot
or change
the CV joint
?
Replacing the outer and inner CV joints of the drive on VAZ 2110, 2112, Kalina, Granta, Priora, 2109, 2114
Video
instructions for
replacing
CV joints or drive assemblies on
VAZ
. Description on the website: https://ladakalinabl.