Until the end of the 90s of the 20th century, all domestic cars were not spoiled with technical innovations that simplified the life of the driver. The braking system (TS) was no exception to the general rules.
For example, the driver of a VAZ-2109, one of the most popular cars of that time, could not boast of having active safety systems (ABS, EBD, SBC, HBA, etc.) and enjoy their benefits when braking. However, front-wheel drive VAZ cars represent a whole driving era, satisfying the post-Soviet hunger for owning your own vehicle.
Master brake cylinder
The GTZ is the most important, since it is with its help that the necessary pressure is created in the tubes. It consists of a piston that moves in the cylinder cavity along a perfectly flat surface. Rubber rings are used as seals, which must be replaced during repairs. The braking system of the VAZ-2109 car is highly efficient, largely due to the use of reliable elements.
Particular attention should be paid to brake fluid when operating a vehicle. It is no secret that it is too aggressive and contains many additives that ensure stable operation. Note that during compression, the temperature of the liquid increases, therefore, its viscosity changes. The use of additives allows you to get rid of this effect. One minus is that additional components disappear over time. Experienced technicians recommend replacing the fluid in the system at least once every two years.
Vacuum booster
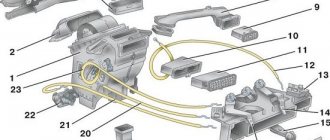
If you know the design of the VAZ-2109 brake system, then you have seen that on the fire partition (between the passenger compartment and the engine compartment) there is a large, cylindrical container with which the GTZ is connected. Also from this container there is a hose to the carburetor (if such a fuel injection system is used on the car). This is the vacuum brake booster.
It serves to make driving easier. With its help, the force that must be applied to the pedal to stop the car is reduced several times. Comfort and safety are guaranteed to you. To fully appreciate all the benefits of using this device, try driving an old Zhiguli car that does not have a vacuum booster. The difference is simply colossal - all movements of the pads impact the pedal, and the braking efficiency is extremely low.
Stage 2. Installation of the HCD
First, the caliper is mounted. It can be placed in relation to the axis in front or behind, but the second option is recommended as the most symmetrical.
Next, you should dock the hub with the faceplate so that the holes completely coincide. If inaccuracies are observed, you can correct this deficiency using a hammer.
A hammer is also used to straighten the corners of the beam, on which the caliper will rest in the future. Please note that there is no need to place the engraver under the upper left bolt, since the caliper bracket will rest against it. But, again, you have a choice - you can refuse the engraver or grind off its head using a grinder.
Brake calipers
Calipers are installed on the front axle, which firmly press the pads to the surface of the disc. When repairing the brake system of a VAZ-2109, replacing calipers is extremely rare, since they have a long service life. This is a device consisting of an aluminum housing in which there is a hole for connecting to a tube using a hose. Nearby there is a hole into which a fitting is screwed, used when bleeding the system. There is a steel piston inside. This is what sets the pads in motion.
The front caliper is attached to the wheel hub using two bolts. When carrying out work, do not press the brake pedal if the front pads are removed. This will cause the piston to be pushed out of the housing. It will not be possible to collect it after this. The rear brake system of the VAZ-2109 is a little simpler. It uses a caliper, but it is made in the form of a cylinder with pistons on both sides. With their help, the pads are moved apart.
WHAT PROBLEMS CAN APPEAR AFTER CHANGING DRUM BRAKES
VAZ 2109 rear disc brake
Of course, the VAZ plant does not officially install rear disc brakes on its cars, but despite this fact, the instructions provide a section on replacing brake drums with disc devices. Let's pay more attention to the shortcomings of installing the HCD on VAZ 2109 cars. So:
- High-quality brakes are the key to safety. They are not installed just for beauty; they are precisely balanced mechanisms developed by experienced engineers. It’s not enough to just buy and deliver a product; it needs to be properly adjusted and tested. All this work can be done either at a service station or independently, following certain instructions. In the worst case, braking will be uneven, the car will skid when braking, the discs may overheat and complete or partial failure. In addition, you can hear an unpleasant creak.
- It is not always practical to install an HTD on VAZ cars. Perhaps the money spent produces the desired results, but along with the purchased HRT, new problems arise.
- Troubles associated with maintenance. Even though HBRs are much more efficient than drum brakes, replacing them is perceived as an illegal change.
VAZ 2109 how to make rear disc brakes
- Problems on the road with traffic police. Often on the road people don’t find much fault with the rear brakes, but if this does happen, you’ll have to come up with a convincing explanation.
- Troubles with the handbrake of a VAZ. When changing brakes, you will need to think about the handbrake. You can consider two options: installing a cable handbrake or using a hydraulic handbrake. In the second case, it becomes possible to brake on any plane, but it is not recommended to use it for parking, since it weakens over time. Some drivers do not pay attention to the handbrake at all and pass the technical inspection without any hindrance.
- In an accident, a car with rear disc brakes will most likely be the culprit, since design changes have been made that are not required by law.
VAZ 2109 rear disc brakes
- Setting up the braking system. Upon completion of the installation of this mechanism on the VAZ 2109, in any case, you cannot do without adjusting the sorcerer. In the worst case, the rear wheels will brake more than the front wheels. An incorrectly adjusted sorcerer can cause skidding, squeaking and overheating of discs.
Note! In certain cases, the problem of excessive braking of the rear mechanisms cannot always be solved, so it is necessary to grind down up to 25 or 50 percent of the pads, which reduces the contact area.
Pressure regulator
This element allows you to make the braking system more efficient. It is no secret that the entire braking process is performed 75% by the front wheels. And the rest is in the back. But this is an approximate value, it depends on many parameters. For example, the degree of loading of the car affects it, as well as the intensity of braking. Therefore, for effective operation it is necessary that the VAZ-2109 brake system independently adjusts the force on the front and rear wheel calipers.
Using this simple mechanism, the pressure in the tube through which fluid is supplied to the rear axle of the car is reduced. It is attached to the rear beam using a bracket. When carrying out repairs, it is necessary to pre-treat threaded connections with penetrating lubricant. To unscrew the ends of the tubes you will need to use a special wrench. It can be purchased at auto stores; it is a crimp type. Unlike carob or cap ones, it does not lick the edges.
How to install rear disc brakes on a VAZ 2108 - 21099 with your own hands
Expensive foreign cars are equipped with rear disc brakes, thanks to which the car can brake confidently. The obvious disadvantage of Russian cars is the not very effective braking system. In this article you will learn how to install rear disc brakes on a VAZ 2108, 2109.
But before you start reading the article:
ATTENTION. CHANGING THE DESIGN OF THE AUTO BRAKE SYSTEM IS PROHIBITED. THIS MECHANISM IS NOT CERTIFIED. WE ARE NOT RESPONSIBLE IF YOU DECIDE TO REPEAT.
Car tuning projects are usually divided into several stages, namely: fine-tuning the engine, gearbox, suspension, body and, most importantly, fine-tuning the brake system.
According to professionals, tuning should begin with modifying the brakes - the car must be taught to stop! I will write in more detail about the installation of RBD (rear disc brakes) in this article. It is clear that many foreign cars are equipped with disc brakes on all wheels, and thanks to this they confidently brake at high speeds. The braking system of our cars is equipped with rear drum brakes and are not very effective, especially when driving fast.
Almost all drivers are familiar with a brake pedal that has lost its information content due to overheating of the entire braking system. Agree, it’s a bad situation, I decided to correct this deficiency in my VAZ 2109 and teach it to stop no worse than foreign cars.
On my car, I recently replaced the front brake discs with a diameter of 240 millimeters with ventilated VAZ 2110 discs with a diameter of 264 millimeters, which in itself gave a significant increase in braking efficiency. The original wheels remained out of use and were dumped in the corner of the garage.
And so I decided to bring the old idea to life and began installing rear disc brakes. Old discs from the front brakes were loaded into the “body” of the nine, went to the garage, installed the eight on jacks, and began disassembling; if you have the necessary tools and skill, the whole job takes less than 4 hours. The rear brake installation procedures are quite simple .
Necessary parts for brake conversion:
- brake calipers - use regular front calipers from the VAZ 2109;
- brake hoses - front brake hoses, since ordinary iron pipes do not reach;
- brake pads – Lucas pads, 1 set;
- Grover bolts and washers - I recommend using M10x1.25 bolts with a length of 30 millimeters - 12 pcs. with growers;
- spacer washers – timing belt tensioner roller washers from VAZ 2108, 8 pcs.;
- caliper mounting plates (faceplates) – 2 pcs. an unusual part that requires precise production using a coordinate machine;
- brake discs - I took front discs with a diameter of 240 millimeters. Beforehand, they need to be machined to accommodate the hub seat of 60 millimeters. You can also grind the hub instead of the brake rotor.
(photo with a broken brake drum)
Handbrake cable
You could even say that this is a minor element of the entire system, since, unfortunately, not all motorists use the parking brake. Therefore, they do not monitor the condition of this unit, without which the diagram of the VAZ -2109 brake system would seem incomplete. The reason for this is the habit of setting the car to speed. And in winter, this habit turns out to be useful, because the pads may freeze to the drum. When you start moving, the entire mechanism in the rear drums may simply fall apart.
But often a parking brake is necessary. But not everyone can adjust it correctly. It is advisable to carry out the work on a pit or a lift, it is more convenient. First, raise the parking brake lever two clicks. Then, using wrenches and penetrating lubricant, loosen the locknut. Use the second adjusting nut to tighten the cable. Lower the lever and check that the drums are not touching the shoes. If not, then the setup was done correctly.
Replacing brake fluid
The fluid in the system is replaced regularly, as mentioned above, every two years. But if the brake system of a VAZ-2109 is repaired, new tubes or hoses are installed, then you will need to add fluid and bleed it. To do this, all the elements are collected and liquid is poured into the expansion tank. Bleeding is carried out from the farthest wheel - the rear right one. And you move as you approach the front left, which is closest to the brake cylinder. In order not to get confused the first time, a diagram of the VAZ-2109 brake system will help you.
You will need a small container into which you pour brake fluid. You also need to use a small piece of transparent hose. If there is no suitable one, then borrow it from the windshield cleaning system for the duration of the repair. Use it to monitor the air coming out of the system based on bubbles. Place your assistant in the driver's seat; he must depress the pedal and hold it in the extreme position. At this time, you unscrew the fitting and release the air. However, in case of any malfunction of the VAZ-2109 brake system, bleeding must be carried out - this will ensure operational efficiency.
Replacing pads
However, this is the simplest thing you can expect during maintenance. Unfortunately, VAZ-2109 cars do not provide for monitoring pad wear, so it must be carried out visually. To carry out the replacement, you will need to remove the wheel, first lifting the side to be repaired. After this, unscrew one bolt securing the caliper and move its front part, freeing up access to the pads, which you simply remove. The design of the VAZ-2109 brake system is such that it is not necessary to completely remove the caliper. You won't be able to install new pads right away. First, you need to use a pry bar to press in the caliper piston to increase the gap from it to the disc surface.
Brake system VAZ 2109
The reliable operation of your vehicle's brakes is an integral part of the safe movement of the driver and passengers. Timely diagnosis of system breakdowns and DIY repairs will help keep the components in working order for a long time.
Advantages and disadvantages
If you decide to change from conventional drum mechanisms to disc brakes, be sure to take into account the positive and negative aspects of such a decision.
| Advantages | Flaws |
| Braking distance is reduced | High cost of new disc brakes compared to traditional drums |
| Braking force is distributed evenly across all wheels | Requirements for precise adjustment and tuning, which not everyone can do with their own hands |
| Unsprung weight is reduced | If installation requirements are violated, the car skids, it brakes unevenly, and squeaks occur. |
| Provides more efficient heat dissipation and prevents brakes from overheating | Replacing drums with DT is illegal and not a certified action for VAZ |
| Increases the reliability of the braking system | There may be problems with the traffic police. People don’t often find fault with rear disc brakes, but if they catch you, you’ll have to competently “excuse yourself” |
| Replacement and maintenance of pads cause fewer problems and difficulties | There are problems with the handbrake that needs to be changed or improved |
| No need to regularly tighten the handbrake | In case of accidents, you will most likely be the culprit, since such design changes are unacceptable by law |
| Appearance noticeably changes for the better | Careful adjustment is required after replacement, which is best done at a service station |
| Disc brakes do not freeze during winter washing, which cannot be said about drums | If you make an error during assembly, the rear wheels may begin to brake more effectively than the front wheels, which will cause serious consequences and troubles. |
Think carefully about the feasibility of carrying out such work. Please note that all responsibility falls on you.
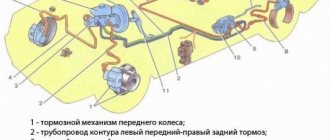
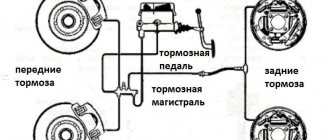
Repair of the brake system of a VAZ 2109 car
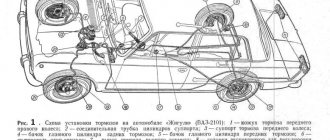
The VAZ 2109 car is equipped with a working brake system with diagonal separation of circuits, this increases safety when driving the car. The operation of the front right and rear left brake mechanisms is provided by one circuit of the brake hydraulic drive, the right rear and left front - by another brake circuit. In case of untimely failure of one circuit in the brake system, the second one can be used, and it provides sufficient operational efficiency. The hydraulic brake drive includes a vacuum booster pos. 6, dual-circuit regulator pos. 9 rear brake pressure. The hand brake provides braking of the rear wheels. Repair of any brake unit of a VAZ 2109 car is carried out after detection of malfunctions.
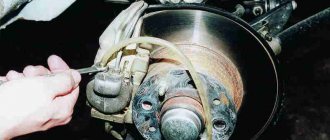
Replacing brake pads
If the thickness of the friction linings on a VAZ 2109 car has become less than 1.5 mm, the rivet connection with the base has become weak, there are chips or deep scratches on the surfaces of the linings, they must be removed.
Tip: The pads need to be changed on each side in pairs. Do not install old parts, which may result in uneven braking. This is especially dangerous for front-wheel drive vehicles.
Work order:
- The car is fixed in a stationary state.
- The battery is disconnected.
- Check the brake fluid level. To prevent it from spilling when the pistons are squeezed, it must be pumped out to about.
- The wheel is removed.
- The surfaces of the caliper and brake disc are cleaned of dirt.
- At the stand, the seal is removed from the bracket, which also serves as a brake hose holder.
- The antennae of the lock washer of the guide pin fixation bolt are bent.
- The bolt is unscrewed and the body is folded back.
- The brake pads are removed.
- When replacing pads, use a caliper to check the thickness of the friction linings; it should not be less than 1.5 mm.
- Assembly is performed in reverse order.
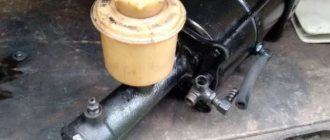
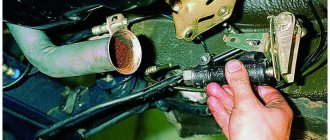
Replacing the master brake cylinder
Repairing the main brake cylinder on a VAZ 2109 most often does not lead to the desired result. Therefore, it needs to be replaced with a new one. So:
- The car is de-energized. The negative terminal is disconnected from the battery.
- The block with wires is disconnected from the sensor indicating the brake fluid level.
- The brake pipes are loosened without unscrewing them.
Replacing the master brake cylinder
- The fixing nuts to the main brake vacuum booster are unscrewed, the brake pipes are unscrewed and disconnected.
- The brake cylinder is removed from the studs.
- If necessary, remove the brake fluid reservoir. To do this, you need to slowly rock the device's leg out of the socket bushing.
- After inspection, elimination of defects or replacement, the cylinder is installed in place.
- Once the new assembly is installed, the nuts can be fully tightened.
- The reservoir is put in place, brake fluid is filled to the “MAX” mark.
- All the air present there is displaced. To do this, the hole for installing the front brake pipes is closed with fingers. An assistant gently presses the brake, which creates pressure in the system until air comes out of the holes.
- Without lowering the brake pedal, when fluid appears, put on and tighten the brake pipes.
- The rear tubes are connected in the same way.
- The job ends with bleeding the brakes.
Necessary materials
If you decide to install the HTD yourself, then you will need the following materials:
- Directly disc brakes, machined under the hub by 0.6 cm. The diameter of the disk should be 24 cm. Please note that it is not necessary to grind the disk itself. If you want to leave it unchanged, then you need to groove the hub.
- Front calipers and hoses.
- Faceplates necessary for attaching calipers. You will have to tinker with this part, since it is quite unusual and requires separate manufacturing to the exact dimensions.
- High quality pads that fit true to size.
- 12 bolts M10 × 1.25 with groovers.
- 8 spacers. You can use timing belt tensioner roller washers for the VAZ-2108.
When you have acquired all the necessary materials, it’s time to proceed directly to the replacement. The procedure is performed in several stages.
Stage 1. Removal of the PTA
First of all, you need to remove the wheel. After this, you need to loosen the handbrake cable and bring the pads together. The guide pins are unscrewed using a 12mm wrench.
If the car is old or the brakes have not been changed for a long time, it is recommended to treat the seats with a wire brush, and also lubricate all running surfaces with WD40. This will help you remove the brake drum without much effort.
Please note that even if the drum is tight, you need to remove it gradually, gently tapping it with a hammer along the entire circumference. If you do not want to damage the part, then use a hammer with a rubber tip or a rubber gasket.
Next, remove the tension spring and guides by prying them off with a screwdriver. After this, the brake pad needs to be lifted up, the spacer bar removed and the pad and tension spring removed.
To remove the second block, you need to remove the handbrake lever from the cable. The bolts that secure the hub to the beam should be treated with WD 40 and unscrewed with a split or regular 17 wrench.
At the last stage, the brake tube of the hub is dismantled. After this, you can begin installing the HCD.
How to replace rear brake cylinders
Smudges on the brake flap or the inside of the wheels most often indicate poor condition of the seals, less often the failure of the piston - the formation of scratches on it, which caused a seal failure. Repairing the brake cylinder is possible, but most often it needs to be replaced.
Work order
- The VAZ 2109 is placed in first gear and the wheel is removed.
- The drum and brake pads are removed, which can only be disconnected, and the upper spring tie is removed.
- Using a metal brush, remove dirt from the bolts that secure the cylinder to the brake flap and the brake pipe. The bolts are loosened.
- The brake pipe is plugged with a rubber cap or a piece of wood.
- The tube unscrews completely.
- The bolts securing the brake cylinder are unscrewed, while holding it with your hand from the reverse side. The part is removed.
- The new cylinder is installed in the reverse order.
- After completing the work, it is necessary to bleed the rear brake circuit.
How to repair a handbrake lever
Repairing the device consists of replacing the worn mechanism with a new one after removing it from the VAZ 2109 car. Damage can be: wear of the locking teeth, jamming or breakage of the lever, failure of the locking mechanism. So:
- The battery is turned off.
- Under the car, the nuts securing the equalizer to the drive cable are unscrewed, first the lock nut is unscrewed, then the adjusting nut.
- The equalizer is removed from the handbrake lever rod.
- In the car interior, all decorative trim between the front seats is removed. The plastic cover of the tunnel is removed, before this the cover is removed from the handle for shifting gears. The hatch into the tunnel is removed.
- The carpet is moved to the side.
- The retaining ring and drive rod are removed from the axle.
Repair of handbrake drive lever
- If necessary, the handle is unscrewed and removed, and the tension spring is changed.
- Assembly of the mechanism is performed in reverse order.
Replacing the vacuum booster
The mechanism on the VAZ 2109 car is changed after confirmation of its inoperability. In other cases, the vacuum booster assembly is dismantled during body repairs. The work is performed under the hood and inside the car:
- The vacuum hose is disconnected from the brake booster.
- The brake fluid level sensor and the block with power wires are disconnected.
- Then the work is carried out inside the car. The locking bracket is removed from the pin that connects the brake pedal and the vacuum booster rod. The parts are separated.
- Under the hood, the nuts securing the main cylinder brake are unscrewed. The cylinder is removed and set aside.
Advice: Care must be taken to ensure that the brake pipes are not deformed.
- The nuts holding the bracket and amplifier to the car body are unscrewed, and the entire assembly is removed.
- After repair work, assembly is performed in the reverse order.
Checking the vacuum booster check valve
A malfunction of the vacuum booster is determined by difficult movement of the brake pedal. This degrades braking performance and can ultimately affect driving safety. Before replacing the old amplifier, it is necessary to check its operation and the operation of the check valve. The functionality of the mechanism is checked by pressing the brake pedal several times. This will create increased pressure in the system. The brake pedal should be in the highest position. When the pedal is not lowered, the engine starts. If there are no faults, the pedal goes to the floor. Otherwise, it is necessary to check the tightness of the check valve and the quality of the hose connection.
The procedure for checking a check valve on a VAZ 2109
- The tightness is checked at the junction of the hoses and the fitting on the inlet pipe and the check valve.
- The valve itself is checked. Before this, the hose is disconnected, and the valve is removed from the amplifier using a screwdriver.
- A sealed bulb is pulled onto the fitting, and by squeezing it, air is released through the valve. After releasing the bulb, if it does not unclench, then the valve is in good condition and holds the vacuum. Otherwise, it needs to be changed.
How to replace brake pressure regulator
The distribution of the load, in other words, across the brake cylinders of the brake fluid, when turning, is carried out by the VAZ 2109 brake pressure regulator. The appearance of body skids during braking may indicate a malfunction of the regulator, if the remaining components are in working condition:
- The elastic lever must be disconnected from the rear suspension beam. For this purpose, the locking ring is removed, then the finger and earring are removed.
- All brake pipes are disconnected from the regulator using a special wrench. After disconnection, all tubes must be marked. This will make the work easier when assembling the unit. To prevent oil leakage, all holes are plugged.
- The bracket is removed from the studs on the body along with the regulator.
- The regulator is disconnected from the bracket and a new one is installed in its place.
- Assembly is performed in reverse order.
DIFFERENCES IN DISC AND DRUM BRAKES
VAZ 2109 rear disc brakes
Compared to drum brakes, disc brakes have the following advantages:
- shorter braking distance;
- even distribution of braking forces;
- brakes operate faster;
- Unsprung weight is reduced;
- heat dissipates better;
- greater reliability;
- maintenance and changing pads is easier;
- there is no need to frequently tighten the handbrake;
- more attractive appearance;
- During the winter months, disc brakes do not freeze after washing, which cannot be said about drum brakes.