Lada Granta cars, like other vehicles, are equipped with a generator designed to power electrical equipment components while driving. If there are malfunctions in the operation of this device, first of all the driver pays attention to the condition of the belt. Below we will talk about how to replace the alternator belt on a Lada Granta car with air conditioning.
Technical regulations Lada Granta
If you decide to change the belt or belt tensioner of the alternator (RG) on a Grant with an 8-valve engine, you must follow the technical regulations of the manufacturer. According to these data, the Lada Granda alternator belt should be checked every fifteen thousand kilometers. And every 30 thousand kilometers a replacement procedure must be carried out.
White Lada Granta
In other words, the owner of an 8- or 16-valve Grant must carry out a diagnostic or replacement cycle every 15 thousand km. And if we take into account that a tensioning device, as such, is not used, then the RG is completely intended for one-time stretching during its installation. Of course, you can tighten the replaced RG on an 8-valve engine, but the manufacturer does not recommend this.
Replacing the tensioner
The device consists of several elements, each of which is removable. Therefore, the need to replace the Lada-Kalina alternator belt tensioner assembly does not arise so often. As a rule, it is associated with mechanical damage to the bracket and stud.
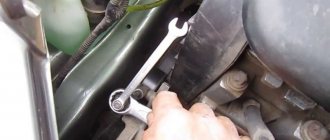
Replacement work must begin with preparing the tool. No special variety is required; keys 8, 13 and 19 are sufficient. Replacement is carried out in the following sequence:
- Use a 19mm wrench to loosen the tensioner locknut.
- Using a 8 key, rotate the pin clockwise. Here you need to be careful and not put in much effort. If rotation is difficult, it is better to loosen the locknut a little more.
- The pin is released until the roller no longer acts on the belt.
- By unscrewing two 13mm bolts, you can completely remove the tensioner.
Here you need to pay attention to one point. Bushings are inserted into the tensioner mounting holes. When removed, they often fall out and get lost, and they may not be present on the new tensioner. Bushings are necessarily included in the kit, but not everyone knows about their existence, so they don’t check it when purchasing. Installation of the Kalina generator belt tensioner is carried out in the reverse order. The pin is tightened with a force of 0.18 kgf/m.
We check the condition of the alternator belt ourselves
Before replacing the Lada Granta alternator belt, car enthusiasts usually check its condition to make sure whether this is really necessary. To diagnose, you need to follow simple steps. First, you need to engage fifth gear and get out of the car, and then try to push your Grant back, working on the front bumper or side pillar, if an assistant does this. In this case, the hood must be open and while pushing it is necessary to see how the RG behaves.
Worn and damaged RG, unsuitable for use
There should be no signs of damage on the strap when pushing the car. We are talking about cracks, delamination or breaks, even the most minimal ones, although this is quite possible, especially if the vehicle is used frequently. If during the diagnostics you notice traces of damage on the RG, this indicates that it will not be possible to tighten the belt - it needs to be replaced. The timing belt is diagnosed in a similar way.
If you don’t need to tighten the RG and adjust the tension on an 8-valve engine, you can also check the condition of the generator itself. After all, if you have any suspicions about the quality of the work of the DG, it makes sense to check the device itself. In addition, during diagnostics, you can also check the generator belt tensioner pulley, with which the belt can be tensioned. If there are chips on the roller or other signs of deformation and damage, including changes in geometry, the element must also be replaced. The video below provides detailed instructions for replacing the bracket, as well as the alternator strap on a Lada Granta car (the author of the video is Igor Semenishin).
Advantages of a tensioner
Why weren't designers happy with the previous adjustment methods? Why did they add an extra video? It's not just about convenience. The tensioner significantly increases the service life of the generator. Without a roller, the entire load falls on its bearings. If the belt is tensioned normally, then there is nothing to worry about. In this case, the generator will last many thousands of kilometers. However, very often car owners overtighten the belt, and this is bad.
The load on the bearings increases many times over, so they quickly fail. In itself, this is not so scary and expensive, although repairing a generator is quite labor-intensive. But the car owner does not always recognize the breakdown in time. The bearings gradually “break”, the rotor moves and begins to cling to the stator winding. The result is the need to purchase a new generator. Of course, the Kalina generator belt tensioner pulley can also fail, which happens quite regularly, but that’s only 400 rubles, not twelve thousand.
Replacement instructions
The procedure for replacing the RG is quite complicated and responsible. If you make a mistake during the steps, this may lead to the strap breaking while the car is moving. Of course, it will be possible to continue driving to the nearest service station or garage, but you will lose not only the money spent on the purchase of the RG, but also your own time. Therefore, think several times before whether you can do everything yourself and whether it is advisable - perhaps it makes sense to simply pay specialists at the service station. But at the same time, you will be sure that everything was done correctly, and if problems arise, you will have someone to file a claim with.
Tools and materials
So, if you decide to replace the cylinder head on an 8-valve engine yourself, below you will find instructions on how to complete this process. In order to do everything yourself, prepare the strap itself. There is one more point here - the purchase of all parts and consumables for repairing an 8- or 16-valve engine must be carried out from representatives of an official dealer. Today the cost of such a RG is around 12-15 dollars or 700-1000 rubles.
Video “Detailed instructions for replacing the RG on a Lada Granta car”
You can learn how to properly replace the strap on the domestic Lada Grant from the video below (the author of the video is MR. BORODA).
On cars of the Lada Granta family with 8-valve engines, an automatic alternator belt tensioner is not pre-installed. Engine modifications are as follows: VAZ-11183, VAZ-21116, VAZ-11186.
You can compensate for the lack of a tensioner in different ways:
- monthly check of the tension level of the converter drive, which is impractical and costly;
- replacing the standard KATEK generator with a Bosch: not every car owner will afford to purchase an imported converter;
- systematic “updating” of the generator bearings: excessive tension of the drive belt, the absence of an automatic tensioner in the design creates the preconditions for premature wear of the bearings;
- set the fastening bolt with a diameter of “6.0” instead of “10.0”, which will increase the free play of the converter by a few millimeters to adjust the tension;
- “makeshift” modification of the standard bracket for the Lada Granta generator;
- replacing the Lada Granta generator bracket with the Kalina bracket.
Each of the above methods has its own advantages and disadvantages. Let's consider the last two options for “modernization” as the most common.
Forced tuning
Unfortunately, since 2011, designers have abolished the tensioner on Kalina. They were guided primarily by considerations of economy, but they did this without any modification to the generator. In practice, cases of its premature failure immediately became more frequent. Therefore, owners began to install the tensioner on their cars themselves.
It's not very difficult to do this. True, you will have to purchase not only the tensioner itself, but also the generator bracket. The only problem is removing the standard belt. It is very difficult to remove because it is very tight at the factory. You can simply cut it, as you will have to buy a new one. The fact is that the Kalina generator belt without a tensioner has a size of 820 mm, but 880 will be needed.
Preparatory stage before modifying the Lada Granta generator belt bracket
Necessary tools, materials:
- a set of car keys, sockets, ratchet, screwdriver with a flat, cross-shaped bit;
- rags;
- liquid for removing deposits and rust WD-40;
- hammer, drill, metal drill bit for “6”, “8”, “10”;
- graphite-based lubricant;
- additional lighting, since visibility in the engine compartment is limited;
- metal mounting;
- torque wrench;
- bolt with a diameter of "8", length 100 - 110 mm.
Step-by-step instructions for removing the generator from a Lada Granta car
Before altering the mount, we remove the converter from its standard place in the engine compartment. To do this, perform the following steps:
- We place the car within the perimeter of the repair area, provide safety measures, and secure the rear row of wheels with wheel chocks. Additionally, squeeze the parking brake lever.
- Open the hood and disconnect the terminals from the battery to prevent a short circuit in the circuit.
Accumulator battery
- We unscrew 6 bolts under the bottom of the car and temporarily remove the oil pan protection.
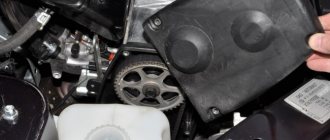
- Remove the protective cap and terminals from the contact board on the converter.
Removes clamps
- We unscrew the nut of the upper fastening (key set to “13”), and use the mounting tool to move the converter to the side. Unscrew the lower mounting bolt.
Unscrew the nut and bolt
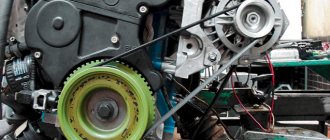
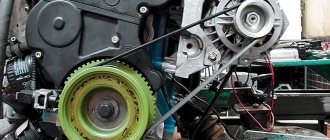
- We remove the generator belt from the pulleys.
- We remove the converter assembly and fix it on the surface of the workbench.
Removing the converter
Parts diagram
Sequence of actions when modifying the generator bracket with your own hands on the Lada Grant
- We grind 2 - 3 cm on each side of the generator mount. It is better to do this in a stationary vice using drilling equipment. Due to the lack of equipment, we use a grinding machine, which is known as a “grinder”.
Sew 2-3cm on each side
- Using a drill with a metal drill (at “8”), we drill out the standard hole on the mount, making the stroke length for the bolt 1.5 - 2.0 cm.
Drill out the standard ring
- Using a grinder, we partially grind down the stiffening rib on the mount so that it does not interfere with the free movement of the converter.
- We cut out a corner of metal 40 mm long and 30 - 40 mm thick, and bend the edge. It turned out to be something like the letter “G”. One end is attached to the bracket, on the other we weld a nut to “10”.
Corner letter G
- We assemble the structural elements, screw in the bolt to tension the generator drive belt.
- We install the converter and the bracket without tensioner in its original place.
- We move the rocker to the third gear position, put on the drive belt, and turn the crankshaft pulley by hand.
- Check the degree of belt tension.
Belt tension level
At home, we check the tension level of the generator drive belt as follows. Using your finger, press on the section of the belt between the crankshaft pulley and the tensioner. The belt bends by 10 - 12 mm, no more. Tighten the fastening (tension) as necessary.
Finally, we start the engine and check the functionality of the system.
Modification of the Lada Granta generator mounting
If you don’t care about the warranty, you can slightly upgrade the generator mounts. You will need: a grinder, a sharpener, the top bolt of the generator (2cm longer than the original one).
Thus, we have the opportunity to slightly adjust the belt tension.
Replacing the generator bracket with tensioner on the Lada Grant from Lada Kalina
Despite the fact that the previous method is the most economical, it is time-consuming.
Many drivers prefer to pay an additional 350-450 rubles and purchase a ready-made kit for installing a bracket from the Lada Kalina to the Lada Granta.
The sequence of actions is as follows:
- After dismantling the converter from its standard place in the engine compartment, we proceed to install the bracket from the Lada Kalina.
Original equipment of the modernized mount:
- belt;
- tensioner roller;
- bracket;
- axis to “10”;
- tensioner
- We unscrew the three mounting screws from the old converter, remove the old bracket, install and screw the new one.
- We fix the structure in its regular place, screw the three nuts to “13”.
- We activate the rocker to the third gear position.
- We put on the generator belt, turn the generator pulley by hand until the belt fits into the groove grooves.
We start the engine, check the charging and the LED indication on the dashboard.
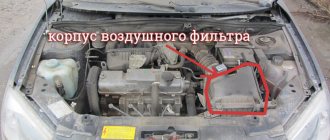
Where is the standard generator located on a Lada Granta car?
Regardless of the modification of the Lada Grant, the converter is installed in the engine compartment on the left side, closer to the radiator of the cooling system.
The design of the Lada Granta’s engine compartment is not “entirely successful”; craftsmen have difficulty dismantling the equipment.
Engine compartment
The difference between replacing the generator bracket in 16 and 8 valve engines
The brackets are identical in shape and number of fasteners. The difference is the absence of an automatic tensioner in the 8-valve engine modification.
The Lada Granta generator bracket with air conditioning is identical to the 16-valve modification of the engine.
Difference between belts of 16 and 8 valve engines
For Lada Granta models, an alternator belt with the following markings is used:
- 8 valves: 1118-1041020-07: 6РК 823, length 823 mm, thickness 3.0 mm;
- 16 valves: 6PK1123 with air conditioning, 6PK1113 with power steering, without air conditioning.
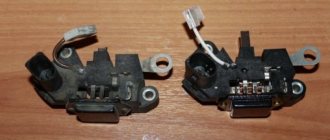
Signs of generator malfunction, methods for eliminating them
| Sign | Cause/remedies |
| The control diode on the console does not light up when the engine starts | The power circuit is broken in the section from the battery to the generator. Checking the continuity of the circuit circuit. |
| The control diode does not go out after starting the power unit | The belt tension is weak, insufficient to generate current. Check the voltage in the circuit. |
| The brushes are badly worn, the diode bridge has become unusable. We measure the output voltage with a tester. We replace worn elements as necessary. | |
| Shorts to ground | The cable insulation is damaged. Check the insulating coating. |
| The output voltage from the converter is below 14 - 16V | The contact terminals have oxidized. Clean with a metal brush, sandpaper, or file. Replace with new ones as needed. |
| Replace the battery. | |
| Insufficient drive belt tension. Adjust the tension. | |
| The diode bridge has become unusable. Install a new one. | |
| The battery is not receiving charge from the converter | Replacing the rectifier bridge. |
| Damage to the power cable. Replacing wiring. | |
| The voltage in the circuit drops randomly | The terminal connections are weak, the clamps are oxidized. Tighten the terminals, replace with new ones. |