VAZ 2101
The legend of the domestic automotive industry, the VAZ 2101, was produced for 28 years (from 1970 to 1988), during which 4.85 million cars rolled off the assembly line. The VAZ 2101 had virtually no competitors in the vast country. Its technical characteristics, dynamics, braking system, handling and price made it a favorite in the domestic automobile market. “Kopeyka” still enjoys prestige and is often found on the streets of cities and towns. As with most damaged cars, the main problem of the “penny” is considered to be its body, since time, humidity and road reagents do not leave the body metal much of a chance. And if you consider that it is also a load-bearing part and makes up 60% of the cost of the car itself, then overhaul of the VAZ 2101 body is a necessary and labor-intensive operation, the quality of which directly determines the service life of the car itself.
Rotten bottom
Malfunctions of the front suspension of the VAZ 2101
The service life of front suspension elements directly depends on the conditions and intensity of vehicle operation, as well as on the quality of the parts used. Since this or that malfunction manifests itself in different ways, it is worth dwelling on each of them in more detail.
Noises and knocks while driving
Extraneous sounds in the operation of the suspension can occur for a number of reasons:
- failure of shock absorbers. In this case, it is necessary to replace the damaged shock absorbers;
- wear of silent blocks. “Broken” hinges need to be replaced;
- development of the transverse stabilizer in the rubber cushions. Inspection and replacement of worn-out products is required;
- The shock absorber rod mount has come loose or the rubber cushions have become unusable. It is necessary to check the fasteners and, if necessary, replace rubber products;
- ball joint malfunctions. When a working appears, the failed supports must be replaced;
- increased clearance in wheel bearings. It is necessary to adjust the gap, and if the bearings are worn out, parts need to be replaced;
- wheel imbalance. It is necessary to check and, if necessary, balance the wheels;
- wheel rim damage. The disk needs to be restored or replaced;
- spring breakage or sag. The front suspension springs need to be replaced;
- damage to the bumpers. Rebound buffers that have become unusable require replacement;
- loosening of the upper or lower arms. In this case, it is necessary to check and tighten the nuts and bolts.
Video: causes of knocking in the front suspension
The car is pulled to the side
If the vehicle pulls to the side, then there can be no question of any safety of movement. There may be several reasons for this behavior:
- different tire pressures. The correct pressure must be checked and set;
- The front wheels are at the wrong angle. A visit to a car service center is required to adjust the wheel alignment;
- Excessive play in the wheel bearing. If there is a large gap, adjustment should be made;
- The front suspension arms or axle are deformed. Replacement of damaged parts is required;
- the springs have uneven subsidence. The front springs need to be replaced;
- The brake mechanism is not fully released. The brake mechanism should be checked and the malfunction eliminated;
- Tire tread has a big difference in wear. Worn tires need to be replaced;
- wheel imbalance. Eliminated in the same way as with knocking in the suspension.
Suspension breakdowns
Sometimes in the operation of the suspension characteristic impacts of metal on metal occur, which is called breakdown. This indicates that one or another part of the suspension does not fulfill its function. The reasons for this phenomenon may be the following:
- sag of front springs. Elastic elements need to be replaced;
- The shock absorbers have become unusable. If damping devices break or fail, they should be replaced;
- deformation of levers. Levers with changed geometry must be replaced with serviceable ones.
There can actually be many more faults in the front suspension. For example, the appearance of squeaks when driving over uneven surfaces may indicate the failure of silent blocks, oil smudges on shock absorbers indicate damage to the product and indicate the need to replace it, etc.
Preparing for painting
Preparing the car body for painting is an important and responsible process in the repair of a “penny”. Any mistake can lead to undesirable consequences, so you need to approach it as seriously as possible.
Grinding
In order for the paint to lie on the surface of the car as evenly as possible, you need to remove the old paint layer from the body. This can be done using sandpaper or a sanding machine.
Pay attention to depressions and bulges: they need to be leveled with the surface
If you are working with a sander, do not stay on one element for too long, otherwise cracks and deep scratches will form.
It is best to process body parts using a “cross” pattern, i.e. First make horizontal movements, then vertical ones. This sanding technique will allow you to remove the old paintwork as smoothly as possible.
Before moving on to the next stage of work, spray the surface of the machine with compressed air.
Putty
After we have cleared the surface of the old coating, we begin to putty. Apply the pre-prepared mixture to the damaged area in an even layer and let it dry.
Using a block or a grinder, we begin to give the body element a smooth surface, and also recreate the original lines of the body. At this stage, abrasives with large grains are used.
Primer
The next stage of preparing the body for painting is priming the treated parts. Any auto parts store offers a wide range of soil mixtures, so we will not dwell on recommendations for their selection.
Distribute the primer mixture over the surface of the VAZ 2101 so that there are no flaws, dents or cracks left on the body
Pay special attention to the joints of the parts and the surface itself - it must be perfectly flat
Re-sanding
Repeated sanding is used after priming. The element is sanded again using a special developer, which shows all the irregularities and deep risks left during the initial sanding.
If everything is done correctly, then after carrying out the listed preparatory work we should receive a perfectly flat surface of the body, with all the lines and bends, as it was when it came off the assembly line, completely ready for painting.
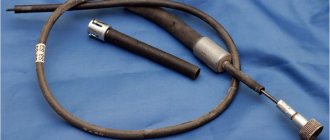
Device for applying liquid anticorrosive
The problem faced by car enthusiasts who decide to process hidden cavities on their own is the lack of necessary equipment. They can use a relatively simple device that operates on the principle of air spraying of drugs under a pressure of 4-6 kg/cm2.
The simplest design of such a device is as follows: a nozzle for it can be made from a cologne spray bottle by drilling out the nozzle in its tip to a diameter of 1.2 mm. A brass tube must be soldered to the inner wall, through which the anti-corrosion agent will be supplied.
The pump is connected with a hose to the spray tube going to the container with Movil. To supply the drug to the tube, you can use a polyvinyl chloride tube lowered into the vessel. For greater clarity, a diagram of such a device is shown below.
With the constant creation of air pressure by the pump, the torch emerging from the Movil nozzle is ensured within 14-20 cm, which is enough to apply it inside hidden cavities.
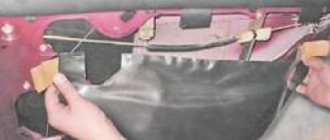
Before applying Movil to hidden surfaces of cavities, it is necessary to ensure that the sprayer has access to the required areas. For this:
- remove the seals of the front wings, headlights and their rims (VAZ - 03, -02);
- remove the spare tire, tools and floor covering (VAZ - 013), upholstery (VAZ - 03, -07 and -06) from the trunk;
- open the rear door (VAZ - 02) and remove the carpet, trim, spare tire and its cover;
- remove the door signal lamps (VAZ - 03, -06) and the reverse signal lamp (VAZ - 03).
Then you should perform a somewhat unpleasant, but technically necessary operation - drilling holes (9 mm) in the sills, and for VAZ-013, -21 and -05 - also in the end surfaces of the rear doors.
If possible, accessible treatment areas should be washed with water, blown with air and dried. In garage conditions, where it is impossible to carry out effective drying, it is enough to limit yourself to wiping them with a damp cloth, followed by natural drying. Considering that the largest number of points requiring treatment are located in the bottom area, it is advisable to carry out all work on a lift or overpass.
To process the sills, the place of the spare tire and the cross member of the front part, you need to pull out the plugs. Two plugs are installed on both sides under the front fenders, a plug on both sides in the rear arches, in the center in the spare tire niche, and one on both sides in the cross member under the front seats. The drainage holes also need to be cleaned.
Preparing the car for painting
With prolonged use, any car loses its attractive appearance, shines less and is no longer as pleasing to the eye of its owner. Atmospheric factors and mechanical stress damage the paint layer, so there is a need to renew it.
Repainting a car is quite difficult. But if you take this responsibly and prepare well, the result will exceed all the owner’s expectations.
The painting process consists of the following steps:
1. Preparation.
There are two options for painting a car - completely and partially. Accordingly, the level of preparation should be different. Here you can learn in detail how to perform local painting to hide scratches and chips on the car body.
At this stage you should purchase the necessary tools:
• Abrasives – for removing paint and cleaning surfaces; • Spatulas – for applying the base; • Spray gun (paint gun) – spraying paint onto the car body; • Compressor – pumps air into the spray gun.
It is better to choose a room for painting that is spacious and well ventilated. It is worth making sure that it is dry, warm and clean. If the first two factors affect the drying time of the paint, then cleanliness is a condition for the quality of the result.
2. Identification of problem areas on the body.
Before painting, you need to meticulously inspect the car and objectively assess its condition. Which places need to be prepared especially carefully, where is it better to paint and what kind of work will be needed in each case.
Let us remember that in the previous article we talked about the capabilities of parking sensors with a rear view camera. Read more on our website.
3. Carrying out welding work.
It is possible that some damage will have to be welded, this applies to rusted areas, deep cracks and chips. If necessary, special metal “patches” are applied.
4. Cleaning the body with abrasives.
A special abrasive wheel is applied to the grinder, which levels the surface of the body. Welding areas are treated with special care.
5. Applying putty.
A universal type of putty suitable for applying minor damage to areas. For more serious scratches, putty with large fragments is used, which is applied in two layers. The strength and flexibility of the spatulas will create a smooth surface and save application time. Therefore, it is better to choose names that are more expensive, but suitable.
6. Surface grinding.
Leveling is done with a soft abrasive wheel to prepare the body for priming and painting.
7. Body priming.
A base coat should be applied underneath the paint; it prevents the paint from spreading and ensures even distribution.
8. Direct staining.
The paint must be applied carefully, in even layers, to avoid smudges, covering areas that cannot be painted.
Choosing a compressor and a spray gun is the key to correctly and beautifully painting your car. Therefore, it is better to buy a compressor that is more productive, at least 1.5 times higher than the consumption of the spray gun. You also need to know the values of its volume. For example, a volume of 100 liters. – this is a continuity of 15-20 minutes of painting. The larger it is, the faster the process occurs.
The spray gun is also used for priming, the quality of which depends on the size of its nozzle. Values from 1.3 to 1.5 mm are the best option, but if there is a large amount of work to be done, nozzles with a diameter of 1.6 - 2.5 mm are suitable.
It is important to know that before you start painting, you need to try the paint on a special surface, adjust the intensity of application and adapt to holding the tool. Video
How to prepare a car for painting
Video. How to prepare a car for painting
https://youtube.com/watch?v=FbeajYg7Y68
Repair of individual components of VAZ 2107
The VAZ 2107 is a modernized version of the VAZ 2105, differing only in the shape of the hood, trim, stylish seat backs, new dashboard and instrument panel. However, the need for repairs usually arises after 10–15 thousand kilometers.
VAZ 2107 body repair
The soft suspension ensures a fairly comfortable stay in the VAZ 2107 cabin while driving. However, poor sound insulation means that at speeds above 120 km/h the interlocutor is completely inaudible. The car body can be used without corrosion for more than eleven years, but fasteners begin to rust much earlier. Therefore, when replacing steering rods or silent blocks, you have to use WD-40, without which it is very difficult to dismantle these elements (sometimes they are simply cut off with a grinder). Body work is one of the most complex and expensive, so any signs of corrosion should be promptly eliminated.
Wing repair
The wings protect the space under the body from various objects - small stones, lumps of dirt, etc. In addition, they improve the aerodynamic characteristics and appearance of the car. The wings of the VAZ-2107 have an arched cutout and are attached to the body by welding. Due to constant exposure to the environment, they are most susceptible to corrosion. Therefore, the standard wings of the VAZ 2107 are sometimes replaced with plastic ones, which are less durable but last much longer. In addition, plastic fenders reduce the weight of the car.
Restoring the rear wing of a VAZ 2107 after a collision, considered as an example, looks like this:
- Dents are leveled using a special straightening hammer.
- With the car fixed, the damaged part of the wing is pulled out.
Threshold repair
Thresholds protect the body from various damages and are durable metal pipes welded to the sides of the car. Loads on these elements associated with periodic boarding and disembarking of passengers, lateral collisions, etc., significantly reduce their service life. Despite the fact that the thresholds are made of high quality steel, they quickly rust.
Restoring thresholds begins with inspecting the door hinges. If they sag, then the gap between the door and the threshold will be uneven. Therefore, first adjust the hinges, and then restore the threshold in the following order:
- The outer part of the threshold is cut off with a grinder.
- The amplifier (if present) is removed.
- Working surfaces are polished.
- A new amplifier is installed and welded.
- The outer part of the threshold is installed and secured with self-tapping screws.
The amplifier can be made with your own hands from a metal strip, in which holes are drilled every 7–8 cm with a hardened drill.
Jack repair
The jack quickly rusts and, as a result, needs to be repaired. It is drilled out at the welding points. If these areas are heavily rusted, they are completely cut out, and a sheet of metal of the appropriate size and thickness is welded in their place.
A new jack can be easily made with your own hands and attached to the bottom using bolts. It can be further strengthened by a metal pipe welded nearby.
VAZ 2107 engine repair
Symptoms of engine failure are:
- fast oil consumption;
- increased fuel consumption;
- weak traction;
- uncharacteristic noise.
At the same time, the car has difficulty climbing uphill in third or fourth gear. The main measures for repairing the VAZ-2107 engine include rebuilding the cylinder head and replacing the pistons.
Cylinder head repair
There are medium and major repairs of the cylinder head. In any case, the cylinder head is dismantled and partially disassembled. The gasket must be changed.
Why does the body rot?
- In the 70s and 80s, the thickness of the metal of body parts was 0.8 mm; closer to the 90s, this parameter often reached a value of 0.5 mm, although, as the official operating instructions stated: “... the thickness of the metal is equal to 0.7 mm...";
- The hinged elements (doors, hood, fenders) have a sophisticated design, with many hidden openings and cavities of unknown purpose. They are the initial sources of corrosion;
- Winter operation in urban conditions is also fraught with the negative impact of road reagents;
- Cheap car tuning. Yes, yes, it’s all these extra-studded hangers - linings that accumulate dirt and moisture underneath;
- Garage-free storage. Sharp temperature fluctuations cause condensation to appear on body parts, which in turn do not have time to dry out and are constantly in a wet state;
- The car is rarely washed and cleaned of dirt, which likes to accumulate in various niches and cavities.
Lesions
Areas susceptible to body corrosion
As time has shown, in most passenger cars, corrosion damages certain areas of the body, the number of which is not so large. But corrosion develops especially actively in hard-to-reach places - gaps, flanges, bends of edges, that is, where moisture does not evaporate for a long time:
- Wheel arches are not only constantly exposed to aggressive environmental influences, they are also damaged by road surface particles flying from the wheels, which accelerate the corrosion process;
- Thresholds, doors, fenders, hood and trunk lids are an excellent place for the accumulation of moisture, penetrating both from the outside and in the form of condensation;
- In places where parts rub against each other (at places where hinged parts are attached, doorways, etc.).
Attention! If corrosion has spread to the central pillars, the joint of the sub-engine frame, side members and other strength elements, then it would be wiser to replace the body completely, since in this case welding the frame is not practical and is a complex process that only trained professionals can do.
The corrosion process can be divided into two types:
- Surface (the process occurs evenly over the surface of the part).
- Point (the process of corrosion goes into the thickness of the metal - cavities, holes, stains).
Surface corrosion
Surface corrosion
This type of corrosion at the initial stage (until it turns into the second type) is not terrible and most often occurs due to poor preparation of the part for painting. We will not consider this type of repair in this article; we will only mention that it is not complicated and does not require special skills. It can be treated by re-cleaning the part, degreasing, priming and painting. I promise that in the future I will provide detailed video and photo instructions, but for now let’s move on to the second type.
Pitting corrosion
Pitting corrosion
Here it is - the first enemy of the car, which destroys the part, destroying not only its surface, but also making the metal structure so fragile that operating the car becomes simply a dangerous activity. Here, treatment will require more serious plumbing skills, or at least the desire to acquire them. After all, it’s not the gods who burn the pots, is it?
Advice! If the metal is heated in the flame of a gas burner to a light red glow and does not crumble into a sparkling fountain or evaporate, then it is quite suitable for welding work.
Overhaul of VAZ 2107
In some cases, major repairs of the VAZ 2107 power unit can be partially carried out without dismantling it. Before starting work, thoroughly rinse the engine and engine compartment with running water and dry. Without removing the motor you can replace:
- crankcase seal;
- cuffs of both collectors;
- crankshaft oil seals;
- pump;
- generator;
- gasoline pump;
- carburetor.
The cylinder head is also easily removed from the engine without dismantling.
A major overhaul involves the restoration of engine elements, as a result of which the technical parameters will correspond to the parameters of the new engine. For this:
- the entire piston group is changed;
- cylinders are bored;
- the crankshaft is ground;
- liners are changed.
I remember how I got into the first major engine overhaul due to my own stupidity. I went out onto the field. There was a ravine ahead, so I drove in my “seven”. I couldn’t go further up the hill, and I couldn’t go back either. Basically, the car is stuck and skidding. Then an acquaintance came up, he was collecting something there - flowers or plants of some kind. He says: “You’re doing it wrong, you need to give it back, and then sharply forward. Let me sit down, and you push me when he moves forward.” Well, I agreed like a fool. The car skidded for about half an hour, no use. I called a tractor, which I wanted to do before. They pulled out the car. I sat down and drove back home. A few meters later the check flashed. It turns out, as I later found out, all the oil leaked while the car was slipping. It’s good that the tractor didn’t go far. I had to take the car for a major overhaul, replacing the piston and boring the shaft.
The need for major repairs is determined by the condition of the cylinder block and piston group. If most of the elements are well preserved, you can limit yourself to replacing individual parts. If even slight block wear is detected, cylinder honing will be required.
Sometimes VAZ 2107 owners buy a repair kit, which includes a reground crankshaft and a piston set. It is also recommended to purchase an incomplete cylinder block for major repairs. Since in this case the gaps are not misaligned, replacing the block will be quite simple. However, most often you have to buy a complete cylinder block, including an oil pump, pan, cylinder head, etc.
It is recommended to disassemble the internal combustion engine on a professional stand, after first removing the flywheel and clutch assembly. If there is no such stand, the dismantled engine is firmly fixed and only then its repair begins.
Typically, a major overhaul of a VAZ-2107 engine involves:
- disassembling the cylinder head, followed by cleaning and checking;
- inspection of rocker arms and valves;
- valve repair or grinding;
- dismantling pistons and connecting rods;
- dismantling the crankshaft;
- checking the condition of the cylinder block and cleaning it;
- checking the camshaft;
- inspection of bearings and checking them for play;
- removal and installation of rings;
- checking clearances;
- inspection of seals and their replacement.
Thus, almost any repair of the VAZ-2107 can be carried out independently. To do this, you need to have certain skills and a set of repair tools, as well as follow step-by-step instructions from specialists.
DIY replacement
When replacing the thresholds yourself, you will need a gas welding machine, a set of parts and the necessary tools for cutting or cutting out the element:
- power screwdriver;
- chisel;
- spot welder, spotter or MIG welding;
- electric drill;
- metal brush.
To clean and align the element after welding you will need:
- automotive putty;
- primer;
- sandpaper R-80;
- anti-corrosion mastic;
- enamel.
The procedure for replacing thresholds using welding is step by step:
- Place the car on a flat surface.
- For ease of operation, dismantle the doors, having previously marked the position of the hinges on the body.
- Use a chisel or grinder to cut off the outer panel of the part.
- Remove the amplifier.
- Clean the seat from corrosion with a chisel, drill with an attachment or grinder.
- Try on the amplifier, modern replicas can be several centimeters longer than necessary, cut off the excess part.
- Weld the amplifier, first securing it with welding clamps or pliers.
- Try on the outer part of the threshold, remove the shipping primer from the factory part.
- Treat the panel with an anti-corrosion compound, install the outer part with screws or secure with clamps.
- Install the doors, check the gaps and the length of the part, which should not exceed the length of the door.
- Weld the outer part, start welding from the place of the central pillar, then work the seam left and right.
- Weld the connecting strip at the bottom of the threshold.
- Clean the welds with a grinder and sandpaper.
- Prime, treat uneven areas with putty, and paint at the final stage.
Experienced drivers often do not use factory parts, preferring to weld the body using square profile pipes. The material has the required thickness and has undergone a galvanizing process, which makes it extremely resistant to sandblasting and corrosion. To make a threshold from a pipe on a VAZ 2106, you will need the following materials:
- Profile pipe 60x60 mm - 180 cm long for the threshold itself, 70 cm for the cross member that will connect the threshold with the spar.
- Profile pipe 40x40 mm - 70 cm for an additional cross member, 25 cm for jack fastenings.
- Metal plates 50x150 mm for welding the threshold to the bottom.
- Anticorrosive – bitumen mastic – 500 gr.
- Welding machine, electrodes 2 and 3 mm.
- Bulgarian.
Pipe installation process step by step:
- Turn the car on its side and cut off the old threshold with a grinder.
- Remove the amplifier, tap all elements that are not cut with a hammer and bend them upward.
- Attach the pipe, cut to size, weld a plug along the edges of the profile.
- Grab the profile to the bottom from the front and back.
- Weld along the length from the outer part. If the standard threshold has a bend, use a hammer to align the profile along the bend.
- Weld the cross members that will connect the threshold and the spar, and weld the jack.
- Tie the part to the bottom using a steel plate.
- Clean the welding areas with a grinder, degrease, and apply bitumen mastic.
When installing a profile pipe yourself instead of a standard threshold, the cost of work does not exceed 2000 rubles.
Description of the VAZ 2101 body
The Kopeyka, like any other sedan, is equipped with a monocoque chassis. In other words, the metal frame not only provides a convenient container for the driver, passengers and luggage, but also at the same time carries a large number of elements, components and assemblies. Therefore, a sedan, like no other type of body, needs timely inspection and repair.
Body dimensions
The dimensions of the car frame are usually understood as dimensional data. The body dimensions of the “penny” are as follows:
- width is 161 cm;
- length - 407 cm;
- height - 144 cm.
Weight
The mass of the bare body of the “penny” is exactly 280 kg. This was found out through simple mathematical calculations. It is necessary to subtract the weight of the engine, gearbox, cardan, rear axle and radiator from the total weight of the car.
As for the total weight of the “penny”, it is 955 kg.
Body number
As a rule, it is placed on the identification plate, which must be looked for in several places:
- on the right cup of the telescopic stand support;
- on the top cross member of the engine compartment.
In some cases it may be stamped separately.
The body number of the VAZ 2101 in some cases can be stamped separately
Additional items
Body parts are usually divided into basic and additional elements. The first include whole parts - wings, roof, floor, side members; the second includes mirrors, sills, a platform for the battery, etc.
The VAZ 2101 mirrors are designed to provide the driver with good visibility. The interior mirror is equipped with a special anti-dazzle device. As for the side exterior mirrors, there were many of them, depending on the year of production of the “penny”. Old versions were equipped with round models, new ones with rectangular ones.
VAZ 2101 mirrors were installed round and rectangular, depending on the year of manufacture
The mounting option was gradually modernized - instead of three holes for screws, only two were left.
On the VAZ 2101, one of the weak points of the body is the sills. They quickly rust and rot, as they are subject to regular mechanical stress. In order to protect and extend their service life, they are covered with plastic covers.
Today on the market you can find “standard” plastic linings for any modifications of the VAZ, including the “penny” one. You can also install linings from more modern models on the VAZ 2101 - VAZ 2107, Lada, etc.
Part one. Deformations
Deformations of the car body and its elements occur in two cases - either you crashed into something or it crashed into you. But this is not the point; the main thing is how we will eliminate the consequences of this embarrassment. Calculation First, you need to estimate the total amount of work, namely:
- all parts of the VAZ 2101 body must undergo defect detection (precisely ALL, since there is a high probability of detecting hidden defects);
- an estimate has been drawn up;
- the sequence of work performed is determined.
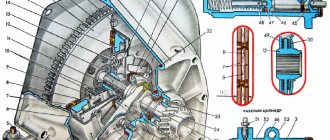
Checking control points
Since we cannot be sure that the previous owner of the “penny” drove flawlessly and, given the very advanced age of our car, first of all we will need to measure its geometric dimensions, which are contained in the instructions for operating and repairing the car.
The photo shows the dimensions of the main control points* of the frame, where the following are indicated:
| A | Anti-roll bar installation location |
| B | Attaching the front cross member |
| IN | Mounting locations for rear engine mounts |
| G | Lower longitudinal rods of the rear suspension |
| D | Rear suspension upper longitudinal links |
| E | Rear tie rod installation location |
| AND | Technological holes in the bottom |
*- The indicated dimensions are taken along the axes of the bolt or hole. By taking measurements from the control points of the body floor, we receive information about the correct location of the fastenings of the main elements of the car, and for this we did not need to dismantle them. We will also find it useful:
Central pillars VAZ 2101 (without upholstery):
Reference dimensions of the hood and windshield
Geometric parameters of the trunk lid and rear window opening
By the way, for the installation of mounted body parts, the manufacturer provides tolerances for unevenness (taperity) of gaps of up to one and a half millimeters, and for internal and external tolerances of the front part of the element relative to the stationary part, this value is increased to two millimeters.
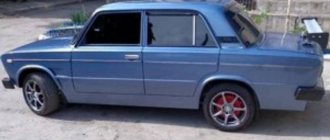
How to paint a VAZ 2101
Any owner of a “penny” dreams of his car shining like new. However, the minimum age of the VAZ 2101 is thirty years, and the body has probably survived more than one welding. To bring it into perfect shape, you need to carry out high-quality painting. It is customary to distinguish between two types of such work: local and partial painting. In both cases, painstaking and lengthy preparatory work will be required before the main operation. This involves sanding and priming. During partial painting, they work exclusively on damaged body surfaces - the hood, doors, trunk, etc.
Particular attention is paid to the choice of paint. Today, there are several composition options that differ in quality, manufacturer and price.
Everything will depend on the financial capabilities of the owner - powder is considered the most expensive. The required set of new paintwork must include: primer, paint and varnish.
The list of painting works includes:
- Complete or partial disassembly of body elements.
- Washing and mechanical cleaning.
- Carrying out straightening and welding works.
- Degreasing surfaces.
- Puttying.
- Padding.
- Degreasing.
- Painting and drying in a special chamber.
- Assembly of units and elements.
- Final finishing and polishing.
The car body needs an eye and an eye. This is especially true for the VAZ 2101 model, more than 25 years have passed since its last release.
How to stretch a car body
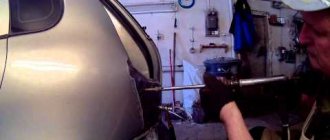
If your “Kopeyka” has been in an accident and received noticeable distortion, before tuning it is necessary to remove the dent on the car body. To eliminate distortions in the hood, door openings, and trunk lid, screw and hydraulic jacks are used.
Aligning car geometry
When pulling out body elements, it is necessary to take measurements with a special forge ruler. Tap the machine parts with a hammer to give it the desired shape. After finishing the work, leave the VAZ 2101 part in a tense state for the metal to get used to.
Pulling in practice
In addition to jacks, tinsmiths use stands to eliminate body deformations. If your “penny” has a large part of the supporting structure bent, place the car on a stand and secure the junction of the floor and the threshold of the car with special clamps. Next, having examined the places of damage, select the appropriate grips that come with the stand. Having secured the grips, you can begin direct pulling.
IMPORTANT! Be sure to follow safety precautions and use protective equipment!
Hood of VAZ 2107
VAZ 2107 owners often modify the hood of the car. First of all, the lid stop, which was made at the factory in an extremely inconvenient way, changes. First you need to remove it from the latch and only then close it. On the VAZ 2106, the same stop is designed much simpler and more functional.
Installing an air intake on the hood
An air intake or snorkel is often installed on the hood of the VAZ 2107, which improves the appearance of the car and helps cool the engine. It is mounted so that air flows directly onto the air filter. Sometimes additional pipes are installed to the main air intake to increase cooling efficiency.
The snorkel is usually made by hand. In this case, it is better to use durable plastic or metal as a material. The air intake is mounted as follows.
- A U-shaped hole is cut in the hood with a grinder.
- The cut out part of the hood is bent to form the snorkel profile.
- Triangular metal pieces are welded along the edges to cover the ends of the part.
- The hood is puttied and painted to match the body color.
When cutting the hood, it is important not to touch the stiffeners provided by the design. Otherwise, the strength of the body will noticeably decrease
Hood lock
Sometimes car owners modify the hood lock of the VAZ 2107. If it does not work well or fails, the mechanism is dismantled. It is recommended to first outline the lock with a marker - this will avoid adjusting a new or restored lock. The mechanism is removed in the following order.
- The hood opens.
- The lock cable clamps come out of their seats.
- The bent end of the cable is straightened with pliers. The fixing sleeve is removed.
- Use a 10mm wrench to unscrew the lock nuts.
- The lock is removed from the pins.
- A well-oiled new lock is installed.
When replacing the cable, it is first disconnected from the lever handle. This is done from the salon. Then the cable is pulled out of its sheath. Nowadays, cables are often sold complete with a sheath. In this case, when replacing the old cable, it is pulled out along with the casing.
Preparing a car for painting
Washing your car with your own hands is not difficult.
This process will be the first operation in the list of painting works. Use water and a special cleaning agent to remove dirt. Grease stains that cannot be treated with water can be removed with automotive solvents. Rust must be removed; for this you can use ordinary sandpaper. The car is painted in parts; in connection with this advice, bumpers, headlights, external lighting equipment, decorative ornaments and all other parts are removed. If necessary, dismantle the door and wing. All removed parts are washed, removed from rust, and dried.
To prevent paint from getting on the windows and some other parts of the car, they must be secured with paper or film and secured with adhesive tape.
Remove old coating
Before painting the car with your own hands, remove the coating. This contributes to better adhesion and durability of the new coating. If a scratch appears on a freshly painted car, the old paint will not attract attention if it is removed before painting. After carrying out such actions, the car must be dried.
The paintwork can be removed from the body in two ways:
- For the manual version, various sandpapers, scrapers, and chisels are used.
- With the chemical method, a special substance is applied to the body to promote swelling and peeling of the coating. Remove peeling paint with a metal spatula.
Body defects away
Minor damage can be outlined with colored chalk. This will create convenience for further surface processing.
All designated areas are cleaned until clean metal appears. You only need to clean the damaged areas, there is no need to go beyond their boundaries, this will help you save materials and work time. Sometimes it is enough to touch up some parts, thresholds and others.
The transition from a cleaned area to a normal surface should be smooth, without protrusions or irregularities. A sensitive device of the human body - the hand - will help check the fulfillment of this condition. By stroking it over the surface of the body, the height difference is determined with high accuracy.
If the car needs serious repairs, the entire surface of the body is cleaned of varnish and paint. This process requires more experienced skill, although with step-by-step training and the desire of the owner, it can be carried out by a beginner.
Each stage has its own characteristics and is performed sequentially, without skipping. Failure to follow their order will affect the quality of the result. Skills can be acquired over time, but then they remain forever.
Basic tools and materials
Specialists who have a personal car dealership have the entire set of necessary tools. Painting a car with your own hands in the garage requires the use of the most basic tools, and if the car owner does not have them, then you can turn to your garage neighbors for help.
To prepare and paint your car, you will need the following:
- Spotlight to provide good lighting and heating of the surface to be painted.
- An electric drill with a vinyl attachment is useful for removing surface defects.
- Construction hair dryer for removing old paint.
- Grinding machine and plane for cleaning and polishing.
- A paint mask is needed to protect the respiratory system, eyes and face when working with equipment.
- Spray gun or compressor for applying any type of coating.
- Putty, primer, paint, varnish, sanding sheets of different thicknesses.
Internal chrome trim
Threshold covers are installed not only outside, but also inside the cabin. The internal linings are a set of four chrome plates with mounting holes for self-tapping screws. In some cases, there may be no holes, and then the linings are simply glued to the threshold.
A set of internal sill plates; there are no holes in these sill plates
In addition, some overlays have a car logo. All this is in great demand among drivers who decide to further decorate their car. Installing the overlays is not particularly difficult: the overlay is installed on the threshold, marked with a marker, then holes are drilled for the screws and the overlay is screwed on. If the trim is installed with glue, then everything is even simpler: the surface of the thresholds and trims is degreased, a thin layer of glue is applied to it, and the trims are pressed down. After this, the glue just needs to be allowed to dry.
Sometimes the name of the machine or manufacturer is applied to the internal linings
So, the thresholds on the VAZ 2107 can be changed on your own. All you need for this is to have minimal skills in handling a welding machine and an angle grinder. But to perform local threshold repairs, the car owner, alas, will not be able to do without the help of a qualified auto mechanic.
About local threshold repair
The need for such repairs arises when the threshold is not rusty, but simply deformed due to the impact so much that a hole appears in it. In this case, the car owner can resort to local repair of thresholds, which consists of straightening the deformed area and then welding it.
This task may seem simple to some, but it is not. Because local repair of thresholds requires special equipment and extensive experience working with a welding machine. A novice driver usually has neither the first nor the second. So there is only one way out: seek qualified help from a car service center.
Local repair sequence
Let's consider in general terms what exactly auto mechanics do when they get a "seven" with crumpled and torn sills.
- Hoses with small hydraulic devices are inserted through the hole into the threshold. Then pressure is applied to these mini-jacks from the compressor, and they begin to squeeze the crumpled section of the threshold outward, straightening it.
- Then one or more small anvils are installed under the raised section of the threshold and careful manual editing of the threshold begins using a special hammer. This is a very lengthy and painstaking procedure.
- After the deformed area is completely leveled, the hole in the threshold is welded. This can be either welding the torn edges of the threshold, or applying a patch if too large a piece has been torn out of the threshold and it is impossible to weld the edges.
Description and purpose
Technologically, the threshold is a hollow box welded to the bottom of the car using gas or electric welding. Structurally, the part consists of four parts connected to each other by spot welding; the total length of the part corresponds to the length of the sidewall. The design includes:
- Overlay or outer part. A metal plate that is located on the outside of the car. Spot welded to the amplifier.
- Amplifier. The power load element is a plate of perforated stamped steel, welded to the bottom of the car.
- Connector. The element is visible from below the body and connects the inside of the sill and the amplifier.
- Inner part. A strip visible from inside the cabin that is attached to the amplifier and the base of the underbody.
Thresholds for all models of the VAZ line belong to the load-bearing elements of the body, which bear up to 25% of the force and vibration load. Factory welding covers the sill edges of the front and rear fenders, which are overlap welded to the part. When completely replacing an element, it is possible to cut out the threshold without dismantling the wings. The cutting runs near the factory welds. In addition to power load, the elements provide protective and decorative functions:
- They give the car a finished look and aesthetics.
- Protect the underbody and interior of the body from corrosion due to the penetration of salt reagents and moisture.
- They take on the mechanical impact from gravel flying during movement and impacts when moving over obstacles.
Repair without welding
Thresholds 2106 are very rarely repaired without welding. This is due to the fact that the “youngest” car is 13 years old, such a service life for metal is critical. If necessary, you can patch corrosion holes with metal patch or use epoxy resin, putty or fiberglass. Necessary tools that will be needed for repair:
- sandpaper R-80;
- fiberglass cover;
- epoxy resin;
- rubber spatula, roller (optional);
- solvent;
- rust remover;
- automotive putty;
- aluminum powder;
- primer;
- enamel.
Repair with epoxy resin and fiberglass goes through the following stages:
- Clean the area of corrosion with sandpaper and rust remover until bare metal.
- Prepare epoxy resin, be sure to add aluminum powder to the mixture, this will reduce the fragility of the material after drying.
- Degrease the defect on the threshold.
- Apply a thin layer of glue to the surface and cover the damage with a piece of fiberglass. Cut the patch larger than the damaged area.
- If necessary, apply several layers of fiberglass, coating each layer with epoxy resin.
- Roll each layer with a roller to remove excess air.
- Treat the surface with automotive putty, leveling possible dents at the defect sites.
- After drying, use sandpaper to remove any rough edges.
- Prime the surface, let dry, and paint at the final stage.
If it is necessary to update the body after winter, then the repair procedure is similar; if there is no corrosion, the surface is cleaned, primed, and painted.
Strengthening thresholds
To enhance the thresholds, you can purchase a factory amplifier. Often home craftsmen make it themselves, using a metal strip 125 mm wide and 2 mm thick. A piece of the required length is cut from it, in which holes are made every 6–7 cm, and the amplifier is ready. To obtain maximum body rigidity, some craftsmen strengthen the sills using a profile pipe.
To obtain maximum body rigidity, some craftsmen strengthen the sills using a profile pipe
To strengthen the location of the jacks, you can additionally weld a metal plate, and only then fix the jack.