Passenger cars of the “Tenth Family” were produced by the VAZ plant in the early 2000s. These include the Lada-112 hatchbacks, the design of which is considered the most successful. On the VAZ-2112 the front suspension is designed in the same way as on station wagons or sedans. And it is more complex than on all Logan family cars. The reason is the absence of triangular levers. But in the VAZ-2110 (2112) suspension you can adjust literally everything, while in Logan we only adjust the toe.
Sometimes the suspension unit is tuned. But what is shown in the video should not be repeated. Let's see...
Design features.
The front suspension is independent, telescopic, with hydraulic shock absorbers, coil springs, lower wishbones with braces and a stabilizer bar.
6.1. Front suspension assembly: 1 – telescopic strut; 2 – nut; 3 – eccentric bolt; 4 – nut; 5 – steering knuckle; 6 – front wheel drive shaft; 7 – protective cover of the hinge; 8 – external shaft joint; 9 – lower lever; 10 – ball joint; 11 – decorative disk (cap) of the wheel; 12 – hub; 13 – brake disc; 14 – protective casing; 15 – rotary lever; 16 – lower support cup; 17 – suspension spring; 18 – protective cover of the telescopic stand; 19 – compression stroke buffer; 20 – upper support cup; 21 – upper support bearing; 22 – upper support of the rack; A – control size
The main element of the suspension is a telescopic hydraulic shock absorber strut 1 (Fig. 6.1), the lower part of which is connected to the steering knuckle 5 with two bolts. The upper bolt 3, passing through the oval hole of the strut bracket, has an eccentric collar and a washer. Turning the top bolt changes the camber of the front wheel.
The following are installed on the telescopic rack: a coil spring 17, a polyurethane foam buffer 19 for the compression stroke, an upper support 22 of the rack assembled with a bearing 21.
6.2. Telescopic stand: 1 – compression valve body; 2 – compression valve discs; 3 – throttle disk of the compression valve; 4 – compression valve plate; 5 – compression valve spring; 6 – compression valve cage; 7 – recoil valve nut; 8 – recoil valve spring; 9 – recoil valve plate; 10 – recoil valve disc; 11 – throttle disk of the recoil valve; 12 – piston; 13 – bypass valve plate; 14 – bypass valve spring; 15 – plunger; 16 – plunger spring; 17 – rod guide bushing with a fluoroplastic layer; 18 – guide bushing cage; 19 – sealing ring of the rack housing; 20 – rod seal; 21 – oil seal cage; 22 – gasket of the rod protective ring; 23 – rod protective ring; 24 – nut of the strut body; 25 – compression buffer support; 26 – rod; 27 – spring cup; 28 – rotary lever; 29 – rod limit sleeve; 30 – rack body; 31 – cylinder; 32 – drain tube
The upper support is attached with three self-locking nuts to the body mudguard strut. Due to its elasticity, the support ensures the rack swings during suspension movements and dampens high-frequency vibrations. A bearing built into it allows the rack to turn along with the steered wheels. Parts of a telescopic hydraulic shock absorber, shown in Fig. 1, are mounted in the strut housing. 6.2.
A hydraulic recoil stroke buffer is installed in the upper part of the cylinder, consisting of a plunger 15 and a spring 16. It limits the movement of the rod during the recoil stroke.
The lower part of the steering knuckle 5 (see Fig. 6.1) is connected by a ball joint 10 to the lower suspension arm 9. Braking and traction forces are perceived by longitudinal braces, which are connected through rubber-metal hinges to the lower arms and front supports of the front suspension cross member. At the junction of the brace with the lever and the front support, adjusting washers are installed, with the help of which the angle of longitudinal inclination of the steering axis is changed.
6.3. Steering knuckle and parts of the front wheel hub: 1 – steering knuckle; 2 – outer mud ring; 3 – hub bearing; 4 – wheel hub; 5 – thrust washer; 6 – nut; 7 – retaining rings; 8 – internal dirt ring
The steering knuckle (Fig. 6.3) is equipped with a closed-type angular contact double-row bearing, in the inner rings of which the wheel hub 4 is installed with interference. The bearing is tightened with nut 6 on the shank of the outer wheel drive joint housing and is not adjustable. All front and rear wheel hub nuts are the same and have right-hand threads.
The anti-roll bar is a bar, the knees of which are connected to the lower suspension arms through struts with rubber and rubber-metal hinges. The middle (torsion) part of the rod is attached to the body with brackets through rubber pads.
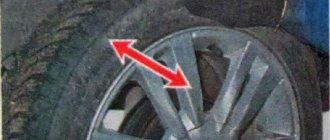
1. When the front wheel is suspended, it is difficult to discern play in the wheel bearings and ball joints. Ask an assistant to press the brake pedal, and if in this case you feel play, the ball joints are faulty.
2. Install the wheel bearing caps with any adhesive and you will avoid many problems in the future.
Repair of VAZ 2110 Lada Chassis
4.0 Chassis
Telescopic stand 1 – compression valve body; 2 – compression valve discs; 3 – throttle disk of the compression valve; 4 – compression valve plate; 5 – compression valve spring; 6 – compression valve cage; 7 – recoil valve nut; 8 – recoil valve spring; 9 – valve plate from...
4.1. Checking the technical condition of suspension parts on a car (Category). See the list of materials inside...
4.2. Rear suspension (Category). See the list of materials inside...
↓ Comments ↓
1. General data 1.0 General data 1.1. Vehicle Specifications
2. Engine 2.0 Engine 2.1 Possible engine malfunctions. 2.2 Replacing the coolant 2.3 Replacing the engine oil and oil filter 2.4. Installing the piston of the first cylinder to the TDC position of the compression stroke 2.5 Replacing the camshaft drive belt and tension roller 2.6 Adjusting the camshaft drive belt tension 2.7 Removing, troubleshooting and installing the flywheel 2.8. Replacing engine seal parts 2.9 Cylinder head 2.10 Grinding in valves 2.11 Adjusting clearances in valve drive 2.12 Removing and installing engine 2.13. Engine repair 2.14. Lubrication system 2.15. Cooling system 2.16. Exhaust gas system 2.18. Features of VAZ-2112 engine repair
3. Transmission 3.0 Transmission 3.1. Clutch 3.2. Gearbox 3.3. Front wheel drives
4. Chassis 4.0 Chassis 4.1. Checking the technical condition of suspension parts on the car 4.2. Rear suspension
5. Steering 5.0 Steering 5.1 Inspection and check of the steering on the car 5.2. Steering column 5.4. Steering mechanism 5.5 Possible steering malfunctions.
6. Brake system 6.0 Brake system 6.1. Vacuum booster 6.2. Main brake cylinder 6.3. Pressure regulator 6.4. Brake hoses and tubes 6.5 Bleeding the brake system 6.6 Replacing brake fluid 6.7. Front wheel brakes 6.8. Braking mechanisms of the rear wheels 6.9. Parking brake 6.10 Possible malfunctions of the brake system.
7. Electrical equipment 7.0 Electrical equipment 7.1. Mounting block 7.2. Generator 7.3. Starter 7.4. Ignition switch (lock) 7.5. Checking and replacing spark plugs 7.6. Integrated engine management system (fuel injection system) 7.7. Contactless ignition system 7.8. Lighting, light and sound signaling 7.9. Windshield wiper 7.10 Replacing the electric motor of the radiator fan of the cooling system 7.11. Heater electric motor 7.12. Cigarette lighter 7.13. Instrument cluster 7.14 Checking the carburetor solenoid valve control unit 7.15 Possible malfunctions of the EPHH control unit. 7.16 Electrical diagram of a VAZ-21102 car 7.17 Electrical diagram of a car with a carburetor engine 2110 7.18 Engine control diagram 2111 (pin M1.5.4) 7.19 Engine control diagram 2111 (pin MP7.0) 7.20 Control diagram for engines 2111 and 2112 (pin M1) .5.4N, "January-5.1")
8. Body 8.0 Body 8.1 Possible body malfunctions. 8.2. Replacing the buffers 8.3 Removing and installing the radiator trim 8.4 Removing and installing the locker 8.5 Removing and installing the wing 8.6. Hood 8.7 Removing and installing upholstery, trim and windshield frame lining 8.8. Trunk lid 8.9. Side doors 8.10 Removing and installing the front seat 8.11 Removing and installing the upper and lower lining of the floor tunnel 8.12. Seat belts 8.13. Rear view mirrors 8.14. Instrument panel 8.15. Heater 8.16 Anti-corrosion compounds for body treatment 8.17. Features of body repair of models 2111 and 2112 8.18. Body care
9. Appendices 9.0 Appendices 9.1 Fuels, lubricants and operating fluids 9.2 Basic data for adjustments and control 9.3 Filling volumes 9.4 Lamps used in the car
What kind of tuning does the G7 suspension undergo?
In general, the VAZ-2107 car is very similar to the already outdated “penny”. The latter is completely copied from the Fiat-124. Therefore, many motorists try to improve the design as much as possible in order to achieve higher performance. Tuning will allow you to achieve the following results:
- Improve ride smoothness.
- Significantly improve vehicle handling.
- Significantly improve stability when driving at high speed.
- Increase the durability and reliability of all structural elements.
The easiest way of tuning is to install higher quality products on the car, which are produced by foreign companies. In particular, this applies to shock absorbers, the fine selection of which can solve a lot of problems, as well as “tailor” the car to specific needs. You can make it either soft and smooth, or hard but more stable when driving at high speeds.
Front suspension device on the VAZ-2110 device, design
Front suspension VAZ-2110: device and design
Why a suspension is needed and what responsibility it bears, everyone knows from driving school, if not from school
Therefore, we will not focus on general maxims, but will immediately get down to business
The VAZ-2110 inherited from the eight and nine the MacPherson suspension, developed back in the 70s of the last century and tested on the experimental VAZ-2108.
Of course, adjustments were made to the design and today it looks like this:
Suspension diagram.
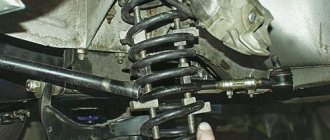
As can be seen from the diagram, there is nothing complicated in the design, and there is nothing superfluous. The Spartan suspension of the tenth family is of the type of independent suspension with hydraulic shock absorbers, coil springs 7 on the lower (23) wishbones. The right and left levers are hinged, using silent blocks, connected by a stabilizer bar. A stabilizer is necessary to maintain vehicle stability in turns and during active maneuvering. It is a rod made of springy steel with a bend for the muffler.
Front pillar
The most important, expensive and maintenance-requiring unit is the front shock absorber strut (16).
There's a suspension strut hidden somewhere here!
In the lower part, the rack is attached to the steering knuckle 19 using two bolts, one of which (18) is eccentric. By turning this bolt and releasing nut 17, the camber angle of the front wheels is adjusted. The front spring rests on the support cup 6 from below and on the upper support cup 10. To prevent breakdown of the suspension, a compression damper 9 is installed on the shock absorber rod.
The stand itself rests on top of cup 12, which is assembled with a rotary bearing 11. The upper support is a separate unit, it is fixed to the body mudguard using three self-locking nuts. The support has some elasticity in order to absorb high-frequency vibrations and not transmit them to the body, and free rotation around its axis by the rack and the front steered wheel is ensured by the upper bearing 11 and the lower ball joint 1.
The front struts are oil-based and dismountable.
Front suspension springs.
Front strut supports.
Front strut shock absorbers and protective covers.
The working shock absorber is installed in the strut housing. If necessary or when choosing a different type of shock absorber (gas, gas-oil), it is always possible to remove it from the strut body, repair or replace it. It should be taken into account that the figure-eight shock absorber is not suitable for the ten, since the strut body on the 2110 is shorter, although the design looks identical.
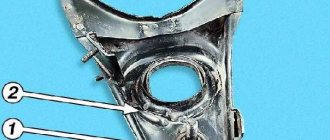
Ball joint and lower control arm
It is the ball joint that takes on all the loads - braking, accelerating, longitudinal and transverse, and in addition, it is the lower point of support of the steering knuckle.
Ball joint fastening unit.
Support 1 is fixed on the lower arm using three blind bolts. When disassembling this unit, you need to be extremely careful, since the holes in the steering knuckle for the support mounting bolts are not through and if handled carelessly, you can easily tear off the heads or break the body of the bolt. If this happens, you will have to drill out the remaining bolt or change the steering knuckle. This is labor-intensive and expensive work.
Ball joint with cover.
Lower suspension arm with silent blocks.
Stretch marks
To prevent bending of the lower arm and relieve braking and accelerating loads from it, braces are attached to it, the second end of which is fixed through a silent block to the front suspension beam.
Front suspension of VAZ-2110.
The stretchers perform another important function: they help regulate the longitudinal inclination of the rotary axis. This angle greatly affects the stability of the vehicle and its behavior when maneuvering. Adjustment is carried out using washers installed at both ends of the stretcher.
Rounded fist
An equally important detail is the steering knuckle.
Steering knuckle and hub assembly.
It is he who is responsible for the safety and fixation of the wheel bearing. The bearing is held in the fist by two retaining rings. Bearing type: angular contact, double row. It does not require adjustment throughout the entire period of operation.
The hub itself is pressed into the inner race, and it is secured with a nut, and the nuts on the right and left are the same and have a right-hand thread.
Rounded fist.
Wheel bearing.
conclusions
In short, this is how the VAZ-2110 suspension works. We examined only the basic elements of the design, but the essence is clear - repair and maintenance of the front suspension is not at all a complicated procedure, the main thing is to know its structure and promptly identify and eliminate faults. Take care of your suspension and let only smooth roads under your wheels!
https://youtube.com/watch?v=gS1brgDQlSk
Front suspension - complete assembly
The photo shows what the right disc suspension looks like. It is easy to recognize the telescopic post 6, as well as the lever 3. Both of these parts form the basis of the assembly.
Suspension parts assemblies
We list the main parts in ascending order of number: 1 – anti-roll bar; 2 – stabilizer rod; 3 – suspension arm; 4 – ball joint; 5 – steering knuckle; 6 – suspension strut; 7 – stretch (saber); 8 – extension bracket.
Parts 7 and 3 could constitute a "monolith". But even then they would be mounted on hinges, and in the suspension design of the VAZ-2112 (and 2110) we will find these hinges plus one more - it connects parts 3 and 7.
The photo does not show the swing arm, but here it is attached to the shock absorber, that is, it is part of it.
The main part is a strut with a shock absorber
Everything that is indicated above by the number 6 consists of several parts. Let's list them.
Strut
The numbers indicate the elements:
- 2108-2901056 – metric nut M14;
- 2110-2902760 - cup;
- 10519601 - washer;
- 16105021 – self-locking nut M12;
- 2110-2902816 – bump stop;
- 2110-2905003 and 2110-2905002 – shock absorber left and right;
- 2110-2902826 - frame;
- 2108-2901052 – washer for screw;
- 15540931 – M12 screw (until 07.2001);
- 2108-2901051 – lower screw (after 07.2001);
- 2110-2901054 – cap;
- 2110-2902842 - washer;
- 2110-2902830 – screw;
- 2110-2901032 - washer;
- 2110-2902820 – upper support (pillow);
- 2112-2902712 – suspension spring;
- 2112-2901031 and 2112-2901030 – left and right rack;
- 2110-2905681 – anther;
- 2108-2901050 – screw with eccentric;
- 16104111 – self-locking nut M8;
- 2108-2902840 (-01, -02) or 2110-2902840 (-01) – support bearing.
Some station wagons and sedans have racks 2110-2901030 and 2110-2901031. But then springs 2108-2902712 are used. But the parts marked with the number 21 are interchangeable.
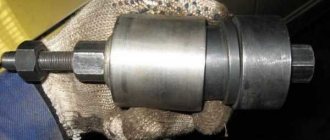
Dismantled rack
Rounded fist
Let's consider one important unit, consisting of a minimum number of parts.
Steering knuckle with hub bearing
From the appearance of the unit it is clear what and how it is attached to. Let's list the articles:
- 2108-3103020-01 (-02) – wheel bearing;
- 2108-3103068 – sealing ring;
- 2108-3001060 – dirt protection lining (internal);
- 2108-3103012 – hub;
- 2108-3103079 – bearing element (washer);
- 2108-3103032 – a retaining ring that secures the bearing;
- 2108-3001061 – dirt protection pad (external);
- 2110-3103065 – decorative cap (after 01.2003);
- 2108-3103065 – decorative cap (until 01.2003);
- 2108-3001015 and 2108-3001014 – left and right fist;
- 2108-3103061 – hub mudguard;
- 14044271 – self-locking nut M20.
Lever and everything connected with it
The lower arm holds the ball pin (part 2). The steering knuckle is attached to the ball joint housing. It is not shown in the drawing, but fastening screws 15 are shown.
Levers together with saber stretchers
Let us list the designations:
- 2108-2904046 – rear hinge of the saber;
- 2108-2904185-01 – ball pin;
- 10517070 – spring washer;
- 2110-2904192 – ball joint;
- 15541231 – M12 screw;
- 2108-2904045 – thrust washer;
- 16105011 – self-locking nut M12;
- 2108-2904040 – swivel joint;
- 2108-2904020 - lever arm;
- 2108-2904270 – saber or stretcher;
- 12638601 - washer;
- 2110-2904070 – casing;
- 2110-2904076 – spacer sleeve;
- 12574921 – self-locking nut M16;
- 15970730 – M10 screw;
- 2108-2904225 – spacer washer (maximum number – 4 pcs.);
- 16101521 – metric nut M12;
- 10516870 - spring washer.
Brackets for attaching sabers are welded to the transverse pipe. That is, on the VAZ-2112 the front suspension contains a “cross member”, and it cannot be excluded from the design.
Cross pipe and fasteners
The photo shows:
- 2112-2904400 – cross pipe;
- 2108-2904050 – saber front hinge;
- 12574921 – nut M16;
- 2110-2904436 – cap-plug;
- 2108-2904054 – front joint washer (up to 12.2000);
- 2110-2904054 – the same (after 12.2000);
- 2108-2904225 – spacer washer (maximum number – 2 pcs.);
- 2110-2904055 - washer;
- 2110-2904312 – screw.
Some sedans and station wagons have a cross pipe 2110-2904400 (-01).
How much does it cost to repair the front suspension of a VAZ 2112 (cost of spare parts)
Today our group received an application for repair of a VAZ 2112 suspension in a circle, since the person plans to drive long distances and does not have the means or desire to spend time on repairs, he changed it correctly once and went.
Now we will tell you how much it will actually cost to repair the wheel suspension on a VAZ 2112 and whether it is so expensive.
QML, for example, is expensive
offers Stoik oil from 1500 rubles per piece
The front strut compression buffer will cost from 100 rubles per piece
Front pillar protective cover from 150 rubles per 1 piece
do not forget that when replacing the struts, you also need to change the camber bolts, the cost is about 300 rubles per pair, two pairs are needed.
Front strut support bearing from 850 rubles per piece
With high mileage and a car age of more than 5 years, we recommend changing the front suspension arm assembly, the cost of which is about 1000 rubles per piece, but many do it on a more budget-friendly basis and change separately the sales block bushing and the “Romashka” bushing, but sometimes and very often this It doesn't last long. The cost of bushings starts from 100 rubles (but it must be repressed, which costs about 200 rubles for one salen block), and “Romashki” salen blocks, which cost about 300 rubles per set and repressing them also costs around 150 rubles per pair, but this is the cost with the spare parts removed from the car. And we get either a new one for 1000 rubles or our used ones for 600 rubles, and I would give preference to the new one, because... There will still be wear and tear, and the mechanic may simply not notice it, but it’s everyone’s business.
Ball joints from 350 rubles apiece, for this cost we will get a budget ball joint that will last about 10-15 thousand, the more expensive the better, but that’s also not a fact, because Unfortunately, there are a lot of counterfeits.
The sales block of the front beam is also not very expensive, only 200 rubles apiece
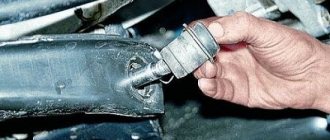
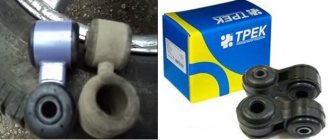
Don’t forget to change the stabilizer struts either, they cost from 200 rubles apiece but sometimes they rattle and then the owners are guilty of everything but them.
The stabilizer pads also need to be changed, but this is a very dangerous undertaking, because on old cars, the bolts break and then the pain of drilling and disassembling the interior (costs from 100 rubles apiece, but hemorrhoids can cost more than 1000 rubles for a replacement, but this is when everything is very sad.
Tie rod ends cost from 850 rubles per set, but they also require bushings, which cost from 200 rubles apiece. It’s best to change them so that the person who makes your alignment doesn’t spit and charge you for the fact that these bushings don’t fit.
To summarize, we can say that when ordering spare parts from us, you save about 10-30% of what is in stock, waiting only a week.
The cost of the front suspension, according to our calculations as of 11/03/19 for spare parts, is 10,450 rubles, not expensive when compared with foreign cars, I changed it once and forgot about it. It rarely happens that people change everything at once; more often they change only what is out of order or what has external wear, for example, when the rubber bands are externally cracked and you can see from them that they have “aged”
Sources
- zen.yandex.ru/media/mehanika/skolko-oboidetia-remont-perednei-podveski-vaz-2112-stoimost-zapchastei-5dbeda71f557d000b1537929
- drive2.ru/l/516434015570363293/
Knocks
If you start to hear knocking noises coming from the front suspension, this could be caused by several reasons:
- The rack has certain faults;
- The ties on the cross member, the cushions are worn out or the bolts are loose;
- The attachment to the body was not strong enough;
- The springs have failed;
- The hinges are worn out;
- The rubber part of the suspension has broken its integrity. The knock should be clear, like the impact of metal on metal;
- Wheel alignment is out of balance.
Front suspension arms VAZ 2110-2112
When, after a hard day's work, you get behind the wheel to take a breeze on a flat surface, an important condition for reliable driving will be complete control over the vehicle.
Driving pleasure will not be complete if one important system in the car that helps achieve this goal is unstable - the suspension. A properly tuned suspension system will provide some pleasant driving experiences, and the main component of this system is deservedly recognized as the suspension arms
The very first suspension arms were made from cheap stamped steel. Their main disadvantage is rust. When in a humid environment, rust did not leave anything behind the product. In addition, with rust it is quite problematic to replace bushings and ball joints.
Cast control arms are popular on modern vehicles, especially trucks and SUVs. They are very strong and can withstand harsh conditions better than stamped arms.
Over the years, levers have evolved from humble stamped steel products to cast aluminum parts that are stronger and lighter. Die-cast aluminum, the products are not at all susceptible to corrosion, but since aluminum is a soft metal, the levers are not designed to withstand harsh conditions.
The lever is located between the frame and the ball joint of the wheel; it is shaped like the letter “A” with two hinge points attached to the frame on one side, and the “sharp” end to the wheel knuckle. The main purpose of the lever: support and assistance with car controllability. In its most basic terms, the lever allows the suspension to move up and down and is the first to take on the load of wheel torque that occurs as a result of vehicle braking. If a car enthusiast is confident in the condition of the suspension arm, he can be confident in the good handling of the vehicle. A worn lever will lead to a significant decrease in ride quality and safety.
A decent condition of the lever is the key to precise and precise steering, allowing the car to move straight, without yawing the nose. A defective suspension arm can lead to loss of control and poor vehicle stability when cornering. To regain your former confidence, you need to get rid of the defective lever.
The new control arm for VAZ 2110, 2111, 2112 must match the type of suspension system used in the vehicle and the design of the suspension link that meets the specifications and requirements of the vehicle. For this product, you must select only high quality material with certifications that meet industry standards.
Damage to a suspension part is possible:
- due to damaged bushings;
- damaged ball joints;
- mechanical wear of the suspension from impact;
- improper towing.
Regardless of the cause, a defective part will result in poor handling and loss of control. Replacing a lever is not an easy job, but it can be done at an average level of difficulty. The only way to get stuck is to remove the ball joint. If the condition of the hinge itself is excellent, the work may require a special removable tool. Paired with MacPherson front suspension, lower control arms are the only type of support used in the suspension. The upper control lever is not required as the rack takes its place. For the rear of the car, the most commonly used are four arms with rubber bushings at each end.
When undergoing a technical inspection, it is necessary to check the wheel alignment for proper traction and even tire wear.
Different vehicles have different degrees of difficulty in installing key parts. In most cases, replacing the entire suspension arm assembly of a VAZ 2110, 2111, 2112 is much simpler than replacing one ball joint or a set of arm bushings. Without the right tools, replacing a bushing is an energy-intensive task. A leisurely thirty minutes of work will require good manpower to compress the springs and a special tool. When performing replacement work for the first time, it is recommended to follow the instructions in the operating instructions.
Common reasons for replacing levers on VAZ 2110, 2111, 2112:
- noise when driving and turning the car;
- knocking noise from the wheel;
- steering wheel vibration;
- tire wear.
Diagram of the anti-roll bar on the VAZ-2112
The stabilizer is an important part, but you can drive without it. The absence of a stabilizer is not a reason to remove the car from service.
Stabilizer and traction rod
The unit consists of a rod and two rods. Articles:
- 2110-2906050 – thrust or stand;
- 2110-2906010 – assembly assembly;
- 10516870 – spring washer;
- 2110-2906040 - pillow;
- 10519601 - washer;
- 2108-2906042 - bracket;
- 2110-2906016 – rod;
- 2110-2906078 – upper rod bushing;
- 15971321 – M10 screw;
- 12164711 – nut M10;
- 16104111 – self-locking nut M8;
- 2108-2906079 – lower rod bushing.
To get rid of the stabilizer, remove the parts shown in the list.
Interior
The interior of the car is simple and not very presentable. You won’t find any “bourgeois excesses” here. The only exception is electric windows and heated front seats, but this is not found in all modifications of the car.
The steering wheel is large and very antediluvian. The steering column is height adjustable only. Moreover, some models come without power steering and electric power steering, which is a significant disadvantage.
Torpedo Lada 2112 (2006-08)
To the right of the steering wheel is a console with a heater, radio, on-board computer (if equipped) and main keys. The heater, in theory, should be adjustable in order to separately heat the windows, top and bottom of the cabin, but in reality everything is heated at once. There are no airbags in the cabin.
The glove compartment is quite large and even has a backlight. The position of the exterior mirrors is adjusted by a special lever, but it is adjusted very mediocrely, so usually no one uses it.
A tall person is unlikely to be comfortable in the back row of seats, because his head will touch the ceiling. Long-legged people will also not be very comfortable, since there is quite a bit of space left to the front seats. The width of the cabin is cramped; only two passengers can be comfortably accommodated. Three people will fit, but they will be cramped.
Interior of Lada 2112 (1999–2008)
The rear windows are manual and constantly stick. As anyone who has ever owned a Lada, Zhiguli or any other AvtoVAZ product knows, the windows go down exactly to the level they want. Often it is completely impossible to lower the glass completely; it gets stuck in the middle and does not move anymore.
The rear row seats recline together or separately, which increases the size of the trunk, so you can put a fairly large load in the car.
A detailed video about the suspension and brakes
Welcome! Front transverse arms - installed in the front of the car on the sides, over time they (from bad roads) can become deformed, and also in the event of a strong collision with a deep hole or when flying at speed onto a curb, the arms are most likely the very first to fail , not counting the wheels and some other suspension elements, so after that you have to change them, in this same article we will teach you how to change the transverse front control arms on cars of the tenth family, in addition, we will also show where they are located and explain what symptoms they will have car if any of the levers is deformed.
Note! To replace both wishbones (one is located on the left side of the car and the other on the right), stock up on: All the keys that you have in your toolbox, in addition to this you will need a bit and you will have to find an inspection hole somewhere, because the levers are located at the bottom car and you will have to crawl under it, you also need a jack and a wheel wrench to remove the required wheel from the car in which the front suspension wishbones will be replaced!
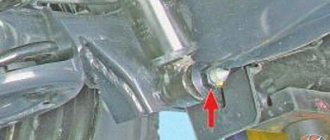
Where are the front wishbones? We will not insert a picture in this article, because in one article we already described where these levers are located, but still we will explain a little, in order to see them you will have to crawl under the bottom of the car and there will be many levers, starting from two transverse ones and ending with anti-roll bar, for more details about where the wishbones are located, see the article entitled: “Replacing the front wishbones on a VAZ”, they are shown there with a red arrow in the photo.
When do you need to replace front wishbones? We won’t tell you exactly how the car will behave if they are bent, but we will try to convey to you in what cases they need to be checked, firstly, what is a lever, this is the thing that holds the wheels of the car in a vertical position and does not give up when hitting It’s too much for them to move away from this position, the levers themselves are durable and rarely will anyone change them, but if any accident occurs or the car hits a hole at high speed, then there is a possibility that the levers were deformed upon impact and thus became unusable, where they are located we have already told you, so as soon as you feel that after hitting a hole when you release the steering wheel, the car is leading somewhere to the side, although you have never had this before, then here we recommend that you crawl under car and look at the condition of these levers and, if necessary, replace them with new ones, in addition, from time to time the levers become corroded and do not rust much, so if you notice rust on them, then in this case we also recommend replacing them with new ones, just over time that’s all get worse and definitely won’t lead to anything good (metal also weakens from rust and when you hit even a small bump, the lever will most likely become deformed).
suspension
| Has there been a hum in the car while driving? Check the condition of the hub bearings; most likely they need to be replaced. The service life of bearings depends not only on lubrication, but also on the quality of the part. Do you know what the best wheel bearings are for the VAZ 2110? |
| Owners of VAZ cars know firsthand what crickets are in a car. When they begin to irritate on the road, the driver frantically searches for their habitat. The acoustics in the car are very deceptive, so it is not always possible to find the cause of the squeak. In this article, we will look at the most common problems associated with extraneous noise and rattling, as well as how to remove squeaks inside and outside the car with your own hands. |
| If while driving you notice that there is something humming in the front suspension, then most likely the problem is in the front wheel hub, in the bearing. You can replace the front wheel bearing yourself, but this will require some experience. |
| Many people associate external tuning only with a low-slung car, which is terribly impractical on Russian roads. However, there is a solution - this is an air suspension, which is capable of lowering or raising the car by the required amount in one moment. Let's try to find out how difficult it is to install air suspension with your own hands, and also find out how much air suspension costs. |
| The steering wheel of the VAZ 2110 is more comfortable and imposing than the Samara, but not everyone likes such smooth handling. With a simple modification you can make the steering wheel sharper while maintaining comfort. |
| Easy driving is not only driving pleasure, but also safety on the road. Correct wheel alignment largely determines the vehicle's handling. Let's try to figure out what wheel alignment is. |
| The triangular front suspension arm (in simple terms - triangular arms) is a single, rigid and non-deformable front suspension unit, which is installed instead of the standard structure, consisting of two parts (suspension arm and braces, connected rubber hinges (silent blocks)). What benefits do they provide and is it worth installing them? |
| Why does a car with low ground clearance cause more emotions in some groups of people than with a high suspension? This is probably a question to which the answer will not be clear. Such suspension tuning as “reducing the ground clearance” can be done in different ways, some of the methods can be called “correct”, and some can be classified as “collective farm”. Do you know how to lower a car with your own hands? |
The production of cars of the tenth family has long been discontinued, replaced by the Lada Priora. This is probably why many parts from Priora are installed at ten. In this photo report we will look at how to replace the rear beam of a VAZ 2110 with a Priorovskaya one.
Russian roads make us think about how to increase the vehicle's ground clearance. Such topics can even be found on forums dedicated to the Chevrolet Niva, to say nothing of cars of the tenth family. You can raise the suspension in different ways and to different heights, let's try to understand the advantages and disadvantages of all methods.
Encyclopedia of tuning and modifications for VAZ 2110, VAZ 2112
| Helical suspension (coilovers) allows you to easily adjust the car’s suspension to different operating conditions. But such adjustable shock absorbers have one big drawback - their high price (a set from 50,000 rubles). Want to save money? Try making homemade coilovers. |
| One of the popular ways of tuning a car is to lower it. To do this, the suspension is modified using different methods, for example, cutting off the springs (which is not recommended), installing a lowered suspension kit, installing air suspension, or using suspensions with adjustable clearance. I will dwell on the last method in more detail. |
| On the VAZ 2110 (and some other front-wheel drive cars), rubber silent blocks are used in the cross member of the front suspension. To change the characteristics of the suspension and handling, they can be replaced with rubber-metal hinges (popularly “daisies”). Let's look at this improvement in detail. |
| Car silent blocks are hinged elements that serve to connect parts of the front or rear suspension and dampen vibrations transmitted from one unit to another. Most often they are made of rubber, but for tuning enthusiasts they offer polyurethane silent blocks. Do you know what is better to choose polyurethane or rubber? |
| Buffers are interturn spacers made of durable and elastic material designed to increase the stiffness of suspension springs. According to the manufacturers, these accessories can not only make the ride more comfortable, but also extend the life of the suspension and increase ground clearance. They claim that the installation of an auto-buffer is comparable in its characteristics to the installation of an additional shock absorber and gives the effect of an air suspension. Is this really so? |
| If the car falls into a deep hole, cracks in the paintwork may appear on the strut support. Most often, Kalina owners encounter this defect, but older VAZ models (2108-21099, 2110-15) are also no exception. To extend the life of the body, there are special protective spacers that can protect weak points from damage, as well as prevent the further spread of existing cracks. |
| For the first time at AvtoVAZ, negative camber of the rear wheels was used on the sports Kalina. Later, minus camber of -1 degree was used on Grant and the new Kalina. Do you know how to make negative camber on a VAZ with your own hands? |
| AvtoVAZ recommends installing wheels with a camber angle of 0 degrees. When the wheels are parallel to each other, good traction and stable driving are ensured. Do you know why they do negative camber and how it affects the behavior of the car? |
| Many car owners complain about insufficient handling due to weak body rigidity and suspension mounting points. This problem can be solved using an integrated approach to improving the driving performance of the car - installing a subframe. |
| On front-wheel drive VAZ cars, the rear suspension is semi-independent (torsion bar), which has its advantages and disadvantages. To change the characteristics of the car, the rear suspension is changed to independent. Do you know how complicated this process is and what impressions you get after such tuning? |
| At the front of the car, as a rule, an independent MacPherson-type suspension, double-wishbone or multi-link suspension is installed. But the rear suspension may have significant differences. Depending on the car and its operating conditions, the rear suspension is dependent, semi-independent or independent with a different number of levers. Each design has its own characteristics, advantages and disadvantages, and which one is better? |
| Do you hear extraneous noise in your car when driving? You should not delay in finding the cause of the malfunction, but repair the failed part as quickly as possible. The table describes the main causes of noise when driving a car, as well as ways to eliminate the problem. |
| During the operation of the car, we involuntarily have to deal with the appearance of extraneous noise, no exception knocking or squeaking when turning the steering wheel. In this article, we will look at the possible causes of this problem and how to fix it. |
| The front struts of the VAZ 2110 are designed to absorb shocks and impacts on the car body. Their approximate service life is 60-100 thousand km. mileage, and it largely depends on operating conditions. If you notice that the car has become less stable on the road, replacing the shock absorbers will most likely solve the problem. |
DIY car suspension diagnostics
The service life of suspension components varies greatly in different countries, and this is due to the quality of the road surface. If the suspension rarely changes abroad, then in the case of Russian roads, suspension elements have to be changed every year, and sometimes more than once. How can you determine suspension wear yourself?
<< First < Go back 2 Read more > Last >>Rear suspension
The diagram of this node includes a total of 16 elements:
- Rubber-metal hinge (it serves as the main fastener to the body);
- Bracket. It secures the rear suspension arm to the body;
- Shock absorber housing;
- Compression stroke load buffer;
- Housing cover;
- Support washer;
- Shock cushion;
- Spacer sleeve;
- Solid spring;
- Shock absorber;
- Beam lever;
- Insulation gasket;
- Lever connection element;
- Flange;
- Rack bracket;
- Lever bushing.
Disassembly and replacement
It is necessary to completely disassemble the rear suspension on the VAZ 2114 in cases where you want to fully lubricate the elements or replace some of them.
Dismantling is carried out according to the following scheme.
- The machine is driven into a viewing hole or raised using a lift.
- In the trunk, the lining and the belt reel are removed. There is also a fastener for the struts to the body, which is simply loosened a little. There is no need to unscrew it.
- Now the rear wheel pair fasteners are loosened. To do this, the caps are removed and the wheels are dismantled. Make sure that the jacks hold the car properly.
- Remove the brake cables. Here you need to unscrew the cable fasteners to the suspension arms and body. Next, the brake drum is removed, and the cable ends are removed through the manual drive lever. Do not forget to unscrew the flanges from the brake flaps at the same stage.
- At the next stage, the pipes and hoses from the brake system are removed and the drive lever is dismantled. It is used to operate the pressure regulator. To remove the lever, the bracket is disconnected by removing the washer and removing the earring from the wheel axle.
- After this you can disconnect the shock absorbers. Remove the rubber cushions, unscrew the fastening nuts and remove the washer from the body. Next, stops are placed under the front wheels and the rear part rises slightly. This will allow you to remove the buffer, springs and shock absorber housing.
- By unscrewing the body mounting bracket, you can dismantle the entire beam. This gives you full access to the rear suspension and struts. This even allows you to disassemble the shock absorbers themselves, replace them with new ones, and lower the VAZ 2114. Although, given the quality of our roads, this is not recommended. Do not forget that to remove the shock absorber, or rather the springs, you need to use special ties. If you don't have them in your garage, you may be seriously injured if you try to dismantle them without these tools. The spring is under high pressure, so it can easily jump out and cause injury to you.
Article on the topic: Do-it-yourself replacement of front silent blocks on a VAZ 2110
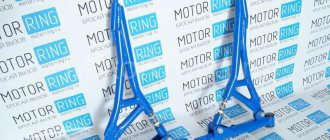
Front suspension struts SS20 for VAZ 2110, 2111, 2112 RACING “SPORT” series (set of 2 pcs)
Lowered front struts SS20 Racing SPORT for VAZ 2110-2111-2112
Since August 2022, front shock absorber struts SS20 with lowering “-30”, “-50” and “-70” mm for VAZ 2108 and VAZ 2110 have been combined into a single position VAZ 2108-10 and can be used on both automobile. Lowered (sports) shock absorbers “SS20 Racing” are a series of SS20 products for drivers who prefer a fast and active driving style, for whom not only the appearance of the car is important, but also the correct and stable operation of the suspension when the ground clearance is lowered.
Benefits of SS20 Racing Lowered Shocks
- lowering the car suspension by 30, 50, 70 or 90 mm at your choice;
- increasing vehicle stability and reducing roll when cornering;
- increased resistance of rebound and compression valves, which provides increased energy consumption for lowered suspension;
- the reduced rod output ensures reliable fixation of the spring when the wheel is fully suspended;
- the geometry of the shock absorbers is designed in such a way as to ensure the balanced operation of all suspension elements for the required lowering of the suspension;
- improving the aerodynamics and speed characteristics of the car;
- equipped in pairs with the same characteristics, which guarantees uniform running of the car;
- improving handling and preventing the car body from swaying at high speeds;
- increased strength and rigidity of the body of the SS20 Racing struts (due to the reinforcement gussets) allows them to be used as sports shock absorbers for competitions;
- new impressive sports characteristics and sporty appearance of the car.
The lowered SS20 Racing struts , produced in the “Sport” modification, have high rebound and compression forces, which allow them to be used in amateur competitions. These shock absorbers are less suitable for everyday use, as the suspension becomes much stiffer.
Shock absorbers of the SS20 Racing series have the following design features:
- reduced rod output for working with shortened springs -30, -50 and -70 mm (with the number of turns no more than 6 for the front struts and no more than 9.5 for the rear ones);
- a shortened upper part of the body for proper distribution of forces between the bump stop and the spring as part of the lowered suspension;
- a spring cup shifted 20 mm downwards in modifications of the SS20 Racing shock absorbers -70mm;
- a downward-shifted swing arm to ensure the design geometry of the steering linkage;
- a gusset-reinforced body that can withstand increased loads compared to standard shock absorbers.
The kit includes:
- Left shock absorber strut
- Right shock absorber strut
- Warranty card
Warranty - 1 year Price is per set
| Applicability | |
| Model | 2110, 2111, 2112 |
| Packaging dimensions | |
| Height | 20 cm |
| Width | 30 cm |
| Length | 50 cm |
| Guarantee | |
| Guarantee | 1 year |
| Product line | |
| Series | SS20 Racing SPORT |
Ready-made solutions for lowering a car:
Selection table for lowered suspension kit SS20 for VAZ 2110-2112 cars:
| Lowering amount (mm) | Shock absorbers | Springs |
| -30 | SS20 Racing [–30] | SS20 Racing [–30] |
| -50 | SS20 Racing [–50] | SS20 Racing [–50] |
| -70 | SS20 Racing [–70] | SS20 Racing [–50] |
| -70 | SS20 Racing [–50] | SS20 Racing [–70] |
| -90 | SS20 Racing [–70] | SS20 Racing [–70] |
As you know, the steering of front-wheel drive VAZ cars is designed in such a way that when the car is on its wheels, the steering rods are in a position close to horizontal. Thus, when the suspension moves and when the car rolls, there is a minimal change in the toe-in of the front wheels.
When lowering a car using springs without replacing the standard shock absorbers, the body is lowered by the amount of lowering, and the steering mechanism is lowered along with it. The ends of the steering rods remain at the same height relative to the ground, therefore, the rods stand at an angle. When such a suspension moves and when cornering with a roll, the steering rods deflect even more. In this case, the toe-in changes more than on the standard suspension, and it becomes necessary to increase the steering movement in the direction of the turn.
Let's consider the case when one wheel hits a bump. The rack goes up, and the steering rod deflects, while the rack turns away from the straight path. And such a deviation must be countered by turning the steering wheel. The car becomes overly sensitive to road irregularities. The SS20 Racing shock absorbers have the swing arms shifted downwards. This made it possible to maintain the neutral position of the steering rods. And ensure minimal changes in toe-in on turns and road unevenness. Thus, when lowering a car with SS20 Racing shock absorbers, the necessary steering precision is maintained, and there is no need to constantly steer when driving over uneven roads and when banking in a corner.
Like all SS20 struts, the lowered front and rear shock absorbers of the SS20 Racing series undergo mandatory 100% quality control. They are equipped in pairs with the same characteristics, which guarantees uniform running of the car.
You can get the best results when lowering your suspension by combining these shock absorbers with SS20 Racing lowering springs
Note!
- “SS20 Racing” shock absorbers allow you to install wheels up to 195-50/R15 in size. If the wheel size is larger, it is recommended to install SS20 wheel spacers. When installing larger wheels, make sure that there is at least a 10mm gap between the edge of the wheel and the edge of the rear shock absorber spring cup.
- The use of modified products on public roads is strictly prohibited.
- Products with a modified design are intended for cars prepared for competitions in areas specially equipped for this purpose.
- The seller is not responsible for changes made to the design of the vehicle by the buyer. The buyer bears all responsibility for these changes.