Clutches VAZ 2101
Gear shifting in a car transmission occurs through the operation of the clutch. The clutch mechanism consists of several elements that wear out during operation. For timely diagnosis of breakdowns, it will be useful for you to know their structure.
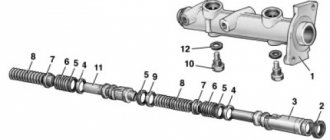
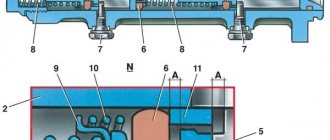
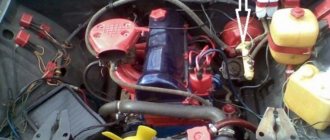
Rice. VAZ car clutch diagram
| 1 – locknut of the clutch release fork pusher;2 – clutch housing;3 – working cylinder of the hydraulic clutch release drive;4 – release spring of the clutch release fork;5 – valve cap for bleeding the hydraulic clutch release drive;6 – clutch diaphragm pressure spring;7 – friction linings of the driven disc;9 – driven clutch disc;10 – rivet-damper stop;11 – damper disc plates;12 – front sealed ball bearing of the gearbox input shaft;13 – driven disc hub;14 – damper spring;15 – pressure ( drive) clutch disc;16 – front cover of the clutch housing;17 – engine crankshaft flywheel;18 – flywheel ring gear;19 – bolt securing the casing to the flywheel;20 – primary (drive) shaft of the gearbox;21 – clutch release clutch thrust bearing ;22 – spring plate for fastening the thrust flange;23 – thrust flange of the pressure spring;24 – rear ball bearing of the gearbox input shaft;25 – drive gear of the gearbox input shaft;25 – clutch release clutch;26 – clutch release fork;27 – friction thrust flange ring; | 28 – fork ball joint;29 – fork retaining plate;30 – fork cover;31 – stepped rivet (9 pcs.) fastening the pressure spring support rings and thrust flange plates;32 – clutch cover;33 – clutch release fork pusher;34 – adjusting thrust nut; 35 – master cylinder plug; 36 – tube fitting socket for supplying fluid to the working cylinder; 37 – piston return spring; 38 – clutch release master cylinder; 39 – bypass hole; 40 – flexible hose fitting for supplying fluid from tank;41 – inlet (compensation) hole for filling the cylinder;42 – master cylinder piston;43 – piston o-ring;44 – clutch pedal pusher;45 – master cylinder pusher piston;46 – cuff seal channel;47 – piston cuff;48 – hole (0.2 mm) for air outlet; 49 – damper friction rings; 50 – damper friction disk spring; 51 – valve for bleeding the hydraulic clutch release; 52 – piston support plate; 53 – working cylinder piston; 54 – plug working cylinder with a socket for the fluid supply fitting to the working cylinder |
Why do you need to change the clutch?
Clutch disc VAZ 2101
To replace the clutch you will need to stock up on: A 13mm wrench, and in addition to all this you will also need to take two different types of screwdrivers (Flat and Phillips in this case), and you also need to stock up on a mandrel for centering the clutch disc which in a car store it costs literally 100 rubles! (You can see what this mandrel looks like, which is discussed in the article, just below in the section: “For beginners!”)
When should you change the clutch?
During operation, the clutch of any car wears out over time, and the first signs of a worn clutch that a car will show are:
- Increased noise that begins to appear very clearly when changing gears in the car.
- Jerks can also occur when starting a car, and they can also occur while driving when you depress the clutch pedal, then engage a gear, and then when you release the pedal, the car jerks forward slightly.
This mainly happens due to the damper springs that are installed on the driven disk, and in the photo below they are shown by arrows. These springs are needed so that the clutch disengages smoothly and thus does not cause discomfort when driving, and when these springs become unusable, when the clutch is disengaged, as mentioned earlier, a jerk occurs, which often has a very negative effect on the comfort of driving a car!
- In addition to all this, if the clutch malfunctions, the effect that the clutch “slips” may occur. This is when you are driving a car and at the same time you press the gas pedal, let’s say to the floor, and your car does not accelerate, but the engine speed increases sharply and even reaches the red zone, this effect is popularly called the clutch “Slipping”.
- And in conclusion, we note one more effect, called the “Leads” clutch. The first signs of this effect are as follows: let’s say you engage first gear and at this time the clutch pedal is still fully depressed, but even despite this the car starts to roll. This effect is called the “Leads” clutch.
conclusions
Replacing the clutch cable on a VAZ-2114 car is quite easy and simple. So, anyone, even a novice car enthusiast, can do this on their own in 1 hour in their garage
Particular attention should be paid to product selection and quality.
So, a high-quality part will serve for a long time and will last its entire resource. If the replacement process itself seems complicated and impossible, it is recommended to contact a car service.
Sources
- https://v-mireauto.ru/zamena-trosa-scepleniya-svoimi-rukami/
- https://www.avtika.ru/qa/197-Zamena-privodnogo-trosa-stseplenija-VAZ-2113
- https://carfrance.ru/zamena-trosa-scepleniya-vaz-2114/
How to replace the clutch on a VAZ 2101
Before you start replacing, be sure to make sure that the clutch malfunction is not caused by any other reasons, because replacing this unit itself is very labor-intensive and time-consuming compared to replacing the same clutch slave cylinder, due to which the same problem may occur. the effect that the clutch “Drives”! (If you want to take a closer look at the malfunctions of a particular unit of the entire clutch system, then use the “Search” form, which is located in the upper right corner of the site, and enter into the search the malfunction that you specifically need, for example: “Clutch is slipping” and you will get all results in which this combination of words was found)
Removing the gearbox
This operation is not particularly complicated, but it requires certain skills and knowledge of the sequence of work. The complexity of the operation lies in the fact that many elements have to be unscrewed and disconnected, and access to them is not always convenient.
To remove the box you will need the following tools and accessories:
- A set of keys and sockets (including keys for 10, 14, 17, 19);
- Screwdrivers (thin flathead, Phillips, impact);
- WD-40;
- A section of the gearbox input shaft;
- Long wooden beam;
- Rags;
- Marker;
- Container for draining transmission oil;
All work is carried out in three places - the interior, the engine compartment, and under the car. Draw your attention to!!! To remove the gearbox you will need an inspection hole.
The removal sequence is as follows:
- We place the car in the pit and immobilize it with wheel chocks installed under the wheels. We put the gearbox in the neutral position, do not tighten the handbrake;
- First we will do all the work in the salon. At this point it is necessary to remove the lever from the box rod. To do this, pull the lever boot up, which will provide access to the fixing sleeve. You need to carefully pry it up with a thin screwdriver so that it pops out, after which you can pull the lever off the rod;
- Remove the upper plastic bushing from the rod by loosening the petals with a screwdriver, then the rubber boot and the lower bushing. As a result, there should be nothing left on the rod;
- Remove the plastic trim located under the floor covering. To do this, you need to remove the seats, their guides, etc. from the car. It is much easier to make a cut towards the rear seats, this will allow you to not disassemble the interior. Having provided access to the cover, unscrew the 4 screws securing it and remove it. We turn on 1st gear at the gearbox;
- Let's go under the car. For ease of work, the exhaust system should be completely dismantled. To do this, unscrew the muffler from the exhaust pipe. To make it easier to unscrew bolts and nuts, you should treat them with WD-40 in advance;
- Having removed the muffler, we go into the engine compartment and unscrew the nuts securing the exhaust pipe to the exhaust manifold. Then we remove this pipe from the car;
- All subsequent work is carried out under the car. Unscrew the driveshaft from the gearbox flange. Next, unscrew the two safety crossbars to lower the cardan down;
- We substitute the prepared container and unscrew the drain plug to remove oil from the gearbox;
- Unscrew the fastening of the clutch slave cylinder. In this case, there is no need to disconnect the pipe from it; after unscrewing the fastening, it should simply be moved to the side;
- Unscrew the 4 bolts securing the clutch housing cover;
- We support the back of the box with a beam and unscrew the nuts securing the cross member. Carefully pull out the timber. In this case, the rear of the gearbox will go down a little, this will provide more convenient access to the remaining elements that need to be removed;
- We disconnect the chip with the wiring suitable for the gearbox. Unscrew and remove the clutch cable;
- We get to the bottom and unscrew the starter mounting bolts. Start with the top bolt. After unscrewing the fastening, move the starter away;
- We place a support under the rear part of the engine, after lifting the box by hand;
- We unscrew the bolts securing the gearbox to the power plant;
- Supporting it with your hands, rock it up and down to remove it from the guides, and then remove the input shaft from the clutch and lower the box down;
- We install the prepared section of the input shaft into the clutch to prevent displacement of the driven shaft.
If the gearbox is to be repaired, then the VAZ-2101 gearbox is then disassembled, followed by replacement of worn elements, and then the unit is assembled and installed in place.
Removing the clutch
photo. 1 (Clutch removal tool)
After the box is removed, pick up the mandrel (photo. 1) to center the clutch disc, and then install it in the central hole as shown in the photo.
The mandrel must be installed all the way until it rests on the crankshaft bearing!
3) Then, to prevent the flywheel from turning, screw one thick bolt, which is indicated under the letter “B,” into the lower left side of the block, and then using a screwdriver to secure the flywheel from turning “A,” unscrew all the bolts that secure the housing and the clutch pressure plate itself.
When unscrewing the bolts securing the casing and the clutch pressure plate itself, hold this same disc by its casing so that it does not turn! (Please note that you only need to hold the disk by the casing, because if you, for example, grab the thrust flange of the pressure spring with your hand, you can easily damage it, so hold only the casing with your hands)
4) Next, remove the clutch pressure plate together with the casing, but when removing it, hold it with both hands by its casing.
5) After removing the clutch pressure plate along with its casing, proceed to removing the driven disc, to do this, take the installed disc in your hands and then remove it together with the mandrel from the place where it is installed.
By the way! If you didn’t understand where you needed to insert the mandrel earlier, then we indicated this place for you with a blue arrow in the photo just above! Install a new clutch carefully and be sure to center the position of the drive plate using a mandrel when installing the pressure plate!
Installing a new clutch occurs in the reverse order of removal.
We repair it ourselves (VAZ classic)
We replace the DS and KS on a rear-wheel drive VAZ as follows:
- place the car on a car lift or pit;
- turn off the engine, put the car in neutral gear;
- remove the gearbox lever mounting cover (unscrew the screws);
- we dismantle only the upper part of the gearbox lever; there is no need to remove it completely (we disconnect it at the place marked by the arrow in the figure);
- unscrew the propeller shaft bolts, dismantle the shaft itself (make marks on the cardan and rear axle gearbox - this is necessary in order to secure the shaft according to the same marks during installation to avoid unnecessary vibrations);
- disconnect the speedometer cable from the gearbox, as well as the control center;
- unscrew all the gearbox fasteners (including the traverse), remove the gearbox;
- unscrew the six bolts securing the basket, remove the parts;
- We put new parts in place and put everything back together.
When installing new spare parts, the disk must be centered, otherwise the manual transmission will not fit into place. A factory mandrel or an old “primary” from a “classic” gearbox is used as a center.
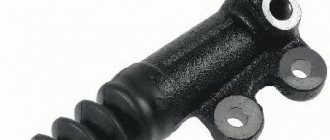
Replacing the working cylinder on a VAZ 2101
Clutch slave cylinder - not all people know what it is, but you still have to replace it from time to time, but how can you replace it if not everyone knows what it is? In short. In the car we are currently considering a classic, there are two clutch cylinders, one of which is the main one and the other is the worker. They perform almost the same function; when you press the clutch pedal, the piston (indicated by a green arrow) which is located inside the clutch master cylinder moves and thereby pushes the brake fluid further.
At this time, the brake fluid continues its path and thereby rests against the same piston (Indicated by a blue arrow), only which is already located in the clutch working cylinder, and after the brake fluid rests, it begins to push the piston and therefore it moves to the front and there, by pressing the fork, the clutch in the car disengages.
In general, we understand that there must always be brake fluid in both cylinders, but why is it needed, some of you may ask? The thing is that brake fluid is not compressible, and therefore it is used both in the brake system and in the clutch drive, in general, let's get back closer to the topic. To replace the clutch slave cylinder with a new one, you will need to stock up on: A basic set of wrenches, as well as pliers, and you may also need about 1 or 2 liters of new brake fluid!
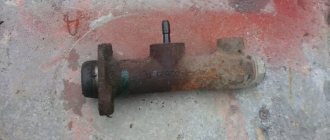
Where is the clutch slave cylinder located?
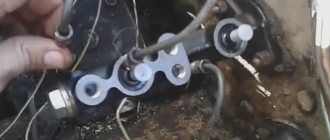
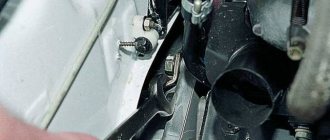
It is located next to the box, and to be more precise, it is secured with two bolts on the clutch housing itself, so you will only be able to see it unobstructed if you are under the bottom of the car, or if you look deep into the engine compartment, For more details on its location, see the photo below, it is indicated by an arrow:
When should you replace the clutch slave cylinder?
As we already understood, inside the working cylinder there is brake fluid due to which the clutch is disengaged in the car, but it happens that over time this cylinder becomes unusable and cracks begin to appear in its body and thereby the liquid that is in it gradually begins to come out of it be, it is very easy to understand if you visually look at it, and you can also understand it without looking at it at all, but how to do this you ask?
The thing is that if the cylinder becomes unusable and brake fluid begins to come out of it, then the first thing that will happen to the clutch pedal is that it will become very easy to press, that is, the system will not be airtight, so to speak, and if the system is not is sealed, then the clutch will practically not work, that is, you press the pedal, it is pressed very lightly and the clutch does not engage, this is perhaps one of the most common problems that happens when the clutch slave cylinder fails.
Removal
1) To remove, first you will need to stock up on a wrench and, using the wrench, loosen the nut that secures the hose to the cylinder.
Please note that you only need to loosen the tightening of this nut, and not completely unscrew it, and then disconnect the hose from the cylinder, this does not need to be done yet, this is just below!
2) Then put the wrench aside, and then use pliers to pull back and then completely remove the release spring from the cylinder.
3) Next, without removing the pliers, straighten and then remove the cotter pin from the hole located in the tip of the pusher of this cylinder.
4) Next, using a wrench, remove the two bolts that secure the cylinder to the clutch housing of the gearbox.
5) Now disconnect the bracket from the cylinder, which was also bolted together with the cylinder itself and which serves to secure the tension spring.
6) Then, grasping the working cylinder with your hand, carefully remove it, while removing the pusher, which is indicated by the arrow, from the hole located in the fork.
7) And then completely unscrew the nut that secures the hose to the cylinder, and then completely remove the cylinder from the car.
Before you start unscrewing this nut, prepare some kind of plug or container into which all the brake fluid from the clutch hydraulic hose will drain. Now that everything is prepared, carefully unscrew the nut that secures the hose and thereby disconnect the hose from the cylinder and then drain all the used brake fluid from the hole in the hose, as well as from the hole in the working cylinder itself! It would be better, of course, to drain all the fluid from the hose into a container and, after installing the new cylinder, pour completely new brake fluid into the clutch hydraulic drive, because when the fluid is drained, it will thereby flush the entire system from the dirt that is in it!
Installation of a new clutch cylinder occurs in the reverse order of removal.
Replacement
The cost of this type of work in a car service starts from 550 rubles. But for most car enthusiasts, this operation is not so difficult to perform on their own.
What you will need:
- new GVC;
- brake fluid;
- set of wrenches with extension;
- syringe or rubber bulb.
Sequencing:
- Pump out the fluid from the hydraulic drive reservoir using a syringe or rubber bulb.
- Remove the expansion tank and move it to the side so that it does not interfere with work.
- Unscrew the tube with a 13mm wrench. Move it a little.
- Loosen the clamp and disconnect the rubber hose that goes from the tank to the cylinder.
- Unscrew the two nuts with a 13mm socket wrench and an extension.
- Remove the master cylinder from the studs.
- Replace the GCS with a new one.
- Reassemble everything in reverse order.
Bleeding the clutch
The replacement has been made, but you should not hit the road without bleeding the clutch system. The process is similar to bleeding the brakes and is carried out in the following sequence:
- Brake fluid is poured into the reservoir.
- A hose is put on the master cylinder fitting, the other end is lowered into a bottle filled with liquid. This will show how air leaves the system during the pumping process.
- The operation requires an assistant. One sits in the car and presses the clutch pedal 5-6 times on command, after which he leaves it pressed. The second one opens the fitting until the release of air stops. This is done several times until all air is removed from the clutch system.
- Tighten the fitting and add fluid to the reservoir.
Conclusion
After replacing the clutch master cylinder and bleeding the entire system, you can safely hit the road without fear that the clutch will fail and the car will lose control because of it.
Back in the winter, I began to notice that the clutch master cylinder was leaking from the pedal side through the cuff, and under the hood a wet leak was visible on the engine shield, the level of brake fluid in the reservoir began to drop sharply. The information content of the pedal dropped a little, and the gears began to shift unstably, so as the fluid was pushing outward - the clutch was not fully depressed. In this case, an immediate replacement of the cylinder is required. A new original part was purchased at the store. So, we need to arm ourselves with: an open-end wrench for 8 and 13, a socket head for 13 with an extension, a flat and figured screwdriver WD-40 or similar, a metal brush, a medical dropper or hose for bleeding, a rubber bulb or syringe for pumping out liquid
- small capacity
To begin with, use a bulb or syringe to pump out the liquid from the tank. Then disconnect the expansion tank and move it to the side so as not to interfere. Using a 13mm wrench and a screwdriver, unscrew the pipeline nut, as well as the tank hose, and also move it to the side. When the nut becomes sour, clean the area with a brush and spray with “liquid wrench.” We remove everything carefully to prevent damage to the pipeline and the plastic fitting of the cylinder. Now, use a socket head to unscrew the two bolts securing the cylinder to the body and remove it, not forgetting to hold the engraving washers from falling.
| This is where the liquid leaked from here. |
We remove the old factory sealant from the seat and thoroughly clean the seat. You can install a new cylinder. But first check the presence of lubricant under its boot and add it if necessary.
| Everything is fine here |
From the passenger compartment, we position the piston pusher in the center of the opening; it should fit into the hole in the cylinder cuff without any problems.
| The tip of the pusher is visible |
We coat the flange of the new cylinder with a thin layer of automotive sealant, let it dry a little and insert the new cylinder into place. We install new engraving washers and tighten the bolts. We press the clutch pedal and make sure that the pusher is in place and the cylinder is working. We return the pipeline and hose to their place, tighten everything securely. Fill the reservoir with new brake fluid and begin bleeding the clutch. For this, it is advisable to have an assistant, although you can do everything alone: 1. We put one end of the dropper or hose onto the clutch bleeder fitting of the working cylinder on the box, and lower the other into the jar.2. The assistant sharply presses the clutch pedal 4-5 times at intervals of 2-3 seconds and holds it pressed.3. Using a size 8 wrench, unscrew the fitting approximately 3/4 of a turn, liquid with air bubbles will begin to flow into the jar. 4. After the flow of liquid stops, tighten the fitting and repeat operations 2 and 3 until the bubbles stop completely. It is necessary to ensure that the liquid level in the tank is above the minimum and add it in time.5. We wrap the fitting, remove the hose and put on the protective cap. By pressing the pedal, we check the operation of the clutch - the moment of pressing the clutch should be clearly felt, the pedal should not “fall through”. The system is pumped in the same way when replacing the working cylinder. If everything is in order, then we check for leaks at the connections of the hoses and the pipeline, add fluid in the tank to the norm and close the lid. We make sure that the cuff on the lid is intact. I decided to disassemble the old cylinder and see what’s inside. First, use a small screwdriver or special pliers to remove the retaining ring. We do this carefully, since the piston inside is spring-loaded and can fly out along with the remaining brake fluid. We inspect the piston - surface wear is clearly visible, small scuffs, especially at the edges. The same is true on the pusher piston , accordingly, the “mirror” of the cylinder is also worn out. Replacing the rubber sealing rings may help, but not for long, so it is recommended to change the entire cylinder completely, especially since it has already reached the end of its 10 years. Subscribe to the blog! Good luck on the roads!
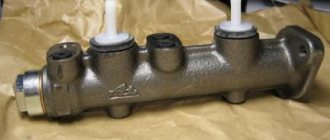
Replacing the clutch master cylinder on a VAZ 2101
Clutch master cylinder - thanks to it, the clutch moves away from the engine flywheel, and the principle of its operation is as follows: When you press the clutch pedal, the pusher, which is screwed to the pedal at one end and inserted into the master cylinder at the other end, pushes the piston located in the cylinder, and therefore The piston located in the cylinder moves forward, and as a result, the piston pushes out the brake fluid that is in the master cylinder. After the fluid is pushed out, it quickly flows to the clutch slave cylinder and, as a result, disconnects the clutch from the flywheel.
Over time, the main cylinder becomes unusable and has to be replaced. So that you know all the intricacies of replacement, as well as where the main cylinder is located, study this article and we hope everything will become clear to you. If you still have any questions after reading, then feel free to ask them in the comments and we will answer them for you!
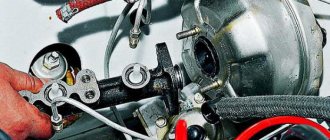
Where is the clutch master cylinder located?
It is located in the engine compartment of the car, indicated by a yellow arrow in the photo. And next to it there is a vacuum brake booster (Red arrow), as well as the main brake cylinder (Blue arrow) and on top of it there are several reservoirs, one of which is the hydraulic brake reservoir indicated by the green arrow.
When should you replace the clutch master cylinder?
It must be replaced when:
- The appearance of a brake fluid leak on it.
- And also when the clutch is not fully disengaged and when the clutch is not fully engaged. Many will ask the question: “How do you know that the clutch is not fully engaged and disengaged?” Let's explain.
If, when you press the pedal all the way, you turn off and then on the gear and feel that the gears are turned on hard and with a crunch, then this means that the clutch is not fully engaged.
And if you are driving a car and during sharp acceleration the car jerks, or the tachometer needle generally jumps up and the car does not move, then this means that the clutch is not disengaged completely.
But there is one nuance: the same problems with disengaging and engaging the clutch can also occur with a working master cylinder, let’s say the parts of the clutch itself are worn out, etc. Therefore, it is best to proceed to replacing the cylinder only when various kinds of cracks appear on it through which brake fluid will escape, which in turn is unacceptable!
Removal:
1) First, you will need to pick up a rubber bulb and then use it to pump out all the brake fluid from the clutch hydraulic reservoir.
2) Then, by hand, disconnect the rubber belt that secures the expansion tank to the car body, and after disconnecting, carefully remove the tank and place it in such a way that liquid does not spill out of it and does not interfere with work.
A hose is attached to the bottom of the tank; disconnect it only if the expansion tank is completely empty and therefore the tank can be completely removed from the car!
3) Next, use a screwdriver to unscrew the nut that secures the pipeline to the cylinder, and after unscrewing the nut, move the pipeline to the side.
4) Now, using a screwdriver, loosen the clamp that holds the hose on the master cylinder and then remove it from the cylinder.
5) Next, using an extension with a union head, unscrew the two nuts that secure the cylinder to the car body and then carefully remove the cylinder, pouring out the remaining brake fluid.
Installation: 1) Installation of the new clutch master cylinder is carried out in the reverse order of removal.
Removal and repair
Regardless of whether the owner decided to restore the GVC or preferred to buy a new one, the first step is to dismantle the old one. To work you will need:
- set of spanners;
- medium sized screwdriver;
- pliers;
- brake fluid for topping up;
- repair kit for clutch cylinder VAZ-2107 (in case of repair);
- small container for draining brake fluid.
The sequence for removing the clutch master cylinder is as follows:
What part is used for pumping and where is this part installed?
Bleeding is carried out only through a fitting that is specifically needed for bleeding the clutch on a car, and this fitting is located on the clutch slave cylinder, which in turn can be very easily seen by looking under the bottom of the car, or by looking from above into the engine compartment.
When should you bleed your clutch?
Pumping is carried out only in cases where. When you press the clutch pedal all the way, the clutch is not completely disengaged, for example, you pressed the pedal, engaged first gear and before you even had time to take your foot off the pedal, the car is already moving, this is what is called not completely disengaging the clutch, as people say that the clutch is moving. And also if there was a repair, replacement of cylinders.
Why do you bleed the clutch? In order to remove air from the cylinders, or more correctly, to remove air from the brake fluid, otherwise if there is air in the brake fluid that is in the cylinders, then the clutch will not work as it should, as was noted earlier, it will not turn off completely, and also the pedal travel can be very light, therefore, after detecting these malfunctions, it is recommended to bleed the system as soon as possible, because it is dangerous to drive with a clutch that is not fully functional, since during emergency braking, the car itself will also roll into the before, as the clutch will not disengage completely!
How to bleed the clutch on a VAZ 2101-VAZ 2107?
Always remember that you need to bleed the clutch together in a car, because it’s difficult to do this without the help of an outsider, but there is still a way out, so if you are going to bleed the clutch alone, then first read the entire article to at least visually understand how it’s done , and then run the video clip located at the very end of the article, and this video shows a visual process of bleeding the clutch, performed by just one person!
And it’s best to do all the work in a pit, because it’s much simpler and more convenient, but if it’s not there, then you can do the work without it, it’ll just be a little problematic!
1) At the very beginning of the operation, pour new brake fluid into the clutch reservoir, and then close the reservoir with a plug.
2) Next, take a small hose in your hands and put one end of it on the fitting of the working cylinder.
3) Then ask an assistant to sit in the car and press the clutch pedal about 5 times, for the last time let him leave the pedal fully depressed.
Ask an assistant to press the clutch pedal sharply and at intervals of 3 seconds!
4) Meanwhile, while the assistant holds the pedal down, prepare an empty container into which you will drain the brake fluid with bubbles, and then lower the other end of the hose into this container.
5) Then loosen the fitting with a wrench and at this time brake fluid with bubbles will begin to drain into the container you are holding.
As you already understood and this was already mentioned earlier, bubbles are air that should never be present in the brake fluid, otherwise the system will begin to malfunction, in general, we continue!
6) Now wait until the clutch reservoir containing the brake fluid is almost completely empty and then immediately tighten the bleeder fitting tightly, and let the assistant take his foot off the pedal.
Be sure to pay attention to the words: “It will not empty almost completely,” so you don’t have to wait until all the fluid comes out of the reservoir; in no case should it fall less than 15 mm, otherwise you will be bleeding the clutch for a very long time and most likely the system it won’t even be pumped if you do this, because when the fluid is completely emptied from the tank, during this time air begins to enter the system, and therefore the clutch hydraulic drive will depressurize again, which will lead to constant pumping!
7) Now, as you already understand, when the level reaches almost to the very bottom, then stop the bleeding operation by screwing in the bleeder fitting and the assistant removing his foot from the pedal, and then again add liquid to the tank and repeat the entire bleeding operation again.
Which one is better to put
On the VAZ 2101 it is necessary to install a hydraulic clutch designed for the VAZ 2101–07. Cylinders designed to work in UAZ, GAZ and AZLK vehicles are not suitable for installation on a “penny” car. The situation is similar with imported analogues. It will be quite problematic to introduce a GVC from any foreign car, which is due to different mounting of the unit, different threads and tube configuration. However, a hydraulic drive from a VAZ 2121 or from a Niva-Chevrolet is suitable for the “classic”.
Manufacturer's choice
Today there are many companies that manufacture clutch master cylinders. However, when choosing and purchasing the unit in question, preference should be given to the following manufacturers:
The average cost of a hydraulic clutch is 500–800 rubles. However, there are products that cost about 1,700 rubles, for example, cylinders from ATE.
Table: comparison of hydraulic clutch actuators from different manufacturers by price and reviews
| Manufacturer, country | Trademark | Cost, rub. | Reviews |
| Russia, Tolyatti | AvtoVAZ | 625 | Original GVCs are made with high quality and are more expensive than analogues |
| Belarus | Fenox | 510 | Original GVCs are inexpensive, made with high quality, and are popular among drivers |
| Russia, Miass | Brick Basalt | 490 | Improved design: the absence of a technological plug at the end of the cylinder and the presence of an anti-vacuum cuff increases the reliability of the product |
| Germany | AND THOSE | 1740 | The originals are of the highest quality. The price is tied to the EURO exchange rate |
| Germany | HORT | 1680 | Original GCS are reliable and durable in operation. The price is tied to the EURO exchange rate |
| Russia, Miass | Cedar | 540 | The original GVCs do not cause any particular complaints |
What kind of brake fluid is needed to bleed the clutch of a VAZ 2101
All brake fluid has its own classification, which indicates its composition and properties. At the moment, there are several brands of TJ - DOT 3, 4, 5 and 5.1. There is also another outdated type of brake fluid BSK, which is still used on older cars.
DOT
is an English abbreviation for United States Department of Transportation (USDOT or simply DOT).
There are a huge number of manufacturers producing brake fluid. Therefore, when purchasing, pay attention to the abbreviation DOT , and the choice of the manufacturer is yours. To replace the VAZ 2101, the following types are suitable: DOT 3 (not recommended for use in the far north) , DOT 4, DOT 5.1.
- DOT 3 is made on a glycol base, which includes anti-corrosion and lubricating additives. DOT 3 is recommended for use on low-speed vehicles with front disc and rear drum brakes. DOT 3 brake fluid reacts poorly to negative temperatures and at -40 degrees its viscosity increases, which negatively affects the operation of the braking system. Therefore, it is extremely undesirable to fill in such liquid on cars operated in northern regions.
- DOT 4 is also made on a glycol basis, but unlike DOT 3 it contains additives that increase the boiling point of the brake fluid, which allows it to be used on high-speed cars, where during braking the slowing mechanisms are exposed to high temperatures.
- DOT 5 is made on a silicone basis and also has fairly high temperature conditions - 180-260 degrees. With and lower viscosity 900 sq. mm/s. DOT 5 brake fluid is more suitable for cars with powerful engines, which, as a rule, are used for fast and difficult driving.
- DOT 5.1 is made on a glycol base, but with the properties of DOT 5. Increased boiling point, more anti-corrosion additives, and low viscosity - 900 sq.m. mm/s., used on cars with powerful engines.
- BSK - this type includes all brake fluids made on the basis of Butyl Alcohol and Castor Oil, hence the abbreviation in the name. It has very low boiling readings for TJ (115-120 degrees C), as well as at – 20 degrees. It crystallizes, which renders the car’s braking system unusable.
Is it possible to mix brake fluids?
Theoretically, brake fluids that contain the same component, for example, DOT 3, DOT 4, DOT 5.1 contain glycol, must be mixed, however, due to the presence of a certain set of additives in them, this can only be done in extreme cases, after which a complete replacement of the brake fluid is mandatory. You cannot use TJ in a brake system that is designed for a certain type, for example, DOT 5, which is made on a silicone basis; in a system for DOT 3, DOT 4, DOT 5.1, rubber drive elements (cuffs, seals) may fail.
Didn't find the information you are looking for? on our forum.