Advice from experienced motorists and repairmen on the topic of Lada Granta, replacing the rear wing - come in, we have become even more convenient. We have posted a video course on how to repair a car yourself. How to repair a car yourself at home. We will help you with repairs and repair the car yourself. We know how to restore a car with minimal investment. I have attached video instructions.
Category: Auto repair instructions
Laughter on topic: Usually, in every company there is always an asshole. If you think yours doesn't have it, then I have bad news for you.
Published by Admin: at the request of Abdullah
Reviews from a car owner: We all juggle three balls, which are called: “work”, “family” and “friends”. So, the work is a rubber ball. If you accidentally drop it, it will jump into your hands again. And all the other balls are made of glass. Remember this.
Contact the professionals! This will be the first step towards ensuring that your Lada Granta shines again and gives pleasure not only from fast and safe driving, but also from contemplating the beauty of your car.
How to dismantle the front wing of Lada Granta
Lada Granta is a modern popular vehicle that was first released in 2011. The car enjoys a wide range of advantages and is in demand among buyers. This is due to the fact that it not only has an attractive aesthetic appearance and a moderate price range, but also has decent driving characteristics.
The operating experience of such a car suggests that it is a good option for traveling in an urban environment. At the same time, such a unit has high performance qualities, which allows the driver to feel comfortable and comfortable in any driving situation.
Special Features
Owners of the LADA Granta car highlight some criteria that attract special attention from both manufacturers and users. These criteria can hardly be called positive or negative sides of the vehicle. That is why a list of some special characteristics is presented, based on which each potential buyer or owner can draw their own conclusions:
- The car interior is designed in a minimalist style. It has a fairly simple appearance and is equipped with high-quality fabric upholstery. Many parts are made of high quality hard and dense plastic.
- An increased level of visibility, which allows the driver to see a fairly complete picture. Without much difficulty, you can adequately assess various situations during the movement.
- Unclear gearbox shifting. Car owners repeatedly notice that at various times the gear lever stops working, which makes driving difficult.
- Powerful high quality engine.
- The specific sound of the gearbox operating, which causes surprise from the first moments of using the unit.
- Affordable price category.
- Moderately priced components that can be purchased at any car market or store.
- Convenient spacious trunk.
This car is considered not just an ideal solution for large cities, but also an excellent family car. That is why many domestic car enthusiasts choose the Lada Granta.
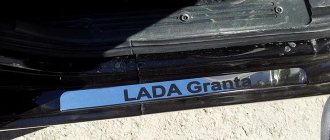
This is what a modern Granta looks like
Recommendations from professionals
Experienced service center experts recommend that if any malfunctions or questions related to the Lada Granta arise, contact a professional directly. However, domestic owners have a different opinion, as a result of which they repeatedly independently remove the front wing of the car. Often this subsequently causes some difficulties due to the fact that car owners do not have experience.
Installation sequence
On the body of the Kalina-2 there are fastenings in the form of four bolts, onto which the nuts that hold the amplifier are screwed. These nuts still need to be purchased, their standard size is M8. We looked at how to remove the bumper of the Lada Kalina 2 earlier. But anyway, let’s briefly repeat this sequence:
- Using a 10mm wrench, unscrew the 6 bolts located on top of the radiator grille;
- There are similar bolts at the bottom, their number is 3. Remove these bolts;
- On the bottom side of the bumper you can see the screw caps, which can be unscrewed with a Phillips screwdriver. The number of screws is 4;
- Two similar screws are located on the side of the fender liners. They definitely need to be unscrewed!
- The assembly called the “front bumper” is disengaged from the side brackets.
Print out the drawing and find similar parts on your car.
Kalina-2 bumper, fastening parts: 1 – metric bolts, 2 – self-tapping screws
Note that the connector for the fog optics (if any) must be disconnected before dismantling. Assembly is carried out in reverse order.
The most common mistakes: sometimes not all the screws located next to the fender liners are unscrewed. There is no need to explain what this can lead to.
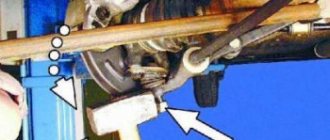
The part itself, called the “bumper reinforcement,” is easy to install. There are appropriate fastenings on the body; all that remains is to tighten 4 nuts. But the design has a bracket that holds the “signal”. This bracket must be removed as shown in the picture.
Removing the signal bracket, installing the bumper amplifier
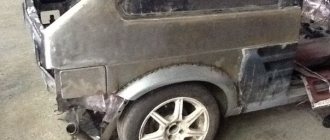
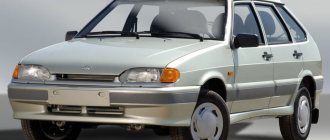
Replacing the front wing on a VAZ 2113, VAZ 2114, VAZ 2115
The front fender is hit just as often as the front bumper. People usually immediately replace a dented wing with a new one. Today we will talk about replacing the wing on cars of the Samara-2 family.
Note! You will need the following tools: a screwdriver, a set of wrenches, a set of spanners, small pliers, anti-corrosion compound (over time, the standard anti-corrosion compound that covers the car from the factory becomes worse or disappears altogether).
Replacing the front wing on a VAZ 2113-VAZ 2115
Note! First you need to remove the screws and bolts that secure the excess parts to the car. Superfluous in today's context, this includes wheel arch liners, the front bumper (namely, the side bolts for attaching to the car fender and facing trims), and the sill.
Important! Before starting work, be sure to disconnect the negative terminal from the battery so that when working with electronics you do not damage anything and inadvertently get electrocuted.
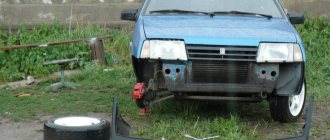
Why do you need to remove the front bumper?
From time to time, for various reasons, the car owner needs to independently carry out some work on the car, which involves removing the front bumper.
- Installation or replacement of lighting fixtures located in the front part of the car.
- Work with electrical wiring.
- Repair and replacement of signaling device.
- Tuning works.
- Bumper straightening, repair or replacement.
- Body painting.
- Installation of sensors, for example, external temperature.
- Installation of additional equipment and devices.
In order to detach the front body kit yourself, the car owner will need the simplest set of tools and auxiliary materials.
Preparation
Before removing the front bumper on the Lada Granta, you need to prepare the following.
- Crosshead screwdriver.
- Open-end wrench No. 10 and No. 12.
- Ratchet No. 10.
- Fasteners with Torx slot T No. 20.
- Fasteners with Torx slot T No. 30.
- Rags.
- Any penetrating lubricant, such as WD-40.
- Grease.
If the crankcase protection is of a non-standard type, then you will need some rectangular object on which to place it just right after removal. This could be a small plastic canister, cardboard box, etc.
The dismantling of the front body kit on the Grant, as well as its installation, must be carried out very carefully. A slight misalignment or carelessness can lead to breakage of latches or latches, the repair of which will be quite expensive.
Owner reviews, recommendations
The part designated by number 21900-2803131-00 may have the following names from different sellers: bumper beam, channel, etc. This “beam” is usually sold unpainted. Therefore, we take putty and prime it. And then we take the part to a paint shop and let them apply a polymer coating. It is not recommended to install an unpainted metal part. It will quickly begin to rust.
Various amplifier installation options
It is advisable to place washers under the nuts, then the paint will not be scratched. The “beam” itself, unpainted, weighs about 1 kg and is easy to transport. A labor-intensive process, as you can understand, is the installation of a standard bumper. This operation is best performed by two people.
There is no point in trying to apply the polymer coating yourself. The baking temperature of the paint is +70 C. C. There is no need to try to solve this problem using a household oven - the bracket simply will not fit in the oven.
It is easy to notice that the bumpers of the Lada Kalina 2 and Grants differ in design and shape. As the owners of the “second Kalina” themselves say, the installed bumper amplifier does not change the appearance of the car. But coming closer to the radiator and looking from top to bottom, everyone notices the iron bracket. Therefore, it is better to paint it with black matte enamel. There are no other options.
Bumper protection may affect safety
Previously, we looked at how a strut extension is mounted under the hood of the Kalina-2. The presence of such a part cannot worsen passive safety, which applies not only to LADA cars, but to any car in principle. Can the same be said about a bracket rigidly attached under the bumper? There are no amplifiers from the factory, and the conclusion suggests itself.
When carrying out any tuning, owners rarely think about how safety indicators will change as a result. Crash tests are always performed on standard vehicle configurations. But what do we get by changing the body design? We can only guess.
There is such a characteristic as “creasability”. It is better to take this into account when choosing alloy wheels, so as not to subsequently encounter the appearance of suspension defects. Something similar can be said about the body: by strengthening one thing, we increase the likelihood of failure of everything else.
The engine compartment of a modern car is crushed during a collision, the engine goes down, and the so-called “safety capsule” remains unharmed. For station wagons and hatchbacks, this capsule is considered to be the passenger compartment. Everything that is in front of the capsule should, as it were, soften the blow. The conclusion is obvious: it is unsafe to install those parts that prevent the bumper, fenders, and front side members from collapsing. The tuning discussed here is performed at your own peril and risk. We are waiting for your comments.
Why might you need to remove the bumper?
If everything is relatively clear regarding the issues of dismantling the front bumper, then why such a procedure may be required still needs to be figured out.
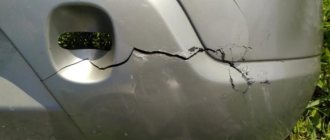
Most often, the bumper needs to be dismantled in order to repair it.
Removing the bumper for repair
The fact is that it is made of plastic, so it will be very easy to damage it. And, given some difficulties in welding plastic, the best choice would be to completely dismantle the bumper. In addition, if it is no longer possible to repair it, then you may need to completely replace this part with a new one.
But, in addition to the real need to replace the bumper, its dismantling is also required in situations where you install a new tuned radiator grille or new “horns”.
Installation of “horns” (horn, sound signal) from Volga - cheap and cheerful
In addition, the bumper will significantly interfere with the installation of fog lights. In any case, working with the body will be much more convenient without a bumper.
Sources
- https://ladaprofi.ru/lada-granta/kak-samostoyatelno-snyat-perednij-bamper-na-lada-granta.html
- https://car-fact.ru/marki-i-modeli/otechestvennye/lada-granta/granta-bampery.html
- https://LadaKalina.club/service/usilitel-perednego-bampera-na-ladu-kalinu-2
- https://InfoKuzov.ru/kuzov/zamena-bampera-lada-granta
- https://carfrance.ru/snimaem-perednij-bamper-na-lada-granta-svoimi-rukami-video-i-foto/
How to remove the rear bumper
We won’t break the article into different ones – we’ll talk about the rear bumper too. To remove you need :
- Crosshead screwdriver;
- Wrenches 10 – open-end or socket;
- Torx hexagons 20 and 30;
- Preferably a lift.
Let's see step by step how to remove the rear body kit on a Grant:
Stage 1 . We dismantle the 5 mounting points of the bumper from below. You can lift the car on a lift - this will make the task easier.
Remove 3 bolts and 2 screws as shown in the photo.
Stage 2 . Let's move on to the mounting in the rear arches. Here we remove the clamp 3, screws 1 and 2.
We carry out this stage on both sides.
Stage 3 . We dismantle the rear lights - from the trunk side, remove the lamp chip and three fastening nuts.
How to remove tail lights in 5 steps
We look at the rear of the car with the lights removed - in front of us are the last 8 mounting points. Four in the place where the trunk lid comes.
2 more under each lamp.
If you do not remove the lights, the body kit cannot be dismantled. No way.
Stage 4 . The bumper is free. Do not rip it abruptly to the side! All that remains is to disconnect the wiring.
Be sure to unscrew the license plate light mount. If you have parking sensors installed, disconnect the sensors!
Disconnect the wires - remove the bumper.
We put everything back together in reverse order.