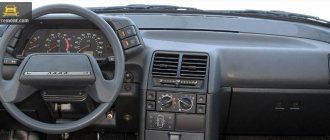
On cars of the “tenth” family, a one-piece plastic “dashboard” is used, which includes control indicators, climate control and air ducts. Dismantling and disassembling the structure is necessary in cases where the instrument panel of the VAZ 2110 does not work, as well as for installing additional equipment and sound insulation.
The device of the instrument panel on the VAZ 2110
The term “instrument panel” on cars refers to a block of warning lamps and indicators located in front of the driver. The correct name of the part is the shield, which is installed in a plastic panel called the dashboard.
The instrument panel on the VAZ 2110 includes:
- a device for determining the speed of movement - a speedometer;
- speed meter - tachometer;
- indicators of coolant temperature and fuel level in the tank;
- control indicator lamps equipped with yellow, orange, green, blue and red filters;
- lighting system (6 separate lamps);
- installation location of the warning lamp.
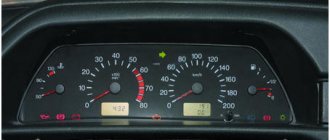
On VAZ 2110 cars it is possible to see several options for instrument combinations:
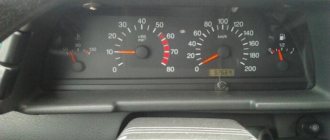
- The first releases used an electromechanical version of the panel with serial number 2110-3801010. Externally, the device is easily identified by a mechanical odometer mounted on the speedometer scale. Its drive is made from an electric motor, the rest of the indicators operate on a magnetic principle. On the back of the shield there are two connection blocks located at right angles.
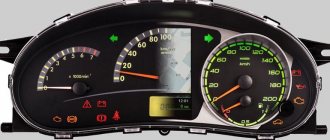
- Later, an electronic version of the dashboard appeared, equipped with a liquid crystal display on the bottom of the speedometer. There are “gauges” with a “suction” indicator (which was not installed on the VAZ 2110 with such a panel from the factory) or with an airbag lamp in the same place. There may be cars with a double display window - under the tachometer and speedometer.
- A very rare variant of the instrument cluster is designed for the VAZ 21106, equipped with a 2.0-liter Opel engine. The part number is 21106-3801010 and features an extended speed measurement range (up to 240 km/h) and an additional liquid crystal display on the bottom of the tachometer.
- On the latest versions of the VAZ 2110, a shield began to be used, unified with the 2118 Kalina car (model 1118-3801010), differing in the layout of the scales. Such a part is called a “new sample” panel among its owners. The device is installed in a modified type dashboard.
Depending on the manufacturer and date of assembly, there are different designs for the VAZ-2110 instrument clusters. It is possible to digitize the tachometer in hundreds or thousands of revolutions, write technical information on the scale, etc.
What is needed for work
If you decide to diagnose faults in your VAZ 2110 yourself, then you will need several basic things for this work.
| Device | Peculiarities |
| Adapter | This is a kind of microcircuit enclosed in a housing. It allows you to connect the “brains” of your car with a computer and display the relevant information on the screen of a laptop or tablet. |
| Cable | Used to connect the adapter to the car and computer. Usually comes with an adapter |
| Computer | When choosing a computer, rely on what you have - a desktop PC, a tablet, a laptop. A laptop computer is better, since connecting a car to a stationary PC is difficult. Cables longer than 5 m are not suitable for diagnostics, so keep this in mind when connecting to a PC |
| Software | The necessary software can be found on the Internet, or you can take the software provided with the adapter. There are no problems with finding software today. |
When choosing an adapter and cable, take into account the characteristics of your vehicle. Not all adapters are universal
For the VAZ 2110, an example of an excellent adapter is the ELM327. We'll talk about it later.
How it works?
Now let’s figure out how it all works together and how you can diagnose the car yourself.
- The diagnostic program sends signals via the COM port through the adapter to the vehicle controller.
- The controller sends information in response.
- The program processes the received data, producing the corresponding result on your computer screen.
- Data exchange is carried out according to the appropriate protocol. Depending on the car manufacturer, the protocol may be different and have its own characteristics.
- To simplify diagnostics, many manufacturers use the universal ODB II protocol. Its capabilities are limited and not adapted for all cars. It is ideal for the VAZ 2110 model, since the top ten does not have an increased amount of electronics, unlike more modern cars.
- In the case of the VAZ 2110, the program on the computer screen will display the result in the form of error codes. It is enough to open the material where we described the error codes for the VAZ 2110 to understand what kind of breakdown has occurred to your car. Next, appropriate actions are taken to eliminate them.
https://youtube.com/watch?v=2RWzbHFrppk
A significant advantage of diagnostics is the fact that after it you know exactly what kind of malfunction you are dealing with. You don't have to go through half the car to find the source of the problem.
Types of diagnostics
Computer diagnostics of a car can be divided into three main types, one of which is not directly related to the VAZ 2110.
- Checking the suspension. It must be carried out if the rubber begins to wear unevenly or if extraneous sounds are heard when moving. Diagnostics will allow you to determine the reasons for the drift of the rear and front axles, which you may notice when entering turns at speed.
- Engine check. The main share of diagnostic activities falls on power units. The computer and adapter will help you if the idle speed is unstable, the car is difficult to start, fuel consumption increases, power decreases, etc.
- Automatic transmission check. Since the VAZ 2110 is not equipped with an automatic transmission, there is no point in diagnosing it.
Connectors
You have decided to carry out diagnostics. But what and where to connect?
On the VAZ 2110, the connector for computer diagnostics (CD) is located at the bottom of the steering column to the right of the driver. The connector is called OBD. This information makes finding the right adapter much easier.
To carry out the test, you should perform the following sequence of operations:
- An adapter is inserted into the OBD connector near the steering column;
- The computer must already be turned on;
- When the block is connected to the adapter, you need to turn on the ignition. Without power, the program will not be able to work and read data;
- Next, we connect the program with which testing is carried out;
- If all elements are operational, the car’s electronics will be displayed on the computer monitor;
- Start checking.
Pinout
Since for testing we need a diagnostic block, that is, OBD, it would not be amiss to learn about the features of its pinout. This way you can easily figure out how to connect:
- Contact A - is responsible for connecting the ground;
- Contact B - required to connect L-Line. Please note that not all vehicles have this contact;
- Contact M - used to connect K-Line;
- Contact H - power supply +12V;
- Contact G - controls the operation of the fuel pump.
Instrument panel pinout
The instrument cluster is connected to the vehicle's on-board network using plugs located on the rear wall. The connectors are made of white plastic (indicated as X1 in the diagrams) and red (X2 in the diagrams). Depending on the manufacturer, the pinout of the plugs is different. This point should be taken into account when performing repairs.
Placement of elements on the rear wall of the shield
- 1 — fuel remaining lamp;
- 2 — panel illumination;
- 3 — right turn indicator;
- 4 — left turn indicator;
- 5 — white block X1;
- 6 — coolant temperature indicator;
- 7 — lamp for side lights;
- 8 — indicator of the switched on “suction”;
- 9 — control lamp for engine oil pressure;
- 10 — indicator of the applied parking brake;
- 11 — indicator of lack of battery charging;
- 12 — tachometer;
- 13 — Check Engine indicator;
- 14 — speedometer and red block X2;
- 15 — lamp for emergency brake fluid level drop;
- 16 — operation of external emergency signaling with turn signals;
- 17 — high beam indicator;
- 18 - a device that displays the fuel level in the tank.
Purpose of wires in the white plug of old-style combinations. The pin positions of the block are indicated in the diagram above.
| Pin number | Purpose | VDO wire color | Wire color Schetmash | AP wire color |
| 1 | Mass signal | Black | Black | Black |
| 2 | Tachometer from the engine control unit | Brown-red | Brown-red | Brown-red |
| 3 | Tachometer from ignition coil | Yellow | Yellow | Yellow |
| 4 | Constant positive supply (via fuse) | Red-blue | White-red | Red-blue |
| 5 | Liquid temperature signal | Green-white | Green-white | Green-white |
| 6 | Side lights (via fuse) | Yellow-black | Brown (2 pcs.) | Yellow-black |
| 7 | Choke indicator | Not used | Not used | Not used |
| 8 | Check Engine Light | White-red | White-red | White-red |
| 9 | Positive power supply (via fuse) | Orange (2 pcs.) | Blue | Orange (2 pcs.) |
| 10 | Likewise | Orange (2 pcs.) | Orange | Orange (2 pcs.) |
| 11 | Parking brake indicator | Brown-blue (2 pcs.) | Brown blue | Brown-blue (2 pcs.) |
| 12 | Generator terminal D | Brown-white | Brown-white | Brown-white |
| 13 | Signal from oil pressure sensor | Gray blue | Gray blue | Gray blue |
Purpose of wires in the red plug of old-style instrument clusters.
| Pin number | Purpose | VDO wire color | Wire color Schetmash | AP wire color |
| 1 | Outdoor air temperature sensor | Blue-red | Blue-red | Blue-red |
| 2 | Positive power supply (via fuse) | Orange | Orange | Orange |
| 3 | Negative signal | Black (2 pcs.) | Black | Black (2 pcs.) |
| 4 | Instrument lighting control | White | White | White |
| 5 | Right turn indicator | Blue | Blue (2 pcs.) | Blue |
| 6 | Same for left | Blue-black | Blue-black (2 pcs.) | Blue-black |
| 7 | Signal from brake fluid level sensor | Pink blue | Pink blue | Pink blue |
| 8 | Communication channel with the trip computer | Brown | Brown | Brown |
| 9 | Signal from vehicle speed sensor | Grey | Gray and yellow | Grey |
| 10 | Signal from fuel level sensor | Pink | Pink | Pink |
| 11 | High beam protection (fuse) | Green-black (2 pcs.) | Green-black | Green-black (2 pcs.) |
| 12 | Signal from alarm relay | Blue-white | Not used | Blue-white |
| 13 | Ignition switch control | White | Red | Red |
What malfunctions may occur and how to fix them
1. If the temperature or fuel level indicator does not work, then the culprit may be:
- the device itself;
- its sensor;
- wires that go to them.
In the first two cases, faulty parts need to be replaced. Regarding the wires:
- if there is a break, then get rid of it;
- if the tips are oxidized, then clean them;
- If necessary, replace the wires.
2. If your tank is full, and the fuel level indicator arrow indicates that there is no fuel, or it moves irregularly, it means:
- the float travel limiter is not installed correctly - in this case, bend it down 1-2 mm;
- The sensor resistor weakly touches the current collector – bend the current collector;
- The resistor winding of the sensor has broken - only replacing the sensor will correct the situation.
3. If the fuel reserve warning light is constantly on, then there is a short circuit in the wire to ground. It is necessary to eliminate the short circuit.
4. If the control lamps - one or more - do not work, then the reasons may be as follows:
- the lamps are burnt out - then install new ones;
- The lamp sensor is broken - replace it with a new one;
- if the wires are oxidized or broken - replace them;
- The lamp socket is not pressed tightly against the printed circuit board - either bend the socket contacts to the board or replace it.
Constantly shows a full tank even if you turn off the dashboard. What is the reason?
The devices don't work. Could I have mixed up the chips?
Why did the speedometer needle, when the ignition was turned on again, spontaneously move to a zone of more than 200 km and freeze there, what is the reason?
You will learn how to change its appearance, what to do if the purchased trim is not the right size, how to get rid of cracks, how to remove only the visor, and not the entire panel.
You will find out whether it is worth doing repairs at all. Maybe it’s much more profitable to buy a new rail? It also describes what problems you may encounter during repairs.
How to adjust: throttle valve position and drive, starting device, fuel level and idle speed. And you can do all this yourself.
2012-2016 AUTOMANYAK.COM • Copying of materials is prohibited
What problems can arise with the instrument panel on the VAZ 2110?
The reasons why the instrument cluster stopped working are divided into two types:
- incorrect operation of the backlight or part of the indicators;
- complete shutdown of the panel.
Instrument panel backlight does not light up
Several light bulbs are used to illuminate the combination. A darkened section indicates one or two burnt out bulbs. If the backlight fails completely, you should check the fuse responsible for the power circuit. It is located in the cabin block in the first place on the left in the top row, and has a nominal value of 5A.
The cause of the indicators not working may be problems in the electronics. So, a malfunction in the engine controller is a possible reason for the failure of the Check Engine lamp.
If, in the event of a complete failure of the instrument lighting on a VAZ 2110, the rear license plate lighting lamps and the left side side lights stop working, all these symptoms indicate a failure of the fuse link.
Complete node failure
Complete failure of the instrument cluster means turning off the dial indicators, warning lamps, and display. The main cause of the malfunction is the blown fuse located in the cabin unit. The 10 A insert is installed second from the right in the bottom row.
You can verify that the fuse has failed by looking at the direction indicators not working. If the new insert burns out, you should look for the problem in a short circuit in the wiring. It is forbidden to try to solve the problem by installing fuses of increased ratings or “bugs”, as this may cause a fire.
Arrows jump up and down
The reason for the chaotic movement of the arrows is a poor mass signal due to rotting or loosening of the wire fastening. According to the factory wiring diagram, ground comes from a wire attached to the engine panel. The bolt attachment point is located behind the audio system installation location. There may be other points for conducting the mass wire, obtained as a result of repairs performed by the previous owners of the car. After locating the contact point, you need to securely crimp the fastener and check the integrity of the conductor with a tester.
Instrument panel problem
On many used cars, instrument failures are often encountered due to the destruction of printed circuit board elements. To check, you need to pull the combination out of the panel without disconnecting the power supplies.
Cigarette lighter problem
A common cause of incorrect operation of the instrument panel on the VAZ 2110 is the cigarette lighter. When high-power consumers are connected, the fuse and the power supply to the instrument cluster located next to it burn out. The 25 A cigarette lighter insert is located to the left of the indicator panel (discussed in the complete unit failure section).
Diagnosis and troubleshooting
If the instrument panel of the VAZ 2110 does not work, then to fix the problems you need to:
- check the lamps and replace faulty elements;
- check the integrity of the wiring using a multimeter or test indicator;
- inspect the condition of the contacts and clean their surface from traces of oxidation;
- check the condition of the fuses;
- test the operation of the devices.
The diagram shows fuses in blue that need to be checked if problems arise with the devices on the VAZ 2110.
Instrument cluster circuit fuses
To check the temperature or fuel level gauge you must:
- Connect the ignition.
- Connect the positive power output of the device (attached to pin 5 in the white plug) to ground with a wire. If the arrow deviates, you need to check the condition of the wiring connecting the sensor and indicator.
- If the temperature indicator constantly indicates overheating, it must be disconnected from the sensor. If the needle drops to zero, the sensor needs to be replaced. Otherwise, there is a short circuit in the wiring to ground or failure of the indicator device itself.
- To test the device, you need to remove the white plug from the panel and apply power to pin 10 directly from the positive terminal of the battery. At the same time, a negative voltage is applied to pin 1. A working indicator shows a value equal to zero; if the arrow deviates, the device requires replacement.
Wednesday, June 17, 2015
Repair of instrument panel VAZ 2110
On cars of the VAZ 2110-2112 family, the dashboard includes control lights and on-board instruments, with the help of which the driver can easily monitor the condition of the car. The following indicator lights are displayed on the instrument panel: coolant temperature, turn signals, tachometer, fuel level, speedometer, an image in the form of a gas station, indicating that it is necessary to refuel, lights for turning on the dimensions and high beams, low brake fluid level, a screen reflecting the vehicle’s mileage, emergency alarm, Check Engine, which signals engine malfunctions, a display with a clock, an indication of a generator malfunction or battery recharging, an indication of the handbrake, a low oil pressure light in the engine and, on carburetor engines, a choke light). Disassembly and replacement of devices
To replace (repair) devices, you must perform the following actions in a strictly established order:
1. The entire instrument cluster must be removed completely.
2. Unscrew the screws (2 pcs.) that secure the tire. After this, the bus itself must be disconnected from the instrument system board.
3. Unscrew the screws (7 pcs.) that secure the frame with glass.
4. It is necessary to remove the frame by disconnecting it from the instrument system.
5. Unscrew the 2 screws that secure the instrument cluster board.
6. Disconnect the left light filter, which has warning lamp symbols.
7. Disconnect the right light filter, which has warning lamp symbols.
9. Unscrew the nuts securing the fuel level sensor, coolant temperature sensor and tachometer. Each device is secured with 3 nuts.
10. Disconnect the board from the instrument system housing.
11. Unscrew the screws securing the instrument scale to the body (5 pcs.).
12. Remove the scale with instruments from the system body.
13. Very carefully, prying the arrow of the fuel level indicator with a screwdriver, you need to remove it from the axle.
14. Unscrew the screws (2 pcs.) that secure the fuel level indicator to the scale.
15. Disconnect the fuel level indicator. Install a new one in its place. When installing the sensor, perform all steps in the reverse order of removal.
16. Replace the remaining devices in the same manner as described. This is the entire repair of the VAZ 2110 instrument panel. As you can see, there is nothing complicated and there is no need to go to a specialized service center and pay money.
17. Assembly of the instrument system should be carried out in the reverse order of disassembly. When carrying out this work, it is necessary to take into account that the nuts that secure the tachometer have a different thread.
How to remove and disassemble the old-style instrument panel on a VAZ 2110?
To dismantle the instrument panel of a VAZ 2110, high qualifications are not required. Removing and installing another combination does not lead to immobilization of the car and the appearance of errors in the electronic units. The complex itself is equipped with a collapsible body and is divided into several components for repair or tuning.
What tools will you need to remove the panel yourself?
To remove and disassemble the instrument cluster, two screwdrivers are required:
- set of wrenches and sockets;
- short with a cross-shaped sting;
- regular length with a cross-shaped tip.
Preparatory work
Preparation for removing the instrument panel includes:
- turning off the power supply to the on-board network by removing the battery terminal;
- dismantling the steering wheel and column trim;
- glove box removal;
- a number of owners remove the front seats, freeing up additional space for work.
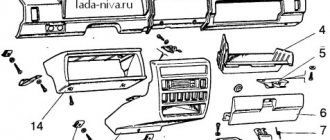
Instructions for removing the instrument panel
Step-by-step disassembly of the VAZ 2110 dashboard:
- Remove the screws securing the shield in the passenger's feet and the shield itself.
- Using a similar scheme, remove the shield from the driver's side.
- Remove the curved plug located under the parking brake lever.
- Remove the four screws securing the center console cover to the brackets. Attachment points are located on the sides, center and trailing edge.
- Disconnect the power window control key pads (if they are installed on the car). Remove the cigarette lighter connector.
- Remove the protective cover of the gear shift lever from the console cover housing. Dismantling is carried out carefully so as not to tear the cover.
- Remove the center console cover from the vehicle.
- Remove the warm air supply ducts to the rear seats.
- Unscrew the nuts securing the lower part.
- Remove the plastic trim on the front roof pillars.
- Remove the radio, heater control unit, clock, on-board display unit.
- Remove the plugs located along the top edge of the panel, in the area of the small non-adjustable deflectors.
- Unscrew the fixing nuts located underneath them.
- Unscrew the screws securing the casing along the lower edge. Two screws are located on the left, the third secures the diagnostic connector. Two more screws are located in the center of the dashboard, at the feet of the driver and passenger. Additionally, there are screws in the fuse box and in the cavity under the glove box.
- Remove the mounting block.
- Carefully remove the plastic casing from the seats. You may need to remove the plastic ties that secure the wiring.
We're sorry, but the requests coming from your IP address appear to be automated. For this reason, we are forced to temporarily block access to the site.
To continue, please enter the characters from the image in the input field and click "Submit".
Cookies are disabled in your browser
. We will not be able to remember you and correctly identify you in the future. To enable cookies, follow the tips on this page.
Replacing backlight bulbs
1. Take the plastic rim of the lamp and turn it to the left. When turning, you will feel that the lamp has become free.
2. Take a new lamp, insert it, and turn it to the right until it locks.
If you don’t understand anything about removing the shield or replacing lamps, watch the video below.
Video lesson
Why did it happen so?
Perhaps the automatic requests do not belong to you, but to another user accessing the network from the same IP address as you. You need to enter the characters into the form once, after which we will remember you and be able to distinguish you from other users exiting from this IP. In this case, the page with the captcha will not bother you for quite a long time.
You may have add-ons installed in your browser that can make automatic search requests. In this case, we recommend that you disable them.
It is also possible that your computer is infected with a virus program that is using it to collect information. Maybe you should check your system for viruses.
If you have any problems or would like our support team, please use the feedback form.
The instrument panel does not work on the VAZ 2110? For repairs you will need a diagram and panel pinout. As in any other model, the “tens” dashboard serves to display the status of the car, it shows the amount of fuel, speed, and also informs the owner of the VAZ 2110 about problems in the operation of components. But the panel is not an open book for all motorists, especially for novice drivers. This material describes the pinout, operating principle, purpose of the devices, main malfunctions, as well as repairs.
Throttle valve
The on-board computer issues two unpleasant errors - 0122 and 0123 when there is a problem with the throttle sensor. Moreover, 0122 will be displayed if the signal level of this sensor is low, and 0123 – if it is high.
Both one and the other, naturally, are not good. Especially if the on-board computer readings are accompanied by increased idle speeds, jerks at low speeds and dips. In this case, replacing the sensor does not always help.
Throttle position sensor
If codes 0122, 0123 are issued, be sure to check the signal and power wires for breaks, and also pay attention to whether there is any leakage through the injector rings. Remember: the main enemies of DPZD are engine washing and also the manufacturing plant, since there are a lot of defects here.
Indicators
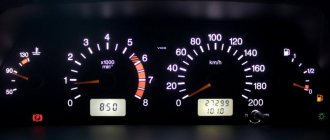
Dashboard
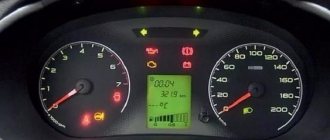
At the moment of ignition, all the lights on the instrument panel light up; after the engine starts, most of the indicators go out. Sometimes, even after starting the engine, one light continues to glow or even blink. This alarms drivers, because it is difficult to say which component in a VAZ 2110 car is malfunctioning; diagnostics are required to determine the breakdown.
We know that the “ten” can be old or new. In both versions, the designations remain identical, the only difference is the location of the light bulbs and their diagram.
At the bottom of the instrument panel there are indicators that indicate a malfunction in the operation of various systems of the VAZ 2110. If they continue to light when the engine is running, it means that repairs will have to be carried out.
Wires
The number of wires is amazing. It would seem that the VAZ 2110 is far from the most modern car, which does not have a huge amount of electronics. However, there is wiring in abundance.
Pinout
Disconnect only those wires that relate to the instrument panel. Label them, label them with self-adhesive labels, write down all the designations on a piece of paper. This will allow you to understand where which wiring is connected during the reassembly process.
The easiest way to disassemble the instrument panel is to contact professionals from a service station. After all, you planned to remove it for a reason, but in order to make some adjustments, replace dashboard elements, install LED backlighting, and so on. Therefore, it is not necessary to carry out dismantling yourself in order to go disassembled to a service station. Entrust the entire range of work to specialists.
Pinout
If you want to perform repairs or other operations on the instrument panel, then you need a VAZ 2110 pinout. If you don’t have it, you will have to track every wire from the indicator, button to the device. The diagram allows you to determine which of the devices does not work in the event of a malfunction in one or another node. If the indicators in the old and new VAZ 2110 are identical, then the pinout is slightly different. There are two pads - red and white. Pinout may seem complicated only at the beginning. Let's take several connectors as an example.
The first number indicates the black wire that goes to ground. The thirteenth number is tied to the oil pressure sensor in the system, as the diagram tells us. The white block indicates the connector number, the wire and the unit (unit) to which the wiring goes. The red block is read in exactly the same way. The first connector contains blue and red wires; they go to the external temperature sensor. As for number thirteen, here the white wire leads to the ignition switch.
see also
The pinout and diagram shown in this article are basic. They may differ in color marking, because many variations of the VAZ 2110 have entered the market. To avoid confusion, it is recommended to compare the data from the article with the instruction manual, which also contains a diagram and pinout.
Connecting the trip computer
The mentioned diagram took into account only one, brown wire leading from the red block to the trip computer, but this is clearly not enough. Therefore, let's see how the pinout occurs here.
- The fuel consumption signal from the electronic control unit is indicated by a green wire;
- Orange leads to terminal “15” in the ignition switch;
- Red and white - to terminal “30” in the ignition switch;
- Black, which is common, goes to ground;
- The speed indicator corresponds to brown;
- The positive terminal of the fuel sensor is green and red;
- Responsible for lighting the dashboard white, it leads to the light control.
Make sure that the board is not damaged, on which, in fact, uninterrupted reading of information from your VAZ 2110 depends, and providing it to you through all those sensors and devices that you always see in front of you.
Hello everyone) A new entry is dedicated to the transition from the AutoDevice (AP) panel with one window 2110-3801010-04 to the new VDO Panel 1118-3801010. The devices are completely different, so the modifications affected primarily the pads.
Malfunctions and repairs
Instruments or indicators may fail. This could be part of the indicators or even the entire speedometer. VAZ 2110 owners rarely encounter this situation, since the dashboard works properly, especially in domestic cars. Before changing the instrument panel or repairing individual parts, you should make sure that the sensors are working properly - we use the on-board computer.
Inaccurate installation leads to failure of elements. On the instrument panel board, the parts are attached using simple rivets, hence the negative result. The body is constantly subject to vibrations, so the installation simply “falls apart” and breaks appear in the circuit. Repair in this case involves soldering the rivets and thoroughly cleaning the contacts.
- It is necessary to remove the plug; the board does not need to be disconnected from the case.
- The next step is to apply flux to the places on the board with arrows (photo below). Both pads also need to be removed and thoroughly lubricated.
After soldering is completed, the instrument panel can be returned to its place. If you have free time, you can go through the contacts using sandpaper. On older cars they usually oxidize, which can prevent the devices from functioning properly.
You can see how to remove the dashboard in the video below.
conclusions
As you can see, replacing the steering column switch on a Daewoo Nexia is quite simple. Moreover, after completing the work, it makes sense to repair the removed part by purchasing copper strips of contacts separately and soldering them in place of those that failed.
Some car enthusiasts try to make new contact pads on their own using thicker copper sheets, but in practice such modifications make little sense, since home-made contacts do not always have the proper elasticity, bend and fail faster than ready-made factory parts. It is also worth remembering that original contacts produced by Daewoo are not sold, since the manufacturer insists on a complete replacement of the assembled part. However, if you repair the switch yourself, you will receive a spare, working unit and, in the event of a subsequent breakdown, will be able to avoid additional expenses.