As the name suggests, the VAZ 2107 air filter (injector) is designed to clean the air supplied to the combustion chamber from dust. A clogged filter creates additional resistance to passing air. As a result, the composition of the air-fuel mixture changes, fuel consumption increases and engine power decreases. If the filter is damaged, it will allow dust particles and grains of sand to pass through, which, when entering the engine, will begin to act as an abrasive, increasing wear on the rings and cylinder surface. Therefore, the filter must have the proper density, which will not allow dust to enter the engine, but will not create unnecessary resistance to air flow.
What is an air filter
An air filter is a device that filters the air entering the fuel system. All modern cars are equipped with air filters, including the Lada family with carburetor and injection systems.
The main purpose of the air filter is to clean the incoming air from sand, dust, soot, midges, small particles, plant seeds and other substances. The absence of the product in question will lead to the fact that all of the above-mentioned substances will enter directly into the fuel system, and after a short time it will simply be clogged.
It is important to know! All types of cars, including the VAZ 2107, must have an air filter, and it is necessary to monitor its condition and, if necessary, replace it in a timely manner. https://www.youtube.com/embed/jcxrpgecbhw
A clogged element negatively affects engine performance, since air must pass through the device to enter the fuel system. This reduces engine power accordingly. The resistance of the product in question is quite high, but in its absence the consequences for the car will be simply catastrophic.
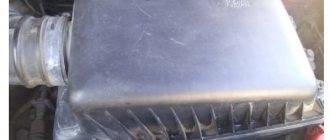
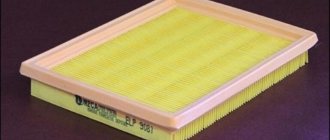
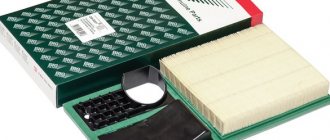
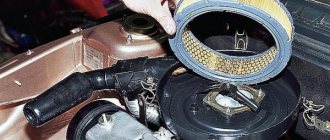
In a car of the classic VAZ 2107 family, the design of filters for the injection and carburetor injection systems is different. For the injector, the product in question has a rectangular shape, and on carburetor engines round-shaped filters are installed. Both types of products consist of a plastic housing and a filter element. This element is presented in the form of paper, which contains micro-pores and traps all types of small particles.
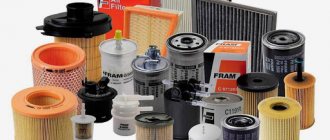
Since the creation of the part in question, many varieties have appeared. Types of air filters are divided into the following options:
- Inertial. The first products that are now used extremely rarely.
- Inertia-oil. They are also considered obsolete, so they are used extremely rarely today. Their main difference from inertial ones is the presence of oil at the bottom of the body of the product, which is intended to hold large and small particles.
- Paper. Some of the most common types are shown in the photo above.
- Products with zero resistance. Instead of a paper element, foam rubber or cotton fabric is used.
How often to change the air filter on a car
Replacing the part in question depends on the condition of the filter element. The condition of this element is influenced by factors such as the terrain in which the vehicle is operated, the frequency of operation of the vehicle, and the seasons. The VAZ-2107 injector air filter needs to be replaced somewhat less frequently than on carburetor models. In some manuals you can find a figure of 30 thousand kilometers - this is the recommended mileage for replacing the part in question. In reality, this figure does not mean anything, since the main condition for replacement is clogging of the filter element.
The part in question cannot be repaired, but if the filter elements are in good condition, that is, there is no damage and its color has not changed much. It is necessary to change the air filter because when it is clogged, fuel consumption increases. If the injection “sevens” have an on-board computer that displays an increase in consumption, then on the classics you have to rely on your memory.
How to replace it yourself
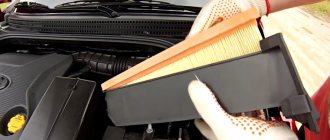
Let's look at how to replace the air filter on a VAZ-2107 car with a fuel injection system. The replacement procedure is as follows:
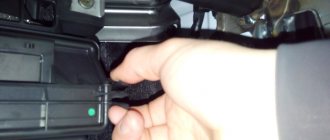
- First you need to open the hood, then use a screwdriver to unscrew the 4 bolts securing the air filter housing.
- Lift the air cover by applying slight force.
- After this, you can safely remove the product.
- The inside of the lid must be wiped with a damp cloth.
- After this, you need to place a new element inside the housing in the direction of the arrow and install the cover in place, screwing it with 4 bolts.
In conclusion, it is worth noting that the cost of the product in question is low enough to risk clogging the fuel system. A regular paper filter costs about 150-200 rubles, so be sure to check this product periodically and replace it in a timely manner.
In order to change the air filter on a carburetor seven, you need to perform similar actions, which you can learn about from the video below.
https://youtube.com/watch?v=6GC8i79faZM
Carburetor calibration data
| Options | 2108-1107010 | 21081-1107010 | 21083-1107010 | |||
| First camera | Second camera | First camera | Second camera | First camera | Second camera | |
| Mixing chamber diameter, mm | 32 | 32 | 32 | 32 | 32 | 32 |
| Diffuser diameter, mm | 21 | 23 | 21 | 23 | 21 | 23 |
| Main dosing system: | ||||||
| fuel jet marking | 97,5 | 97,5 | 95 | 97,5 | 95 | 97,5 |
| air jet marking | 165 | 125 | 165 | 135 | 155 | 125 |
| Emulsion tube type | 23 | ZC | 23 | ZC | 23 | ZC |
| Idle system and transition system | ||||||
| first chamber: fuel jet marking | 42* | — | 40* | — | 40* | — |
| air jet marking | 170 | — | 170 | — | 170 | — |
| Second chamber transition system: | ||||||
| fuel jet marking | — | 50 | — | 50 | — | 50 |
| air jet marking | — | 120 | — | 120 | — | 120 |
| Econostat: | ||||||
| conditional fuel jet flow rate | — | 60 | — | 70 | — | 70 |
| Power mode economizer: | ||||||
| fuel jet marking | 40 | — | 40 | — | 40 | — |
| spring compression force at a length of 9.5 mm, N | 1,5±10 % | — | 1,5±10 % | — | 1,5±10 % | — |
| Accelerator pump: | ||||||
| sprayer marking | 35 | 40 | 35 | 40 | 35 | 40 |
| fuel supply for 10 cycles (total for both chambers), cm3 | 11,5 | 11,5 | 11,5 | |||
| cam marking | 7 | — | 4 | — | 7 | — |
| Starting clearances: | ||||||
| air damper (gap B), mm | 3±0,2 | — | 2,7±0,2 | — | 2,5±0,2 | — |
| throttle valve (gap C), mm | 0,85 | — | 1,0 | — | 1,1 | — |
| Hole diameter for vacuum corrector, mm | 1,2 | — | 1,2 | — | 1,2 | — |
| Needle valve hole diameter, mm | 1,8 | 1,8 | 1,8 | |||
| Diameter of the fuel bypass hole into the tank, mm | 0,70 | 0,70 | 0,70 | |||
| Engine crankcase ventilation hole diameter, mm | 1,5 | — | 1,5 | — | 1,5 | — |
Replacing the air filter Ford Focus 2 —
Although the last Ford Focus 2 rolled off the production line 6 years ago, this model continues to remain popular on the market. Naturally, all cars of this generation are already out of dealer warranty, so the question is “where to service the car?” always relevant for their owners.
Fortunately, the design of the car allows you to carry out many routine maintenance work yourself without any problems: for example, by replacing the air filter on a Ford Focus 2 yourself, the owner will spend only a few minutes.
How often should I replace it?
First, let’s decide which filter to talk about: cars in the first years of production used a compact flat filter, which, according to reviews from owners, did not prove to be the best, especially on 2.0-liter engines.
Although the manufacturer set the replacement interval at 15 thousand, even under average conditions, without getting carried away with driving on dirt roads, the owner could feel a noticeable deterioration in engine thrust even before the next maintenance.
Therefore, cars that rolled off the assembly line after May 2007 received an updated cylindrical filter with a much larger area (for the Russian assembly, the update affected primarily engines from 1.6, some cars with 1.4 engines continued to be equipped with old filters). The new filter is guaranteed to last the stated 15 thousand, exceptions are possible only with constant driving on primers.
Air filter selection
The air filter on pre-restyling cars had a factory part number 1232496. In fact, the Knecht/Mahle LX1572 filter was used on the assembly line, supplied directly in Ford OEM packaging, so this analogue can be considered absolute.
Also among non-original substitutes we can point to Bosch 1 457 433 323, MANN C 28 122, Champion U 793/606. Since the filter life is short due to the selected size, more frequent replacement of the Ford Focus 2 air filter with a non-original one is significantly more profitable than using the original.
After restyling, a filter with article number 1708877 began to be used (on cars of recent years, article number 1848220 can be selected by VIN).
This filter was also produced for the Ford assembly line by the Mahle concern (their catalog number is LX1780/3), its other analogues are Bosch F 0264 001 36, MANN C 16134/1, Fram CA 10521. All these filters perfectly withstand 15 thousand runs, and only on very dusty roads they manage to significantly reduce their throughput.
Instructions for replacing the air filter on a Ford Focus 2
Replacing the air filter with your own hands does not take much time and does not require the purchase of special tools for both pre-restyling and post-restyling cars, although the procedure itself is somewhat different for them.
On pre-restyling versions, the air flow sensor was rigidly attached to the filter cover itself. Therefore, for convenience, it is best to remove the connector chip from the sensor, having first turned off the ignition, then loosen the air duct clamp and pull off its corrugation from the MAF outlet pipe.
Then you can remove the screws around the perimeter of the air filter cover (head size – Torx 25)
There is no need to take any precautions when removing the filter, since all the dirt from it will fall down to the air intake and cannot accidentally enter the intake manifold
Before putting the new filter in place, it is worth wiping the perimeter of the box with a damp cloth to remove dust and ensure a good fit of the seal.
Having placed the filter, we carefully tighten the screws securing the cover crosswise (the plastic is fragile, and there is no point in overtightening them), place a rubber corrugation on the MAF pipe and tighten the clamp for its fastening, after which all that remains is to connect the MAF connector.
- On updated cars, everything is even simpler: using a small ratchet with a “7” head and an extension, you need to remove the four screws located around the perimeter of the filter housing cover, and then simply lift the cover up.
- Lifting the filter by the right edge, we pull its neck off the protrusion on the air duct, which centers the filter in place.
Now you can install the new filter. In this case, the main thing is to settle it on the protrusion of the air duct without distortions, which can lead to the suction of unfiltered air into the intake.
The main inconvenience in this case is associated with the low rigidity of the filter housing - the plastic “walks” in your hands, which is especially noticeable when installing the cover.
It stretches in exactly the same way as on the pre-restyling version - crosswise, without making much effort.
- Air filter replacement video:
Compression check
After checking the compression, you can breathe a sigh of relief or worry, since the cost of the repair depends on the result.
Impaired compression often causes the presence of oil in the VF, and also causes a number of other problems.
Compression check
To work you will need:
- Compressometer;
- A rag in oil, which you will use to determine the compression stroke;
- Adapter for spark plug holes. It is used when checking the combustion chamber for leaks;
- Compressor.
Now let's start checking.
- Warm up the engine to operating temperature, then turn off the fuel supply.
- In the case of a carburetor, you need to remove the hose, clamp or squeeze it with something, or lower it into a container.
- If you have an injector, remove the fuel pump fuse, start the engine and let it run. As soon as the fuel in the fuel rail runs out, it will stall on its own.
- Disconnect the ignition system by removing the center wire from the distributor (on the carburetor). The crankshaft position sensor at the injector must be disconnected.
- Remove all debris from the spark plug wells so that it does not end up inside the cylinders. Unscrew the spark plugs.
- Insert the compression gauge fitting while an assistant starts the engine. The starter should rotate the engine until the pressure gauge needle stops in one position.
- By analogy, measurements are carried out on each cylinder, the results are recorded on paper.
- To calculate ideal compression, use the formula - 1.2 * Compression ratio.
See your owner's manual for the compression ratio of your engine. Please also note that measurements may have some error.
What you need to know about verification
- If the indicator is 12 atmospheres, this indicates that your engine is almost in perfect condition.
- When checking the compression on a cold engine, the compression readings will be significantly lower. Perform the test only on the engine at operating temperature.
- If the battery is partially discharged, the test data will also not be accurate.
- The increase in compression occurs due to the combustion of oil in the cylinders.
What the results say
We take the paper where you wrote down the data of the check, carried out according to all the rules, and study what is wrong with the motor.
- Indicators in the range of 0-4 atm indicate a high probability of burnout of the piston, head gasket or valve.
- Compression of 4-6 atmospheres indicates that the piston rings or the partition between them have broken.
- If you get about 8-10 atm in each cylinder, the cylinder-piston group is worn out. Major repairs will soon have to be carried out.
- 12-12.5 atm - these are the indicators that occur in a new, run-in power unit.
- If the car has serious mileage, and the check data shows numbers equal to or exceeding the norm, oil has probably entered the cylinders due to wear of the cylinder-piston group or valve liners.
Obviously, the presence of oil in the filter does not bode well. But the problem can still be prevented if measures are taken in time.
Possible breakdowns and their causes
A separate issue for many car owners is possible breakdowns associated with the filter.
The main attention is focused on leaks, oil starvation, failure of engine components
Leaks occur when connections are worn or loose
To eliminate them, pay attention to rubber bands, sealants, washers and other sealants. It is recommended to replace them as a preventive measure along with replacing the oil filter.
Leaks can also occur due to faulty hoses and components. This is usually due to damage, cracks, and corrosion. To eliminate breakdowns, it is also necessary to completely replace the faulty part.
Oil starvation is a consequence of a lack of lubricating fluid in the working mechanisms of the engine. It can be caused by two factors: a decrease in filter capacity or lubricant leakage due to a leak. To solve the first option, cleaning the filter element is suitable as a temporary measure, but this does not eliminate the need to completely replace it.
Engine breakdowns are a consequence of wear and tear on components. Solving such problems requires certain training and qualifications. Often the problem can be solved by simply replacing the damaged unit, however, if you lack experience in these matters, it is recommended to contact specialists.
Repair work
If you discover the presence of oil in the air filter of your VAZ 2109, you should definitely take immediate action.
Ignoring the presence of oil in the VF can lead to serious damage, including the need for major engine repairs. I don’t even want to imagine how much it will cost.
- Check the compression of your engine. If there are problems with it, the piston rings or the piston system are worn out, this can be determined by blue or dark smoke. Plus, the level of lubricant, that is, oil, will constantly drop.
- If the compression test shows that everything is fine, then you can breathe a sigh of relief. This suggests that the problem is not that complex.
- Most likely, the filter element is clogged or the hoses for removing crankcase gases from the crankcase are clogged. You will have to change the filter, wash or replace the output hoses.
The most important recommendation is periodic maintenance of all engine components and auxiliary mechanisms. It is better to prevent a disease than to eliminate its consequences later.
Replacing cabin filter Suzuki SX4: instructions
The cabin filter on the Suzuki SX4 is an element of the vehicle's interior circulation system. Oxygen from the environment is cleared of impurities.
If the established deadlines for technical inspection or replacement of the cleaner are violated, pathogenic bacteria and dust enter the body of the driver and passengers. Ultimately, your health worsens, coughing, fatigue appears, and concentration decreases.
Suzuki SX4 is a joint product of the Japanese concern of the same name and the Italian Fiat. Since its release in 2006, there have been two generations. We expect the third generation soon.
Where is the cabin filter located: regardless of the generation of Suzuki, the location of the cleaning elements is identical: behind the body of the dashboard glove box. The shape of the filter is rectangular, with multiple folds (accordion) of hygroscopic material. This method of installation contributes to maximum purification of the air flow from foreign impurities, chemical elements, and allergens.
Suzuki 2 is equipped with carbon impregnated cleaners. This improves absorption and reduces the risk of disease and penetration of pathogenic bacteria.
The cost of a carbon element is 20–25% more expensive than its stock counterpart. In this regard, many car enthusiasts save on maintenance by installing analogues. Changing the cabin filter on a Suzuki SX4 yourself is not difficult.
How often should I replace?
In accordance with the instructions, replacing the cabin filter on a Suzuki SX4 is carried out after a mileage of 10,000 km. for the first generation and 15,000 km for the second generation.
If the machine is actively used in conditions of gas pollution, dust, heavy leaf fall, and poplar fluff, reduce the resource by 2000 - 3000 km.
When the actual interval is less than the specified range, the unit of time is taken to be one year from the start of operation.
Choosing a cabin filter for a Suzuki SX4
By default, Suzuki SX4 is equipped with an original filter with catalog number 95850-61M00-000. For most motorists, buying an “original” is unaffordable, since the average cost is from 750 rubles.
The stores offer alternative options that are 150 - 250 rubles cheaper. There is no point in overpaying for branded packaging.
Each owner independently decides which class of consumables to purchase.
Analogs: FRAM CF11862, TSN 97222 (carbon), Meyle 3412 (carbon).
Replacing cabin filter Suzuki SX4
The process of replacing the cabin filter of the Suzuki SX4 is identical to such models as Nissan Juke, Kia Soul, Mini Countryman.
Preparatory stage: rags, screwdriver, new filter element, antibacterial aerosol for air conditioner (if necessary). If there is not enough natural light, take care of additional, for example, a flashlight. It will not be superfluous to use a household vacuum cleaner to blow out the cavity, clean debris and leaves.
Sequencing:
- We fix the car and provide access to the dashboard;
- We squeeze the limiters on the sides, lower the glove box down;
- The cabin filter is located behind the housing. We remove it, carry out troubleshooting, blowing, replacement. We lay the new element in the “UP” direction upwards.
- We complete the assembly and check that the airflow system is working properly.
(1
Options:
- Cabin filter VAZ 2107 regular
- Cabin filter VAZ 2107 carbon
auto parts store
- Kasimovskaya, 2
- +7‒916‒772‒45‒85
chain of stores
- Andropova Avenue, 8
- +7 (495) 663‒22‒01
network of auto centers
- Krasnobogatyrskaya, 2 st26
- +7 (495) 223‒22‒11
wholesale company
- Electrolyte passage, 3
- +7 (495) 510‒25‒58
auto center
- Nagatinskaya, 16 k1 st5
- +7 (495) 995‒60‒00
center
- Basovskaya, 16 st1
- +7 (495) 660‒77‒37
service center
- Tank proezd, 4 st47
- +7 (495) 740‒91‒29
trade company
- Zvenigorodskaya 2-ya, 13 st17
- +7 (495) 215‒55‒57
auto parts store for foreign cars
- MKAD 80 km, 4 st18
- +7 (495) 517‒57‒31
car showroom
- Pskovskaya, 13
- +7 (495) 229‒20‒88
auto parts store
- Shokalsky proezd, vl50
- +7 (495) 971‒28‒50
auto parts store
- Kronstadt Boulevard, 37B st3
- +7 (495) 795‒28‒04
car service network
- Barvikhinskaya, 9
- +7 (495) 477‒33‒85
auto goods store
- Budyonny Avenue, 53 k2
- +7 (495) 544‒73‒76
trade company
- MKAD 33 km, 6 st7
- +7 (495) 921‒75‒82
- 1812, 2
- +7 (495) 134‒00‒44
online store
- Bagrationovsky proezd, 7
- +7 (495) 005‒31‒64
online store of car accessories
- Yuzhnoportovaya, 22 k1
- +7 (495) 255‒58‒87
car showroom
- Prokatnaya, 7
- +7 (495) 921‒01‒21
club car service
- Ermakova Roshcha, 7a st1
- +7 (495) 772‒47‒92
auto repair center
- Michurinsky prospect, 31 k7
- +7 (495) 120‒13‒66
car center
- Kashirskoe highway, 61 k3a
- +7 (495) 921‒31‒00
auto parts store
- +7 (495) 437‒28‒22
car center
- Izmailovsky Menagerie 1st, 8
- +7 (499) 110‒78‒79
online store
- Marshala Katukova, 24 k4
- +7 (495) 797‒41‒51
online store of car accessories
- +7 (495) 003‒34‒69
auto parts store
- Vostryakovsky proezd, 10B st2
- +7 (495) 796‒26‒73
Replacing the cabin air filter in a Nissan Note
One of the important systems in the car for the driver and passengers of the Nissan Note is the air conditioning system in the cabin. Thanks to it, comfortable conditions are provided at any time of the year.
It is important that the Nissan cabin filter is replaced in a timely manner
Structural difficulties
Most compact cars have similar problems. After all, the ventilation system used should not take up a lot of space, since volume savings are initially expected.
In this case, designers have to work hard on the layout. The result is reflected in certain difficulties in servicing a Nissan Note when the standard cabin air filter needs to be replaced.
One of the work options is an operation in which it is necessary to dismantle the glove compartment. Then you will have to install the cabin filter in an awkward position. You can refuse dismantling work, but then replacing the Nissan Note cabin filter will create more inconvenience.
Removing the Nissan Note cabin filter
Frequency of installation of a new cassette
Japanese developers have provided a certain interval at which it is necessary to update the cleaning cassette on the Note. The frequency is about 30 thousand km. mileage On average, this takes about 2 years.
Some drivers operate their vehicles in extreme conditions. Then we recommend lowering the mileage yourself, for example, to 20 thousand km. or up to 15 thousand km, like Logan. If you often drive on primers, the pores will become clogged even after 8-9 thousand km.
Important! The filter module can be unscheduled controlled in the fall, since a minimum temperature is formed in this compartment, attracting moisture and potentially causing unpleasant odors. It’s hardly worth cleaning such a block
Only a replacement is required to eliminate unpleasant odors.
It is hardly worth cleaning such a block. It will only require replacement to eliminate unpleasant odors.
Comparison of clean and dirty filter elements
Independent work
Having figured out where the Nissan Note cabin filter is located, most motorists choose the replacement method without removing the glove compartment. To do this, arm yourself with a flashlight and look for part of the filter cover on the passenger side of the front seat behind the console decor. It is visually similar to a similar Logan unit, but access in the “Japanese” is more problematic.
If you attempt to dismantle the glove compartment, then replacing the Nissan Note cabin filter will not be much easier. The lower cross member will interfere with the process. While working, we pry up the lower part of the cover, and then move it to the side and up, which will allow you to remove the filter from the seating area.
It is worth considering that some of the accumulated autumn debris will spill out, and some will remain inside. You can get rid of it using a car vacuum cleaner equipped with a narrow tip.
Before inserting the filter element, it must be twisted. This feature of the Nissan Note helps to squeeze the air purifier into the desired area. First, we press the left side vertically to push it through and place it behind the glove compartment. We twist it down and push it into the landing area.
Choosing the right filters
You need to look for the original among the spare parts using catalog number 27891-AX010. However, a fairly high price tag of 600-700 rubles may scare someone away. In this case, you can use budget analogues, which are similar products from Duster or Logan.
You can choose from the list below:
- BIG Filter GB-9906/C;
- Fortech FS-031C;
- LYNXauto LAC-215C.
These products effectively cope with their task. If necessary, you can use Sakura CA-1806 or MANN CU 1829.
New Nissan Note cabin filter
Conclusion
The cartridge must be replaced in a timely manner, no later than the time specified in the car’s operating instructions. The operation takes little time and can be carried out with Nissan Note even in a garage.
Eliminating the causes leading to the appearance of oil in the pipe
Factors leading to an increase in crankcase gas pressure and, as a consequence, to the appearance of oil in the air filter duct were discussed above. The first of these is a high level of lubricating fluid in the engine crankcase. When the oil is above the maximum level, the internal free volume of the crankcase decreases, which leads to an increase in pressure in it. In this case, it is necessary to drain the excess and subsequently try to maintain the engine lubrication level in the middle between the MAX and MIN marks on the dipstick.
When the air filter is clogged, this not only leads to a decrease in engine power and the possibility of a number of other malfunctions, but also to a change in pressure in the crankcase. When the motor does not have enough air, excess pressure is created in the air supply channels. If all connections are sufficiently sealed, then the missing volume of gas is sucked through the breather connected to the filter pipe from the crankcase. So in this case, oil vapors enter the air duct. A simple and quick way out of this situation is to replace the air filter (if it is really dirty and the reason for the appearance of oil in it).
It is clear that if the crankcase ventilation system (channel) does not work (clogged), then there will be increased gas pressure in the latter. We are talking about special channels in the cylinder block and a thin hose between the throttle valve and the valve cover. These means of crankcase ventilation tend to coke if low-quality or old oil that is not replaced on time is used, which begins to lose its properties, turns into a resin state and clogs the internal lumen of the channels. Also, in winter, in severe frost, these crankcase ventilation systems can freeze - accumulated condensate gets trapped in them.
In the latter case, it is enough to run the engine at idle speed and it is better to do this as a preventative measure for about half an hour each time you start it in the morning. If the ventilation channels are clogged with dirt and oil, you will have to clean and rinse them. Start with the tube between the throttle body and the valve cover. If this does not help, you will have to open the engine and clean the channels in it. It is better to entrust this work to specialists.
The case where the cause of oil getting into the pipe was an exhaust system clogged with molten catalyst is extremely rare. It is described only once and for the VAZ 21124 car. The author (owner of the car) of this story claims that in his car the air filter itself was filled with oil. After all the washing and cleaning of the engine, adjustment and replacement of some parts, no changes occurred. There was no time to disassemble the engine itself, since it did not smoke, although it was dull, it ate a lot of fuel, and besides, a melted catalyst was suddenly discovered. After cleaning the exhaust system, according to the author, the car began to work perfectly and the air filter pipe has not been contaminated with oil leaks since then.
VAZ 2107 and VAZ 2106: differences between replacing the oil filter
Some car owners are wondering about the differences between replacing the oil filter on a VAZ 2106 and 2107
Experts pay attention to the similarity of the assemblies of these models and the general algorithm of actions when working
There are no significant nuances that should be paid attention to. On a VAZ 2106, replacing the oil filter is carried out according to the same procedure; the procedure is the same for most other cars
The main aspect in which there may be differences is the location of components and part numbers of components. There are also no significant differences in the location of the drain plug and oil filter; even a novice car owner can find them.
The part numbers are also largely identical, making them interchangeable. However, it is recommended to check the technical documentation for the manufacturer’s own recommendations before purchasing.
Changing the fuel pump diaphragm
Replacing the diaphragm is not difficult, since this part cannot be repaired. The sequence of actions is as follows:
- We clean the outside of the device with white spirit or gasoline;
- We remove the hoses, both inlet and outlet. To prevent fuel leakage, plugs can be inserted into the hoses (for example, M8 bolts)
- Now you can use a Phillips screwdriver to unscrew the 6 screws securing the upper case and the cover to the lower one and separate them:
- Now you need to press the diaphragm plate, turn the rod, and pull it out of the balancer fork. After this, remove the spring:
- Now, using a size 8 wrench, unscrew the nut on the rod and remove the diaphragm plate along with the gasket. The diaphragm is included in the repair kit for the fuel pump; we replace it, carefully align all the holes in the diaphragms, and then tighten the nut on the rod.
- Assembling the device is done in the reverse order.
As a last resort, you can replace the entire device.
To do this, you only need to thoroughly coat the spacer between the fuel pump housing and the cylinder block with high-temperature sealant to maintain a tight seal.
These simple “tricks” will help you save time and quickly diagnose faults in the VAZ 2107 power system
Filter adapter
If the stove filter does not do its job well, filtering the air poorly (for example, during frequent trips through very dusty areas), you can try installing a special adapter, which you can buy in car stores or online.
Cabin filter adapter VAZ 2114
It solves such important problems as:
- extending the service life of the main filter (replacing the VAZ 2114 stove filter will be required much less frequently);
- complete air purification (passing through such a filtration system, the air is cleaned of even the smallest dust particles);
- protection of the interior from the accumulation of dust and dangerous deposits;
- purifying the air from bacteria and harmful organic particles.
Finishing the conversation about the cabin filter, I would like to once again say about the importance of periodically monitoring its condition and timely replacement. After all, the cleanliness of the outside air entering the cabin directly affects the health of everyone inside the car.
And health is not something worth saving on (especially such small money as the cost of a new porous filter).
Independent production and replacement of cabin filter Hyundai Accent
The Hyundai Accent is equipped with various modern units and devices that are responsible for the normal operation of the vehicle. The Hyundai Accent cabin filter is replaced after several thousand kilometers.
During this time, it is recommended to remove the cabin filter to check whether it is dirty. Otherwise, accumulated dust will enter the interior. The filter installed in the cabin is a barrier between the clean air of the Hyundai and the dirty air from the street.
Design features
The cabin filter is designed to protect the car from dirt, dust, fluff and other substances due to its complex design. Manufacturers of such units equip them with several layers of special elements. The tasks of each layer include cleaning the incoming air masses from various elements.
Activated carbon has an adsorbing effect and great absorption capacity, which can trap dirt and absorb harmful odors.
does not install a cabin filter on Hyundai. Dealers rarely install the device in question when preparing a vehicle for sale.
The unit consists of two parts built into the ventilation system.
The kitchen analogue is presented in the form of a two-layer carbon accessory, the area of which will allow the production of about 6 cabin filters for the Accent. Initially, you will need to remove the old device. The cabin filter is cleaned of dust. The fabric is cut along the contour of the product. The new unit is made using a plastic frame removed from the old analogue.
Blanks are cut from a kitchen accessory, taking into account the internal parameters of the last element. The layers are glued in a certain order according to the instructions. The 2nd layer is placed in the same way. The cabin filter on the Accent has a groove at the bottom and a protrusion at the top.
These elements are necessary for fixing the components of the manufactured device. The air flow moves in the duct from the right side to the left. Another layer is glued on the corresponding side. Similar steps are performed in the manufacture of the 2nd part of the filter device for Hyundai. It will take some time for the glue to dry. This indicator depends on the type of adhesive used and is indicated by the manufacturer on the packaging. The finished product is mounted in place.
Exhaust gas release
Exhaust gases are discharged through the exhaust manifold, front pipe 24, additional front mufflers 21 and rear 20, as well as through the main muffler 17. The intake pipe and mufflers are inseparable, connected to each other by sliding the pipes into each other and secured with clamps 19. In addition, one of the connected tubes has a flared end with two diametrically spaced longitudinal slots. During assembly, the above slots must be completely covered with the sliding tube.
The exhaust manifold is made of cast iron and has four quad exhaust pipes. The collector is attached with studs to the head using metal-asbestos or ferronite gaskets. The manifold at the bottom has a flange to which the exhaust pipe of the mufflers is attached.