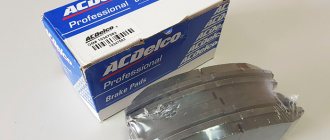
Regardless of the year of manufacture and modification, the VAZ 2110 is equipped with the same front disc and rear drum brake pads. VAZ cars are equipped similarly: 2108, 2109, 21099, 2110-11, 2110-12.
The first thing you should pay attention to when choosing is your driving style. If you prefer a relaxed driving style, then you will be satisfied with pads with low abrasive properties, but at the same time, a disc that costs much more will last longer. And if you prefer a dynamic driving style, then you can afford pads with hard linings, but the wear of both the pads and the disc will be much greater. For more details about the properties, see the note column.
When to change brake pads on a VAZ 2110: instructions and useful tips
Front pads for a VAZ 2110
It turns out that not every motorist, even an experienced one, knows when to change the brake pads of a VAZ 2110. Some say it needs to be changed often, others say rarely. But this approach to the issue is fundamentally wrong, since it all depends on the driving style, the brand of pads and much more. So, when to change brake pads on a VAZ 2110?
Replacing brake pads VAZ 2110
Pad wear
There is, as a rule, a standard service life of the pads, which is 10 thousand km. But again, everything is transparent. In principle, when always buying brake pads, you should be careful and pay attention to the service life of these parts. As a rule, no manufacturer is able to provide accurate information about the service life of the pads. What does it mean? And the fact is that you need to monitor the wear of the pads, and only then draw conclusions.
Replacing brake pads on a VAZ 2110
Each type of brake pad has a concept called acceptable wear. So, for almost all pads it is no more than 85 percent. In other words, if it is noticed that the pads are worn out by more than three quarters, they need to be replaced with new ones. You can say it another way: the thickness of the brake pads should be more than 1.5 mm. If the thickness is less, then there is a possibility of damaging the pistons of the master cylinder when braking, and this will not lead to anything good. The front brake pads, as a rule, are different from the rear ones. We are talking, again, about wear and tear. Rear brake pads are more durable and can work effectively not for 10 thousand kilometers, but for all 60 thousand kilometers. Well, again, it all depends on the degree of wear, driving style, etc. As for the degree of wear, here, like the front ones, it is at least 1.5 mm.
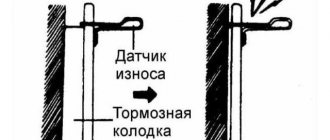
Note. Today, brake pads are known that are equipped with a special wear indicator. The essence of this technology is that a built-in metal plate, which rubs against the disc when excessive wear occurs, thus gives a signal that it is time to change the pads.
What factors influence wear?
The wear of brake system components depends on many factors:
- poor quality material used by the manufacturer;
- installation of any element: pad, disc or drum was previously carried out incorrectly;
- aggressive driving style of the car owner.
The reasons listed apply to all parts of the brake system. We’ll tell you how you can avoid such factors and significantly increase their service life.
Important! It is necessary to purchase parts from trusted manufacturers.
There are plenty of counterfeit goods on the market. The cheap cost of the product should indicate to the car enthusiast that the spare part can be made from low-grade raw materials. In this case, you won’t be able to save money: its service life may quickly end.
How to check pad wear
To independently check the degree of wear of the pads on a VAZ 2110 car, you should follow the process described below.
Front pads
- wheels are removed;
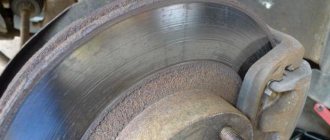
- the disk is cleaned of dust and dirt;
- a caliper is taken and the thickness is measured.
Note. Like pads, discs must have a certain level of wear. As a rule, the permissible wear of discs is 10.8 mm and no smaller. If the disc is too worn, it needs to be replaced.
- A visual inspection of the brake pads is carried out.
How to check pad wear
Note. You can determine the condition of the brake pads by looking through special holes designed for this purpose. As mentioned above, their thickness should not be less than 1.5 mm.
- The ease of movement of the pads is also checked.
Note. The ease of movement of the pads is checked with a screwdriver. If the pads are difficult to move, then it is likely that they are pinching the disc. You will have to replace the disc or caliper.
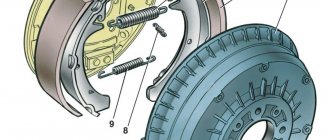
Rear pads
In order to check the brake pads at the rear, you should do the same, only after removing the wheels, you also need to remove the drum. Drum wear must also be measured. To do this you should:
- measure the diameter of the working surface of the drum.
Note. You should know that the maximum permissible wear should not exceed 201.5 mm in this case.
The following are situations when it is necessary to replace brake pads:
- if the thickness of the pads is less than one and a half millimeters;
- if the friction linings of the pads have traces of oil on the surface;
- if there is a poor connection of the linings with the base;
- if you hear a characteristic creaking noise when braking;
- if there is a beat when pressing the brake pedal.
Physics of security
The friction lining is the most important part of the brake pad. Its main tasks are to obtain the necessary friction forces during braking and ensure the stability of the friction coefficient when changing the speed of rotation of the brake disc and pressure in the system. The natural desire of car manufacturers (as well as developers and manufacturers of brake linings) is to obtain a friction coefficient close to a constant under all operating conditions. Fulfilling this requirement is not easy, as evidenced by all world experience. We can only talk about finding the optimal combination of lining properties.
Most modern brake linings have a friction coefficient of 0.35-0.45. Why is that? Why is a value of 0.28 or, say, 0.55 bad? Everything is clear with the first number: reduced friction properties lead to an increase in braking time and braking distance, which negatively affects safety. Are high friction properties good? At first glance, yes. But only for the first one. In fact, an increase in the friction coefficient narrows the range of influences on the pedal from the start of braking to wheel locking. And the trouble begins.
Judge for yourself: blocking leads to slipping or skidding. This is unacceptable for at least two reasons. Firstly, the stability and controllability of the car deteriorate. After all, the grip of the wheels on the road becomes the same in all directions - both in the directional direction and in the lateral direction. Secondly, the braking distance increases, since the grip on the road when the wheels are sliding is much less than when they are rolling.
Therefore, with a high coefficient of friction of the linings, caution in “stomping the pedal”, certain driving skills and a quick reaction are required. Particularly dangerous are roads where sections with good and poor wheel grip alternate. For example, asphalt, ice, asphalt, snow, again ice and this stretches for many kilometers. Or this: on the left is asphalt, and on the right, closer to the side of the road, is liquid mud. In such situations, on cars without ABS, braking can lead to loss of control and unpredictable consequences. Such cases are especially dangerous in heavy traffic conditions at high speeds.
Replacing front brake pads
Replacing brake pads VAZ 2110
Before you start replacing the front brake pads of the VAZ 2110, you need to prepare the car. Started:
- hang out the wheel;
- remove it;
- Now you will need to bend the edges of the locking plate of the lower bolt that secures the wheel cylinder to the guide pin.
We change the rear brake pads on a VAZ 2110 with our own hands
To find out when it is necessary to replace the rear brake pads of a VAZ 2110, you should focus not only on your own sensations or the appearance of squeaks when braking, but also on their actual wear.
You can assess the condition of the pads through the inspection window without even removing the drum. To do this, remove the rubber plug in the dust shield, pry it off with a screwdriver, and look at the pads. Their thickness should be more than 1.5 mm.
If it is less, then they will no longer provide a quick stop after pressing the pedal. In addition, with such a thickness, the piston stroke of the cylinder will be greater than normal. Hence, leaks leading to loss of fluid, a drop in its pressure, that is, the entire braking system is at risk.
When should the stop valve be activated in a passenger carriage?
So, in what cases is the thickness of the brake pads of a locomotive important in operation? When the responsible representative of the train operating personnel pulls down the hand wheel, and he has the right to do this in the following situations:
- giving the driver a signal about the need for an emergency stop (three long beeps) or an alarm (one long, three short);
- self-release;
- guarding the tail with a conductor;
- fire (if vehicles do not pass through a tunnel or bridge);
- threat to traffic safety or human life;
- high probability of going downhill (if there is a slope);
- activation of the axle box heating control system;
- wheel jamming.
The stop valve itself is a device consisting of several disconnect valves and outlet pipes located in the cabin, vestibule, passenger and service areas. To use it, you need to move its handle from the upper position to the lower position, holding it at arm's length (this will help prevent injury). It is not only an emergency, but also a backup means of stopping.
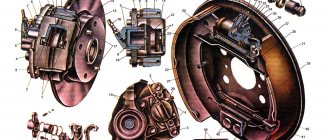
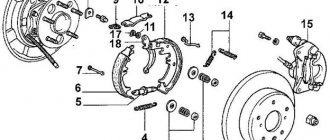
Device
Before disassembling, you need to know the structure of the braking system. The VAZ 2110 has hydraulic brakes with distributed circuits. One circuit is the front right and rear left mechanisms, the second circuit is diagonal.
The hydraulic drive includes a (also dual-circuit) pressure regulator. It helps regulate the brake fluid pressure on the rear brake systems. It is through the regulator that the fluid flows to both rear mechanisms.
Adjustment is carried out through four chambers. Their design is as follows: two are connected to the main cylinder, and two, respectively, to both cylinders of the rear brakes.
For high-quality braking, it is necessary that the entire system works smoothly, there is correct adjustment and reliable mechanisms.
Parsing order
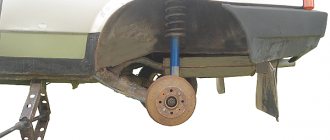
It is better to carry out the repair operation on an overpass (you can use an inspection hole), or just a flat area with a hard surface, because you will have to remove the rear wheels, naturally, first jacking up the car.
- Remove the wheel and disk;
- We unscrew the guide bolts, of which there are 2, and remove the drum;
- A common problem is the drum sticking, so sometimes it is not so easy to remove it. The problem has long been solved by tapping a drum with a hammer (through a board);
- Using pliers, remove the tension spring;
- After this, a fixing guide spring holding the block;
- We remove the block from the support bar that is not connected to the handbrake rod. To do this, pull its free edge to the side and along the shield;
- Loosen the upper spring. To do this, you need to turn the block to the side until you can disconnect the spring;
- We do the same with the spring of the second pad;
- Remove the spacer bar;
- Disconnect the handbrake rod from the cable;
- We note to ourselves or sketch how the connection to the rod is made;
- Unhook the spring, remove the cotter pin, and disconnect the brake pad.
Thus, the disassembly process is completed.
Replacement
In principle, assembly occurs in the reverse order, although there are some peculiarities:
- To achieve normal brake fluid pressure, in the future, it is necessary to drive the piston of the brake cylinder inside;
- Connect the handbrake rod and the block, be sure to insert the cotter pin;
- Connect the guide spring to the brake pad;
- Connect the cable to the handbrake rod;
- Connect the upper spring to the installed new block;
- You need to rest the second shoe on the heel of the brake cylinder and pull its lower edge. The spring is tensioned, the bar can be inserted;
- All that remains is to insert the second block and place it in the slot of the bar;
- Using pliers, engage the spring with the second block;
- After making sure that the cable does not get affected by the movement of the parts that make up the brake mechanism, it is necessary to install the brake drum in place;
- All that remains is to tighten the guide bolts, then install the wheel.
We do the same with the other wheel.
Test methods
The actual chemical composition of cast iron brake pads for cars and locomotives is determined according to GOST 22536.0 and a number of other interstate standards.
To assess the correct execution of the mating points of the hole for the bracket and the fit of the shoe to the back, templates are used - pass-through and a rectangular prism. Control of contact of the reference sample is carried out using probes. Linear defects are measured with a standard caliper.
The strength test of the backrest is carried out under pressure - the finished product is subjected to a force of 30 tf (300 kN). Under a load of 30 kN, with a ten-millimeter ball, find the hardness (on the Brinell scale) - according to GOST standards 27208, 9012, 23677.
To determine the microstructure, one should be guided by the provisions of interstate standard 3443. The actual mass can be calculated with an error of ± 0.2 kg.
Adjusting the pressure
First, you need to adjust the parking brake. This device always requires adjustment after repair work.
Secondly, the rear brakes are adjusted so that the system locks the rear wheels a little later than the front ones.
Knowing the structure of the brakes, loosen the bolt securing the pressure regulator, using a screwdriver, move the bracket of the regulator drive lever to create a gap of about 2 mm between the lever and its spring.
We carry out a test - we accelerate the car to 40 kilometers, then sharply brake. Someone observing the process from the outside notes whether the wheels are locked correctly. If the front wheels lock later than the rear ones, then the adjuster must be moved in the direction of decreasing the gap. Then test again until correct wheel locking is achieved.
Replacing the rear brake pads of a VAZ 2110. Step-by-step instructions
Minimum permissible thickness of friction linings for VAZ 2110 brake pads
-1.5 mm. Replace the pads in the following cases:
- the thickness of the friction linings is less than the permissible value;
-the surface of the linings is oily;
-friction lining
not firmly connected to the base;
- deep grooves and chips have formed on the linings.
You will need: a 12" wrench, a flat-blade screwdriver, a mounting spatula, a hammer, pliers or a bit for removing the tension springs.
1. Engage first gear and install thrust blocks under the front wheels.
2. Make sure that the parking brake lever is lowered all the way down (the car is released).
3.Remove the wheel and clean the brake mechanism from dirt.
4.If the brake fluid level in the master cylinder
is at the “MAX” mark or is approaching it, pump out some of the liquid from the reservoir. Otherwise, when replacing the pads, it may splash out.
5.Remove the brake drum.
6.Remove the upper tension spring with a punch or pliers.
7.Remove the lower tension spring in the same way.
8.Remove the front pad guide spring and then the front pad.
9.Remove the expansion bar.
10.Remove the rear shoe guide spring and then the rear shoe by disconnecting the drive arm from the parking brake cable end.
11.Remove the cotter pin and the support washer from the pin of the rear shoe
.
12.Press the pin and remove the drive lever from the block. Remove your finger from the block.
Diagnosis of brake drum problems
If, during a preliminary inspection, such stains are found on the working surface of the brake drums, which are interspersed with small cracks, small and shallow grooves and grooves, then to preserve the pads there is only one way out, to prevent their rapid abrasion and for the safety of movement on the car, it is necessary to remove the products and their processing on a grinding machine.
If such artificial "sinks" are of sufficient depth and cannot be removed by sanding, the brake drums must be replaced with new products. When preparing a repair job to replace these rear suspension components, brake drums should be purchased early so that they can be replaced without delay later.
When purchasing a VAZ 2110 brake drum, the price of which varies both in the materials of manufacture and in the brands of the manufacturer of spare parts and mechanisms, car owners have to make the right choice.
There are certain requirements regarding the condition and size of brake drums that must be met. Therefore, the maximum permissible diameter of the brake drum cannot be more than 201.5 mm, and the nominal value is 200 mm. The requirements for the condition of the surface mating with the brake pads are as follows: it must be mirror-like, without scratches and cracks, external and internal cavities.
If cavities and cracks are detected, it is necessary to replace the brake drums in such a condition that their operation is not recommended.
Car enthusiasts are often asked to imagine the best brake drums for installation in the "top ten". The issue is quite controversial, so we will bring the facts to the attention of motorists. Standard VAZ 2110 brake drums have the nomenclature classification 2108-3502070 and are made of aluminum alloys. There are no special complaints about them, they meet all road safety requirements, but they are trying to compete with cast iron brake drums, which are so popular on the European continent. Their distinctive features are greater strength and significantly greater weight.
Let's move on to the independent experts who appeared under the auspices of the Za Rulem magazine more than 10 years ago. A comparative analysis of cast iron and aluminum brake drums was carried out, during which the configuration, balance, mass, reaction of the metal from which the products were made to an increase in temperature, as well as the static stiffness of the test part were assessed, with respect to.
During the tests, a comparison was made between cast iron brake drums from the West German company ATE and similar aluminum products from the Russian company. The results are as follows: cast iron brake drums weigh more than twice as much as domestic aluminum ones (5.02-2.42 kg). If the suspension weight is light (installation of light aluminum alloy wheels, tubeless tires), there is no point in installing cast iron brake drums.
In other respects, there are also no advantages of cast iron parts. The undeniable advantage of such brake drums is their increased strength, which gives practically nothing to such products.
We change the rear brake pads on a VAZ-2110 and choose which ones are better
The load on the rear brakes during braking is much less than on the front . However, this does not eliminate the need to monitor the rear brake mechanism. The VAZ tenth family is no exception. Replacement of rear brake pads on a VAZ-2110 is carried out as they wear out , and when, how and which pads are best to choose, we’ll figure it out together.
Prologue
No matter how much you complain about the financial crisis, it won’t make it any easier. There's a frog from a children's fairy tale - he fell into a jar of sour cream, fluttered and fluttered, knocked over a piece of butter, and got out. The moral is simple: you have to work!
No one will argue with this. But everyone “knocks down” the “saving oil” in their own way... Including manufacturers of auto components, in particular brake pads. This is where the fairy tale ends. Then there are only facts, figures and conclusions.
The editors have at their disposal a “Report on research of disc brake pads from <…> companies for compliance with technical requirements for their sale on the Russian spare parts market.”
We intentionally omit trademarks. We will explain why at the end of the article. Let's leave behind the scenes the country where these pads came from. Let's limit ourselves to the laconic: our closest neighbor. And we denote the blocks from the nearest neighbor as “Block B”, “Block D”, “Block T”.
Now let’s reveal the report issued in 2014. His competence is beyond doubt. The document was prepared by a manufacturer that supplies disc brake pads to conveyors and service centers in Russia and other countries and includes testing carried out by responsible and qualified specialists using modern equipment and modern methods. For the sake of brevity, we will simply refer to them as Testers.
Rice. 1. Appearance of the “Block T” sample after testing the strength of the connection between the friction lining and the frame
Sometimes we will be forced to switch to a formal presentation style - as in a report. Especially when it comes to methods and equipment. Perhaps these fragments will seem dry and boring. But in this case, protocol clarity is more important than literary delights.
When to change the rear brake pads on a VAZ-2110
According to technical regulations, replacement of the rear pads should be carried out when the thickness of the friction linings approaches the critical level of 1.5–2 mm.
It is impossible to measure the thickness of the linings without disassembling the brake mechanism, but in this case the handbrake will help. If, when tightening the handbrake, the equalizer nut rests against the end of the rod, but the wheels are still far from being completely locked, and the wheels are not blocked when the handbrake is fully tightened, most likely the pads have worn out to the limit.
Knocks and squeaks
In addition, knocking in the rear brake mechanisms, squeaking when braking, contact with brake fluid or oil on the lining, chips and cracks on the surface, as well as jamming of one of the wheels due to a torn lining will force us to replace the pads.
Tool
For work, it is most convenient to use a lift or inspection hole, since some operations must be (or more convenient) performed from under the machine.
For our work we will need the following set of tools:
- plumber's hammer;
- rubber straightening hammer or wooden spacer;
- steel rod with a hook at the end for removing and installing springs;
- mount;
- standard set of tools and penetrating lubricant.
Essential tool for replacing pads.
Work algorithm
If you have all this at hand, including new pads, let's get to work:
- We put the car on a lift or inspection hole and remove the wheel bolts.
- We hang one side on a jack if we are working in a pit.
- We remove the wheel.
Jack up part of the body and remove the wheel.
Using a 12mm wrench, unscrew the two guide pins and remove the drum.
But if it doesn’t give in, we go down under the car and tap the perimeter of the drum with a rubber or wooden hammer. If it doesn’t work, generously apply penetrating lubricant to the place where the drum fits on the hub, wait 5–10 minutes and repeat the procedure. You can take a heavier hammer, but you can’t hit it directly on the drum, it will crack. We hit it through a wooden spacer, turning it evenly.
Remove the expansion bar.
Having disconnected the guide spring from the rear brake pad, we remove the manual brake pad drive lever from the cable end.
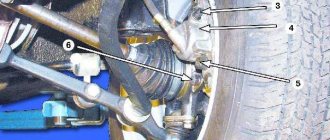
We inspect the pads and brake mechanism for damage, leaks, etc.
After dismantling
After dismantling, we thoroughly clean and check the condition of the brake mechanism, boots and working cylinder.
Pay attention to the condition of the brake cylinder and boots.
- We look at the brake fluid level; if the reservoir is full, we take a small amount with a syringe.
- We remove the handbrake drive lever from the old block and install it on the new one.
Installation of new pads is carried out in the reverse order , but during installation it is necessary to recess the pistons of the working cylinder as much as possible. This can be done with a pry bar, resting it against the side of the brake flap and a new pad. Don’t forget to adjust the tension of the handbrake cable after installation.
Video about replacing the rear brake pads of a VAZ-2110
How to choose
When replacing, it is important to install high-quality brake pads that are fully compatible with your car. To do this, you can ask for help at a service station or a spare parts store. Today there is a good selection in different price categories, from the original to alternative manufacturers. In general, please pay attention to the following points before installation:
- The friction material has a uniform color and does not contain foreign inclusions;
- The surface is smooth without defects or defects (small chips along the edges are allowed);
- The surface where the friction material is attached to the metal has no cracks.
We also do not recommend basing your choice on price alone, as it may be due to low-quality friction material, which will lead to rapid abrasion.