Interior tuning
Author: Vladislav12.06.201513.06.2015
The instrument panel is an integral part of any car. Thanks to it, the motorist can quickly find his way on the road.
The instruments on the panel indicate the important characteristics of the vehicle’s movement, which determine the driver’s safety and comfort behind the wheel.
Instruments must have good lighting.
The appearance of the panel plays an important role, since it is always in front of the driver. It requires constant care, regardless of whether the car is new or not.
The standard dashboard of the VAZ 2110 is quite simple and laconic, but most car owners prefer something ultra-modern and attractive. The only way to solve this situation is to replace the instrument panel. To do this, you need to find a device that you can install yourself without using special tools.
The main tools that should be on hand when replacing the panel are:
- pliers;
- crosshead screwdriver;
- attention, patience and skillful hands.
It should be noted that the choice of instrument panels for the VAZ 2110 is quite wide. Based on the price factor, everyone can also find a suitable option. Even modern panel devices with digital instruments can be purchased at reasonable prices. It is quite possible to buy this device on the auto parts market, in online stores, and it is also quite likely to find a good option on message boards.
Modernization will not take much time
The process of upgrading a panel device does not take too much time. All that needs to be done is dismantling and installing it. Before upgrading, the device must be removed. The main steps are indicated in the car repair and operation manual.
- Illumination of buttons on the VAZ 2110 panel
- Installing tweeters in the dashboard of a VAZ 2110
- Stylish and modern overlay
- Soundproofing panel VAZ 2110
Vibrant variety of colors
Current fashion trends regarding the replacement of panel devices are gaining popularity . Almost every car has neon lighting or internal LED illumination. It should be noted that such innovations are not a cheap pleasure and are not available to everyone.
As for replacing the factory backlight with a multi-colored version, there are no obvious obstacles and this can be done with your own hands. The first thing to start with is to disassemble the instrument panel. Then remove the protective glass and arrows. After this, it is necessary to remove the layer of paint from the back side of the substrate, which serves as a light filter and provides the color design of the instrument numbers. Acetone or any other liquid containing alcohol is perfect for this.
You can replace the backlight yourself
Next, let's pay attention to the color of the backlight. Let's start with the odometer. First of all, you need to dismantle the device screen and then remove the film and the backlight. It can be replaced with a universal LED that changes colors. We attach it to the socket of a standard light bulb and then attach the odometer screen back.
To begin a full replacement of the backlight, you need to connect the LEDs to the dashboard frame.
They can be purchased in a set with a special color switch.
Now all that remains is to install the light elements in place and connect them to the standard backlight contacts of the panel device.
The next step is to ensure that the hands also have multi-colored backlighting. In this case, you need to remove the paint from them and then cover them with ordinary white nail polish. This color better conveys the color saturation of LEDs.
At the final stage, it is necessary to secure the light-emitting diode color switch, preferably in the lower right area of the panel device. In the end, all that remains is to install everything in its place. First, the substrate is mounted, and then the arrows and protective glass.
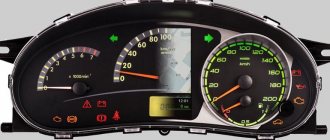
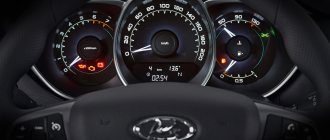
Description and location of indicators and instruments on the panel
Let's start with a description and designation of the instrument panel icons and symbols in 21102:
- Engine coolant temperature controller; this sensor determines the temperature of the engine as a whole. Thanks to the device, it is possible to promptly detect overheating of the power unit.
- Tachometer. This controller is designed to display crankshaft speed readings.
- The left turn signal indicator always flashes when the turn is turned on.
- Left right turn signal. Icons numbered 3 and 4 blink synchronously when the light alarm is turned on.
- Speedometer. Thanks to the speedometer, the driver can know how fast his car is moving.
- A controller for the volume of remaining fuel in the tank, which helps the driver navigate when to refuel. If there are about 5-7 liters of fuel left in the tank, a yellow indicator in the form of a gas pump will light up next to the sensor. Do not operate a car with a yellow light on regularly, as this can lead to failure of the fuel pump.
- The gas station indicator, which we described above.
- Light symbol for turning on the side lights.
- The brake system performance symbol appears on the instrument panel when the engine is running if there is not enough brake fluid in the expansion tank. The problem may be due to a leak.
- High beam activation icon.
- Clock setting regulator with switch. Can be used to switch between daily and total mileage data.
- At the bottom of the instrument cluster there is a small screen that displays data on the vehicle's kilometers traveled.
- A light bulb that lights up when the light alarm is activated.
- Check Engine symbol. Its appearance indicates that the control unit has detected a problem with the motor. It is advisable to turn off the power unit and identify the breakdown, which is often caused by the inoperability of auxiliary sensors.
- Clock screen. When the regulator is switched, it may display data on the outside air temperature if such a sensor is installed.
- This instrument lamp indicates a detected malfunction in the battery charging system. The cause may be a loose, worn or broken generator set drive belt. It may also indicate a malfunction of the unit itself, damage to the power circuit and other problems in its operation.
- Handbrake activation icon.
- The symbol in the form of an oil can indicates an insufficient level of engine fluid pressure in the internal combustion engine. When it appears, you need to turn off the car engine and find the cause, which is usually an oil leak from the system.
- The air damper icon is placed only on carburetor engines (the author of the video is the In the Garage channel).
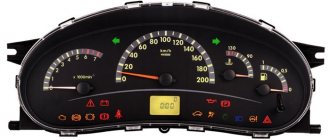
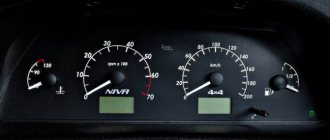
Features of the old and new dashboard
Over the decades of production of the VAZ 2110, the dashboard has undergone certain changes. Therefore, devices can be divided into two groups - devices of the old and new models. It should be noted that these dashboards are not interchangeable, since they have different electrical connection diagrams, as well as designs of the central console in the cars. Moreover, both types of devices are characterized by different shapes, but as for the location of sensors and indicators, in fact it is almost the same.
Over time, devices began to be equipped with backlight brightness controls. In addition, digital odometers (mileage meters) were not used on old-style dashboards; they began to be installed much later. At first, the odometer was mechanical (author - proVAZ-2110 channel).
Illumination of buttons on the VAZ 2110 panel
When upgrading a VAZ 2110 panel device, in addition to illuminating the instruments, you can give a sophisticated look to the panel buttons. For example, consider the option of installing a backlight for a button designed to switch the rear fog lamp. To do this we need to remove it and disassemble it. Having access to the incandescent lamp, it must be removed and completely removed using tweezers. Then everything depends on imagination. For example, you can install an LED lamp of absolutely any color.
To install it, it is important to know that contact No. 6 is positive, and No. 7 is negative. The polarity is indicated on the back of the button housing.
Now we will insert the block with wires and check the operation of the backlight. If everything works properly, we can move on to the assembly stage.
Illuminated buttons look more sophisticated
Dashboard - Priora device
When choosing the most suitable car model, you should not only pay attention to the availability of various additional options, but also evaluate the dashboard with the main indicators of the car’s condition. This is especially attractive for VAZ fans who have tried more than one generation of this product. If we consider the dashboard, the Priora, for example, is expectedly similar, but also noticeably different from the early versions of the VAZ. For example, Priora has a completely different torpedo, and there are no keys on its visor. Speaking about the same device at VAZ, it is worth noting that there are large keys at the edges of the dashboard, which are especially popular for Audi, Land Rover and Citroen models.
If you look at it from the point of view of ergonomics, then this idea is not bad, however, this option is rather inconvenient, since the steering wheel overlaps the indicators on the keys. The Priora has the following controls on the panel: a switch (designed for outdoor lighting, it can occupy 3 positions), an instrument lighting regulator that changes their brightness when the outdoor lighting is on, a headlight range control regulator and a rear fog lamp switch. In order to turn on the sound signal, you must press the right or left button on the steering wheel, where there is always a corresponding symbol.
Installing tweeters in the dashboard of a VAZ 2110
A great addition to a panel device would be a tweeter (tweeter). During its installation, the main problem that may arise is related to drilling holes, since the windshield does not allow this to be done at a right angle. Considering that there is a durable metal plate under the plastic shell, you can’t do without a drill in this case. Therefore, it is necessary to prepare a paper template or stencil in advance. Now take a drill and drill in the marked area. We can correct uneven edges of holes by using a special drill attachment.
It is important to consider that the hole must be made at a sufficient distance from the panel instruments. It is also important to note that there are wires and brackets underneath the metal plate.
We install the tweeter; it should fit tightly into the resulting hole. If it is slightly larger, the free area can be sealed using sealant. We will fasten the wires from the device being installed along the edges of the air duct. This element of the acoustic system will provide high-quality and complete sound.
Tuning seats VAZ 2107
Unlike earlier VAZ Seven models, the factory was equipped with anatomically shaped seats and headrests connected to the backrest. The front seats of the VAZ 2107 are quite fragile and quickly fail - the frame breaks, the backrests warp, and the upholstery wears off.
On our “seven” the seats were exactly like this: wobbly and creaky. The adjustment mechanism also constantly jammed - before adjusting it to suit you, you had to spend a lot of effort.
The easiest way to tune seats is to install covers. Covers for VAZs are sold in almost any auto store; custom-tailoring is also possible.
Seat trim for VAZ 2107
After upholstering the seats, the interior of the car becomes very attractive. For this you can use:
Natural leather is undoubtedly the most durable. But as you know, this is a very expensive material, and in hot weather it is uncomfortable to sit on leather seats. The most budget-friendly and fairly reliable upholstery is made from Alcantara and velor. Therefore, these materials are most widely used among car enthusiasts.
Based on the purpose of tuning and financial capabilities, you can do a complete reupholstery of the interior, including the ceiling, door trim, sun visors, steering wheel, and dashboard.
After you decide on the type of material, you need to choose its color. Traditionally, seat upholstery is made in the same color as the interior upholstery, but a harmonious combination of different shades can make the car interior more original and attractive.
Video: self-upholstery of VAZ 2107 seats
Changing seat mountings
When installing non-original seats on the “seven”, a situation may arise that the seats do not fit the mounts. In this case, you will have to resort to welding.
Experts believe that any seats that fit the dimensions can be installed on the “seven”. However, changing their mounting is a very labor-intensive job, so if possible, it is better to choose seats that do not require welding for installation.
Anyone who has ever driven a classic remembers well and knows which seats are in the front. In my case, taking into account the fact that the car is 20 years old, the seats have become unsuitable for use. After some thought, I decided to take a more complicated and expensive route, namely installing seats from a used foreign car. In general, I ended up taking it from the Passat, but only the front ones. In general, when I bought the chairs, I basically knew that the fastenings of the vv and the vase were different and very, very different. As you already understood, there were problems with this. We thought for a long time about how to get out of the situation and came to the conclusion that we needed to make some kind of swap of the sleds from the old chairs with new seats. In general, we started by completely cutting off the stand, the one near the tunnel, and making a new one in order to achieve the same level as the one near the door. When I brought them to the chairs, there were ears for fastening wheels for the sled, but they were too long (to be installed to the floor) and I had to cut them off and sacrifice the driver’s seat elevator mechanism. It’s unpleasant, of course, but what can you do?
RyslanZinchenko
https://www.drive2.ru/c/288230376152277729/
Installation of seats from another car on a VAZ 2107
Seat covers are a great tuning option, but if they are already loose, they will have to be replaced. On the “seven” you can install both new original seats and seats from foreign cars. Seats from a 1996 Mercedes W210 and a 1993 Toyota Corolla are suitable. Seats from SKODA and Fiat are suitable, but to install them you will need to make two additional holes.
In addition to the above, Peugeot and Nissan seats are used, but they do not match and require modification of the fastening. The seats from Volkswagen fit almost without modifications, but they are too high for the VAZ 2107, therefore, despite the increased comfort, installing them is not recommended.
Replacing seats is considered a change to the design of the vehicle and, in accordance with Russian legislation, requires mandatory registration with the State Traffic Safety Inspectorate.
Stylish and modern overlay
Often the standard panel quickly gets boring. Therefore, many car owners decide to purchase a new panel device. However, this option is quite expensive. An excellent alternative is the economical option of tuning the panel yourself by purchasing an overlay.
In specialized online stores there is a large selection of linings, among which you can find a suitable option at very reasonable prices.
A stylish trim will freshen up your dashboard at no extra cost.
What you will need:
- Leather substitute or leather, a piece of at least 2x2 meters.
- Hot melt adhesive or other suitable adhesive for leatherette and leather, for example, Kleiberit.
- Construction hairdryer.
- Brushes and knife.
Of course, covering a dashboard with genuine leather is very expensive, but it is resistant to mechanical damage and has a more presentable appearance than other materials. But you can also make tuning of the dashboard using artificial coatings. The main thing is to choose the right color and texture so that the car looks stylish and not like a gypsy car. The ideal option would be leatherette. It is easy to work with and has a fairly wide selection of colors.
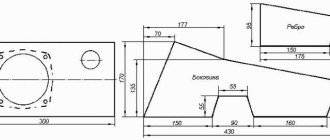
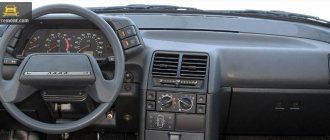
Description of the torpedo on the VAZ 2105
The front panel is a metal frame covered with polyurethane foam and a special film, mounted in the front part of the cabin. The product contains an instrument cluster, radio panel, glove box and shelf, air ducts, levers and switches.
What kind of front panel can be installed instead of the standard one?
The torpedo of the VAZ “five” today does not look very beautiful: angular shapes, minimal instrumentation, black and not very high-quality finishing material, which cracks and warps over time. For this reason, many owners seek to improve the interior and functionality of their car by installing panels from other cars. On the VAZ 2105, with some modifications, you can install a torpedo from the following cars:
- VAZ 2105–07;
- VAZ 2108–09;
- VAZ 2110;
- BMW 325;
- Ford Sierra;
- Opel Kadett E;
- Opel Vectra A.
Before installing a particular front panel, you should evaluate whether it is suitable in size, what modifications are required, and how to make the connection.
How to remove a torpedo
The need to dismantle the panel may be due to various reasons:
The tools you will need are a Phillips and slotted screwdriver, as well as a 10mm wrench or socket. The dismantling process is performed as follows:
- We de-energize the on-board network.
- Unscrew the screws securing the plastic steering shaft linings and remove them.
- We dismantle the instrument panel.
- Unscrew the fasteners and remove the shelf.
Installation and repair instructions
View after dismantling the panel
Replacing the panel, especially if you are installing it on an old VAZ 2112, is a certain difficulty. Older machines do not have some of the functions for which the panel has buttons. The wiring may need to be worked on.
Tools and materials
Standard tools will be required.
But a certain amount of additional materials is needed:
- you will need plugs for extra buttons that are not needed on an old car;
- air duct;
- various inserts, buttons (5 pieces) and pads;
- a new wiring harness suitable for the wiring diagram;
- brackets for mounting the instrument panel;
Algorithm of actions
The shield is fully installed.
First you need to remove the old panel. This is done in the same way as on other models of VAZ cars.
When installing, you need to replace the ignition switch with a decimal or Kalinovsky one, depending on how many terminals there are on the block to the lock. You can leave the old one and rearrange the wires, but the new one will work and look better.
The instrument panel wiring needs to be replaced. Also, connect the dimensions with additional two wires in Ш4/13 and Ш3/13 on the mounting block. This applies to older units with 11 relay spaces.
Depending on whether it is an injector or a carburetor, the connection has its own nuances. If you bought a solid factory panel, then instructions should be included with it. Briefly, it can be noted that the injector is not equipped with a speed sensor, please take this into account when installing.
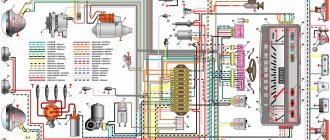
The car's electrical circuit can be of great help. If it is not there, you can find it on the Internet. There are some differences between the VAZ 21124, 2111 and other car variants, so find yours.
If the instrument panel does not work after turning it on, check that the wiring is connected correctly - this is usually the error.
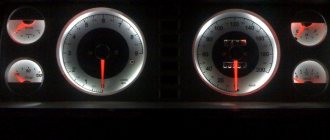
Backlight
LEDs are now commonly used. The beauty of them is that installation is very simple and quick. Plus, there are quite a few colors available. Choosing one of them that best matches the interior design or body paint will allow you to turn your “seven” into a real masterpiece.
As a rule, it is enough to install only a dozen diodes on one panel to radically modernize its appearance. They are connected to each other by a loop of wires. Additionally, they are matted with fine sandpaper - without this operation they will burn too brightly.
Optimal location:
- four pieces in the corners of the dimensional devices;
- one diode for two small sensors;
- the rest is your choice.