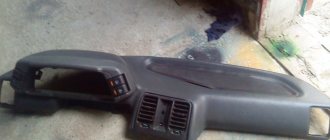
Installation of the dashboard on a VAZ 2110
The dashboard of the VAZ 2110 car is designed to display information about the current condition of the car. Made from regular quality plastic. Having a large number of light bulbs means that sometimes you need to replace them. Many drivers want to replace the nondescript factory panel of the VAZ 2110 with a more modern one. The article suggests learning how to replace the dashboard bulbs of a VAZ 2110 and how to make it more aesthetically pleasing.
How many light bulbs are there in the dashboard of a VAZ-2110
Car : VAZ-2110. Asks : atom. The essence of the question : how many backlight bulbs TOTAL are there in the dashboard of a VAZ-2110?
Good afternoon, I will re-light the instrument panel.
Tell me what type of light bulbs are in the instrument panel and how many of them you need to buy. I want to take diode ones, which one is better?
Reasons why the PP stopped working
It is its malfunction that often causes the shield to fail. The fact is that many car owners turn on various devices through the cigarette lighter, for example, a special vacuum cleaner, chargers, pumps and other devices. Due to the fact that these gadgets require high current, either the socket itself or fuse F19 often breaks, as a result of which the instrument panel on the VAZ-2110 does not work.
In addition, the cigarette lighter may become damaged if left on for too long. In this case, you can return the instrument panel to functionality by disconnecting the socket block. But it is worth saying that such manipulation will be successful only if fuse F19 is functioning. If it does burn out, it must be replaced.
In fact, there are not so many of them and the most common are:
- The easiest one is poor contact between the panel and the electronic control unit. The problem is solved by replacing the plug or simply cleaning the contacts.
- A breakdown in the instrument panel itself or malfunctions. To solve the problem, all connectors are reconnected, taking into account the correct connection diagram.
- Malfunctions of the tachometer, speedometer, fuel level controller. In this case, the cause is mechanical or electrical. To troubleshoot problems, replace regulators or check the operation of fuses.
- The illumination of the VAZ-1215 software stopped working. In this situation, it is necessary to find out the cause of the problem.
To check, you must turn on the hazard signal or turn signal. If they don't work, it means the fuse has blown. Therefore, we can conclude that a short circuit has occurred. To fix the problem, check the electrical circuit.
DETAILS: Alternator pulley VAZ 2114 - All about Lada VAZ cars
However, it also happens that the fuse is intact and in working condition, but the instrument panel on a VAZ-2115 car stops working. Here the reason is much more difficult to find out. The solution to the problem is to remove the instrument panel and check whether voltage is flowing from this fuse to the terminals of the white and red blocks. The white block supplies power to the speedometer, tachometer, and temperature gauge. And the red one is the fuel gauge.
If, as a result of checking, the terminals show a voltage of 12 V, then this indicates that the PCB does not work as a result of poor contact of the wire that goes to the ground of the car. If the voltage of 12 V is not reflected at the terminals, then it is necessary to disassemble the mounting block and look for the cause of the problem.
Types of lamps in the instrument panel on the VAZ-2110
The lighting located on the instrument panel, as well as indicators that demonstrate the status of various units on the VAZ-2110, is carried out using incandescent lamps ( in stock ). Over time, they burn out - we had a case when almost all the lamps burned out. We also replaced them with LED bulbs.
- 12V 1.2W incandescent lamps are used .
- Installation is carried out in cartridge W1.2W .
Number of lamps = 17.
When replacing, you can update both the incandescent lamps separately and with the socket. To replace a complete set for backlighting and indicators, you will need to purchase 17 incandescent lamps with the previously specified characteristics.
Indication symbols
As you know, all the lights on the control panel come on when the ignition is turned on, and then, when the engine is already running, most of them go out. But when one remains on or blinks, this cannot but be alarming, because not everyone can immediately figure out what malfunctions this indicates, which of the systems needs urgent repairs.
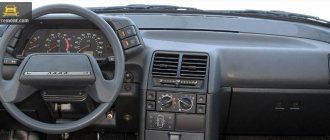
Let's look at the designations of the instrument panel of the VAZ 2110. You should know that regardless of whether the panel is new or old on your car, the designations are almost the same, but the indicators may be located slightly differently.
The VAZ 2112 instrument panel does not work - reasons
If the panel suddenly stops working:
- When the engine does not start and the dash does not work, inspect the ignition switch. Here the contact often burns out or oxidizes.
- If the machine is working and the panel has failed, you will need to check the corresponding fuse, wiring and lines.
- If the manipulations do not help, you will need to remove the device and test its circuits.
Panel backlight does not light up
There may be damage to the light activation key. It is recommended to check the corresponding fuse.
The panel is blinking
Consequence of deterioration of electrical wiring contacts. The user should inspect the supply wires for cracking or damaged insulation. The contact groups should be disconnected and cleaned of oxides and dirt. Treat the terminals with special oil.
Tidy 2112 stuck
This kind of problem is unexpected, but it occurs everywhere. As a repair, users are suggested to reset the electronic equipment. Remove the terminals from the battery and wait 15 minutes.
Top part
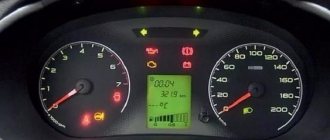
So let's start from left to right. First, the top part of the control panel:
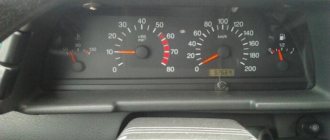
- Side scale from 50 to 130 and arrow. Shows the temperature of antifreeze (antifreeze) in the engine cooling system;
- Almost round scale (0 – 80) and arrow. Tachometer showing engine speed;
- Two arrows at the top, almost in the middle of the control panel - turn signals (right, left);
- Speedometer. Well, this device, probably everyone knows, shows the speed at which the car is moving;
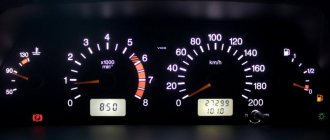
- A side scale with an arrow and, most often, two images of a filling column (white and red). Instead of a red column there may be a yellow light. This is an indicator of the fuel level in the tank. If the red column (yellow light) lights up, it means that there is very little fuel left in the tank - no more than 7 liters, urgent refueling is required.
Bottom part
Let's look at the indicators at the bottom of the control panel. If they don’t light up, it means the machine is working normally, and when any of them lights up, this indicates a malfunction in certain components. Most often, this is a signal that repairs are needed, and the sooner the better. From left to right:
- The indicator on the far left at the bottom is the air damper light (if you have a carburetor engine);
- Icon in the form of an oil can. If this light comes on, it means there is insufficient oil pressure in the engine. An alarming signal. You need to stop, find the reason;
- A round icon with the letter P inside on the control panel indicates that you have the parking brake on, which, as you know, should be turned off when moving away;
- Indicator of a fault related to the generator or battery (a symbolic image of the battery is shown on the indicator). Perhaps the battery is not charging from the generator, there is an open circuit, or the generator belt is loose or broken. In any case, your intervention and repairs are needed, otherwise troubles cannot be avoided;
- If the engine is running and the Check Engine indicator is on on the control panel, this is the most unpleasant thing for the driver, since it indicates serious malfunctions in the engine. In general, when this indicator lights up, it is recommended to stop driving and turn off the engine. Most likely it needs repairs;
- Typically there is a red triangle above the Check Engine. It lights up when the “hazard light” is on - an emergency signal sign;
- The headlight light indicates that the high beam is on. Designed to control headlights: when an oncoming car appears, do not forget to switch to low beam;
- A very important indication icon on the front panel (in a red circle) is a signal that there is not enough brake fluid. Perhaps it is leaking somewhere, which it is advisable to find out as soon as possible and, if necessary, carry out urgent repairs and replenish the level;
- The icon of a burning light is a control for turning on the dimensions;
- In addition to the indicated lights, the front control panel has time indicators (and a button for setting hours and minutes) as well as a display that shows the total and daily mileage. On the new panel, this display may be narrow.
How to assemble and disassemble the panel
To reset the speedometer or fix the problem that the turn signal light on the dashboard is not blinking, it must be removed.
To this end, you should perform the following actions:
- You can remove the cover, but the board will still be locked.
- You need to take a Phillips screwdriver and use it to remove a few more bolts.
- Now you need to unlatch the latches on the panel. You should start from the bottom. If they were disconnected from the bottom side, then you can push them up. This way the fee will be removed quickly.
- The arrows will have to be removed anyway.
Note: some arrows are easy to remove, but the arrows for the gasoline quantity indicator are much more difficult to remove. To remove the arrows, you need to gently pull them.
The panel is disassembled, now we need to try to solve the problem.
Note: There are very small LEDs on the board that can also burn out. Because of them, the turn signal light may not blink, so they need to be replaced.
This requires working with a soldering iron.
But if the panel was disassembled in order to reset the speedometer readings, then:
Now it is advisable to somehow put the panel back together.
This is made even easier:
Place the board in a plastic case.
Note: It is advisable to have a clean cloth underneath to prevent the surface from being scratched.
- Now you need to screw in the bolts on the panel itself. They do not need to be completely screwed in yet, as the arrows must be put in place first.
- Before putting the hands back in place, they need to be wiped thoroughly, as fingerprints, dirt, etc. will be visible when exposed to light.
Note: the arrows need to be set approximately 3-4 mm below zero
It is also important that there is a small gap between the needles and the speedometer, otherwise they will stick
It is much easier to install, as well as remove, long arrows. To install short arrows, you need to act very carefully, as they are more delicate compared to long ones.
- Before installing the glass, it also needs to be wiped. Now snap onto the latches.
- Secure the board with bolts.
- Lastly, screw in the screws on the cover, and then put all the light bulbs in place.
Working with a panel in a car is probably the simplest thing it can be. Therefore, there is no point in going to a car service center, where the price even for such trivial work will be high.
It’s better to look through a bunch of photos and videos before you decide to do repairs and tuning of the car’s interior with your own hands, so as not to harm the car. Any instructions will help you get the job done quickly and efficiently.
Welcome! Instrument cluster - on many cars, instrument clusters differ from each other, in some not significantly, and in others it is radically changed, but the filling in almost all remains the same, they just differ in appearance and the lights and indicators are the same , but the combination is subject to deformation and can easily be damaged, and therefore, if you take some old cars, on every second car, the combination has already changed, despite this combination is a very important thing, because if something happens to the engine, then combinations You can only determine this, you can find out the speed at which the car is moving, and you can also find out how much fuel is left in the tank without looking into the tank just by looking at the instrument cluster.
Note! To remove and install the combination, you will need: A screwdriver and pliers, if you have a standard torpedo, then you will do the work quite quickly and most likely no difficulties will even arise!
When should you change the instrument cluster? If it stops working, there is no need to panic and go to the auto store for a new combination; first of all, check the fuse that goes to it and, if necessary, replace it with a new one; if it turns out that everything is fine with it, but the combination does not work at all, then we can assume that it has failed if some specific indicator in the combination has failed (Speedometer, for example, does not work), then in this case, perhaps the problem is not in the combination, but in the speed sensor, for example (Read the article: “Replacing the speed sensor with car"), if the fuel gauge does not work, then look at the fuel level sensor, in common parlance “FLS” (Read the article: “Replacing the FLS in a car”) or the wiring, and so on.
Additional panel
The additional front panel of the new-style BSK control has indicators:
- An oil can is shown. If the light works, check the oil level;
- An icon lights up, which, with some imagination, can be “identified” as working wipers. This indicates that there is not enough windshield washer fluid in the tank;
- Conventional image of a thermometer over a container with liquid - high temperature of antifreeze;
- A crossed out light, which the arrow points to, is a sign that the brake light or parking lights are not working;
- If the light with the image of a wheel with brake pads lights up, it is quite possible that the pads are worn out and require replacement;
- The sign of a man with a seat belt indicates that the seat belt should be fastened.
Errors on the dashboard 2112
VAZ cars have always stood out for their ease of operation and maintenance. Regardless of the type of engine, injector or carburetor, here the user can independently perform diagnostics and read errors without additional equipment. Symbols may appear on the instrument panel.
| Number | Meaning |
| 2 | Critical voltage drops have been detected in the on-board network. |
| 3 | The gasoline level sensor is damaged or does not work correctly. |
| 4 | Likewise for the antifreeze temperature sensor. |
| 5 | The outdoor thermometer is faulty. |
| 6 | There is critical engine overheating. You need to stop and let the engine cool. |
| 7 | The oil pressure in the engine is insufficient for normal operation. |
| 8 | The brake expansion tank is empty and needs to be topped up. |
| 9 | The battery is not charging properly. You will need to check the generator and its wiring. |
| E | BC firmware is damaged. |
Most two-digit codes are a combination of two errors.
Removal and modification
Here's a quick look at the device and control panel icons. If for some reason she refuses, don’t immediately panic. Most often, the reason is the absence of contacts in some place in the wiring. But of course, if you wish, you can completely change or tune the panel.
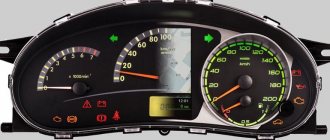
For example, remove the cover and replace the light bulbs with brighter LEDs. Such a panel works brighter and the signals sent by the car will be more noticeable to the driver. If desired, you can install a more solid europanel, which will transform the interior.
- Disconnect the “-” wire from the battery;
- Remove the shield by unscrewing the screws;
- Remove the fastenings of the control panel to the trim, remove the instrument cluster from the socket;
- Remove the glass mask;
- Disconnect the wires from the block;
- Make changes to the instrument panel or replace it with a new one. Reassemble everything in reverse order.
Source
Location of lamps on the dashboard of the VAZ 2110
In order to replace a specific light bulb, you need to clearly know its location. Let's look at the dashboard of a VAZ 2110 car and find out which light bulb is responsible for what.
The purpose and location of the dashboard lights of a VAZ 2110 car, where:
- 1, 5, 7, 8, 12, 15 and 20 – illumination of the pointer instrument system;
- 3 – control of the right direction indicator;
- 4 – control of the left turn signal;
- 9 – emergency low oil pressure;
- 10 – parking brake;
- 11 – the generator is faulty (the battery does not charge);
- 13 – activation of the alarm;
- 14 – malfunction of engine systems;
- 16 – control of turning on the high beam;
- 17 – critically low brake fluid level;
- 18 – control of turning on external lighting (side lights and low beam);
- 19 – critical fuel level sensor (reserve 6-7 l).
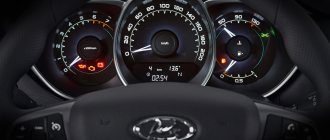
Designation of icons on the dashboard of Lada 2112
| Number in photo | Interpretation of lamps and indicators |
| 1 | Coolant temperature indicator; if the light comes on at the top of the scale, the engine has overheated. |
| 3/4 | The turn signal indicators light up simultaneously when the hazard lights are turned on. |
| 7 | Empty tank indicator; if the lamp lights up, stop at a gas station. |
| 8 | External lighting is turned on and operating normally. |
| 9 | The pressure in the brake system has dropped. It is necessary to immediately add fluid to the expansion tank of the system. |
| 10 | The high beam headlights are activated. |
| 12 | The odometer display shows non-resettable mileage. |
| 13 | The hazard warning lights are on. |
| 14 | The engine control system is damaged or not working correctly. |
| 15 | The battery is not receiving a charge. In this case, you should check the battery itself for wear and the generator set. |
| 16 | The handbrake is activated. |
| 17 | The oil pressure in the engine crankcase has dropped below normal. You should add fluid to the specified level and check the operation of the pump. |
| 18 | In a configuration with an airbag, it indicates that the squib drive is turned off. In other versions the light bulb is a backup one. |
What lamps are installed and how many of them?
The VAZ instrument panel is illuminated and the status of the vehicle’s components is indicated using 12 V 1.2 W incandescent lamps, which are installed in a 2W2 socket. The lamp is easily pulled out of the socket - you just need to pull it with your fingers; it can be purchased either separately or with a socket. In total, 20 lamps are used for lighting and indication in the instrument panel for the VAZ 2110, and they are inexpensive - 5-10 rubles. (at the time of writing) depending on brand (without cartridge).
VAZ car lamp installed in a socket and without it
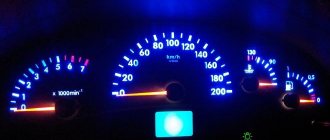
If desired, instead of incandescent lamps, you can install LED ones in the VAZ instrument panel - they are produced for the same voltage with the same standard size and can be either with or without a socket. By the way, in the latest modifications of dozens of VAZs, LED light sources have already been installed.
LED bulbs without socket and with socket for VAZ 2110
Why are LEDs better?
First of all, they have a longer service life (up to 20-30,000 hours instead of 1,000 for incandescent lamps). They are not afraid of vibrations and are 8 times more economical. But you have to pay for all this in the literal sense of the word: LED light bulbs are many times more expensive than their conventional incandescent counterparts. If you consider that there are 20 of them in the VAZ panel, the amount will be considerable.
Be careful with the generator warning lamp; based on feedback from our readers, it is better to replace it only with the same one.
How to remove the tidy
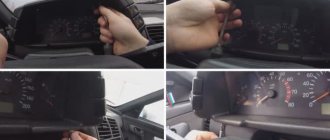
On a VAZ 2110, removing the dashboard from the dashboard is not difficult, and the only tools you need are a Phillips screwdriver and pliers or a wrench. With their help, we will remove the positive terminal from the battery before starting work. So, lower the steering wheel and unscrew the 4 screws that secure the decorative trim.
Releasing the decorative trim on the VAZ 2110
After this, we pull the cover towards ourselves, and it can be easily removed, hanging on the wires of the switches. To prevent the cover from getting in the way, the wires from the switches can be disconnected - they are on the connectors.
Disconnecting wires from switches and removing buttons located on the decorative trim
Before disconnecting the connectors, do not forget to label them so as not to mix them up during assembly!
So, now we have a tidy in front of us, which is held in place by two screws located on the sides.
The instrument panel is secured with two screws
We unscrew them and carefully remove the panel, not forgetting that it is also on the wires. In principle, the wires supplying the instrument console in the VAZ do not need to be disconnected, since their length is sufficient to replace the lamps.
The ten have long enough wires, they allow you to replace light bulbs without disconnecting the connectors
Restoring the backlight and changing the warning lamps
We remove the light bulb that needs to be replaced (the purpose of the light bulbs is in the first photo of the article). To do this, turn the socket counterclockwise 90 degrees, and it will easily come out along with the light bulb.
Replacing a light bulb without disconnecting the power wires on a VAZ 2110
We remove the burnt device from the socket, insert a new one in its place and install the socket with the lamp in place, turning it 90 degrees, but clockwise. After this, we install the terminal on the battery, turn on the ignition and check the operation of the VAZ panel, performing the appropriate manipulations: turn on the hand parking brake, headlights, turn indicators, high beam headlights, etc. If everything is in order, then install the panel and decorative trim in place .
Disassembly and replacement of devices
To replace (repair) devices, you must perform the following actions in a strictly established order:
Unscrew the screws (2 pcs.) that secure the tire. After this, the bus itself must be disconnected from the instrument system board.
Unscrew the screws (7 pcs.) that secure the frame with glass.
It is necessary to remove the frame by disconnecting it from the instrument system.
Unscrew the 2 screws that secure the instrument cluster board.
Disconnect the left light filter, which is marked with warning lamp symbols.
Disconnect the right light filter, which has warning lamp symbols.
Unscrew the screws (2 pieces each) that secure the red and white pads. Then remove these pads.
Unscrew the nuts securing the fuel level sensor, coolant temperature sensor and tachometer. Each device is secured with 3 nuts.
Disconnect the board from the instrument system housing.
Unscrew the screws securing the instrument scale to the body (5 pcs.).
Remove the scale with instruments from the system body.
Very carefully, prying the arrow of the fuel level indicator with a screwdriver, you need to remove it from the axle.
Unscrew the screws (2 pcs.) that secure the fuel level indicator to the scale.
Disconnect the fuel level indicator. Install a new one in its place. When installing the sensor, perform all steps in the reverse order of removal.
Replace the remaining devices in the same manner as described. This is the entire repair of the VAZ 2110 instrument panel. As you can see, there is nothing complicated and there is no need to go to a specialized service center and pay money.
Assembly of the instrument system should be carried out in the reverse order of disassembly. When carrying out this work, it is necessary to take into account that the nuts that secure the tachometer have a different thread.