What does the ignition module consist of?
This is a separate car system that functions normally only if all its elements are in good working order. The main components that it includes:
- Electronic engine control unit (supplies constant voltage to the winding).
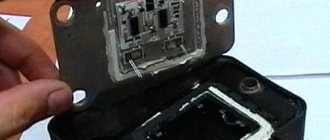
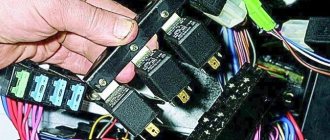
- Two ignition coils and two switches, which are located in a solid plastic case. Thanks to induction, the device generates high voltage. The first coil is responsible for cylinders 1 and 4, the second – for 2 and 3.
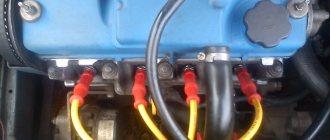
- The current is transmitted through high-voltage wires to the spark plugs. The system also has terminals for connecting the on-board network.
It must be remembered that malfunctions can also be caused by faulty sensors, so they should also be checked if problems arise. To reduce the likelihood of breakdowns, you need to change consumables on time - spark plugs and high-voltage wires, and also inspect all contacts at least once a year.
MH errors
The following errors are associated with the malfunction of the MH:
- P0351 - coil breakage of cylinders 1-4.
- P0352 - cylinder 2-3 coil breakage.
- P3000 (P3001 P3002 P3003 P3004) - multiple misfires.
The faulty module must be replaced (MZ replacement) or repaired (Ignition module repair).
A common cause of this error can be both spark plugs and high-voltage wires - they need to be replaced (How to replace high-voltage wires? How to replace spark plugs?).
Frequent malfunctions on the VAZ 2114 and other models
There are several main signs by which you can determine that the ignition system is not working properly. The most common problems:
- Two cylinders stopped working. Since each coil is responsible for a pair of elements, if it fails, they do not function. The engine stalls, operates with great interruptions, traction is greatly deteriorated, and fuel consumption increases significantly.
- Starting the engine becomes more difficult; you need to turn the starter several times before the car catches on. This is due to a violation of the spark supply to the spark plugs or its absence.
- Power dips may occur from time to time. For example, during sudden acceleration, prolonged movement uphill or under high loads. Sometimes this is observed when driving in a straight line, which manifests itself in the car jerking or spontaneously slowing down.
- The idle speed fluctuates or jumps for no apparent reason. If you listen to the car from behind, the work will be uneven, with interruptions and changes in the speed of rotation of the crankshaft.
Failures can be either permanent or temporary, especially if the problem is with spent spark plugs or high-voltage wires. In some cases, the car simply stops starting.
For your information! In the event of a malfunction, a check will light up on the panel if it is working properly. Many people ignore it, which makes the problems worse. Therefore, it is worth checking the car yourself or taking it for diagnostics as soon as possible after the malfunction signal appears.
Possible reasons for failure of the ignition module
Before repairing the main part in the car’s ignition system, you need to understand the nature of the problem. To do this, the consumer must be aware of the signs of a malfunction, as well as the causes of the breakdown.
The main reasons for device failure
Causes of problems:
- The ignition system uses spark plugs that do not match the vehicle parameters. They may not have the gap specified by the manufacturer. Also, the spark plugs themselves may not be working or dirty; this can be determined by visual diagnostics. If there are traces of carbon deposits on the devices, they must be removed.
- Malfunctions in the operation of the MH can arise as a result of frequent spark checks. At the time of diagnosis, a high load is placed on the device. If it appears frequently, it will lead to equipment failure or incorrect operation.
- The ignition module in the VAZ 2114 operates with the high-voltage cables disconnected. This also leads to device failure. The products themselves may be damaged, which affects the functioning of the engine as a whole.
- The device operates under severe vibration conditions. Their impact may be due to poor quality fixation of the module in the seat. As a result of vibrations, the factory soldering inside the equipment structure is damaged. This leads to its incorrect operation.
- The contact inside the plug with the low-voltage cables is broken.
- Initial use of a defective device or module with poor build quality. This factory defect can only be eliminated by replacing the mechanism; repairing the equipment is pointless.
- Moisture getting inside the case. This problem is unlikely, but exposure of the device to liquid may cause it to short out and break.
Signs of coil malfunction
The main symptoms of a malfunction in the VAZ 2114 ignition module:
- Difficulties arise when trying to start the engine. Starting the car engine may be difficult due to the fact that there is no spark on a spark plug or several.
- When idling or parking with the internal combustion engine running, the speed of the power unit floats. Their change is not associated with pressing the gas pedal and other third-party factors. This happens randomly.
- There are dips in the power of the car's engine. This is especially felt when driving uphill or sharp acceleration. Problems can also occur when driving on a flat road.
- Several cylinders stopped working. Usually these devices operate in pairs, so elements 1-4 or 2-3 could fail. Non-working cylinders may be indicated by “triple movement” of the engine.
- A “Check Engine” warning light appeared on the dashboard.
If the ignition module malfunctions, problems will appear not only in engine operation, but also when starting it.
The “Simple Opinion” channel, using the Lada Priora car as an example, spoke in detail about the symptoms that appear in the operation of the ignition modules.
Signs of coil malfunction
Before starting an instrument test, you can try to determine whether the ignition coil of the VAZ 2114 8-valve injector is working by indirect signs (in some cases they are enough to verify a breakdown).
- instability (intermittency) of idle speed;
- the engine gains speed with great difficulty;
- “triple” when the engine is running;
- The speed gain while driving occurs in strong jerks.
If these signs are present (especially if there are several of them), you can either immediately replace the faulty module, or finally establish the fact of its malfunction using instrumental analysis.
Methods for preventing the ignition module on a VAZ-2114
Malfunctions of automobile ignition coils on the VAZ-2114 can be avoided if preventive procedures are regularly carried out. These include:
- Periodic unraveling of high-voltage wires (associated with greatly increased internal resistance, as this can damage the module).
- Checking the spark gap between the electrodes of the spark plugs (if the distance between the electrodes changes, this will affect the efficient operation of the ignition coils).
If faulty spark plugs are identified, they are replaced, after which the car will function properly again.
How to determine faults at service stations
The easiest way is to entrust the troubleshooting to professionals who have all the necessary equipment. Ideally, a car service center should have certified diagnostic equipment, and not universal ones purchased on the Internet. Licensed software is much better at identifying all problems, minimizing the likelihood of inaccuracies. Ideally, find a certified VAZ service center.
As for diagnostics, everything is quite simple:
- The adapter is connected to a special connector, after which all indicators are checked with the car running. The process takes just minutes, so there is no need to leave the car for a long time.
- After scanning, error codes are issued, by which it is not difficult to determine malfunctions. All codes are in the reference documentation.
- Next, all problematic components are replaced or repaired. After this, be sure to check again to make sure there are no errors.
If you have a suitable adapter and computer software, you can diagnose problems yourself. It’s not difficult to figure it out; usually the equipment comes with detailed instructions, and there are also many training videos on the Internet.
Checking the ignition module with a multitester
You can buy a multimeter at any auto store. It is inexpensive and useful for checking all electrical elements of the car. Even if you have no experience in such work, you can follow simple instructions and easily carry out diagnostics in the garage or right in the yard:
- To check the ignition module itself, you need to check the contacts going to the high-voltage wires. To do this, you need to set the device to ohmmeter mode and measure the readings. First do this on cylinders 1 and 4, and then on cylinders 2 and 3. If everything is in order, the resistance readings at each of the terminals will be in the range from 5.2 to 5.5 kOhm. If the difference exceeds 100 ohms, we can confidently say that the problem lies in the secondary winding.
- You should also check the contacts without using any devices. To do this, the engine starts, then you need to open the hood and slightly pull the body in different directions. When there are no changes in operation, everything is in order: if interruptions occur, you need to check the connections. If this does not help, most likely the reason is in the module itself. It cannot be repaired; the easiest way is to replace it.
Examination
Checking the VAZ 2114 ignition module is carried out as follows.
First of all, you need to check the block of wires that go to it. To do this, disconnect the block of wires, take a tester and connect one of its probes to the block, and connect the other to engine ground. Now look at the tester readings: the voltage should be around 12V. If there is no voltage, then you need to check the fuse. Then take a 12V test light and connect it to pins A and B. Turn on the starter and watch: the lamp should blink, if it doesn’t blink, therefore, there is an open circuit on pin A. Perform a similar operation with pin B. So, how to check the ignition module VAZ 2114, 2115 (8 valve injector)? Today there are several verification methods. 1) The first method is to replace the unit with a known working one. Everything is simple here: take it from the donor car and replace it. But there are certain disadvantages here: - there may not be a donor car, buying a new unit does not suit our task - it will not fit any car. Not everything is so simple here: old Samaras with a 1.5 liter engine are equipped with an ignition module. New cars are often equipped with ignition coils. In them, the switch is located in the ECU - therefore, the module is eliminated as unnecessary, leaving only the coil. — you need to make sure that the high-voltage wires are in good condition, otherwise there is a possibility that the unit will burn out. 2) The second method is the method of moving the unit. If at the moment of your impact the engine operation changes, then the problem is poor contact. This malfunction is common, so you can try to repair the unit yourself. If it cannot be repaired, then it must be replaced with a new one. 3) To check you need a tester. Using a tester, measure the resistance at the paired terminals between cylinders 2 and 3, as well as between cylinders 1 and 4. The resistance should vary around 5.4 kOhm and be the same.
The 2111 (1.5i) engine may have an ignition module or an ignition coil installed. The 11183 (1.6i) engine is equipped with ignition coils.
To perform the work of replacing the ignition coil, you will need a multimeter.
Video “Visual instructions for replacing the module with your own hands”
How to replace the ignition module on a car at home - see the visual instructions in the video below (the author of the video is the PROauto161 channel).
At different times, different engines were installed on the VAZ-2110 car, both carburetor and injection. However, regardless of the type of power system and the number of valves (8 or 16), all engines are assembled on the unit base of the old engine 21083 and 21093. The most progressive of these engines is the 16-valve 1.6-liter VAZ 21124 engine with a power of 89 horsepower. Today we will touch on the ignition module for 8-valve engines 2111 and 21114 (1.6 l), check its performance and find a suitable replacement for the failed module.
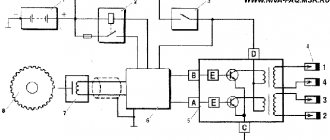
2115 IGNITION MODULE DIAGRAM
The circuit diagram and connection diagram of this electronic device is presented below.
The ignition module installed on the Lada Samara is extremely resistant to both low and high temperatures. Operating temperature range: -400/+1300C.
The only negative point in the operation of this electronic device is its complete inability to repair. However, even a novice car enthusiast can replace it on his own.
Experts consider the most common malfunctions of the Samara ignition module to be:
How to check input wires for serviceability
Often problems arise due to a lack of power to the module. To test the wiring, you need to use a multimeter, which must be set to the voltmeter position before starting work. No preliminary preparation is required in this case. It is better to park the car in a well-lit place, open and secure the hood. Follow simple instructions:
- The car must be turned off and the ignition turned off. First of all, disconnect the wire block by pressing the fastener with a screwdriver or other suitable object. It tightens with moderate effort.
- One probe of the device must be pressed to the contact marked “A”, the second should be applied to ground (any exposed metal on the car body). The main thing is that the contact is good, otherwise it will not be possible to take readings.
- Next, you need to ask an assistant to start the starter for a few seconds; the car will not start with the block removed, but the indicators can be taken. When the starter rotates, the voltage should be 12 V, there may be deviations, but small.
- Check other contacts in the same way, alternately changing the position of the probe from the voltmeter. The mass may be in one place.
If there is no voltage or it is much less than normal, you need to check several basic elements. The work is not difficult and takes literally a few minutes, since malfunctions are usually typical and occur in the same places:
- Replace the fuse. You can find it according to the diagram under the compartment cover or according to the instructions for the car. An element with a rating of 7.5 A is responsible for the ignition module; you need to install the same one. Even if the appearance of the fuse is normal, it is better to change it, since the contacts may be oxidized or the damage may be subtle, but significantly affect the operation.
- Check all wiring connections: vibrations can cause contacts to loosen or move away, and they often oxidize due to moisture. In the first case, you need to put the chips on more tightly or tighten the nuts, in the second, remove the limit switches and clean them of oxides, then apply a special compound for the contacts and put everything in place.
- If everything is in order there, then most likely the culprit is damage or a broken wire. You need to test each core in order to find the problem area. When troubleshooting a problem on the road, you can twist it and wrap it with electrical tape, but it is better to change the wires so that they are solid from start to finish.
WE MAKE THE REPLACEMENT WITH OUR OWN HANDS
Ignition of the fourteenth is a dubious task, since once a device fails, it will continue to “delight” you in the future, so it is much easier to install a new, normally functioning unit. Moreover, it is impossible to do a complete repair of the unit with your own hands - you will need to go to a service station.
Removing the ignition module is performed as follows:
- Remove the “-” terminal from the battery;
- Unscrew the tips of the spark plugs;
- Disconnect the block from the LV module power wires;
- We remove the high-voltage wires - you just need to remove them from the special connectors;
- Unscrew the bolts that secure the bracket holding the unit on the crankcase of the fourteenth engine;
- We dismantle the assembly together with the bracket;
- Disconnect the device from the bracket.
To do everything yourself you will need 13 and 17 keys, a screwdriver and a set of hex keys. Knowing how to ignition, it will take 1-2 hours to identify faults and, if necessary, replace the unit.
Source
How to check the ignition module of a VAZ 2115 injector
Ignition module. I’ll say right away: there are no simple tests that can reliably evaluate this element of the ignition system. For the reason that the spark formation process itself cannot be called simple. First, the accumulation of inductive energy in the coil, then saturation, breakdown of the spark gap, the occurrence of an arc, its combustion, and finally, damped oscillations. Each stage has its own characteristics, characteristics and parameters, everything has its essence and weight. Changes in characteristic quantities: accumulation time, breakdown voltage, combustion voltage, arc burning time and distortion of the shape of damped oscillations provide a lot of information about the health of the coil or module. All this is clearly visible on the monitor of a motor tester or oscilloscope, and deviations in individual cylinders are clearly visible in comparison. But according to the terms of this topic, we, like most car enthusiasts, have nothing except a control unit and a Chinese tester. Well, no need, we’ll try to get out of it, there are no hopeless situations.
Actually, there are only 2 methods worth attention left: Determination of performance by the arrester and the simple replacement method. The first method is often used, but it involves having a spark gap itself, and is based on the fact that a working ignition module should be able to spark a 20mm air gap with any of its terminals. A defective module channel will not be able to do this. Personally, I like the arrester design with an adjustable or 4-step gap of 5, 10, 15, 20 mm. By running the coil leads one by one, you can see when the weakest one gives up. I will not dwell on this in detail, the designs of arresters and descriptions of the method in the sea network. The method works, although it has certain limitations and requires some experience and skill. Therefore, I would like to focus on the second method - simple substitution, especially since it is the most accessible for car enthusiasts.
This is a really simple method, but there is one point. The ignition module is designed in such a way that it easily develops a voltage of 20 kilovolts at its terminals. When a control pulse is received from the control unit, a high-voltage discharge through explosive wires rushes to ignite the mixture compressed in the cylinder. Question. Where will the charge go if the wire is suddenly broken? (or will be completely absent - for the module this is the same thing) The discharge is looking for a way out, and unfortunately, it quickly finds it. Most often, the module pierces its own insulation with its own energy and begins to “sew” to ground along the shortest current path. Where the insulation is weakest. The trodden path drains the charge energy onto the ground, as a result, 2 cylinders fail at once. Either 1-4 or 2-3, depending on which wire breakage triggered the insulation breakdown. The insulation may turn out to be good, then a breakdown is possible between the turns of the coil itself, again inside the module. Moreover, a breakdown can cause an interturn short circuit, or it can simply be sewn when the breakdown conditions, even on a serviceable wire, are the most severe.
And these are moments of maximum load on the engine, for example, intense acceleration. Another question is which turns will close: if they are extreme, then the channel will fail. And if they are adjacent, then the coil will lose power, and almost imperceptibly to the eye - the inductance is no longer the same. But this is for the time being. Soon, twitching, adjustments, jerks and dips, idle speed fluctuations, and other troubles will begin. These are not all types of module malfunctions, but the couple listed above indicate that its health largely depends on its operating conditions. Therefore, in relation to our method, the question is: What will happen if, without checking the serviceability of the explosive wires, you install a known-good ignition module on your car as a replacement, kindly provided by a neighbor? (if one of the wires is broken, and the module is probably fried for this reason) Nothing may happen: your neighbor’s module may turn out to be more powerful than yours, and for the duration of a short test it will cope with the task, breaking through the gap, and you, making a mistake in diagnosis, buy a new one , which will not live long due to a broken wire.
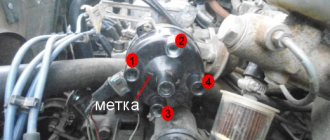
Where is the ignition coil located?
Let's look at the example of a VAZ car; you can find the ignition coil quite simply by tracing where the high-voltage wires from the spark plugs go.
From the photo above you can see the area where the ignition coil is installed, but look in more detail at the next photo.
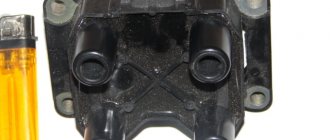
To remove the ignition coil, you need to unscrew three nuts, two of them are clearly visible in the photo above.
Well, basically, that’s all there is to say about dismantling, there’s nothing more to say, unscrew the 3 nuts, disconnect the wire and that’s it, the ignition coil is removed. Let's move on to the next point: coil diagnostics.
VAZ-2114 ignition module and its features
The passenger car ignition module is specially designed to improve the starting of a car engine.
Since two high-voltage coils operate as the main components of the module, it is often called the “ignition coil”. Let's look at the structure of this part:
The main operating elements of the ignition module are high-voltage coils that distribute the igniting spark to the spark plugs. This is possible thanks to the following design:
The mechanism of operation of the ignition coil is as follows:
Even an inexperienced car enthusiast can find this part: just trace the path of one of the high-voltage wires - from the spark plug to the plastic case.
This housing houses the ignition module.
How to check the ignition coil of a VAZ with a multimeter, checking the circuit?
The first thing you need to decide is whether the coil is not working or something in front of it. To do this, take the terminal from the ignition coil in one hand and a milliliter in the other hand and begin testing. Although, before I continue my story, you probably need to familiarize yourself with the pinout of the wires. Therefore, look carefully at the following picture.
Now I’ll explain the picture, we have 4 wires, 2 signal wires, one ground and one power. You need to check all 4 wires, let's start in order; by the way, the pinouts A, B, C, D are not marked on the plug itself. Let's start checking with the power cable. Turn on the ignition, connect one multimeter probe to the negative terminal of the battery, and the other to terminal D. The voltage should be 12 volts.
My test shows 11.86 volts, now we know that voltage is coming to the coil. Next, let's check the ground; this is pin number C; for this, we connect the multimeter probe to pin C and the other to the positive terminal of the battery.
There is also contact with the ground. We can check both wires at once by connecting a milliliter to pins C and D, the voltage should also be 12 volts. Let's move on to checking the signal wires. A and B To do this, switch the multimeter to resistance measurement mode.
I stuck the wires in from different sides because it was impossible to hold everything in place with one hand. My multimeter showed 1.17 kOhm, sources on the Internet say that the resistance should be below 1 kOhm, most likely something, somewhere, has oxidized, by and large, it wouldn’t be bad to start figuring it out, maybe there are problems in the ECU, but today we’re dealing with ignition coil.
Total: we found out that the voltage to the ignition coil comes with the signal wires, and everything is in order. So we move on to the ignition coil itself.
How to diagnose the ignition coil on a VAZ-2114
As already mentioned, when the first signs of malfunctions appear in the VAZ-2114 ignition module, the vehicle owner should diagnose it. You can perform a similar procedure yourself at home using the following algorithm:
- Check the spark plugs.
- Check the crankshaft position sensor.
- Check the ignition coil.
At home, all stages of the checks can be performed independently. The first stage is checking the spark plugs. It is carried out in the following sequence:
- We remove the spark plugs from their sockets - remove the tips of the high-voltage wires (a special spark plug wrench is suitable for this).
- We examine the candles.
- We clean them from possible soot.
- We set the correct distance between the electrodes.
- We check the spark plugs for operation using improvised means (for example, from a device made from a piezo lighter) or on a car engine with a working ignition system.
If the spark plugs are in good condition, you can proceed to the next stage of checking for faults in the ignition module.
The second step is to check the crankshaft sensor. This test is carried out using a multimeter, thanks to which two characteristics are checked - voltage and resistance. To do this proceed as follows:
- Remove the crankshaft sensor.
- Measure resistance:
- a special ohmmeter mode is installed on the device;
- the terminals of the device are connected to the ends of the winding, which is brought to the surface;
- with optimal sensor operation, digital readings will range from 500 Ohms to 700 Ohms.
- Measure voltage:
- switch the device to the mode for measuring alternating voltage;
- terminals are connected to the ends of the winding;
- any handy object made of metal should be passed along the body of the crankshaft sensor;
- When the sensor operates optimally, the device will show increased voltage readings because there will be a metal object nearby.
Otherwise, the faulty sensor will have to be replaced with a new one, because it also affects the operation of the VAZ-2114 ignition module. If after this there are still signs of coil malfunction, then you should proceed to the third stage of the test.
The third stage is checking the ignition coil itself. This part is checked as follows:
- The easiest way is to replace the coil with a new one;
- while the car engine is running, you can move the coil and knock on it (if there are visible changes in the functioning, it is time to judge a faulty contact in the coil itself);
- take measurements with a multimeter for resistance readings, such indicators are taken from paired coils - they should be identical, approximately equal to 5.4 kOhm.
What to do if you don’t have a multimeter, but you need to check the electrical circuit? Experts recommend using a twelve-volt light bulb. To do this, one of the wires coming from it should be connected to the terminal, and the second wire should be shorted to the motor housing. If the control light flickers when the starter starts, then everything is in working order.
If the car owner has problems performing such diagnostics himself, he can always turn to qualified specialists at a service station.
How to check the ignition coil of a VAZ with a multimeter?
To make checking easier, the coil needs to be removed, but you can do this all on the engine. You need to switch the multimeter to resistance measurement mode and take measurements on the coil contacts. We measure the resistance at terminals 1-4 and 2-3; note that there are numbers on the ignition coil; they correspond to the cylinder numbers.
The resistance should be around 5.5 kOhm. In my case, the resistance is 5.9 kOhm, which in principle fits into the standards; we take further measurements.
Source
Signs of a malfunctioning ignition module (coil)
The main signs of coil malfunction are:
- failures during acceleration;
- loss of power;
- unstable idle;
- 2-3 or 1-4 cylinders do not work.
If you encounter these symptoms of a malfunction, then in addition to the module, it is recommended to check the following sensors: Mass air flow sensor, IAC, Mass air flow sensor, .