The article describes an interesting method for solving the problem with rotten thresholds. Perhaps someone will need it for a VAZ car. Cars often have problems with thresholds. This is due to the age of the car. Various weather conditions also influence. Water, dirt - and the car sills begin to rot. There is a different attitude towards repairs now. Previously, to make a high-quality threshold for several years, it took at least two days, or even more.
I want to describe a method of how to quickly repair a car threshold in 5–6 hours. The time also depends on whether to paint the threshold or not. In this repair, I want to leave the top of the threshold and cut off only the low part - the most rotten one, and cut off the lower part of the second repair threshold and put it in place of the rotten one.
First, I change the threshold. In the future I will make sure that the doors match it. Although there may not be any problems since I will only cut off the bottom part. One way or another, there may be some minor difficulties, because the replaceable threshold is “non-native”. My car is M-2141 or Moskvich-41.
Threshold repair process
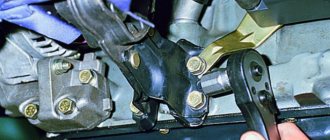
First, I will have to remove the driver's door, the left wheel, and also the front fender of the car. Next, you need to jack up the car, remove the front wheel, and then the wing. I need to remove the latter to make it easier to remove the car doors. My fender is screwed to the hood with six screws. From inside the hood, you also need to pull the “saber” and lower the bumper to free the lower part of the wing. It is fastened from the inside with two screws and one near the door. I unscrew them.
After all the screws are unscrewed—I have 9 of them—the wing is almost free. True, mastic can hold it. To do this, you need to take a tool like a pry bar and try to slightly move the wing from the inside. Gradually I swing it from all sides. After it comes off a little, you can remove it.
After removing the wing, the rack must be cleaned of rust, dirt, plaque and other foreign bodies. In principle, you don’t have to clean it, but I usually always do it. I clean the wing strut at the end of the work, when I install it. Now we need to do the basics and repair the car sills.
Now that I have access to the door hinges, I begin removing it. The doors should be wetted in advance with WD grease and then begin to carefully knock out the hinges. More often than not, when I remove the hinges, I usually knock them down. If the top loop starts to rest against the wall, you will need to bend the ends a little. This happens sometimes. After the door is removed, I proceed directly to repairing the thresholds.
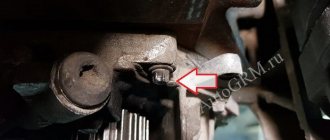
I will cut the threshold right along the corner where it is connected to the upper threshold. I will attach the new one to the top one, a couple of millimeters higher. If he performs, then we will have to come up with another line. I hope there won't be a protrusion.
Before cutting off the threshold, I still decided to remove the rear passenger door in order to avoid damaging it when cutting and installing the threshold. During the inspection, I decided to slightly adjust my repair plan, namely, to completely change the upper and lower thresholds. There you still need to remove the plastic, but this is very easy to do. I think everyone can handle this. Next, I carefully cut off the old threshold.
After I cut the sill off the fender strut, I remove all the old sealant because it's clogged up in places. If moisture gets into it, it will stagnate. After I cleaned off the sealant, I tap the rack so that all the dirt comes off and the rust falls down. Then the rack must be cleaned of all remaining debris. I have a problem with the stand, it has two or three layers, the layers are broken, and the metal just sheds.
Near the left wings (front and rear) I make an amplifier. I weld two plates, right on the roundness of the wings at the back and front. At the back, I welded a plate onto the inner layer of metal, and welded the second one, which I prepared, onto the outer layer. I did the same on the front.
Then I do the first fitting of the new threshold. To do this, I hang the wing again and also the door to improve control. You don’t have to fasten it, just hang it. Well, whoever is not lazy can fix it. I measure it in order to look at the corner of the threshold on the front wheel. The wing should not catch or hit him. My threshold has completely met.
Next, I again remove the wing and door, and begin the actual cooking of the threshold itself. I “grab” it from below in different places. I usually weld the left side, right and center first. Then I hang the doors and fender again to measure the gaps when measuring the threshold.
Everything turned out well for me. It happens that the gap remains a little larger than expected, but this is not a big deal. The main thing is that the gap is not very large. And there, as the customer says. Next, I remove the doors again and weld them completely. All that remains is to sort out the insides a little and make sure that dirt does not fly inside. It will be necessary to close this place under the wing later.
After everything is closed inside, putty, primer, and painting are used. The putty will also cover all welding and other marks. It is advisable to putty immediately, while the metal is fresh. Because if, for example, you come the next day, the metal will already be slightly covered with rust or dust. I cover all welding seams with putty.
I would also like to remind you that usually, when dealing with thresholds, the inner frame needs to be touched and changed too. The inner box is the inside of the threshold. Usually, when you touch the inner box, you need to disassemble the floor and remove the driver's seat. But, since my car is in good condition, I don’t touch the inner box.
After the first layer of putty had dried, all the tubercles from welding became visible. I smoothed them out with putty. After the second layer has dried, I prime the welded threshold before painting.
One more thing is very important: before painting, you need to take the car outside or to a less dusty place. Because it often happens that when painting a car, dust rises from the floor, it can settle on the paint, and then there will be problems. Dust can appear on the paint, like dirt on a table. After I took the car to a place where there is no dust, I paint our sills, as well as the fender.
Repair of the underbody of VAZ 2114
4.1/5 — (59 votes)
So, the threshold is welded. Now we need to cook the floor, the internal threshold, because it is also in a deplorable state, rotten. I've roughly cut out the holes before the rot* is over. All that remains is to trim here, this part, and that part over there. Here's the view from below. This is where the amplifier will be welded together with the jack.
A sheet of iron will be welded here - a repair kit. Of course, it won’t cover it completely; you’ll have to patch it even further. A sheet of iron like this, there will be a repair insert. It turns out that she will stand up like this. That's all she... And this remaining piece will have to be patched, everything covered, covered. Here you will also need to make a form like this.
The sheet of iron is smooth, but there is a little roundness here. You will need to bend the edge and make it round. This is...* like on this side - a small oval. Now I’ll cut it even further, prepare it, and continue filming.
So. I prepared the floor completely, prepared the repair insert for welding, pre-drilled it, made holes in it, and bent the edge on the other side to bend the floor. The bend, it turns out, will be welded here to the box. And this is where the bend will begin. It was for this bend that I folded the edge. Now I will put this sheet of iron on the clamps, and I will weld it already.
So, I welded this strip. First I bent the edge here, down. This part is higher, this part will be lower, it turns out. Now I will have the missing metal inside... I will put the patches here, they will be under the bend. Here I have already welded it underneath the amplifier, there will be a patch like this. Here it is, as you can see, going under the bend. Next I welded the amplifier with the jack. This is how it happened for me.
Now I'm going to patch up these holes on top. This is what it all looks like from the interior. Now I have already cut out a strip for the missing metal. If possible, I will cook in spots. Here I grabbed the edges a little, I’ll bend it, give it a little shape, and I’ll weld the metal. Since the floor in this place has a rounded part, this insert is higher, this one is lower, as I said earlier. In its own way, this is all reinforcement for the body. I'll keep cooking it and see what happens.
So, I patched the floor. This is what it looks like. Now I will patch the internal threshold, for which I have already cut out inserts like these. They will need to be adjusted slightly in place. The edges were bent. I’ll apply it, I’ll adjust it where necessary - it’s all in place. Here I’ll weld it separately later and put two patches. I'm starting to cook, let's see what happens.
I patched the box. The inner box is ready. This is what happened. I won't clean up the seams inside. It's the peeling paint* that creates this look, not very good. It's okay, it will hold up. Now from below. What happened below. I have already cleaned the welding seams on the bottom and painted them with 3-in-1 enamel primer and anti-rust paint.
I won’t process it right away, the owner will process it himself. That's how it all turned out. These excess metals, when treated with structural mastic, will be hidden under a layer, something that is not needed * for the eyes, since a person wants to sell it. Here's what I changed: spars, pieces of spars, inserts - already coated with structural mastic.
Here, on this spar, as you remember, I changed a piece like this, cut it out, patched it (there was no piece) - that’s how it happened. Here it will miss one more time, go through the structure - and it won’t be visible at all. Anyone who understands cars will still burn it all down. Here you still need to clean up the welding. I'll clean them completely and paint them as well - that's enough. That's all. The next one will be the arch.
Why do thresholds wear out?
Thresholds are load-bearing elements that provide the body with additional rigidity. Due to the fact that these parts are located in the lower part of the body, they are constantly exposed to negative factors:
- water;
- dirt;
- sand;
- stones;
- salt;
- chemical substances.
All this significantly reduces the service life of the thresholds. In addition, the mediocre quality of painting and anti-corrosion treatment of body elements from the factory leads to the fact that almost every owner of a “Nine” is faced with the need to replace the thresholds on their car.
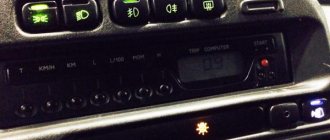
Signs of the need to replace thresholds on a VAZ 2109
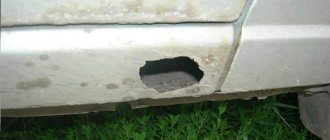
The appearance of even small areas of corrosion on the thresholds is the first sign that these body elements need to be paid attention to.
At first glance, such areas may seem harmless, but if you examine them in more detail and clean them, it may turn out that under the layer of paint there is a serious source of corrosion or completely rotten metal.
It is important not to miss the moment when replacing the threshold is still possible. It often happens that the threshold rots around the perimeter and there is simply no need to weld a new part. In this case, more serious and labor-intensive body work will be required.
Threshold repair options
Repair of the body elements in question can be performed in two ways:
- welding patches;
- complete replacement of parts.
The first option requires less effort and financial investment. However, this is where its advantages end. If you follow the recommendations of specialists, then repairing the load-bearing part of the body with patches is not the best option. This is due to the fragility of such repairs.
It will not be possible to completely remove corrosion with partial repairs, and its further spread will lead to new rust and holes.
If you do not have the opportunity to completely replace the thresholds or the body element in question has minimal damage, you can partially replace the damaged area. To do this, you need to cut out the rotten place, clean the metal as best as possible from corrosion and weld a patch of body metal of the required thickness or use a repair insert.
After this, the threshold is carefully protected from corrosion in order to maintain its integrity for as long as possible.
Tools and materials
To weld the bottom, in addition to welding equipment, you will need consumables. When choosing which metal to cook with, you need to consider two points:
- thin steel is more difficult to weld; experience is needed to choose a temperature regime that eliminates the risk of burns;
- Thick iron is more difficult to process.
The patches are made of metal with a thickness of 1 to 2 mm - these are the optimal parameters.
What you will need when working:
- welding machine, when working with manual arc welding you will need thin electrodes, maximum size 1.6 mm; for a semi-automatic machine you need copper wire and carbon dioxide;
- grinder with cutting and grinding attachments;
- gas welding plus carbide, oxygen for cleaning rust from hard-to-reach places;
- regular or electric metal shears, they are used to cut out patches;
- electric drill;
- a hammer, used to tap the bottom of the car to identify defects;
- a chisel or hammer drill to remove sound insulation;
- screwdriver or screwdriver.
The bottom is viewed on an overpass or in an inspection hole in good lighting. The metal is tapped with a hammer to test its strength. A lift will be needed to provide access to the damaged areas.
You will need a rust converter, soundproofing coatings; anti-corrosion compounds; primer for metal; solvent or other degreasing compound.
Unexpected expenses
It is necessary to provide for the purchase of spare parts. Their necessity is determined after inspecting the car. During repair work, dilapidated elements of the machine are replaced:
- rotten and bent sills, they are removed first, and during installation they control the geometry of the body;
- floor spars;
- floor panels, they are mounted from below;
- brake and fuel pipes stuck to the metal.
How to replace the thresholds of a VAZ 2109 with your own hands
If a significant part of the thresholds is damaged by corrosion, then there are no options other than completely replacing these body elements. To carry out repair work you will need the following list of tools and materials:
- semi-automatic welding machine;
- new thresholds;
- Bulgarian;
- drill;
- sandpaper;
- putty and primer;
- anti-corrosion compound (mastic).
Features of replacement and preparation for it
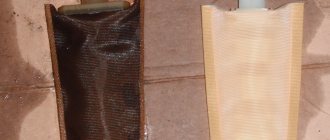
When planning body repairs, you need to understand that the design of the VAZ 2109 thresholds consists of the following elements:
- outer box;
- inner box;
- amplifier
The outer and inner boxes are the outer walls of the threshold. The outer element goes outside and is located under the door, and the inner one is located in the cabin. The amplifier is an element located between two boxes inside. Most often, the outer frame is subject to corrosion, and when replacing thresholds, this particular body part is in mind.
Even though new parts are used when replacing thresholds, they still require preparation. From the factory they are covered with shipping primer, which must be cleaned before installation, i.e. the metal must shine. This is done using sandpaper or grinder attachments. After cleaning, the elements are degreased and coated with epoxy primer.
The final preparation of the thresholds comes down to drilling holes with a diameter of 5–7 mm for welding in the places where the parts adhere to the body.
Preparatory procedures also include the dismantling of doors, aluminum sill trims and interior elements (seats, floor covering, etc.). Before the immediate start of work on removing the old thresholds, a metal corner is welded to the racks from inside the cabin. It will provide rigidity to the body and prevent it from deforming after cutting off the thresholds.
Step-by-step replacement instructions
Having prepared everything you need, you can begin the repair. The procedure consists of the following steps:
- Place the new threshold on top of the old one and outline it with a marker.
Video: replacing thresholds on a VAZ 2109
Damage to the sills by corrosion on the VAZ “Nine” is common. These body elements can be replaced by every car owner who knows how to use an angle grinder and semi-automatic welding. If you don’t have such experience, then it’s better to trust the specialists. Only in this case can one hope for high-quality repair work and a long service life of the thresholds.
Advantages of semi-automatic carbon dioxide welding
Having analyzed the products of the domestic automobile industry, the service life of which today is more than 10 years, experts noted the poor quality of the bodies of VAZ 2101, 2108, 2106, 2109, 2107. Especially those that were produced before 1994. The reason is that the body base was not primed back then, the paint was applied directly to the iron.
Such models are rare on the modern automobile market, and all of them have undergone body reconstruction. To carry out welding work in problem areas of the body of such cars, a carbon dioxide semi-automatic machine is usually used.
In this case, welding is carried out using wire. This welding machine is the most affordable and versatile. It welds iron whose thickness varies from 0.8 to 6 mm. The semi-automatic machine can easily perform the following types of work:
- weld the sills and side members;
- patch holes;
- straighten out dents.
The operating principle of the device is based on the pressure that supplies carbon dioxide to the welding zone. In this case, the air environment is displaced, and this helps protect the metal from oxidation. When welding semi-automatically, the metal does not burn, but melts, reliably fastening the sheets of iron.
The advantage of such a unit is its versatility when working with all types of metals. When carbon dioxide is replaced with argon, even non-ferrous metals such as aluminum or stainless steel can be welded. To ensure a strong seam, stitches 2 cm long should be applied by welding every 5 cm of the welded surface.
To get a complete understanding of the correct conduct of welding work, it is best to watch a special video. You will see that welding seams must be treated with a primer. Particular attention should be paid to the seams that are made on the pallet, the rear of the machine and the racks.
The thresholds of the VAZ 2114 have rotted
Will the side members be rotten if the bottom is rotten? VAZ 2115
- I wanted to buy a VAZ 2115 – 1 answer
- How to calculate the cost of body work - 1 answer
- Water flows through the rubber of the windshield of a VAZ 2114 - 7 answers
- When the bottom is scratched, does some kind of mastic or something wash off? – 5 answers
- How to adjust the trunk on a VAZ 2115? – 4 answers
If you want to give your car a second life, install it on chocks so that the body does not move during welding. Strip down everything inside, below and above.
You will see where you need to boil. Just don’t make double metal, it will rot in no time. Remove the rotten pieces and knock out exactly the same stiffening ribs. After welding, treat those places where you won’t go for a long time with ordinary lithol, it will penetrate even the smallest shells, in the places of arches, thresholds, pillars, pour it with a syringe using pressure (engine oil), the excess will drip off and dust will envelop everything inside.
The bottom is lithol from the inside, put it on silent, it won’t get into the cabin, but the bottom will live for a long time. On the outside, apply lithol directly with a brush, a thin layer of dust, and a crust will appear. In the side members, too, spray it with waste and the car will live for a very long time due to rot (have you ever seen rust in places where oil periodically gets in?). Don't be lazy and the car will thank you, it also has a soul.
The article describes an interesting method for solving the problem with rotten thresholds. Perhaps someone will need it for VAZs.
Cars often have problems with thresholds. This depends on the age of the car, and is also affected by various weather conditions. Water, dirt, and car sills begin to rot. There is a different attitude towards car repair now. Previously, to make a high-quality threshold for several years, it took at least two days, or even more. I want to describe a method of how to quickly repair a car threshold in 5–6 hours. The time also depends on what to do with painting the threshold or not. In this repair, I want to leave the top of the threshold and cut off only the lowest part, the most rotten, and also cut off the lower part of the second repair threshold and put it in place of the rotten one. To begin with, I change the threshold, and in the future I will make sure that the doors coincide with it. Although there may not be any problems since I will only be cutting off the bottom part, one way or another there may be some minor problems because the replacement threshold is not original. My car is M2141 or Moskvich 41.
Do-it-yourself body welding
It is quite difficult to weld a body on your own. This requires skills in working with welding equipment and the ability to accurately determine areas that need correction. You need to carefully inspect the body and do an analysis of the iron that is susceptible to corrosion. Thus, body repair can be divided into local and complete.
A complete repair involves replacing most of the car body, while a local repair involves removing rust in individual places. If a car enthusiast is familiar with the principles of welding, then carrying out a complete repair will not be difficult for him. But for novice welders it is better to start with local problem solving.
If the body rots in a place that is invisible to others, for example, on the bottom, then any material can be used as a patch. The main thing is that it is suitable in quality and thickness. If the corrosion site is located on the outside, it is best to use the type of iron from which the car body is made. It is important that the seam is invisible.
If a small area has suffered from corrosion, you can do without welding. It is enough to use special mixtures. They contain epoxy resin and fiberglass. The effect of such a repair will be no worse than that of welding, and the aesthetically similar patch will look better. To increase reliability, you will need to glue the welding joints from the inside of the crack.
To protect the body from corrosion, its condition should be constantly monitored. To prevent rotting from becoming a real problem, you need to wipe hard-to-reach places dry after each car wash. And after driving through puddles and snow, remove adhered dirt. If all this is done regularly, the car will last quite a long time.
The article describes an interesting method for solving the problem with rotten thresholds. Perhaps someone will need it for VAZs.
Cars often have problems with thresholds. This depends on the age of the car, and is also affected by various weather conditions. Water, dirt, and car sills begin to rot. There is a different attitude towards car repair now. Previously, to make a high-quality threshold for several years, it took at least two days, or even more. I want to describe a method of how to quickly repair a car threshold in 5–6 hours. The time also depends on what to do with painting the threshold or not. In this repair, I want to leave the top of the threshold and cut off only the lowest part, the most rotten, and also cut off the lower part of the second repair threshold and put it in place of the rotten one. To begin with, I change the threshold, and in the future I will make sure that the doors coincide with it. Although there may not be any problems since I will only be cutting off the bottom part, one way or another there may be some minor problems because the replacement threshold is not original. My car is M2141 or Moskvich 41.
Threshold repair process
First, I will have to remove the driver's door, the left wheel, and also the front fender of the car. Next, you need to jack up the car, remove the front wheel, and then the wing. I need to remove the fender to make it easier to remove the car doors. My fender is screwed to the hood with six screws. From inside the hood, you also need to pull the “saber” and lower the bumper to free the lower part of the wing. The wing is also fastened from the inside with two screws and one near the door. I unscrew them. After all the screws are unscrewed, I have 9 of them, the wing is almost free. True, only mastic can hold it. To do this, you need to take a tool like a pry bar and try to slightly move the wing from the inside. Gradually I swing the wing from all sides, and after it moves away a little it can be removed. After the wing is removed, its strut usually needs to be cleaned of rust, dirt, plaque and other foreign bodies. In principle, you don’t have to clean it, but I usually always clean it. I usually clean the wing strut at the end of the job when I install it. Now we need to do the basics and repair the car sills.
Now that I have access to the door hinges, I begin to remove it. The doors should be wetted in advance with “WD-lubricant” and then begin to carefully knock out the hinges. More often than not, when I remove the hinges, I usually knock them down. If the top loop starts to rest against the wall, then you will need to bend the ends a little. This happens sometimes. After the door is removed, I proceed directly to repairing the thresholds.
I will cut the threshold right along the corner where it is connected to the upper threshold. I will attach the new threshold to the top one a couple of millimeters higher. If he performs, then we will have to come up with another line. I hope there won't be a protrusion. Before cutting off the threshold, I still decided to remove the rear passenger door in order to avoid damage to it when cutting and installing the threshold. During the inspection, I decided to slightly adjust my repair plan, namely: completely change the threshold, both upper and lower. There you still need to remove the plastic, but this is very simple and easy to do. I think everyone can handle this. Next, I carefully cut off the old threshold.
After I cut the sill off the fender strut, I remove all the old sealant that was there because it was clogged in places and if moisture gets in, it will stagnate. After I cleaned off the sealant, then I tap the rack so that all the dirt comes off and the rust falls down. Then the rack must be cleaned of all remaining debris. I have a problem with the stand; it has two or three layers, the layers are broken, and the metal simply falls off.
Next, I make an amplifier in the places near the front and rear left wings. I weld two plates, right on the roundness of the wings at the back and front. At the back, I welded a plate onto the inner layer of metal, and welded the second one, which I prepared, onto the outer layer. I also did the front.
Then, I do the first fitting of the new threshold. To do this, I hang the wing again and also the door to improve control. You don’t have to fasten it, just hang it, and that’s it. Well, whoever is not lazy can fix it. I measure it in order to look at the corner of the threshold on the front wheel. The wing should not catch or hit it. My threshold is completely fine. Next, I again remove the wing and door and begin the actual welding of the threshold. First, I “grab” it from below in different places. I usually weld the left side, right and center first. Next, I hang the doors and fender again to measure the threshold to measure the gaps.
I did well. It happens that the gap remains a little larger than expected, but this is not a big deal. The main thing is that the gap is not very large. And then what the customer says. Next, I remove the doors again and weld them completely. All that remains is to sort out the insides a little and make sure that dirt does not fly inside. It will be necessary to close this place under the wing later. After everything is closed inside, putty, primer, and painting proceed. The putty will also cover up all welding and other marks. It is advisable to putty immediately while the metal is fresh. Because if, for example, you come the next day, the metal will already be slightly covered with rust or dust. I use putty to cover all welding work.
I would also like to remind you that usually, when dealing with thresholds, the inner frame needs to be touched and changed too. The inner box is the inside of the threshold. Usually, when you touch the inner box, you need to disassemble the floor and remove the driver's seat. But since my car is in good condition, I don’t touch the inner box.
Next, after the first layer of putty had dried, all the bumps from welding became visible, and I smoothed them out with putty. After the second layer of putty has dried further, I prime the welded threshold before painting.
One more thing is very important: before painting, you need to take the car outside or to a less dusty place. Because it often happens that when painting a car, dust rises from the floor, and it can settle on the paint, and then there will be problems. Dust can appear on the paint, like dirt on a table. After I took the car to a place where there is no dust, I paint our sills and at the same time the fender.
Of course, I didn’t have time in 5-6 hours, I had to spend more time, but one way or another, I didn’t delay it for a day.
I hope I helped everyone who needs it. Happy repairs.
How to change the thresholds of a VAZ-2109 car
Although the body does not affect the vehicle’s progress, the driver will not be pleased if its elements begin to fall off while driving. High humidity, reagents and climate conditions can have a bad effect on the bottom and sills of the VAZ-2109. Do-it-yourself replacement of VAZ 2110 thresholds: video. How to change the rear struts on a VAZ 2114 with your own hands (video). Owners are often faced with the need to replace these parts due to rust that has appeared during normal use.
Features of replacement work
Thresholds are the load-bearing part of the body. Detailed instructions for replacing the generator on a VAZ 2101, 2102, 2103, 2104, 2105, 2106, 2107 with your own hands (+ video). They are placed in such a way as to withstand significant loads; if their design is violated, deformation of the body is likely. The vehicle may become unbalanced and lose some of its maneuverability.
If corrosion occurs, these body elements must be replaced, and at the same time the entire underbody must be tapped. Visually, they seem intact, but when tapped, or even pressed with a finger, the paint can fall off, and underneath it could be anything from a rust spot to a through hole.
Experts do not recommend repairing the lower part of the body using patches. Either 100 or replacing the timing belt with your own hands (manual. This is a short-lived method, and in the worst case, after a season, corrosion will spread further, and the car will become completely unusable. Inspection of the body parts should also be carried out from the interior.
Replacing the threshold of VAZ 2114
Specificity and aspects for replacing thresholds
(like I do).
Due to the nature of the work, many do not risk replacing load-bearing body parts without the help of others and turn to services that are ready to cope with this work. The cost of repairs consists of two reasons:
- how much tinsmiths will estimate their work;
- prices of spare parts (it may vary depending on where the thresholds were purchased).
On average across the country, for welding thresholds they charge from 6 to 7 thousand rubles per side, excluding the price of the spare part. Parts for repairs are purchased second-hand or at car dealerships. Their price ranges from 500 to 1,000 rubles.
Car repair shops can offer you thresholds of their own production. Today I want to talk in detail about how to replace the thresholds of a VAZ 2101 with your own hands. DIY cruise control for cars: Ford Focus, Opel Zafira and Astra, Renault Duster and Megan, Granta, VAZ 2110. Do-it-yourself replacement of VAZ 2110 thresholds. We will show you how you can repair and replace thresholds, repair the bottom, side members, rear wings in a VAZ 2115 and its VAZ analogues with your own hands. In most cases, they are made from an iron pipe or a sheet of zinc-coated iron. When choosing this option, remember that the installation may not proceed correctly, and the body will become hopelessly damaged. Video instructions on how to remove the box and replace the clutch on a Renault Logan with your own hands. Logan, clutch disc replacement video clip. When doing the work yourself, you should also not try to make body parts without the help of others. Replacing the alternator belt and tensioner pulley on a Skoda Octavia Tour 1.6 bfq car with your own hands photo and video report. With the slightest error in size, you risk significantly reducing the maneuverability of your own transport.