The fuel filter in cars is a vital element of the fuel system, which filters small particles of rust and dust, and also prevents them from entering the fuel system line. In the absence of a filter and with a small flow area in the fuel line, dust and rust particles clog the system, preventing fuel supply to the engine.
The filter system is divided into two filtration stages. The main and first stage of fuel purification is coarse cleaning, which removes large particles of dirt from the fuel. The second stage of cleaning is fine fuel cleaning; this filter installed between the fuel tank and the engine allows you to remove small particles of dirt.
Fault diagnosis
There are several signs that indicate that the fuel pump is clogged. Each of them individually may not indicate this one hundred percent, but taken together they are sufficient grounds to begin cleaning. These are the signs:
- the engine stalls when you press the accelerator;
- the acceleration dynamics of the car decreases;
- the engine responds poorly;
- starting with the starter is somewhat difficult;
- When the gas pedal is pressed sharply, jerking occurs.
Depending on how badly the fuel pump is clogged, these problems can vary greatly in scope. For example, if the pollution is very high, then when you press the gas pedal, the car may hardly accelerate.
Cleaning the fuel pump screen can solve these problems, but it is important to remember that there are other reasons that can cause them:
- The injector has failed.
- The fuel pump is not working correctly.
- The fuel filter is dirty.
If the filter and mesh are still easy to change on your own, then for the rest it would be better for a beginner to contact a car service center. This will allow you to avoid gross mistakes that an inexperienced car enthusiast may make during the repair process.
Filter clogging indicators
Key indicators that the filter is clogged:
- When driving uphill you feel a strong jerk;
- A sharp drop in engine power;
- The engine often stalls;
- Fuel consumption has increased;
- The car jerks when driving.
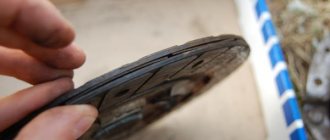
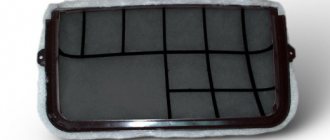
Particularly economical drivers try to cheat and wash the filter with water and then install it back. This will not make the process easier since the dirt is absorbed into the fibers of the mesh and cannot be washed off so easily. But after such cleaning, the filter loses its throughput, which is even worse for the machine.
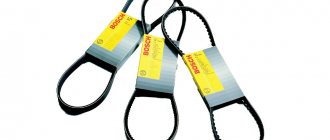
Dirty and clean mesh in the tank This element requires confidence in quality, so we recommend using only original spare parts, here are some of the original manufacturers of parts for Toyota: ACDelco, Motorcraft and Fram.
You should only change the filter outdoors; fuel fumes are hazardous to health and can lead to fire; it is recommended to have a fire extinguisher ready before work. Do not smoke or light a fire near the machine. We recommend disconnecting the battery to avoid sparks. It is also recommended to monitor the pressure level in the system.
Cleaning method
The procedure is carried out in several stages. First, the rear seat cushion is removed and half of the sofa is reclined. Then remove the plastic cover of the fuel pump. Then you need to relieve pressure in the fuel system.
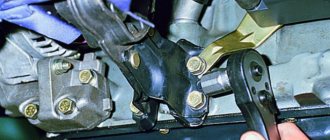
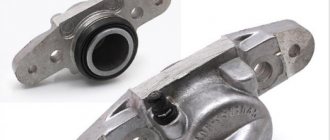
Now you can remove the negative terminal from the battery. It is necessary to disconnect the tubes from the pump (gasoline may spill). A special clamping ring-cover is unscrewed. The remaining gasoline should be drained from the fuel pump housing and the sealing ring should be removed. The pump can now be removed.
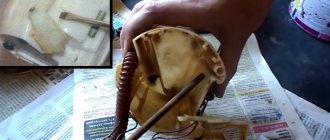
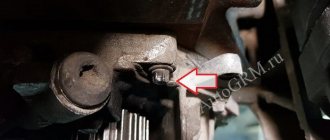
You will need to disassemble the pump to clean it. First, the lower part is removed, and only then the mesh. To dismantle the latter, you need to pick up the filter with a screwdriver at the place where the pump is attached to the housing. Usually the mesh is very dirty.
You can replace the part with a new one, but you can also clean it. As for cleaning the fuel pump mesh, it is better to choose one designed for cleaning the carburetor. If there is a need for mechanical action, it is better to clean the part with a soft brush. Then the mesh is dried and blown. At the end of the process, it is recommended to wash the mesh itself and the bottom of the fuel pump housing with gasoline. All that remains is to put everything back together.
It is not difficult to clean the fuel pump screen yourself. However, as with all repair work, all prescribed safety precautions must be followed. If you don’t want to do the replacement yourself, you can take the car to a service center, where they will do it for little money.
How to measure the pressure in the fuel system?
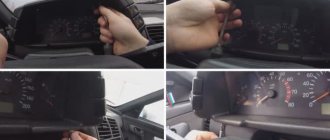
The easiest way to measure pressure is with a special device - a pressure gauge. The kit also includes an adapter and drain. Pressure can be determined using an air pressure gauge. This device is present in almost every motorist, as it is used to measure tire pressure. A normally functioning pump in a VAZ 2110 should have a reading of 2.8-3.2 atm. You need to connect the pressure gauge and check what the indicator is with the engine not running, but with the fuel pump on. It must be no lower than 2.8 atm.
Replacing the VAZ 2110 fuel pump filter is a pressing problem for many vehicle drivers today. In the event that a motorist drives with clogged filters, there is a very high probability that the fuel pump will simply break down and stop pumping fuel to the engine. For this reason, replacing a VAZ 2110 gas filter is an important and responsible matter.
User Experience
My engine rarely stalls. A couple of times there were simply problems with the fuel, but once there was a problem with the pump. I figured out how to take it apart myself. I realized that there was no damage, it was just pollution. I had to change the grille - before I had no idea that they could be cleaned. Since then I have driven a hundred thousand kilometers and so far everything is fine. When another 20-30 thousand are added, then I’ll look under the hood. This time only for preventive purposes.
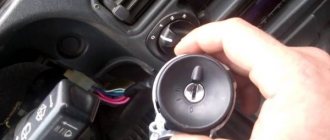
I'm new to driving, but have already encountered this procedure. When the car didn't want to start the first time, I thought the problem was with the battery. But then the engine began to behave strangely - it either would not start or suddenly increased speed. Friends suggested that we need to disassemble and clean the pump. As it turns out, it's not difficult at all.
I became a motorist five years ago. Since then, I have never needed to repair or change anything - my husband usually does this. He simply cleans the grille for himself, but always installs a new one for me. The answer to my questions is that it is safer.
I clean the grille every 150 thousand kilometers traveled. I have a sedan made by Nissan, and I almost never drive it outside the city. Although there are no particular problems, I should do this after about a hundred kilometers. Focus on the ignition - if everything is fine with the battery, then the pump is probably dirty.
I never do this myself and I don’t recommend it. Any car service center will do this procedure almost free of charge. In addition, mechanics spend less than half an hour on it, and when you do it yourself, you don’t know exactly how much more digging you’ll have to do.
On a car like Lanos, replacing the fuel pump grid is not particularly difficult. Therefore, if the time has come to replace this part on your car or characteristic symptoms of a clogged mesh appear, then you can safely get to work. The work will take about two hours at a leisurely pace.
Lanos: replacing the fuel pump mesh is done in a garage, you don’t need to go to a service station for such a simple job, you don’t need rare tools either. Before describing the replacement process, it is worth saying that the fuel pump mesh is located in the gas tank, specifically in the fuel pump glass. The purpose of the mesh is to filter the incoming gasoline into the fuel pump, and, consequently, into the engine. It traps debris and other dirt that somehow got into the gas tank.
Replacing the mesh on the fuel pump is recommended every 30 thousand km. But, if you give statistics, then one part of car owners changes it almost every 10 thousand km, while another, no less, part drives 50 thousand or more, without replacement. Then a logical question arises: when should it be changed?
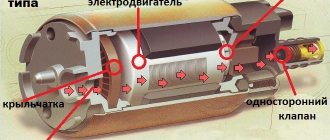
What is a fuel pump and how does it work?
Gasoline filter VAZ 2110
The VAZ fuel pump is an integral part of every car that has an internal combustion engine, so it must be kept in good condition. Usually the fuel pump breaks down in two cases: when the strainer is clogged (we will tell you how to replace it below) and when the car owner drives on an empty tank. In the first and second cases, the fuel pump operates at full capacity and wears out very much.
Note. Car owners are advised to develop the habit of driving on a half-empty tank, in which case the gas pump will last longer.
Gasoline filter for VAZ 2110
In older cars, the fuel pump is not used at all, so the problem of its breakdown does not arise, but, of course, other problems arise. In modern cars, the gas tank and engine are located on different parts of the car, and the gas pump pumps fuel from one part to the other. Types of fuel pumps in modern cars:
There are two types of engines: carburetor and injection engines, both types of these engines use different fuel pumps. A carburetor uses a mechanical fuel pump, and the fuel is usually delivered under slight pressure.
An injection engine, on the contrary, supplies fuel quickly and under high pressure and uses an electric type of gasoline pump (see Electric gasoline pump VAZ 2110 and all about it). The VAZ 2110 uses both carburetor and injection engines, it depends on the vehicle’s configuration.
Fuel pump filter VAZ 2110
These fuel pumps are mounted in different ways; the mechanical type of fuel pump is mounted on the fuel tank, and the electric fuel pump is located directly in the fuel tank. Also, there are VAZ 2110 configurations with two fuel pumps, the first is attached to the gas tank and operates at low volumes, and the second is located directly in the engine and operates at very large volumes. Electric fuel pumps work on the following principle: they push fuel into the engine and the speed at which the fuel is pushed depends on which engine is installed in the car. If the engine is powerful, then the fuel pushing speed will be high, but if the engine is weak enough, then the pushing speed will be lower.
Note. The speed at which electric fuel pumps push fuel is controlled by an electronic system installed on the vehicle.
Gasoline filter for VAZ 2110
On older cars, there is no electric fuel pump, and the fuel supply speed is not regulated in any way. Older fuel pumps deliver fuel to the engine at a constant rate, which prevents it from stalling. Electric fuel pumps are very, very noisy, which is why they are installed directly in the fuel tank. They heat up very quickly, but the fuel in the fuel tank cools the fuel pump and muffles unnecessary noise.
Replacing the fuel pump mesh for Skoda Octavia
I recommend that all Skoda Octavia owners select the mesh according to the fuel pump number, which is stamped on top of the fuel section. There are several options for collapsible and non-demountable structures. In my case, the filter in the form of a flask beats by number. The Skoda Octavia fuel pump is located in the tank; access to it appears after tilting the right side of the rear row of seats.
1. Replacing the Skoda Octavia A5 fuel pump begins with thoroughly cleaning the fuel section. Otherwise, some of this dust and dirt will end up in the tank. This can be done with a vacuum cleaner and a regular brush.
2. Using small blows into the grooves along the inner edge, unscrew the pressure plate counterclockwise. Place a mark on the fuel module body and tank to facilitate positioning of the section during installation.
3. Pull the section out of the tank so as not to bend the float rod of the fuel level meter. Before starting disassembly, pour all gasoline from the flask.
4. Unscrew the 4 screws securing the coarse mesh housing.
5. Disconnect the motor power terminals. Pull off the fuel pump fuel pipe clamp. In the original, a disposable clamp is installed on the car. In my case, I didn’t have one at hand, so I had to install a regular one during assembly. Before removing the handset, warm it up with a hairdryer.
6. Unclip the 3 plastic clips connecting the cover and the bottom of the fuel section.