Have you started to notice a strange knocking noise coming from the engine compartment? When driving on an uneven road with potholes and bumps, the sound appears, but when accelerating or on a flat road it disappears?
Most likely, the engine fasteners are broken, which means it’s time to look under the hood. And if the knocking is accompanied by strong vibration of the body, there is a problem with the engine mounts. What are they and what are they for?
The VAZ 2114 car is equipped with three rubber cushions, two of which support the gearbox, and one serves as a support for the engine.
The direct purpose of rubber supports is to reduce vibrations. When the car moves, strong vibrations occur, transmitted from the engine to the body. To make the ride as comfortable as possible, and the driver not to be distracted by extraneous noise and jolts, airbags are installed.
Without rubber softeners, driving a car would be like riding a cart, just as noisy and shaking.
Signs of faulty engine mounts:
- The appearance of strong vibration, especially at low speeds;
- Metallic knocking coming from under the hood;
- From time to time there is a sound similar to the ticking of a clock;
- Visual damage (cracks on the surface of the cushions, large play in the joints).
If you do not respond in time to the above-described signs of faulty engine mounts, the consequences can be quite unpleasant. Due to the increase in backlash, the engine will start to “spin”, and as a result, the mounts, body, and other dependent components will suffer. Misalignment may cause the cooling fan to hit the radiator or its grille.
To replace the engine mount you will need:
- Two jacks;
- Motor stands;
- A set of keys;
- Inspection hole;
- New engine mounts for VAZ 2114.
Signs of wear
Since the function of the engine mount is to dampen vibrations, if they are noticeable even at idle, this indicates a problem. Among other signs of wear on the airbags on the VAZ 2114:
- Vibration of the gearshift lever. This indicates that all motor vibrations are transmitted to the box.
- If you open the hood, strong vibrations of the engine are visible.
- Uneven car operation. The fact is that when the silent blocks are heavily worn, the crankcase begins to move slightly relative to the clutch. Because of this, the crankshaft position sensor (CPS) constantly produces different signals. The ECU is forced to mistakenly “catch” the revolutions to eliminate the imbalance.
Engine mount malfunctions
The main damage to a pillow is loss of elasticity. The support is made of rubber, which loses its properties with prolonged use.
This is due to constant loads accompanied by changing weather conditions (cold, heat). In the future, the pillow will begin to deteriorate: it will crack and delaminate.
To prevent destruction of the rubber support, it is necessary to inspect it regularly. If damage is detected, the part should be replaced, otherwise strong vibration and extraneous knocking will be felt in the cabin, which will soon affect the operation of the engine.
It is better to replace the airbags in a timely manner than to later spend money on expensive repairs or purchasing a new engine.
The cost of engine mounts depends on the manufacturer, the minimum price for the front support is from 600 rubles, the rear and left ones are 500 rubles each. Average prices start at 1,200 rubles for the front, and 900 rubles for the rear and left.
It is possible to buy a set of three pillows from 3,500 rubles.
To replace engine mounts at a car service center, you will be asked for 1,500 rubles, but you can replace them yourself.
How to change supports
To replace, you will need to purchase front, left and rear airbags. Experts advise replacing the entire set during repairs, since after replacing one part, another one may break after a while. The average cost of parts is 2000 rubles. If you have the necessary tools, you can do the repair yourself and save on car service.
List of tools
To replace the pillows we will need:
- 2 good jacks;
- metalworking tools;
- scrap;
- steel rope;
- glue.
Tip: At some stages you will need to lift a lot of weight, so it would be a good idea to invite a neighbor or a fellow car enthusiast here.
Replacing the front airbag
The repair of each support has its own characteristics. Replacing the front airbag is carried out as follows:
- Put the car in 1st gear or the handbrake so that it does not move.
- To gain access to the support, remove the upper engine protection.
- Raise the engine with a jack. To avoid damaging its lower part or other elements, place a wooden board underneath.
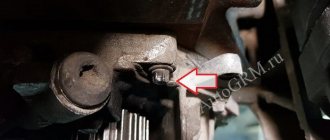
- When we have freed the support from the load, we can unscrew the bolt that connects it to the bracket.
- We unscrew the bolts connecting the pillow to the motor.
Removing the bolt that secures the cushion to the engine - We remove the old part and install the new one.
Design features of engine mounts in the VAZ 2114
Due to the fact that in the VAZ 2114 model the entire load from the engine falls on the front chassis, the requirements for this design have become more stringent. It must be made of high-quality materials with the necessary properties and have accurate dimensions. A special rubber cushion is used as a compensator for loads during acceleration, braking or mechanical impacts.
External view of the VAZ 2114 engine mount
It is important to buy certified original products that can operate normally at low temperatures. The cushion in the VAZ 2114 is one of the most important parts of the engine mount; replacing it is simple and can be done with your own hands. Repairs must be done efficiently using technology to avoid rapid breakdown after the first months of operation.
Replacing the front support
- Place the car on a level surface. Be sure to raise the handbrake or engage first gear. For safety, you can support the rear wheels.
- Remove the engine protection to gain access to the mounts.
- To remove the load from the support, place a jack under the oil pan and raise the engine. It is imperative to place a spacer between these elements in the form of a board.
- When the engine is supported by the jack, we inspect the mounting location of the cushion. We unscrew the bolt that connects the bracket to the support.
- After this, you can disconnect the pillow from the motor unit.
- We clean the fixation points and install the new part in the reverse order.
It is possible that in order to replace the front cushion, you will need to further lift the engine, since the mounting location of the old one has been worn out.
Replacing engine mounts for VAZ Lada 2115 in auto repair shops in Moscow
18 car repair companies
- TTS Motors
- Pyatnitskoe highway, 2
- +7 (495) 24… show all
- Lexus on the market
- Garimotors
- Motorway
- Lorant
- Auto-rad
- Nivus
- Auto complex
- Ddcar
- Technical center gm east
- LR-west
- Tolex tuning Lexus on Taganka
Popular companies
Choosing a support
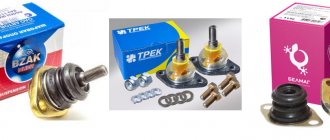
The cost of supports starts from 500 rubles per piece. It all depends on the manufacturer, manufacturing method and materials used.
The front airbag is the most expensive of the three.
As a rule, prices for the front “cushion” are slightly higher than for the left and rear ones, since this is due to the much greater load-bearing capacity of the part and the use of the largest amount of materials.
All supports are in one place, ready for replacement.
In order to replace the supports, it is not necessary to contact a service center, because such work can be easily done with your own hands.
You can suspect that something is wrong with the engine mounts of your car by the characteristic knocking noise under the hood and vibrations while driving.
Today we’ll talk about what engine mounts or mounts are, what they serve and how they are replaced.
Device type
When replacement is necessary
Since the pillow has rubber inserts, it loses its elasticity over time. This becomes noticeable even in the cabin, as an unpleasant vibration appears. The replacement period for a part varies, depending on weather conditions and sudden temperature changes. It is these factors that affect the structure of rubber: it becomes harder.
This is interesting: About power steering
If you do not replace the cushion at this stage, then in the future the part will begin to deteriorate, which can lead to more serious damage to the engine mount. If while driving you hear a knocking noise under the hood and notice increased vibration, you should conduct a visual inspection and, if defects are found, begin preparing for repairs.
Tip: We recommend buying only high-quality pillows from the manufacturer with a guarantee, since a bad part will not properly dampen vibration and will begin to quickly deteriorate.
Self-replacement
Before replacing the pillows, it is necessary to diagnose their condition. The condition of any silent blocks is checked with a mount: with its help you need to influence the support, simulating the movements of the engine during operation. If:
- rubber ruptures are visible,
- the bushing of the silent block touches the joints,
- the motor moves easily when pressed and hits the protection,
- the support bracket is broken,
the part needs to be replaced. Even if the signs of wear are not so noticeable (for example, the rubber is cracked but not torn), it is better to replace them as a set. Silent blocks lose their elasticity over time and begin to perform their functions poorly.
There are regular and reinforced supports for the VAZ 2114 on sale. The second type uses a harder rubber compound, but they are more durable only in quiet driving mode. Fans of sharp starts and braking will have to change any of them every 15-20 thousand; for other drivers they can last 50 thousand kilometers. This is the answer to the question of how long the supports last.
Front engine support VAZ 2114
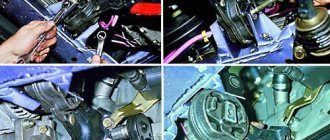
On a VAZ 2114, the supports can be replaced independently, without contacting a car service center. It is more convenient to use a pit or overpass, but you can do without them. To do this, the car is jacked up and placed on supports (bricks or tree stumps). If crankcase protection is installed, it must be removed.
Replacing the front support. You need to jack up the oil pan. First, use a 17mm head to unscrew the 4 bolts securing the bracket to the crankcase, then the silent block bolt. To remove the bolt, you need to use a jack to get it into a position where the engine will not put all its weight on it. When installing a spare part, it is important to lubricate the silent block bolt well: not only the threaded part, but also the body. It is in contact with the metal sleeve, so it can stick.
How to replace the engine mount of a VAZ 2114-2115 with your own hands?
1. Jack up the front part of the car, and then install safety supports under the body.
2. Slightly loosening the nut securing the support to the body, jack up the engine with a jack, installing a wooden block or a thick rubber gasket in the lifting area. This is done so as not to damage the pallet. By slightly raising the power unit, you remove the load from the pillow.
3. Next, unscrew the nut completely and try to pull out the fastening bolt. If the bolt does not fit, try raising the engine a little more.
4. Then we dismantle the old engine mount and install a new one in its place. Align the holes on the cushion with the hole in the body, and install the support mounting bolt. We pre-tighten the bolt, then lower the jack and make the final tightening of the bolt.
5. Replacement of the remaining engine mounts is carried out according to the same principle; differences can only be in the location. For example, changing the front engine mount is relatively simple, the side one is more difficult, but the rear engine mount (box mount) causes a lot of trouble and requires a lift and some skill.
For greater clarity, I recommend watching a video on how to replace engine mounts on a VAZ:
Relevant: WHAT ARE ENGINE MOUNTS? SIGNS OF MALFUNCTION AND REPLACEMENT OF ENGINE MOUNTS FOR VAZ 2110
Replacement
As already mentioned, there are three rubber supports on the “fourteenth”:
- front;
- left;
- rear
Front cushion
- It is necessary to drive the car onto the overpass and make sure that it does not move. To do this, put the handbrake on and engage first gear.
- We remove the crankcase and engine protection, freeing access to the support.
- If the car is not new, to make work easier, all fasteners should be treated with anti-rust solution, and before assembly, all bolts should be cleaned with the same solution.
- Raise the engine slightly using a jack. It is recommended to place a wooden beam or board between them to prevent damage to the part. We carry out the lifting very carefully, avoiding damage to the fan housing and radiator.
- On the body cross member we find a long bolt connecting the bracket to the support and unscrew it.
- We unscrew the mounting bolts connecting the support to the engine block.
- We remove the damaged pillow.
- We install a new one and assemble everything in reverse order.
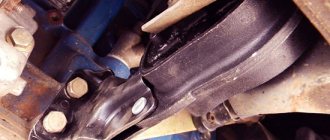
Left pillow
To replace the left airbag, you need to equip yourself with a cable.
- Using a cable, we hook up the gearbox and place a jack under it.
- If the starter is an old type (large size), remove it.
- Find the bolt that holds the support to the bracket and unscrew it.
- We remove the pillow.
- Install the new pillow by performing the steps in reverse order. Before firmly tightening the bolts, check that everything is in place.
Back cushion
To replace the right airbag you will also need a cable.
- Similar to replacing the left airbag, you need to hook up the gearbox with a cable and place a jack under it for safety.
- We loosen the bolts connecting the gearbox and the cushion.
- We also loosen the 2 nuts on the body that hold the cushion.
- Raise the gearbox with a jack and unscrew these 2 nuts.
- We unscrew the bolts from the box that secure the mountings of the pillow.
- Remove the rubber support.
- We install a new pillow, to do this we do what is written above in reverse order. Don't forget to clean off any rust before screwing in the bolts.
How to replace engine oil on a VAZ 2113-VAZ 2115?
Note! Be sure to change the oil only when the engine is warm, because when the car’s engine is warmed up, then all the dirt and all the particles that are in the oil pan are much better cleaned out when the oil is drained and merged with the oil, and if the oil is not hot but cold, then if the engine is not warmed up, then when you drain the old oil into a container, all the dirt that is in the oil pan will mostly remain there, thereby sticking to it, and after filling in new oil it will come off at a high engine temperature, and then dissolve in In new oil, the oil will become contaminated and its service life will decrease!
By the way, the oil needs to be changed only if the car is standing strictly horizontally, or, as they say, level, because if one part of the car is raised, for example the front, then draining the oil will be a little problematic, and not all of it will drain because the car is on a slope !
Draining: 1) Before you start replacing, drive your car into a pit or lift it using a lift.
2) Then take a wrench or socket wrench, and then use it to completely unscrew the drain plug, and after unscrewing, get ready for oil to flow out of this hole, so it is recommended in advance, even before unscrewing this plug, to put some kind of oil under it capacity.
Note! This plug can be easily seen by looking under the bottom of the car, it is also called the bottom!
3) Next, when all the oil has poured into the container, be sure to completely screw this plug into place.
4) Next, take a special puller in your hands and use it to unscrew the oil filter and thereby, after unscrewing, remove it from the car.
Note! If you don’t have a special puller, then try unscrewing the filter by hand, maybe this will work!
And also when you remove the filter from the car engine, always remember that the filter itself contains about 200 grams of oil, so when you remove it, do not spill this oil on the engine, but keep the filter constantly up so that the oil is in the lower closed part parts!
Filling: 1) After the oil filter has been removed and the oil itself has been drained from the car, take a new oil filter and a new oil canister in your hands, and pour new oil into the inner part one third of the filter level.
Note! By the way, also lubricate the sealing ring that fits this filter with engine oil!
2) Then screw the new filter carefully into place, but screw the filter only with your hands, you don’t need to use special wrenches to screw the filter, otherwise you simply won’t be able to unscrew it at all.
3) Next, when the filter is screwed in, unscrew the top cap of the engine filler neck, and then pour oil into this neck (For convenience, fill in the oil using a funnel), but only when filling, be sure to follow the readings of the dipstick, thanks to which the oil level is checked .
Note! Pour oil strictly between the marks on the dipstick; you don’t need to pour anything above or below, so keep one nuance in mind: while you’re pouring oil into the engine, it may not get into the crankcase right away, so if you, for example, pour the entire bottle into the engine and immediately pull out the dipstick to check the oil, most likely there will only be oil on the dipstick for about 0 minutes, so when you pour oil into the engine, do not rush, but wait until the oil has completely drained into the crankcase (This is about 1-3 minutes) and only then check the level oil, if necessary, add more oil and wait for it to drain again!
4) Now when the oil is filled, screw on this cap and then start the engine and let it run for about 10 minutes and only then turn it off again.
5) Then take out the dipstick to check the oil level and use it to check how much oil is left in the system; if necessary, add oil to the required level into the same filler plug and then screw it in.
Additional video clip: You can find more details about how to change engine oil on cars of the Samara 2 family in the video clip located just below and in which the oil change is carried out using the example of a VAZ 2114 car.
The VAZ 2114 engine flywheel is a part whose condition affects both the operation of the engine and the vehicle’s clutch. Replacing it is a labor-intensive process, which, however, can be done on your own.
What is this?
If we talk about the VAZ 2114 model, then there are three supports, two of which are intended directly for the gearbox, and another one for the engine itself.
The main purpose of pillows is to reduce vibrations.
When the car drives, serious vibrations occur, which are transmitted to the body from the power unit. To ensure the necessary level of comfort while driving and not to be distracted by extraneous noise or shaking, special supports are mounted on the car. If you remove them, driving a VAZ 2114 can be compared to riding an old wooden cart.
Causes of malfunctions
The most important problem that pillows face is the loss of elasticity of the material. This is due to the fact that the supports are made of rubber. Over time and with use, these elements lose their original characteristics. Various factors accelerate the wear process of bearings:
- Regular exercise;
- Long service life;
- Cold;
- Heat;
- Temperature changes, etc.
If elasticity decreases, this entails the formation of cracks and delamination of the material.
Replacement is purely a matter of time. But the procedure for changing the front and all other pillows should be carried out on time. If you drive for a long time with worn out bearings, this will result in a negative impact on engine performance. Then the repair will cost much more than the cost of new supports.
The main advice is to periodically check the condition of the supports for wear. If you detect a fault in a timely manner, you can replace it yourself and significantly save on car repairs.
How to replace the flywheel of a VAZ 2114
To prevent a short circuit, before starting work you need to remove the negative terminal from the battery. The VAZ 2114 flywheel is dismantled in the following sequence:
- install the machine on a viewing hole or lift;
- open the hood;
- unscrew the bolts securing the crankcase protection and remove it;
- Unscrew the bolt securing the ground to the crankcase and disconnect the wire;
- loosen the clutch cable tension nuts;
- remove the clutch cable from the lever;
- disconnect the wire terminal of the starter traction relay;
- unscrew the nut securing the starter power wire;
- remove the starter power wire;
- unscrew the three nuts holding the starter and remove it from the car;
- loosen the clamp securing the gear shift joint;
- remove the gear shift rod from the tip;
- disconnect the wires from the speed sensor (located in the upper part of the gearbox);
- remove the reverse switch wire terminal from the sensor located on the gearbox;
- Unscrew the bolt of the lower right mounting of the gearbox to the body;
- Unscrew the bolts and remove the clutch housing cover;
- unscrew the lower left gearbox mount;
- hang or support the engine so that it does not fall over;
- unscrew the nuts holding the engine mounts;
- remove the supports;
- remove the gearbox from the bushings using a powerful screwdriver;
- move the gearbox back so that the input shaft disengages;
- lower the front end of the gearbox and remove it from the car;
- unscrew the 6 bolts securing the clutch basket to the flywheel;
- remove the basket, holding the driven disk;
- unscrew the flywheel mounting bolts and remove them together with the locking plate;
- remove the VAZ 2114 flywheel from the crankshaft flange.
After dismantling the flywheel, you should inspect its condition and make sure there are no burrs or deformations. Minor risks and scuffs can be eliminated by grinding the surface of the flywheel on a machine. The layer of removed metal should not exceed 1 millimeter. If deep scoring or deformation is detected, the flywheel should be replaced with a new one. The flywheel runout should be no more than 0.1 millimeters. The flywheel ring teeth cannot be restored. If they have severe wear or are missing at least one tooth, the flywheel must also be replaced.
Lada 2114 Blue-Green › Logbook › Replacement of VAZ 2114 engine mounts
To complete the work you will need an inspection hole or overpass. I changed it without a pit or overpass.
To complete the work you will also need: a new support/pillows, a jack, a set of socket heads and wrenches, spanners, a ratchet, a plank, and rust preventative (if necessary).
Work diagram for replacing engine mounts of a VAZ 2114 car:
• The car is “driven” into the pit and secured with reliable stops. • The terminal from the battery is removed for the safety of the work. • A jack is placed on the engine under the pallet through a wooden stand. • The engine protection is removed.
When replacing the front support, jack up the engine from the tray!
To replace the side and rear supports, you need to jack up the gearbox.
Unfortunately, I forgot to take a photo of the old supports and threw them away!)
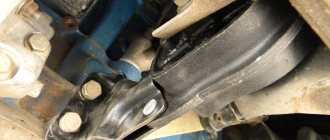
The photo shows the old rear support
When replacing the engine mounts, all the cushions were cracked))) they were coming off))) The reason for the replacement was that even on small bumps something was hitting very loudly under the hood! When I opened the hood, the engine was wobbly, it was DOUGGING there (((and it was decided to change all 3 supports, regardless of the fact that any of the old supports would be intact.
What difficulties may arise when replacing supports?
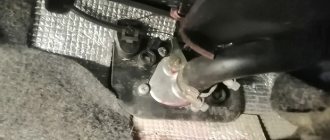
I had a problem when replacing the side support; when unscrewing the bolts, a pin unscrewed in the place with the bolt and rested against the starter! (It was decided to remove the starter (the starter is mounted on 3 bolts at 13m) Before removing the starter, we remove the
ground
and
plus.
When replacing the front and rear supports, no problems arose except that the rear support stud turned and did not tighten as it should!(
This is my first post. Thank you everyone, comment and give us a thumbs up!
Source
What is needed for this
Use a hydraulic or other jack.
To carry out the test, you will need:
- hydraulic or other jack you have;
- some kind of safety support, such as a wooden block or something else;
- lever – a pry bar or a strong stick is perfect for this.
avtoexperts.ru
The car engine is quite heavy and subject to vibration, so it must be secured against any displacement during operation. If the fastening points are rigidly connected to the body elements, they will fail very quickly, since when driving over uneven road surfaces, the fastening points will absorb significant alternating loads.
Plus, the entire body will constantly vibrate, which, in addition to discomfort for those inside the car, will also negatively affect the durability of all elements of the car.
Purpose
Special supports, or cushions as they are also called, are used to dampen vibrations during engine operation and to securely fix it.
The name of the support as a pillow is not accidental, as it fully corresponds to its purpose. So, in Ozhegov’s explanatory dictionary, one of the meanings of the word “pillow” is something that supports something, takes on the pressure of a mechanism.
The main task of installing supports is to securely fasten and minimize sideways movement during operation.
In addition, thanks to the pillows, the power unit is isolated from all body parts, which makes the car comfortable to drive.
Depending on the car model, the engine can have from 3 to 5 airbags.
So the front and rear airbags monitor vibration at idle and when the engine reaches maximum load.
Design
The simplest support is a rubber-metal element, where a layer of rubber is placed between two steel plates. The plates have a threaded part in the form of a pin at the ends for connection with body parts. Such products can be made either integral or collapsible.
Some supports, for example, the classic VAZ 2101-07 models, also had a spring and a rubber bumper inside the cushion, which increased rigidity and softened strong impacts.
Recently, increasingly, instead of rubber, manufacturers have begun to use polyurethane, as the most wear-resistant, and metal in most cases has given way to aluminum.
On more expensive car models, more modern designs, such as hydraulic supports, are used for greater driving comfort. They consist of two chambers and a membrane between them; the chambers are filled with liquid, which, when loaded, can move from one container to another.
Such supports can be adjusted to the operation of the power unit in any mode of operation and are capable of maximally damping any vibrations that occur, significantly increasing the degree of comfort when operating the car.
The greatest loads on the engine mountings occur when starting the engine, starting and stopping the vehicle. A faulty mount increases the stress on the engine and transmission, making them more likely to fail.
• Cracks, breaks in the filler body or steel plates;
• Peeling of rubber from metal;
• The motor “bounces” when starting and braking the car;
• Vibration radiating to the steering wheel, gear knob and the entire body;
• Shocks when changing gears;
• Impact when planing at reverse speed;
• When driving on an uneven road, knocking noises are heard, similar to a malfunction of the chassis.
Causes of malfunction
There can be several reasons for premature pillow failure. For example, when tuning a car, shock absorbers with a stiffer characteristic and low-profile tires are installed to improve handling and change the appearance of the car. However, in this situation, the shock absorbers in the pits do not completely dampen body vibrations, which have a negative effect on all suspension elements, including the engine mounts.
Driving style. These are sudden starts and braking that provoke huge loads on the engine mounts due to a rapid shift in the center of gravity. This also includes driving over bumps on the road without slowing down.
Natural wear and tear. These are mechanical loads, temperature changes, aging of the rubber filler, which loses its elasticity.
Replacement timing
On average, the power plant supports are capable of operating for about 100 thousand kilometers or more (up to 200 thousand) with moderate driving and proper monitoring of their condition.
If any signs of malfunction of the engine and gearbox mounts are detected, it is recommended to replace them without delay. At the same time, you should not purchase products from an unknown manufacturer, giving preference to the original.
Finally. Serviceable supports mean comfort and safety of movement, as well as extending the life of your power unit.
Video.
If it happens that while driving on an uneven road you hear a sound from the engine compartment, accompanied by vibration in the body, which immediately disappears as soon as you move to a flat surface, then most likely you have problems with the engine’s locking elements. Simply put, there are faults in the engine mounts.
Video about replacing the front engine mount below:
On the VAZ-2114, the design provides for three such elements, and only one of them holds the engine, and the rest the gearbox.
Replacement result
After assembling all the parts, you should check whether the replacement was carried out correctly. To do this, you need to start the car and drive the car on a rough road.
If no more knocks bother you, and the car doesn’t shake like a tractor, then the job was done correctly. Otherwise, you should check whether you have placed the pillows evenly.
In order to extend the service life of the engine mounts, you should check that the bolts are well tightened and periodically remove dirt from them. Only regular monitoring will help delay the occurrence of engine mount malfunctions.
How to remove a generator on a VAZ 2114 and 2115 Available methods
- The terminal is removed from the battery; this should be done for all work on the car’s electronic systems;
- The car is jacked up, the right wheel is removed;
- The mudguard is unscrewed;
- Remove connector block D from the generator;
- After that, using a 10mm wrench, unscrew the wire from terminal B++. The wires are removed;
- The generator adjusting screw is loosened. The belt is removed. The screw should be completely unscrewed. Remove the tension bar;
- Using a 17 socket, unscrew the 3 screws securing the generator bracket to the cylinder block;
- The generator is removed;
- Remove the bracket, to do this the nut is unscrewed, this is done with a 13 key. The screw is removed.
- Unlock the cover fastening latches and remove it;
- Use a Phillips screwdriver to unscrew the 2 screws securing the voltage regulator;
- The block of wires from the regulator is disconnected, and it is finally removed from the generator;
- Using a 10mm wrench, tighten the nut securing the capacitor wire. Next, unscrew the screw securing the capacitor itself;
- We remove the diode bridge. To do this, unscrew the screw securing the block with a Phillips screwdriver. Next, unscrew several screws securing the winding terminals. There are insulating washers on the screws;
- We remove the winding leads and remove the diode block;
- While holding the head from turning with a gas wrench, use a hexagon to unscrew the pulley;
- Using a Phillips screwdriver, unscrew the 4 screws holding the covers together;
- We mark the position of the covers relative to each other. Separate both halves;
- We remove the stator;
- We clamp the cover with the rotor in a vice. We knock it out with a punch;
- All that remains is to remove the bearing using a puller.
AutoFlit.ru