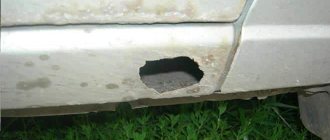
Cold methods of sealing holes in thresholds
Depending on the degree of damage, a cold or hot repair method is selected. The cold method includes body work that does not require welding equipment. A small hole can be sealed:
- construction putty;
- using fiberglass;
- primer and secured with moldings.
The semi-hot method involves using a soldering iron to seal small holes.
How to fill a hole with fiberglass
The easiest way to repair a hole in a car sill without welding is to use a fiberglass patch. For repair you will need:
- The two fiberglass patches are 2cm larger than the corrosion area. Fiberglass or fiberglass can be used.
- Automotive primer, degreaser.
- Sandpaper, grinder for preliminary cleaning of the surface.
- Putty knife.
- Varnish, paint.
Self-repair takes up to 1 hour and does not require special skills, you need:
- Use a grinder to remove the old paint layer.
- Clean the threshold, if rusty dents or through holes are found, treat with a degreaser.
- The dents should be primed well and the material should dry completely.
- Cut out the fiberglass pads, place them on a dry surface, and secure them with adhesive and epoxy resin.
- After drying, the surface is primed, sanded and painted.
When using fiberglass, it is recommended to additionally secure the thresholds with moldings.
Filling holes with putty
It is recommended to restore thresholds with putty in the following cases:
- In the absence of large through holes.
- If moderate pockets of corrosion are observed that have not affected the geometry.
- For primary rust.
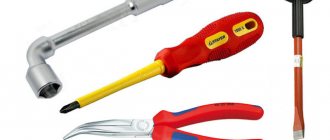
Sealing thresholds using this method is quite simple; repairs take up to 2 hours and do not require special skills, but you must have the necessary tools and material. For repair you will need:
- construction fiberglass and automotive standard putty;
- Bulgarian;
- aluminum mesh if you have to patch a significant but only hole;
- medium abrasive sandpaper from 800 grit;
- medium spatula;
- degreaser;
- automotive primer;
- paint, varnish.
Starting repairs requires preliminary preparation of the surface, for this you need:
- Clean the threshold from old paint by cutting off the layer of waste material with a grinder.
- Sand the surface and treat with degreaser.
- If the threshold does not have through holes, aluminum mesh is not used. If a significant deep focus of corrosion is discovered, cut out a patch of the required size from the mesh and apply it to the recess.
- Cover the mesh with construction putty. If the damage is minor, apply a layer of putty, leveling the composition. Let it dry.
- Sand and apply a thin layer of automotive primer.
- After drying, clean the area with sandpaper.
- Paint over, varnish.
The option of sealing holes with construction putty is often used when repairing a body, but experienced drivers do not recommend it, since it begins to dry out after 7-9 months, allows moisture to pass through, and corrosive destruction continues.
Cold welding method
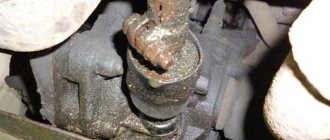
The method is suitable for sealing small holes in thresholds, when there are no large pockets of rust and the internal metal, threshold amplifier, is not damaged. For repairs you will need polyester resins for body work, i.e. epoxy. Repair process step by step:
- Holes are cleaned with emery, a grinding wheel, and degreased.
- The resin is diluted in the required proportions or a ready-made composition is used.
- Fiberglass of the required size is impregnated with resin and glued to the hole.
- After drying, the surface is primed, sanded and painted.
This method is suitable for repairing those parts of the body that do not experience stress. If this method is chosen for thresholds, it is recommended to always install metal moldings.
Repair technology
Fixed thresholds are repaired in two ways: with or without welding. The method of sealing holes in the outer cover of an element with a soldering iron is not recommended either by experienced drivers or service station technicians. After soldering, the process of electrochemical corrosion begins on the metal, as the structure of the metal of the patch and the base is destroyed. You can solder the threshold in exceptional cases, not forgetting that this is a temporary measure that will require a complete reinstallation of the part in 3-6 months.
It is also recommended to use fiberglass to seal through individual corrosion plaques in exceptional cases. This is a short-lived cosmetic type of repair that does not provide reliable structural rigidity. Repairing car thresholds with epoxy glue and fiberglass in steps:
- Use a grinder to cut off the old paint and clean the area of corrosion.
- Treat the surface with a rust converter and sand it with sandpaper.
- Dilute the epoxy resin, be sure to add aluminum or copper powder to the glue.
- Cut 3-7 patches from fiberglass with an area slightly larger than the hole to be repaired.
- Apply epoxy slurry to the surface and apply a patch.
- Coat the repair area and apply fiberglass in several layers.
- Roll with a rubber roller, remove air and excess glue.
Epoxy glue dries in 24-36 hours. After this, it should be cleaned with medium abrasive sandpaper, primed and painted.
The best method of repair remains welding; how to digest thresholds depends on the degree of damage to the element. It is recommended to use electric welding using a carbon dioxide semiautomatic device or an inverter. Gas welding using electrodes is a rather complex type of work, since it is necessary to have extensive experience and practical skills in order not to burn through the metal and lay a high-quality seam.
Repair by sealing the hole with metal
Metal patches and subsequent soldering are considered the most productive means for restoring thresholds, even with a large area of corrosion. If rust has not led to deformation of the central pillars and distortion of the geometry, then you can use metal patches and strengthen them with a soldering iron. For repairs you will need the following materials and tools:
- metal patch, size 2 cm larger than the corrosion hole.
- assembly hammer;
- Bulgarian;
- medium abrasive sandpaper;
- anti-gravel;
- anti-rust composition - phosphoric acid, if available;
- soldering iron, tin solder;
- automotive primer, degreaser.
Repair cost
If you need to replace thresholds on a car, then it is worth considering that the price of work at a service station starts from 10,000 rubles. A comprehensive restoration of arches and wings will cost at least 25,000 rubles. The high cost is fully justified by the labor required by the craftsman and the cost of components. A common belief is that repairing body parts is a simple job and can take no more than an hour of time, rather than a marketing ploy.
You can save tenfold on repairs if you carry out the welding yourself in the garage. This is justified when the driver has minimal welding skills, knows the design of body elements, and understands what material needs to be used in what sequence. You won’t be able to save time; independent work, even with an assistant, rarely fits into 3 days; you need to be prepared to spend a week.
Fixing pinholes
When diagnosing a car, if there is a pinhole from corrosion on the threshold, in 80% of cases it is necessary not only to repair the hole, but also to change the amplifier. A full inspection will reveal large areas of rusty metal under a layer of paintwork. If a pinhole occurs from mechanical damage, then it is not associated with natural wear of the metal, so small holes are sealed using putty or soldering.
Soldering is carried out according to the same algorithm as sealing a hole with a sheet of metal, the only exceptions being the small size of the patch.
Use of soldering
If small holes in the threshold or bottom of the car are sealed with soldering, then simple tips will help:
- For heating metal more than 0.5 mm thick, household soldering irons are of little use. It is better to use a portable gas burner that has a small cylinder from 400 to 700 ml. The work will go faster.
- To solder thresholds you need solder and flux. For solder, a composition with lead or tin is used; the flux can be replaced with electrolytic acid.
Experts recommend not using soldering for body work at all. The main reason is that solder, tin or lead have a much lower electrical potential than iron; during their contact, electrochemical corrosion occurs, which can subsequently lead to full-fledged rust at the joints.
The second disadvantage of soldering is hot work, which is carried out in a safe place and as carefully as possible.
Replacing thresholds with your own hands
Example of threshold cut lines from the repair manual
Sill panels have different designs depending on the make and model of the car. There may be several separate ones or one solid amplifier. Before you get started, you need to know how the thresholds on a particular car are designed. To do this, you need to study the repair manual. It shows where to make cuts and joins. If you have a new threshold panel available, plan the cut locations based on its shape.
Use masking tape to mark where to cut
- Place the threshold repair panel on top of the old threshold. Outline the boundaries along which you will need to cut the threshold. Instead of outlining, you can apply masking tape. Add about 3cm of extra space on each edge. This piece is needed for adjustment or for an overlap connection (if you decide to use this type of connection).
- Be careful not to cut close to the base of the B-pillar to avoid cutting through the reinforcement that is located there.
- After the initial cuts have been made, drill out the contact welding points (see article) and remove the damaged threshold.
B-pillar amplifier
- Be sure to remove any burrs from the cut ends of the threshold. This will prevent splashing of molten metal during welding and prevent a weak weld.
- After dismantling the old threshold, you need to align the flanges on which the threshold was attached and clean off the remnants of spot welding.
- If the internal reinforcement has traces of rust, they must be treated with a rust converter and protected with an anti-corrosion agent. If it is significantly damaged, then it is better to replace it.
- Remove the paint from the areas where the connection will be made.
- If necessary, treat the inside of the new threshold panel with an anti-corrosion compound.
- When making a temporary installation of a threshold for testing: install the threshold using special clamps or screws. Self-tapping screws will not interfere when closing doors to check gaps. The holes from the screws will need to be welded later when the threshold is finally installed.
- Place the car in a transport position so that the weight of the car is supported by the suspension. In this condition, check the position of the threshold and the gaps with the doors and fender. If necessary, adjust the threshold position.
- When preparing a welding area, apply welding primer to areas with bare metal. Welding primer can be removed directly from the welding site to reduce slag formation and increase weld quality (see more details here).
- When replacing a threshold, an overlap connection, a butt connection with an insert, or simply a butt connection are used. We will consider the types of connections in more detail in this article below.
- Weld the seam. Thermal distortion is one of the problems in welding. Cook stitches every other period and then fill in the remaining gaps. You can also use compressed air for cooling.
- Factory welding points are replaced by semi-automatic welding points or resistance welding. When replacing an old threshold with a new panel, holes with a diameter of 8 mm are drilled in it.
When welding thresholds on flanges through holes, position the welding torch with wire in the center of the hole so that the wire touches the metal to which the panel will be welded. It is necessary that the electric arc forms precisely on the metal to which the panel will be welded, and not on the edge of the hole. Start welding in this position and do not move the welding torch until the hole is almost full. Next, move the burner in a spiral towards the edges. This way the penetration into the metal being welded will be good and the welded joint will be strong.
- Clean the welds. When stripping, do not remove too much of the seam as this will weaken it.
- Provide anti-corrosion protection. You can use epoxy primer directly on the weld area before applying subsequent coatings. Through the technological holes, treat the threshold from the inside with an anti-corrosion spray compound.
Repairing large-scale damage
Any hole in the threshold of a car indicates the beginning of corrosion, but what to do if the destruction of the metal is large-scale and simple means cannot be avoided? In this case, a gas welding machine is required, a complete digestion of the body, and sometimes a complete replacement of parts of the bottom and wings.
Superficial repairs using putty, fiberglass, and small metal patches will not change the situation dramatically; rotting of the body will continue.
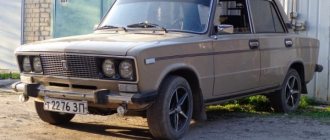
Thresholds and bumpers are considered the most vulnerable parts of a car body. Gravel flying out from under the wheels of the vehicle in front damages the paintwork, and improper crossing of the edge and careless parking lead to dents. Timely repair of thresholds without welding with your own hands will prevent corrosion of the metal and seal and restore the aesthetics of the car.
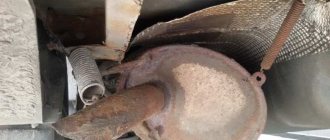
The device of car thresholds
The outer part of the threshold is not the main power part of this structure. It provides rigidity to the body, but the main rigidity is provided by the internal reinforcement, connector and internal part of the sill. These panels are spot welded together to form a box-shaped hollow structure that bears the bulk of the loads. This design gives the car longitudinal strength. The outer part of the threshold provides a more cosmetic function.
Each internal part of the threshold plays a role in providing structural rigidity. The entire sill design reinforces the underbody.
Example of a car threshold design
- The inside of the sill is the part that can be seen from inside the car.
- Connector - This part can be seen from below the car.
- The internal reinforcement is usually a flat piece of steel that is stamped for reinforcement.
- The outer part of the threshold is the part of the threshold that can be seen from the outside, it is called the threshold.
The design of the threshold of a particular vehicle may differ from that shown in the illustration.
What are the defects?
Depending on the degree and type of damage, the repair method is selected. Without welding, it is possible to restore a part in the following cases:
- Dent of a non-removable element, bend of the lower edge. If the dent is shallow and without a sharp edge, then the drawing method, back hammering, and straightening are used.
- A chip in the paintwork with a small area of corrosion. Anti-corrosion metal treatment, stripping, and grinding are used.
- Point-through corrosion can be repaired with epoxy resins and fiberglass patches.
Do-it-yourself repair of rotten thresholds is carried out only by welding. It is necessary to cut out or knock out the rusted metal, weld a patch or a new part of the structure.
Removable elements are repaired only with minimal damage: dents, scratches, chipped paintwork. In case of serious defects, the part is replaced with a new one; the cost of the analog and repair costs are almost the same.
Technology of repair and painting processes of thresholds
First of all, let's delve into the general details. Thresholds can be removable or non-removable. And the difficulty of eliminating the damage significantly depends on this. Removable ones are much easier to restore and paint than to do it directly on the car body. Here you need to have quite specific knowledge. Methods applied to other body parts may not work. And removable ones have their own characteristics, which must also be taken into account. After all, with poor-quality repairs, for example, the threshold may simply not fit into place, which in the future will make it even more vulnerable to fracture. So it is necessary to approach this problem armed with certain knowledge in this area. And the Nikrasoff company has such skills.
Regardless of the complexity of the case, the cycle must be completed completely. What to do carefully and carefully. A car threshold is a capricious thing. Any flaw will be immediately apparent. And even if it is possible to initially hide the damage, then during operation external aggressive factors will definitely find a weak point. So it is necessary not only to restore the appearance, but to give it its former strength and rigidity.
If the paintwork is not damaged, you can use the service of our car service - repairing dents on thresholds without painting.
The cost of removing a dent using PDR technology is lower than the cost of traditional straightening and painting, and the time to straighten a dent on a threshold usually takes no more than 1-4 hours, depending on the size of the damage.
Restoration methods
There are more than ten ways to repair car thresholds with your own hands without welding. With the advent of new samples of glue, resins, protective fibers and equipment, the number of methods is increasing. The most common, simple ones for garage repairs:
- fiberglass treatment;
- epoxy glue;
- construction foam;
- hood without painting;
The use of a reverse hammer, as well as a spotter, are both spot welding repair methods.
fiberglass
Repair using fiberglass or fiberglass is quite simple, cheap, but reliable. Advantages:
- does not interact with reagents on the roads - water, acids, electrolyte;
- has little weight;
- easy to use;
- used for a long time;
- has a low price.
As an alternative, fiberglass or fiberglass is used. The method is used if there are pronounced pockets of corrosion on the metal, without impact deformation. Epoxy glue or resin is used together with the material.
For repairs you will need sandpaper, hardener, brushes, spatulas of different sizes. As a substitute for epoxy glue, you can use polyester resin, which is similar in properties, but somewhat inferior to epoxy in strength. To complete the surface sealing you need:
- Use a grinder to remove the paint layer.
- Sand it with sandpaper.
- Cut a patch from the fiberglass larger than the corrosion area.
- Degrease and prime the surface.
- Glue the patch with putty or epoxy glue.
- Fill the surface and prime it.
- Treat with anti-gravel compound.
- Paint it.
Epoxy glue
A common epoxy adhesive is the ED-20 brand; as a rule, it comes complete with PEPA hardener. These components are mixed in a ratio of 1:10. When working with epoxy glue, you must take precautions, protect your eyes and hands. Contact with chemically active substances can cause severe irritation of the skin and mucous surfaces of the eyes, which can cause allergies.
The repair procedure is similar to using fiberglass. If the deformation is minor, it is permissible not to use reinforced mesh. The glue is applied to the damaged area in several layers, puttyed, primed and painted.
Construction foam
Manufacturers of Japanese vehicles often use special foam, which is used to fill the permanent threshold box during factory assembly of the car. It is believed that the material will ensure that there is no corrosion inside the threshold and will preserve the parameters of the seal. The sealant is anti-corrosion resins and mastics, polyester components, which have nothing in common with construction foam.
Common Mistakes
If you have no experience in body repair, you can make mistakes even when correcting minor damage. To prevent them, it is useful to familiarize yourself with the mistakes that beginners and non-professionals make most often.
Common mistakes when repairing thresholds:
- When repairing metal thresholds, the surface is not cleaned properly. The entire outer part and connector must be carefully treated to remove all traces of rust.
- Metal patches welded to thresholds are not treated with anti-corrosion compounds. To prevent the metal from becoming leaky, it must be cleaned and an anti-corrosion compound applied on top. They also need to process the insides of removable thresholds.
- I don't treat the underbody of the car. When repairing, it is necessary to apply protective mastic to it.
- They forget to check the drainage holes. They need to be cleaned and Movil or another preservative must be poured into the cavity of the thresholds.
Every car enthusiast will be able to eliminate minor defects in thresholds, having the necessary tools and materials at hand. If everything is done correctly, you can postpone contacting the service for a couple of years. Complex damage requires the use of welding and certain skills, and if they are not available, it is better to turn to professionals.
How to stretch a threshold without welding
Repairing a threshold after a dent involves using a reverse hammer, a suction cup, or cutting the area of deformation for a non-removable element. The algorithm of action is as follows: it is necessary to drill holes with a diameter of 1-2 mm near the dent, insert special metal corner hooks of a reverse hammer into them. Then tapping on yourself straightens the area of deformation.
You can weld by spot welding, placing the end of a hammer on the dent, and drawing out the metal. In this case, you need to start from the corner of the dent, welding the end every 3-5 mm, while straightening the surface with a hammer.
The most reliable way to stretch the threshold without full welding is to use a spotter, rings, or stop. The method is often used at service stations, since many drivers do not have the necessary tools in the garage. You can make the device yourself from a used microwave oven. Drawing process step by step:
- The negative terminal from the battery is disconnected.
- Using a sanding machine, a layer of old paint is removed from the entire surface of the dent.
- Spot welding is used to install rings through which the puller bar is passed, and the metal is drawn out using a stop. The procedure is repeated until the surface becomes as smooth as possible.
- The metal is sanded with emery, treated with a degreaser, and primed.
- A thin layer of automotive putty is applied and treated with anticorrosive.
- After complete drying, it is painted with enamel.
Another way is to use a vacuum suction cup. This approach allows you to preserve the paintwork. The difficulty of using suction cups is due to the uneven edge of the dent; it is quite difficult to use a vacuum even if the dent has sharp edges and metal creases.
A frequent question about how to repair rotten sills on a car has only one answer: nothing. Rotten parts must be knocked out or cut out, the seal checked, and new metal welded. Cosmetic repairs are used only before urgently selling a car, but this is just one way of deceiving a gullible driver; it has nothing to do with a full restoration.
It must be remembered that thresholds are called rotten if metal corrosion exceeds 65-70% and there are through holes.
With minimal foci of primary corrosion, the elements are ground, treated with putty, and primed. To strengthen the structure, plastic or aluminum overlays are used.
Now let's look at each process separately and thoughtfully.
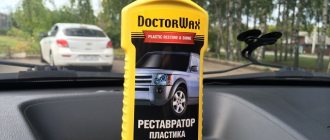
How to repair a plastic car bumper with your own hands
Repair of car thresholds.
When starting to restore damaged thresholds, it is necessary to take into account the rather strong difference between these elements in different car models. They serve both as body rigidity and as an aesthetic component, because they are visible to everyone. Therefore, repairs must be carried out with sufficient precision so as not to worsen any of these factors.
A variety of methods are used for this process, and they often have to be used in combination. Sometimes it is enough to use pads, but sometimes you have to use welding and metal pulling. And here again the subtlety appears - if this is done poorly, then after a month or two it will burst in the same place. Efforts and resources were expended, but the result was nothing.
That is why it is better to turn to specialists who have professional skills in this matter, like the masters of the Nikrasoff car service network. In this case, you can be sure that at one “wonderful” moment a thick piece of putty will not fall out of the threshold of your car, with which the damage was simply covered up, without doing anything to restore it.
In addition, for this process it is necessary to use a whole set of specific tools, the names of which not every person will hear in their entire life. And for us, this is a familiar and favorite job, so all our technical centers are equipped with everything necessary.
Painting car sills.
It’s not that simple here either. In the case of a removable threshold, you need to be able to do this so that during installation you do not damage the fresh layer. After all, any crack will definitely find a path further. And when painting non-removable ones, not only is it necessary to protect all neighboring elements of the car from accidental splashes (and this often has to be done with the door to the salon open!), but at the same time manage to get to all the hard-to-reach bends of the thoughts of the designer of this model.
It no longer matters in what case the painting is done - after the thresholds have been repaired due to damage or as a result of corrosion, or whether this is a preventive step to prevent its formation. In any case, an experienced hand is required.
In the case of painting the thresholds of a car, it is necessary not only to completely match the main color of the body, but also to create a certain protective layer for further use. In the Nikrasoff boxes, a special room is equipped for this purpose, equipped with all the necessary means for painting thresholds of any complexity.
- What do you get as a result when you contact us to repair damage to your car sills:
- Restoration of the body's former rigidity, regardless of the degree of damage to the sills.
- Returning the factory look of the paintwork, which does not contrast in any way with the main color.
- An economical and quick way to eliminate one of the most annoying car body problems.
- Confidence that the thresholds of your car will continue to provide reliable support and support.
Restoration of permanent thresholds
A reliable technology for restoring a permanent threshold remains the application of a metal patch by welding if there are through holes and large corrosion damage. Pull out dents with a reverse hammer or spot welding; chipped paintwork with epoxy resin.
If it is necessary to repair a removable part from primary rust and it is not possible to replace the part, it is recommended to use fiberglass and epoxy glue.
The thresholds are first removed so as not to damage other body parts. Then traces of rust are removed from the surface using a solution. Next, the epoxy resin is diluted with a hardener and applied to a previously degreased surface. Pieces of fiberglass of the required size are placed on the laid glue and pressed down for adhesion. After 12 hours, the area is sanded, uneven areas are removed, a layer of primer is applied, and at the final stage it is painted.
If we are talking about minor damage - rust or dents in a small area, then even beginners can do such repairs. If you lack the skills or desire, it is recommended to contact specialized workshops; tinsmiths will conduct a full inspection of the part and adjacent elements, and will also suggest how to seal the thresholds in the car reliably and quickly.
Repair of plastic car thresholds
There are two ways to repair plastic sill trims.
The first method is simple, but expensive - replace the old panel with a new one. The second type of repair work almost repeats the filling of holes on a permanent metal threshold:
- Remove the panel to carry out work on a workbench.
- Clean part of the plastic from the front side.
- Cut several fiberglass patches to size
- To improve adhesion with glue, you can drill several through holes around the hole with a thin drill. The glue will “flow” through the plastic, forming a reliable connection like a riveting one (similar to a chemical anchor).
- Apply two-component epoxy glue to the area around the hole and onto the first patch, and apply the first piece of fiberglass. Coat the second flap with glue and place it on top of the first.
- A clamp is made from a small board and wrapped with polyethylene stretch film.
- Press the board against the patch from the front surface with a clamp.
- Turn the panel inside out. Apply two more layers of fiberglass and epoxy glue to the hole from the inside out. Leave to dry.
- After polymerization of the epoxy resin (at least 24 hours), remove the clamp from the clamp and remove the remaining stretch film from the patch. The front surface of the panel is sanded, prepared for painting and painted.
Car body soldering
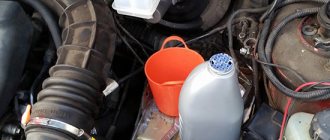
This method is used to seal small and large holes without welding. To work, you will need flux, which will protect the metal from rapid oxidation. Soldering acid, sold in radio stores, can successfully cope with this task. To achieve the required temperature, you will need a soldering iron with a power of 1 kW or more, or a version heated with a blowtorch, but it is better to use a gas torch. The solder is chosen to be refractory, since it can be used to repair a hole in the car body more reliably.
Small holes are simply filled with solder, starting from the edges and gradually fusing to the center. A large hole in the body is covered with a patch cut from tin from a tin can. It provides:
- strong connection, almost like welding;
- significantly longer service life than putty, but less than welding;
- possibility of sealing large holes;
- ease of implementation, repairs are accessible even to beginners.
The work is performed in the following sequence:
- A patch is cut to fit the size of the hole. The larger the area of contact with the body, the more reliable the connection.
- The soldered edges of the patch and the damaged areas are cleaned with sandpaper until shiny.
- Using flux and solder, the cleaned surfaces are tinned.
- After applying the patch to the repaired area of the car, it is heated to the melting temperature of the solder. In this case, you need to ensure the continuity of the seam so that there are no missing sections.
- After cooling, the remaining flux is removed, and the soldering area is washed with hot water and soda.