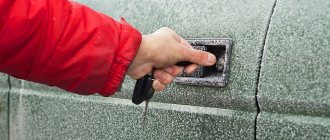
Reasons for replacing the lock cylinder on a VAZ
Most often, the lock cylinder in the doors of VAZ-2113, 2114 and 2115 has to be changed in the following cases:
- In case of defects or breakages of the locking ring or fixing post. Both of these parts are located in a plastic rod cap and are easily destroyed under the influence of an aggressive external environment - during large temperature changes, in the cold season, etc. The problem is often discovered when a car owner tries to open the car in cold weather. The key starts to turn, but the mechanism does not work. If the cylinder is additionally loaded at this moment (for example, by pressing the door, knocking on it, pushing or pulling), the part will come out of the handle socket.
- When worn. During the operation of the car, the internal pins of the device wear out and when you try to turn the key in the cylinder, the parts begin to cling to each other, which ultimately leads to their destruction.
- If the car owner decides to upgrade the door handles or install European locks.
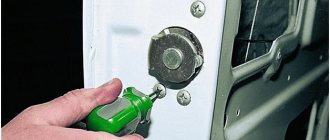
Old castle larva
How to replace all door locks, rods and cylinders?
Removal:
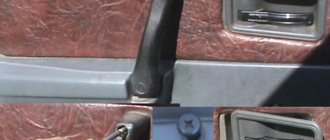
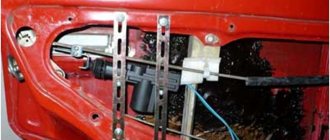
1) First, let's start with the most important thing, without this you won't be able to replace the locks, but in general you won't be able to start the operation because all the work to replace all the things that are listed in the title is carried out with the trim removed from the door, it can be removed quite easily and for more details on how to do this if you don’t already know, read the article: “Replacing a door on a VAZ” in points 1-8, and after the trim is removed, proceed to removal, let’s immediately note a couple of facts to replace the cylinder the rods will definitely need to be disconnected from it, but to replace the rods, you don’t need to remove or disconnect anything, the same with the door locks, the rods from them will also need to be disconnected and only after that unscrew the screws that secure the locks, so first with the rods themselves let's start and explain how they are removed, firstly, you can start disconnecting them from absolutely any side and from any place, for example, start disconnecting the rod first from the internal lock as shown in photos 1 and 2 (Photo 1 shows disconnecting the lock washer with a screwdriver holds the rod, and photo 2 shows the disconnection of the rod itself from the internal lock), then using a screwdriver and your hands, disconnect the other rods and continue the entire operation until the rods on both sides are disconnected, once they are disconnected on both sides, completely remove them from the car (there are several rods in the car and each one goes to the locks and there is even a rod on the cylinder, they are disconnected, as you already understood, with a screwdriver and your hands, in the beginning just disconnect all the lock washers or plastic clamps and pull the rod with your hand , disconnect it from the lock or from the cylinder, etc., but the rod is not always secured with the help of clamps, sometimes it is hooked at one end to something, in this case, also disconnect its end with a screwdriver and then completely remove the rod itself) , thus remove all the rods from the car.
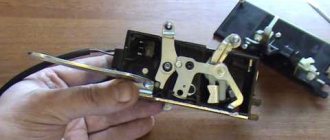
2) After the rods are removed or disconnected from those things that you are going to replace, proceed to removing these things themselves, first we will look at the removal of both door locks, the internal lock and the external one are removed together, that is, if you decide to change the external lock, then you the internal one will have to be touched (You don’t even have to replace the internal lock with a new one, but you’ll just have to tinker with it even if you only need to replace the external one) and vice versa, everything is the same, to remove the external lock you will need to loosen the two screws that it is secured (Please note, loosen, the impact screwdriver does not serve anything else, we recommend that you completely unscrew the screws with a regular screwdriver) these screws are also indicated by arrows in photo 1, as soon as the screws are unscrewed, go further and pull the lock, remove it from car (see photo 2) if you also need to replace the internal lock, then in this case remove the door opening handle (read how to do this in the article: “Replacing a window lifter on a car”, everything is described in the paragraphs) and then into the internal climb up part of the door and use a screwdriver and your hands to disconnect the two rods (Those rods that you will need to disconnect from the internal lock are shown in the photo below under number 1), as soon as the rods are disconnected, pull out the internal lock and as soon as it is removed, proceed to disassembling it, to do this, remove the lock washer from it using a screwdriver that secures the internal drive rod (see. photo 3, on it the lock washer is indicated by an arrow) and then disconnect the rod itself from the lock (see photo 4), disconnect the other rod in almost the same way, it is attached to the internal lock by a plastic retainer, you just need to move it and the rod can then be safely disconnected from the lock; see the video clip at the end of the article for more details.
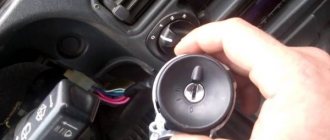
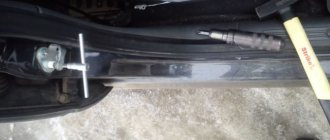
3) Now we’ll talk about how to remove the cylinder from the outer handle, it is inserted into the handle itself and in order to remove it, you will have to first remove the handle from the door and then remove the cylinder, this is all done as follows, from the outer handle to the inside doors, both rods are disconnected (see photo 1) and after the rods are disconnected, unscrew the two nuts that secure the handle to the door (see photo 2) and by pulling the handle with your hand, remove it completely from the car, after the handle is removed (It By the way, it will be removed with the rods), take an awl in your hands and use it to push out the side pin that holds the cylinder and the cylinder leash (see photo 3, the leash is indicated by a red arrow, when the pin for its fastening is pushed out, remove the leash completely from the cylinder), then use a screwdriver pry up the spring that secures the same cylinder and remove it (see photo 4), and finally, when the leash and spring are removed, insert the key into the cylinder and turn it, thereby you will unlock the mechanism and you can easily pull the key to remove the cylinder from external handle.
Installation:
All parts are installed in their places in the reverse order of removal, but do not forget to use an impact rotary screwdriver to tighten the screws securing the locks until they stop, but keep in mind the fact that with this screwdriver you only need to loosen the screws and tighten them until they stop, so just use it like a regular screwdriver (Unscrew the screw completely, tighten it) we do not advise you, because it is not intended for this purpose.
Installation of a new larva
To install a new lock cylinder, you will need to follow a few simple steps:
- Unpack the new kit, prepared for replacement, and lubricate the internal moving parts.
- Install a new return spring. Usually it is not included in the standard replacement kit and is purchased separately. When installed correctly, the key should rotate freely back when in the hole.
Installing a new return spring
- Install the pin in the end of the swivel rod.
- Reassemble the door in the reverse order as described in the previous section.
Recommendations
Reassembling and lubricating individual parts will not work if the fragments are heavily worn. It is better to remove the cylinder from the core and install a new one. Recommendations for replacing the VAZ 2114 door lock:
- Partial repairs or lubrication will only temporarily restore life to the closing mechanism. If problems arise, it is better to replace the entire cylinder.
- After installation, it is necessary to periodically lubricate the mechanism. Experienced motorists use silicone substances for this.
- The repair procedure is carried out in a well-lit room at a comfortable temperature.
- To change the element, you will need a set of screwdrivers, pliers and lubricant.
- Sometimes the springs have to be replaced along with the cylinder. They are purchased separately.
The cylinder fragment is sold as a set. The price depends on the manufacturer. If you buy a cheap Chinese version, it will cost about 150 rubles. It is better to give preference to VAZ spare parts. The cost of such a kit is 400-500 rubles.
Work order
Before replacing the trunk cylinder of VAZ 2115, 2113, 2114, the following is first dismantled:
- Unscrew the 3 screws at the bottom of the door trim.
Remove the cover, from under which the glass switch and block are also removed. These two components must be disconnected.
- Remove the lining by unscrewing the 2 screws in the handle fastening.
- Carefully remove the six pistons located in the door panel (it is impossible to continue without this step).
- Unscrew the two nuts that secure the handle externally.
- Disconnect the locking mechanism, which is connected to the outer handle lock switch, and at the same time connected to the inner rod lock.
- Remove the outer handle and the pin located in the rod end.
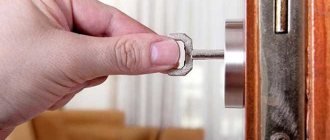
- Remove the plastic tip located in the cylinder.
Get the larva. It only needs to be removed together with the key.Now you can begin installing the new cylinder into the locking device.
- Make preparations - unpack and lubricate moving parts.
Insert a new spring (purchased separately). If the spring is installed correctly, the key in the hole easily turns back.
- Further installation is carried out in the opposite order to that described above. Here the master will find the photographs taken during disassembly very useful.
Install the pin in the steering rod end.
To illustrate the replacement of the VAZ 2114 lock cylinder and other modifications, you can watch the video:
Removal
Note: The door lock can be removed without removing the outer lock handle. You just need to disconnect the handle rod from the lock (see below). 1. Remove the door trim (see “Rear door trim - removal and installation”). 2. Disconnect the wiring harness connectors for the central locking drive gear motor.
how to properly wash the floor after a deceased person
3. Using a Phillips screwdriver, unscrew the two self-tapping screws securing the gear motor. 4. Disconnect the gear motor from the lock rod and remove it from the door. 5. Disconnect the rod end of the outer handle from the lock lever (see “Outer rear door handle - removal and installation”). 6. Using an impact screwdriver, unscrew the two screws securing the outer part of the lock. 7. Remove the outer part of the lock. 8. Using pliers, squeezing the antennae of the plastic holder of the inner handle rod, push it out of the hole in the door reinforcement. 9. Using a Phillips screwdriver, unscrew the two screws securing the inner door handle. 10. We remove the handle from the door and use tweezers to remove the rubber clamp from the tip of the rod. 11. Remove the handle from the rod. Tip: To remove the inner handle along with the rod, see "Rear Door Lock - Removal, Installation and Adjustment." 12. Using a 13 mm socket wrench, unscrew the nut securing the lock switch rod. 13. Remove the lock and rod assembly from the door. 14. If necessary, using a screwdriver, remove the lock washers from the axles and disconnect the two rods. 15. Using any available method, mark the position of the lock latch on the body pillar. 16. Using an impact screwdriver, unscrew the three screws securing the clamp. 17. Remove the clamp and shims.
Adjusting the front or rear door
Setting up door cards is carried out in several stages. Experienced drivers take a comprehensive approach; they check gaps, re-adjust hinges, and inspect the locking and manual mechanism. There are several options for customizing the doors:
When the door is in the correct position, the mounting bolts are tightened with a wrench. Then the functionality of the device is checked again.
Types of door handles
The handle squeaks when pressed
The most common problem and easily solved. Eliminate as follows:
- unscrew the mounting plate using a screwdriver
- disassemble the mechanism
- lubricate all metal parts, such as WD-40
- reinstall the handle.
The handle is loose
The handle on your door has become loose and there is a gap. Backlash is the gap between the contacting elements of the front door. How to fix it?
Most likely the locking screw is loose and needs to be tightened from the outside and inside.
If this does not help, then we disassemble the handle further. Remove the decorative ring and tighten all the screws or screws with a screwdriver. We do this on the inside and outside of the door.
Watch detailed video instructions on how to adjust the input handle if play appears.
The lock latch does not work
This happens when the latch tab stops working or the pin that operates the latch is not long enough.
How to check? You need to unscrew the fastening bar and check whether the lock tongue works. To do this, insert a screwdriver into the lock slot and turn it.
If the tongue works properly, the problem lies in the insufficient length of the pin. There are two solutions:
- buy a new pin at any hardware store and cut the required length
- Place wood chips or pieces of thick cardboard into this socket (on the end side of the handle) to “extend” the existing pin.
The pressure part of the handle fell off, but the mount remained in place
This happens when the retaining ring flies off the groove on the end part:
- or because the ring burst
- or because it has unclenched.
You need to check what exactly happened in the following way - unscrew the fastening bar and look at the condition of the ring. If it is whole, then bend it further. Then return the handle to its place and put the ring on top.
If the ring has burst, then you can only buy a new door handle.
Door handle square broke
If the door handle falls off or does not stay in the grooves, this may be due to a broken square inside the structure. The square is the base of the door handle. The main advantage is that the square can be purchased and replaced.
Choose a new square made of steel, preferably from the manufacturer of your door handle, so that it fits in size. If you can’t find it, you’ll have to cut it with a grinder to the size of the old square.
The handle does not return to its original position after pressing
This happens when a spring falls off or bursts. This part is located behind the retaining ring and connects all structural elements together.
To repair the spring, remove the retaining bar, remove the retaining ring, and secure the spring. If the spring has burst, you can replace it. But often finding a similar part becomes problematic. In this case, you need to buy a new handle entirely.